
In NBA 2K27, change your Park camera on the fly by pressing Right on the D-pad during a Park game to open the Camera Options overlay, then cycle presets and adjust zoom and height to taste.
The Park hides its camera controls. Pull up your controls in the middle of a Park game and there’s no obvious entry for the view, which is why so many players stick with an angle they never chose. The trick is a single D-pad press that opens an on-the-fly overlay, and from there you can swap presets and dial in the exact zoom and height you want.
How to change the Park camera in NBA 2K27
You do this mid-game with the D-pad and the bumpers — there’s no menu to hunt through, so it takes only a few seconds once you know the sequence.
STEP 1/3
Open Camera Options
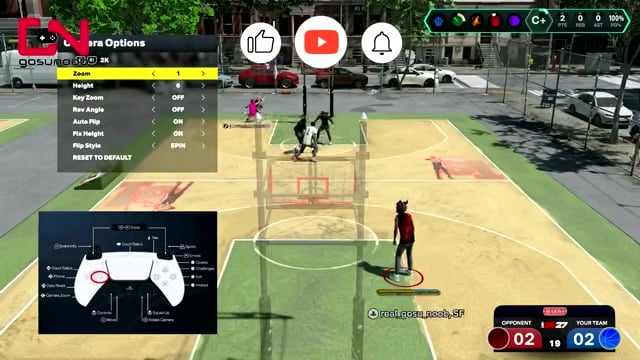
While you’re in a live Park game, press Right on the D-pad to bring up the Camera Options overlay on the left side of the screen.
STEP 2/3
Switch camera views
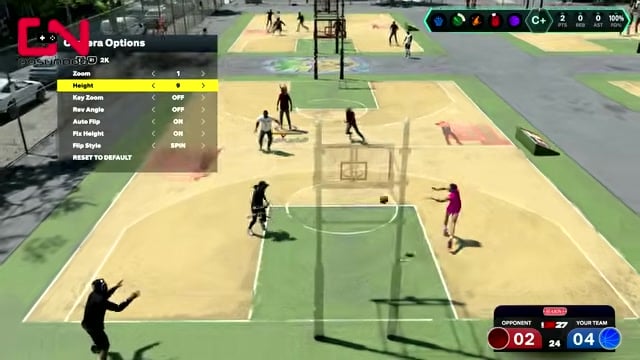
Press the left or right bumper — LB/RB on Xbox, L1/R1 on PlayStation — to cycle through camera presets like 2K and 2K Legacy; if your build maps this to the triggers instead, use LT/RT or L2/R2.
STEP 3/3
Adjust zoom, height and more
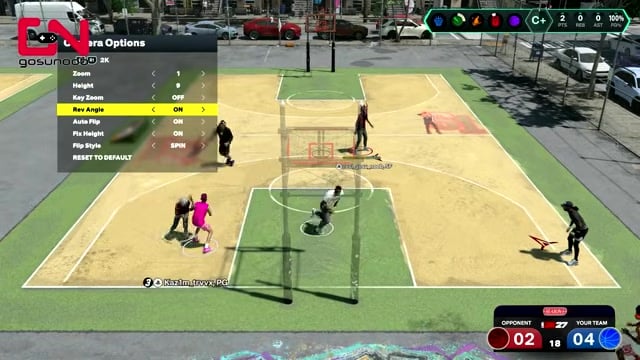
Use the D-pad to move down the list and fine-tune Zoom, Height and the rest until the view sits exactly where you want it for your Park games.
Press Right on the D-pad during a live Park game to pull up Camera Options — there’s no menu entry for it, so this on-the-fly overlay is the only way in.
Video help
What each Park camera setting adjusts
| Setting | What it adjusts |
|---|---|
| Zoom | How close the camera sits to the action. |
| Height | How high the camera is positioned above the court. |
| Key Zoom | How far the view zooms in around the paint. |
| Rev Angle | The reverse-angle orientation of the view. |
| Auto Flip | Whether the camera flips automatically to follow play. |
| Fix Height | Locks the height so it stays constant during play. |
| Flip Style | How the camera transitions when it changes ends. |
Once the overlay is open, the preset gives you a starting angle and the list underneath lets you shape it. NBA 2K27 exposes seven named parameters here, and most do what their labels suggest — you’re mainly playing with how close and how high the camera sits until defense and passing lanes read cleanly. At the bottom of the overlay there’s a RESET TO DEFAULT option if you push a setting too far and want to start over.
Changing the camera outside the Park
Key Everywhere else, the camera lives where you’d expect it. In modes like Open Court, MyCAREER and Play Now, pause the game and pick the Camera tile from the menu to reach the same kinds of settings. That’s the contrast that trips people up: outside the Park you go through the pause menu, but inside the Park that route isn’t there — the D-pad overlay is the only way in.
Park camera tips and cross-mode saving
You don’t have to rebuild your angle in every mode. If you set up and save a camera profile from a MyCAREER game, that saved angle carries into Park, Rec and Pro-Am, so a single pass through your preferred zoom and height covers all of them. It’s worth doing once early, since dialing the view in during a live Park game is quicker when you already know the numbers you like.
Frequently Asked Questions
Does NBA 2K27 remember your Park camera, or do you have to redo it every game?
It keeps your pick. Once you set a Park camera through the D-pad overlay, the game defaults to that choice for your next Park games rather than resetting to the stock angle, so you shouldn’t need to redo it each time — though it’s worth confirming your view the first game after a big update.
Why doesn’t changing the camera in the main Settings menu affect Park games?
Because the main Settings camera controls only govern offline and Play Now cameras. Park runs on its own on-the-fly system, so no matter what you pick in Settings, your Park view won’t change until you open the overlay with Right on the D-pad inside an actual Park game.






Leave a Reply