Apple’s Journal app is another step by the company to help its users manage their mental health in a better way using their iPhones. The Journal app allows you to create journal entries just like a digital journal to help you record your thoughts, precious moments, and more.
However, the Journal app can do a lot more and offers tons of interesting features to help you create journal entries easily. So if you’re stuck on a journal entry or want to use the app in a better way, then here are 11 tips to help you make the most of the Journal app on your iPhone.
12 Tips to Make the Most of the Journal App on Your iPhone
Here are 11 tips to help you make the most of the Journal app on your iPhone. Whether you’re struggling with a new entry or would like to customize your experience, the tips below will help you with the same. Let’s get started!
1. Suggestions can be useful to get started
Short guide:
- Settings > Privacy & Security > Journaling Suggestions > Turn on preferred suggestions
GIF guide:

The best part of using the Journal app is that it can offer various suggestions, termed Reflections to help you jot down your thoughts in case you’re struggling to come up with a Journal entry. This can help you keep up your streak and continue journaling even if you aren’t keen on it. Reflections can also help you automate daily journal entries if you wish to create the same entry to keep track of your thoughts. So whether you’re struggling with a journal entry or want to create the same entry daily, suggestions can come in quite handy.
2. Lock the Journal app
Short guide:
- Settings > Journal > Lock Journal > Enter Passcode > Turn on ‘Lock’ > Require Passcode > Choose preferred duration
GIF guide:
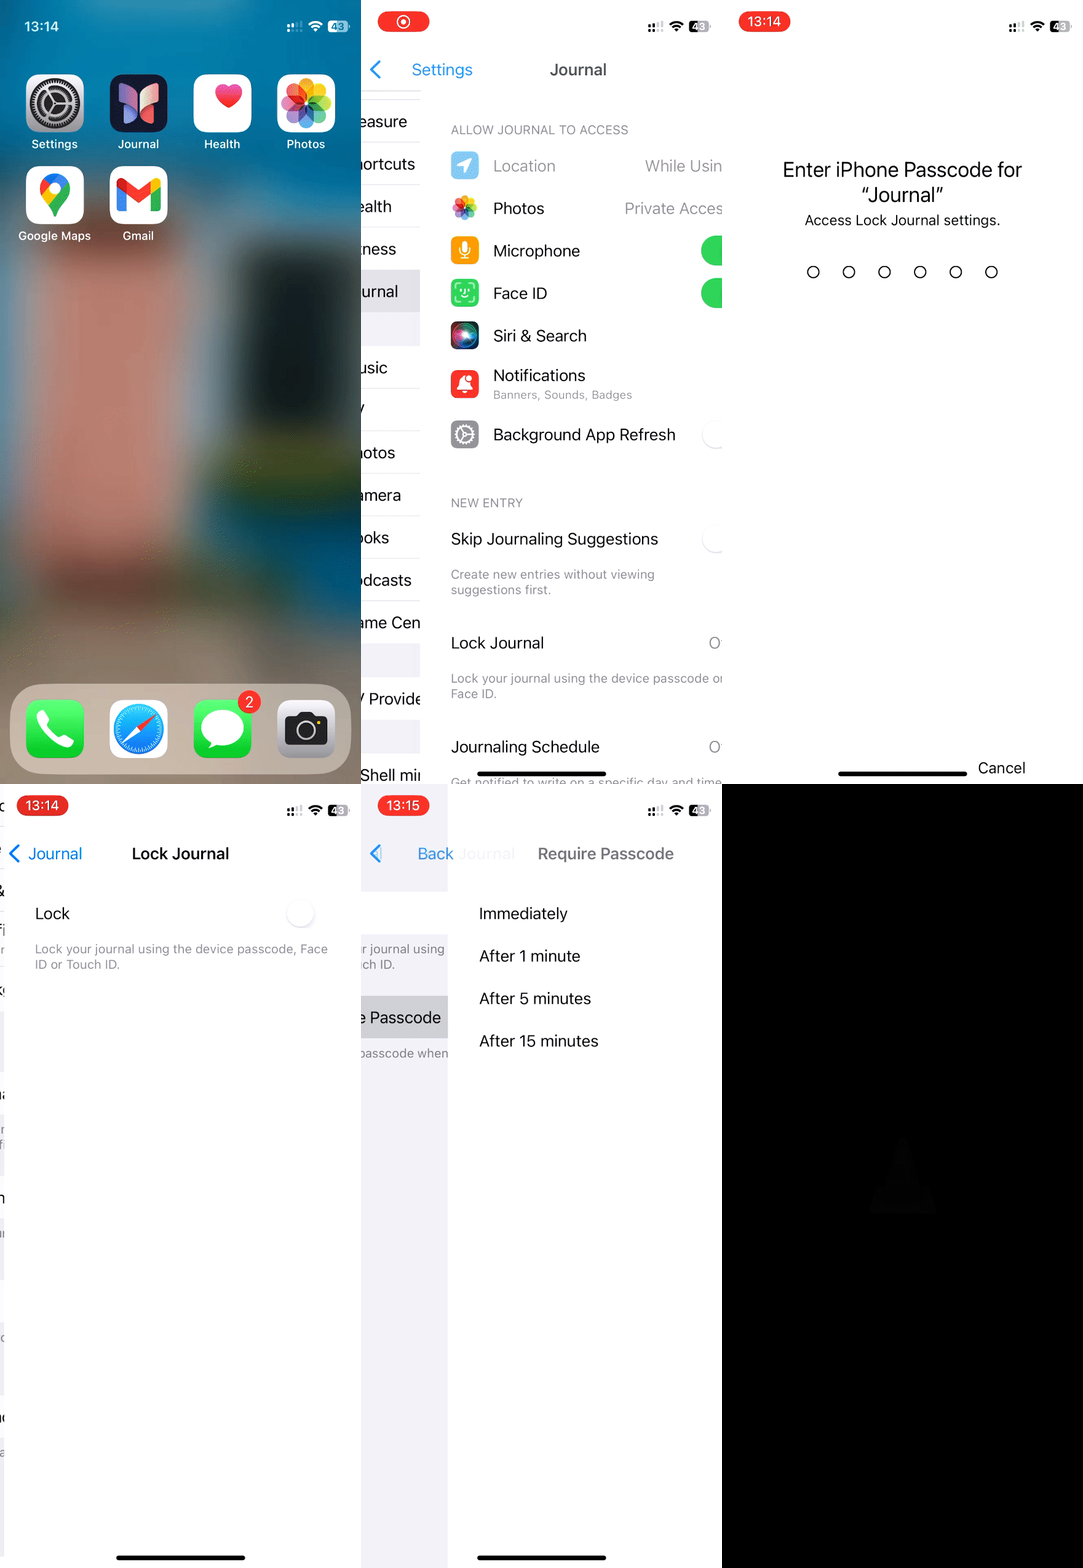
Worried about prying eyes? Then locking the Journal app can come in quite handy. Like many apps, the Journal app has the ability to lock itself using your default security method be it a Passcode or Face ID. This way you can keep your journal entries safe when sharing your device with someone. The guides above should help you easily lock the Journal app on your iPhone for enhanced privacy.
3. Set a Journaling Schedule
Short guide:
- Settings > Journal > Journaling Schedule > Turn on ‘Schedule’ > Tap Time > Choose preferred time > Tap and choose preferred days > Turn on notifications if they’re turned off
GIF guide:

Have a tough time journaling daily? Then you might want to create a journaling schedule to help you remind yourself about the same. The app offers the ability to create a journaling schedule based on your preferences whether you wish to create entries daily, on alternate days, or on weekends. Creating a journaling schedule can help you with the same. This can take away the hassle of remembering to create a journal entry as you will be notified by the app based on the schedule you set.
Note: Ensure you have notifications enabled for the Journal app to receive notifications based on your schedule. You can enable the same by heading to Settings > Notifications > Journal > Turn on ‘Allow Notifications’ > Customize notifications.
4. Save images from journaling sessions in the Photos app
Short guide:
- Settings > Journal > Save to Photos
GIF guide:

Journal entries allow you to create entries that contain photos and videos. This can come in handy when creating entries regarding a place you’re visiting or a special moment in your life. Clicking pictures or taking videos and attaching them to your Journal entries is a great way to remember locations or precious moments in your life. But when creating such entries, it can be a bit cumbersome to open an entry each time you wish to view the photo or video especially when you want to share it with someone. In such cases, the Save to Photos option will help you add photos and videos from your new journal entries directly in the Photos app. Once turned on, any new photos and videos you add to a journal entry will automatically be added to the Photos app.
5. You can use suggestions while typing a new entry
Short guide:
- Journal > Plus (+) to create a new entry > New Entry or choose a Reflection > Tap the suggestions icon above the keyboard > Select preferred suggestion
GIF guide:

Feeling stuck when creating a new journal entry? Or maybe you wish to add reflections to the journal entry you’re currently creating? Suggestions can come in handy even when you’re creating a new entry or editing an old entry. So if you missed out on a journal entry previously or would like to add a reflection, then the suggestions option above the keyboard can help you do the same. Follow either guide above to help you use suggestions when already creating a journal entry or when editing an old entry.
6. Record your thoughts instead
Short guide:
- Journal > Plus (+) to create a new entry > New Entry or choose a Reflection > Tap on the waveform icon above the keyboard > Tap to record > Tap Stop icon once you are done recording
GIF guide:

Don’t want to type? Or don’t want to miss a moment because you’re busy typing? Then you can record a journal entry instead. Journal entries also allow you to record audio which can help you record your thoughts easily without typing them. This feature can also come in handy if you wish to create entries with audio that you wish to remember later or songs in your vicinity that might help you remember a moment in your life. Recording audio is a great way to create journal entries with a little more context while simultaneously allowing you to experience a moment.
7. Add locations to help you remember relevant entries
Short guide:
- Journal > Plus (+) to create a new entry > New Entry or choose a Reflection > Location icon above the keyboard > Select a location under ‘Near me’ or ‘In My Journal > Or, search and select the location using the search bar at the top
GIF guide:

Once you start journaling, the app can get easily filled with tons of entries. This is a great sign that you’re on the right track however, it might become difficult to differentiate between certain journal entries especially if you’re using suggested Reflections to create them. Thus attaching a relevant location can help you differentiate between such journal entries easily. The ability to add locations can also come in handy when you’re creating entries about a certain location or an entry involves some kind of plan. Locations can help you identify journal entries and get more context about them easily.
8. You can set a custom date for a journal entry
Short guide:
- Journal > Tap the Ellipsis icon for a journal entry > Edit > Tap the Ellipsis icon at the top > Custom Date > Select date > Done
GIF guide:

As the tip suggests, you can change the date for a journal entry easily once it has been created. This can come in handy if you’d created a journal entry earlier but would like to change its date to a relevant one. Be it a memory or notes about an upcoming event or date, you can change the date for a journal entry to a custom date as needed. This can also come in handy if you create a journal entry for a previous event or date. Changing dates can help you keep your journal entries organized and find the relevant ones based on their date at a later point in time using filters. You can use either guide above to help you set a custom date for a journal entry on your iPhone.
9. Bookmark entries you want to revisit
Short guide:
- Journal > Tap the Ellipsis icon for the entry you wish to bookmark > Bookmark
GIF guide:

Bookmarking journal entries will make it easier for you to find them at a later point in time. This can help you keep track of important entries, important events, and other moments of your life without having to sort through all your journal entries. So if you find yourself scrolling through journal entries to find the ones you view often, then bookmarking them is a great idea. Use either guide above to help you bookmark journal entries in the Journal app on your iPhone.
10. Tweak Journaling Suggestions to suit your needs
Short guide:
- Settings > Privacy & Security > Journaling Suggestions > Turn off suggestions you don’t want
GIF guide:
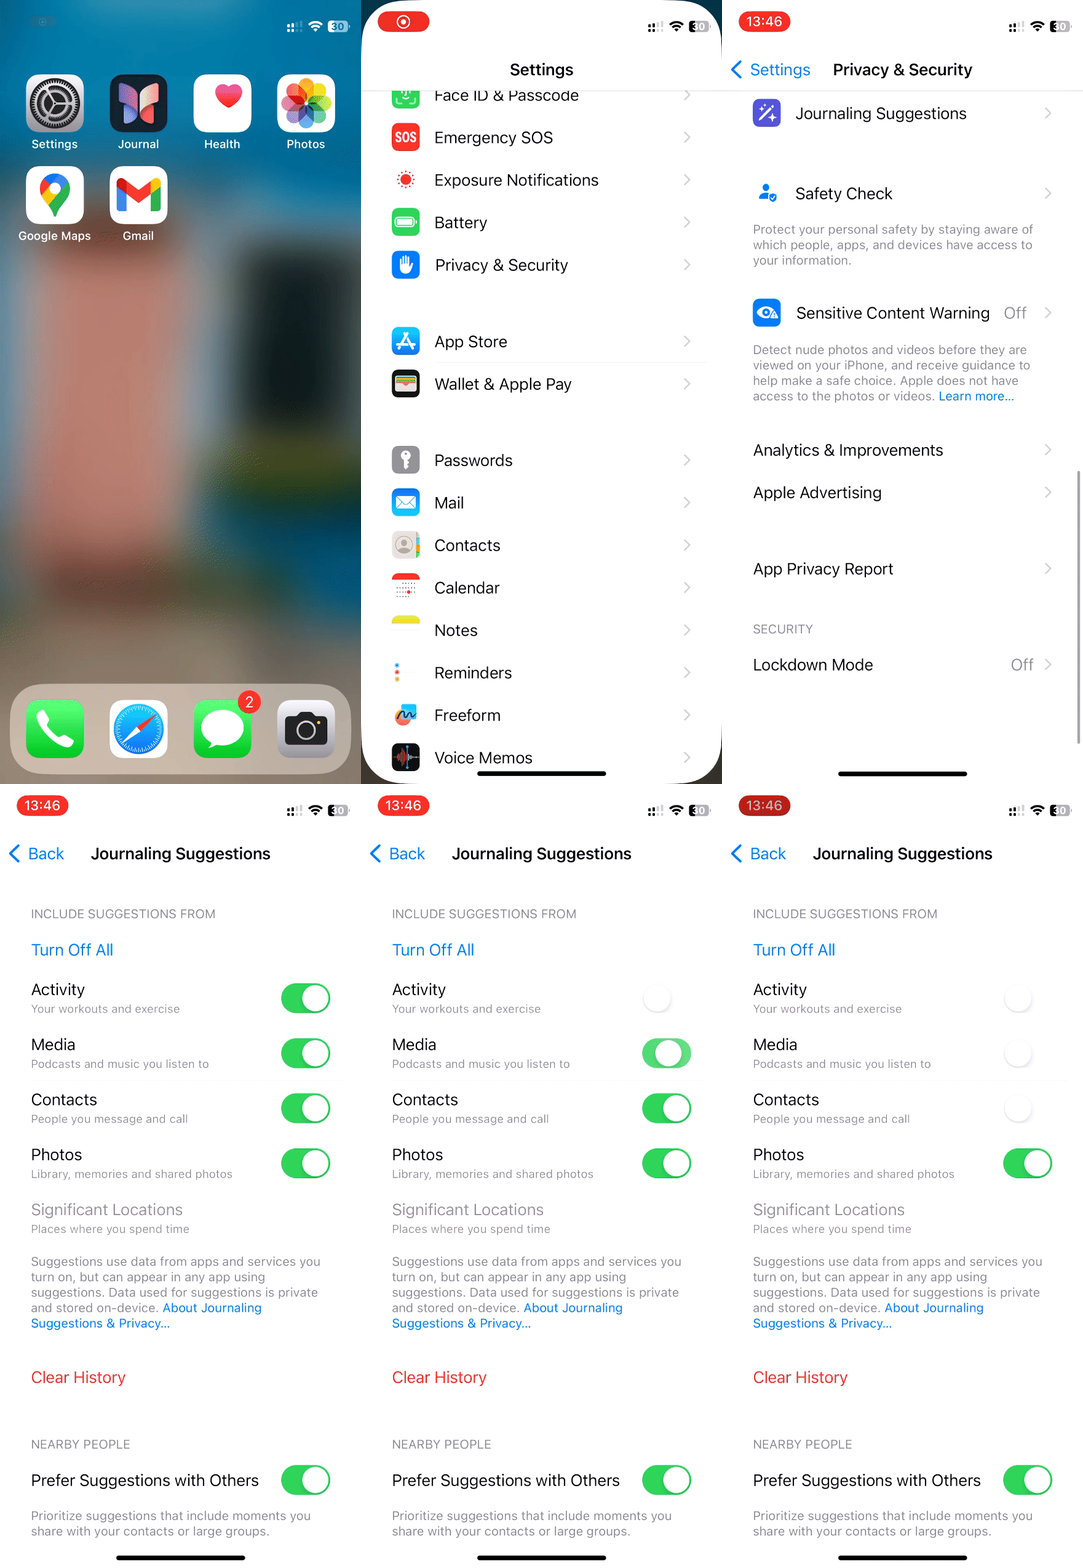
The Journal app can suggest Reflections based on your photos, locations, contacts, and more. This can streamline the process of creating journal entries based on the current happenings in your life. You can easily create journal entries regarding your current location, create entries about someone you’re visiting, or of recent photos that you might have clicked. However, sometimes these suggestions can be intrusive to your privacy and in some cases, you might not want to view suggestions based on your contacts altogether. In such cases, you can tweak your suggestions in the Privacy Settings to help you curate them according to your privacy needs. Either guide above can help you do the same on your iPhone to make Journal suggestions more relevant to you.
11. Create Journal entries using the share sheet
Short guide:
- Tap the Share icon in any app > Select Journal > Create journal entry
GIF guide:
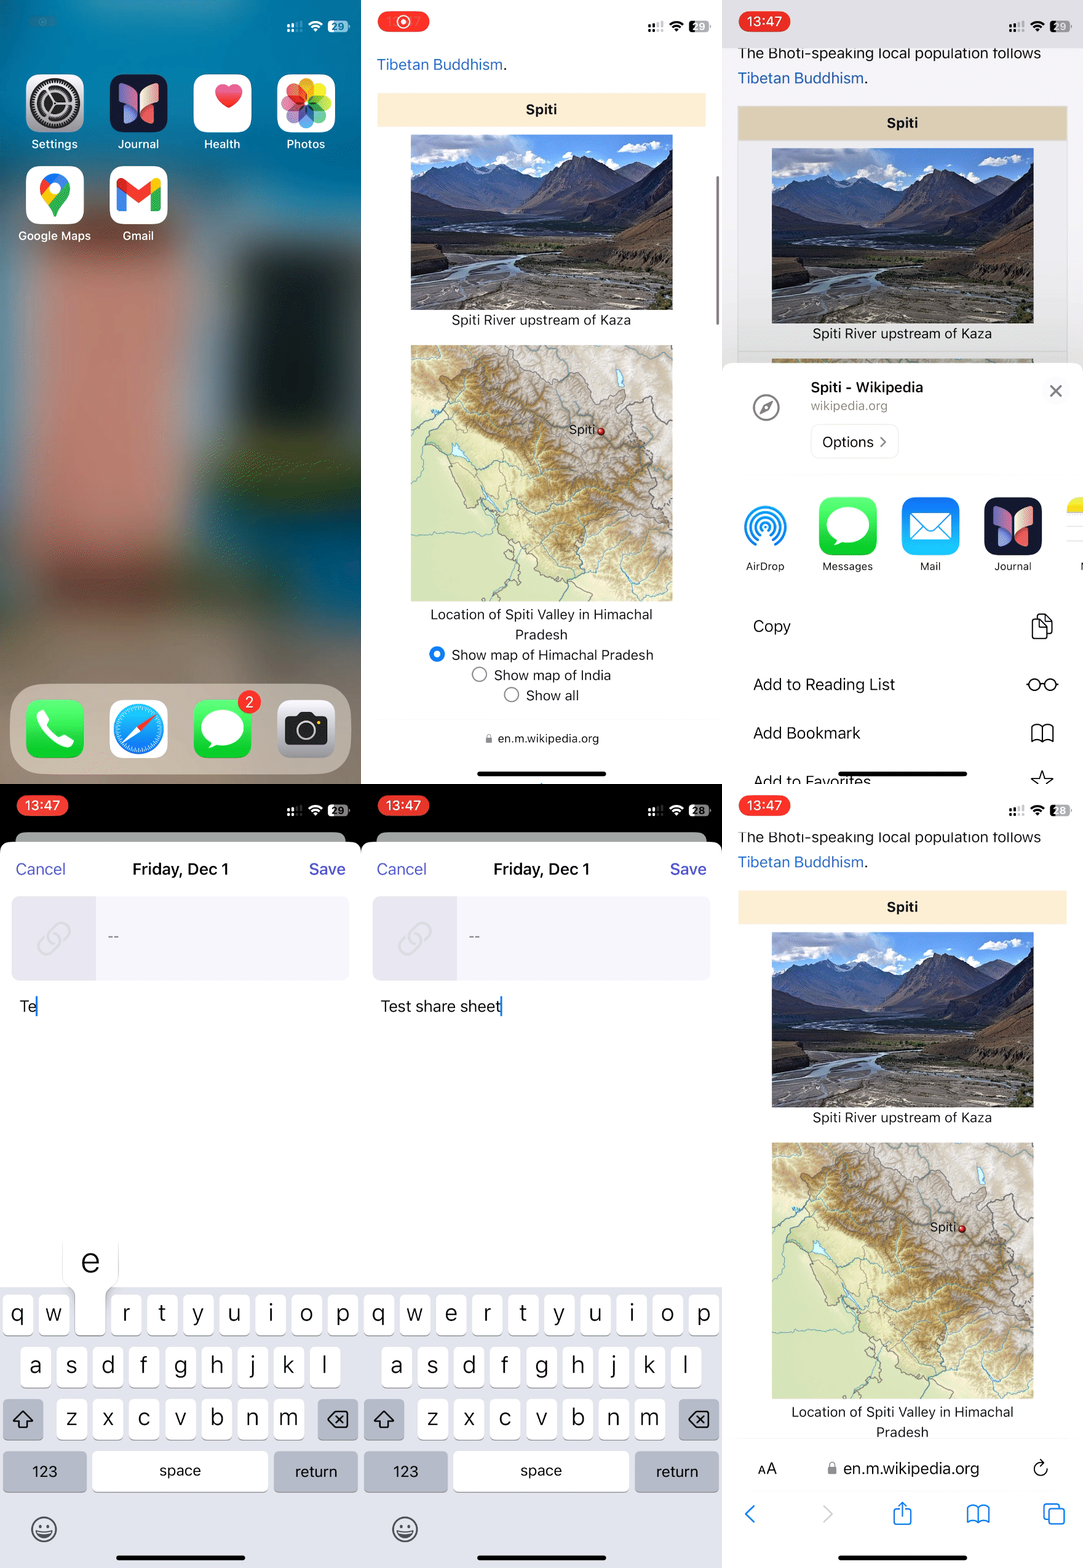
Find an image you want to create a journal entry about? Maybe you’re looking at an upcoming event or location you wish to visit? You can use the share sheet in such cases to directly attach media items to a journal entry without having to save them first and then manually attach them to new Journal entries. You can also use the share sheet to attach links to journal entries. As long as you can access the share sheet in an app, you can add it to a journal entry. Unsupported media items will be added as links which can still be used to view the relevant items.
12. Use filters to your advantage
Short guide:
- Journal > Tap the filters icon in the top right corner > Select a preferred filter
GIF guide:
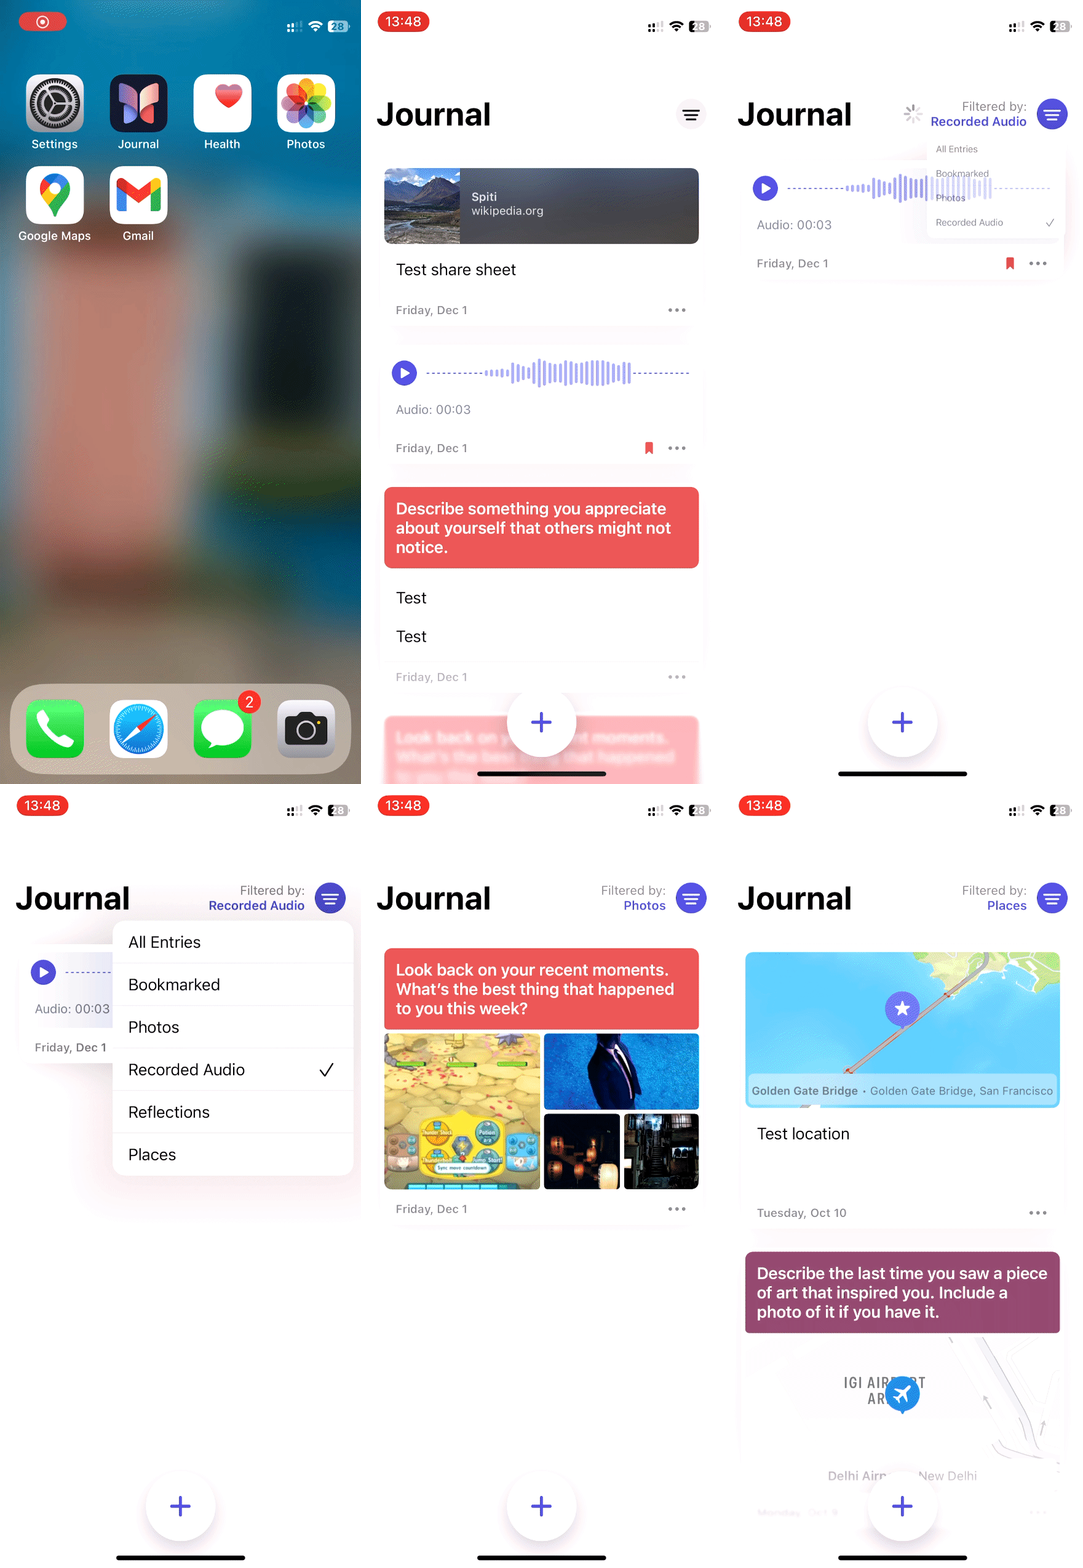
Find yourself continuously scrolling through journal entries to find the relevant ones? Then, filters can come in quite handy for you. Depending on the number of journal entries you have, you can filter the entries based on their photos, locations, and the type of Reflections included in them. This can thus come in handy to easily find journal entries that you’re looking for, by filtering them. You can use either guide above to help you filter your journal entries easily on your iPhone.
We hope you were able to find some tips that help improve your experience when using the Journal app on your iPhone. If you have any suggestions, feel free to drop them in the comments section below.

