HTC One SV might have grown a bit older now, but it’s still right there in terms of development support. The One SV just got the latest TWRP recovery available, for flashing ROMs and mods, or taking nandroid backups and what-not, and if you love to have latest and greatest of modding tools like us, we’re sure you’ll feel very happy about the TWRP v2.8.7.0 for One SV.
Of course, as mentioned in the guide below, you will need to unlock bootloader of your One SV for this, and only then device will be open to modifications. Once done, you can use the fastboot method, as given below, to install the latest v2.8.7.0 of TWRP recovery on your One SV.
Note: If you are doing this for the first time, we recommend you create a full backup of your device right after installing the TWRP recovery, so that when an OTA comes, you can restore this backup — which includes 100% stock system — to make device compatible with updates. You will also need stock recovery for OTA updates, which is easy to get anyway. Lastly, after restoring system, you can easily flash OTA update using TWRP recovery only as a good alternative solution.
How to Install TWRP Recovery on HTC One SV
Downloads
- TWRP_2.8.7.0_Recovery.img.zip | File: TWRP_2.8.7.0_Recovery.img.zip
Supported devices
- HTC One SV
- Don’t try this one any other device!
Warning: Warranty may be void of your device if you follow the procedures given on this page. You only are responsible for your device. We won’t be liable if any damage occurs to your device and/or its components.
Backup important files stored on your device before proceeding with the steps below, so that in case something goes wrong you’ll have backup of all your important files.
- Unlock the bootloader on your HTC One SV. The guide linked here is not for One SV, but the procedure remains exactly same, so follow it to unlock bootloader of your One SV without hesitation.
- Install ADB drivers.
- Install HTC One SV drivers.
- On One SV, enable USB debugging. For this:
- Go to Settings > About phone, and then tap ‘Build number’ 7 times to unlock developer options.
- Go back to Settings, then choose ‘Developer options’. Find the ‘USB debugging’ option and use its toggle button to enable it. Accept warning by tapping on OK button.
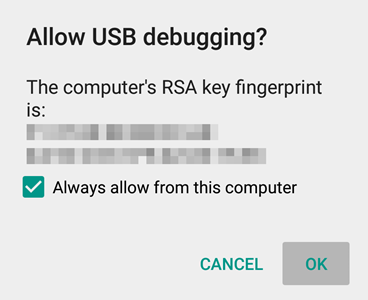
- Connect your One SV to PC now. You will get a pop-up as shown below on your phone when you connect for the first time after enabling USB debugging. Select ‘Always allow from this computer’ checkbox and then tap on OK button.
- Download the One SV TWRP recovery from above.
- Extract the zip file to get img file of the recovery, TWRP_2.8.7.0_Recovery.img.
- Rename the recovery file form TWRP_2.8.7.0_Recovery.img to a simple one, one-sv-twrp.img
- Now, open command window in the folder where you have the one-sv-twrp.img file. For this:
- Left click on empty white space in the folder.
- Now, while holding shift key, right click on empty white space to get a pop-up as shown below.
- Now choose Open command window here option from that.

You will see a command window open up, with location directed to folder where you have the twrp recovery file.
- Boot your HTC One SV into Download mode:
- Power off your device and wait for 5-10 seconds until the device is fully switched off.
- Press and hold Power and Volume down together until see white screen. This is bootloader mode.
- Scroll between options using volume buttons to reach the option FASTBOOT, and then use Power button to select it.
- Next, connect your One SV to PC, and the FASTBOOT text should change to FASTBOOT USB.
- Test whether fastboot is working alright. In the command window, type the following and then hit enter key. (You can also copy paste the commands.)
→ Upon this, you should get a serial no. with fastboot written after it. If you don’t get fastboot written on cmd window, then it means you need to reinstall adb and fastboot drivers, or change restart PC, or use original USB cable.fastboot devices
- Flash One SV TWRP recovery v2.8.7.0 now. Use the following command for that.
fastboot flash recovery one-sv-twrp.img
- TWRP recovery will now be installed on your HTC One SV. Go back to HBOOT screen. You’re still in FASTBOOT mode, so, move the selection to HBOOT (if not already) and then press power button.
- On HBOOT screen, move the selection to RECOVERY option, and then select it using power button. Device will reboot into recovery mode.
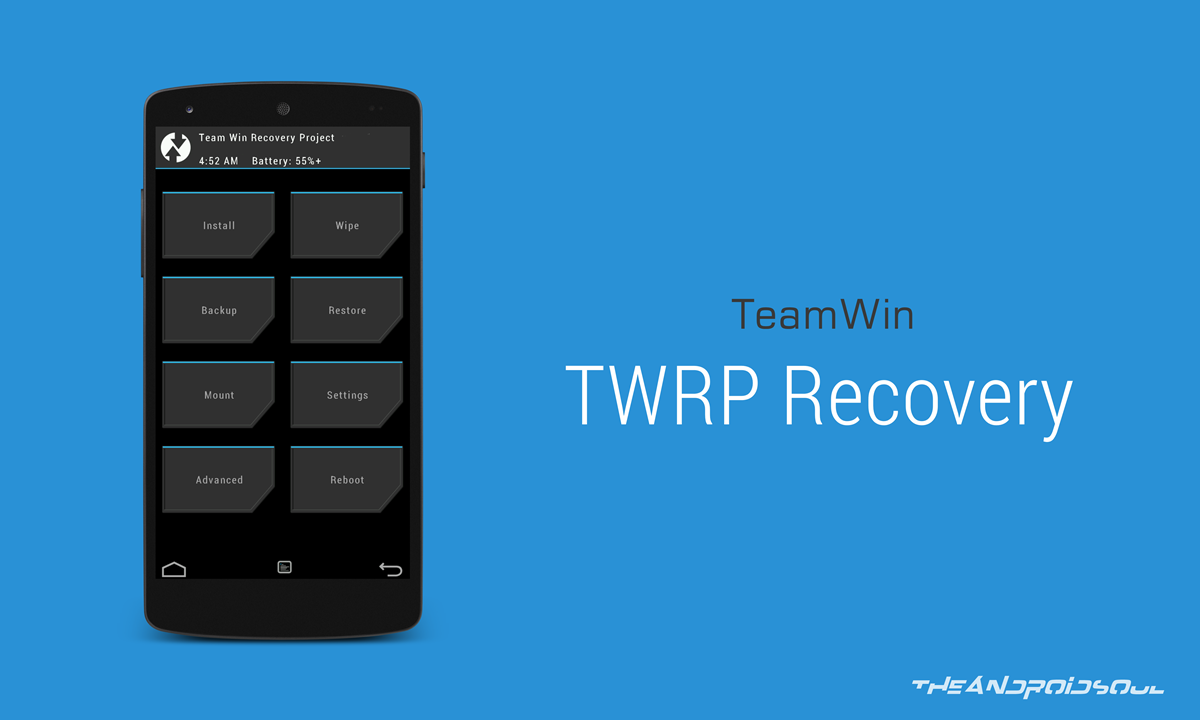
- [Optional] You will see TWRP recovery, v2.87.0. Now, you must take a full backup of your phone, including system partition. In TWRP, tap on Backup, and then select all partitions. Then do the swipe action at bottom to start the backup process.
Happy flashing!
And let us know if you need any help with this. Use the comment section below.

4 responses to “HTC One SV TWRP Recovery: downloads and installation guide”
need help sir. it says failed remote image update error
need help sir. it says failed remote image update error
not work
not work