
Zoom is currently one of the most widely used video conferencing apps in the market. In addition to its vast video conferencing abilities, Zoom’s integrated chat has a load of features waiting to be accessed.
Zoom has differentiated its chats into ‘in-meeting’ chats and ‘private chats’. The settings for each of these can be tweaked individually. Let’s dive right in and learn about Zooms chat function.
- How to enable Zoom chat
- How to change chat access in a meeting
- How to chat privately
- How to indicate your status
- How to use chat mentions
- How to send files
- How to send a screenshot
- How to use Zoom reactions
- How to enable encrypted chats
- How to access chats while sharing screen
- How to use personal chat space
- How to save chats
- How to set expiry date
How to enable Zoom chat
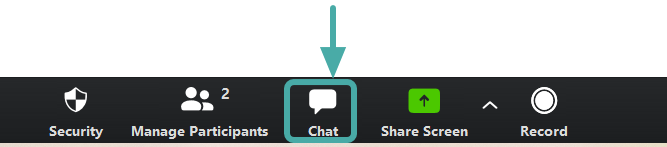
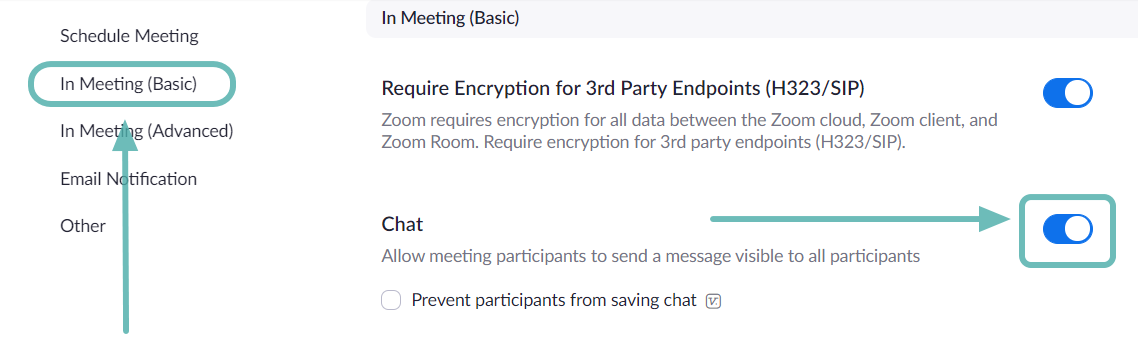
The host of a Zoom meeting has the option to allow or prevent participants from using the chat function during the meeting. Once enabled, participants can click the ‘Chat’ icon at the bottom of the screen and select who they would like to address in the group. Follow the guide below, to learn how to enable or disable in-meeting chat.
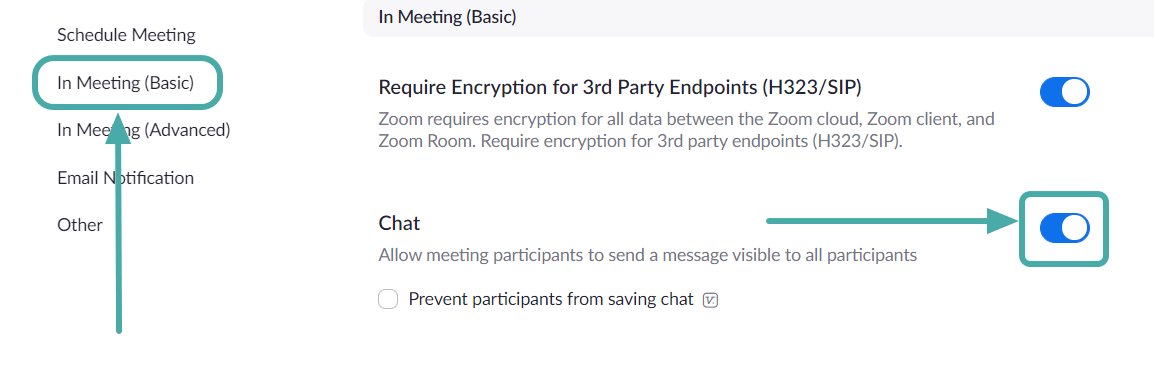
Step 1: Sign in to the Zoom web portal, and go to ‘My Account’.
Step 2: Under ‘In Meeting (Basic)’ scroll down to ‘Chat’. Here you can toggle allowing or preventing participants from using the chat option.
How to change chat access in a meeting
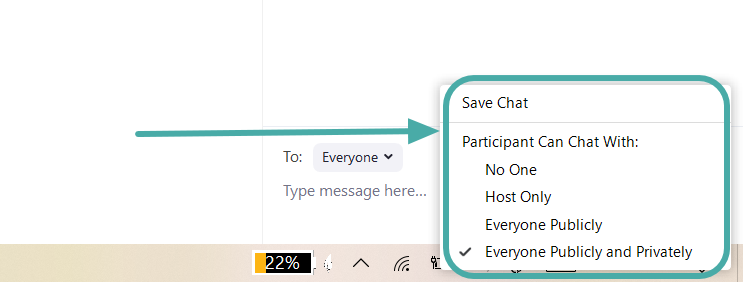
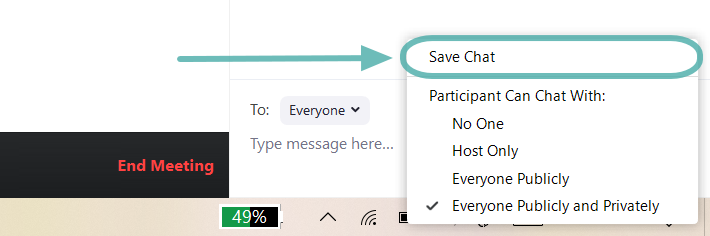
In addition to enabling or disabling in-meeting chat, the host of a meeting can restrict to whom the participants can chat with. There are 4 options that a host can choose from:
- None: Participants cannot chat with anyone in the meeting
- Host only: Participants can only message the host of the meeting but not other participants.
- Everyone Publicly: Participants can chat with everyone in the meeting but only publicly.
- Everyone publicly and privately: In addition to chatting publicly, participants can also message other participants privately.
Follow this guide to change or restrict the use of the chat functionality in a Zoom meeting.
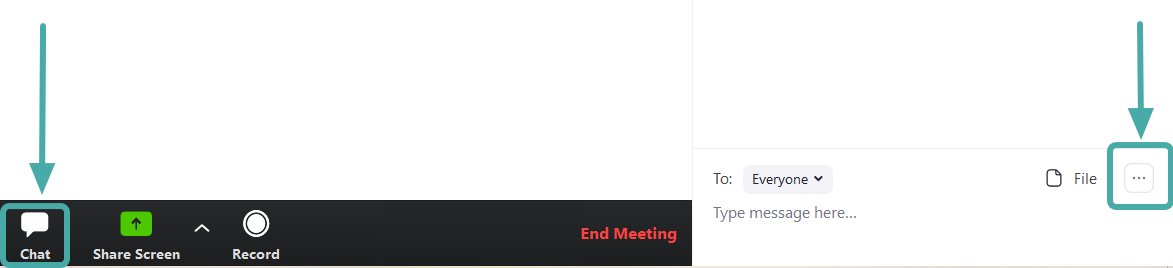
Step 1: Log in to the Zoom application and start a new meeting.
Step 2: Select the ‘Chat’ button at the bottom of the screen. This will bring up the pop out chat bar.
How to chat privately
Zoom allows users to chat with each other through a private chat. Users can send files, screenshots, images to each other without bothering the rest of the group. In order to keep private chats ‘private’ users must toggle on ‘Encrypted chats’ (read on).
Follow this guide to start a new chat in Zoom:
Step 1: Log in to Zoom and Select the ‘Chat’ button at the top of the app. This will bring up the chat homepage.
Step 2: Click the small ‘+’ button beside ‘Recent’ on the left panel and select ‘New Chat’. Once you create a chat you will be able to add the person you would like to chat with, at the top of the page.

How to indicate your status
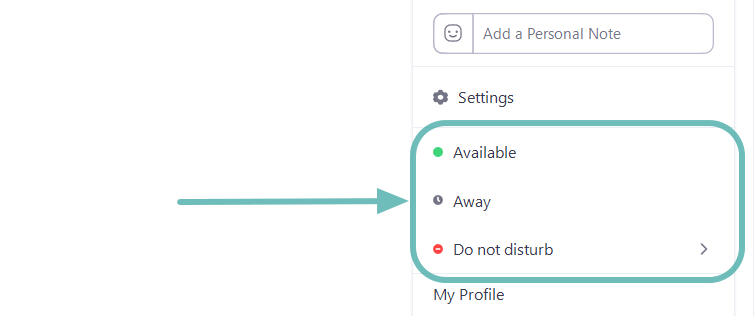
Status icons are an unobtrusive way to indicate whether a user is busy, on a call, in a meeting, etc. They appear beside a user’s name and help identify the current status of the user.
The only status icons that can be implemented are the ‘Away’ and ‘Do not disturb/Busy’ icons. If a user enables the ‘Do not disturb’ status, they will no longer receive chat or call notifications.
To change your status in Zoom, click on the profile picture in the top right corner and select the desired status from the drop-down list
For a full list of status icons and their meaning, head over to the Zoom status icon page.
How to use chat mentions
‘Chat mentions’ allow users to direct their conversation to specific users in a channel or chat. The mentioned user will receive a notification that they have been mentioned. Clicking on the notification will take them to the chat message in which they were mentioned. This is especially useful in creating a flow of conversation, as the user knows they are being addressed.
To mention a user, simply type ‘@’ and begin to type the user’s name. A list with all the users on the current call will pop up to help you choose.
Chat mentions can also be used to link to a certain channel. Use the following chat mentions to notify other users:
- @all: Send a notification to all users on the channel.
- @[User’s name]: Mention a particular user
- #[channel name]: Link to a certain channel. Only members of that channel will be able to access that link.
How to send files
Zoom’s chat function allows users to not only send messages to each other but also files. This eliminates the need to use other file sharing applications to share files since all transactions can happen within the chat window itself.
To send a file, click on the ‘File’ button just above the text box. You can now select where you would like to upload the file from (Dropbox, Google Drive, Microsoft Onedrive, Box, or Your computer) and select the file to send.
How to send a screenshot
Zoom also allows users to take a screenshot straight from the chat window. This intuitive tool allows you to cut out a portion of your screen, draw on it to highlight any aspects you would like to, and then either download it or send it via chat.
Follow these step to send a screenshot from the Zoom chat window
Step 1: Log in to the Zoom desktop app and Open the chat window in which you would like to send the screenshot.
Step 2: Click the ‘Screenshot’ button located just above the text box.

Step 3: Now click and drag your cursor to select the portion of the screen you would like to crop. Once selected, you can edit the image with the tools provided at the bottom of the image.

Step 4: You can choose to ‘Download’ the image or ‘Send’ it in the chat.
Note: For the mobile version of the app, users must utilize the default screenshot settings of the phone (Different phones employ different ways to take screenshots. For example, on a Samsung phone holding the power button + volume down button for 1 second will take a screenshot of the current screen). Users can then share the screenshot using Share>Photo.
How to use Zoom reactions
In an attempt to make the chat feature more fun, Zoom allows users to integrate emojis as well as gifs into their chat. Zoom chat also allows reactions to messages. To react to a certain message, hover your mouse over the message. Now click on the add reaction smiley that appears. You can choose a reaction from a long list of emojis.
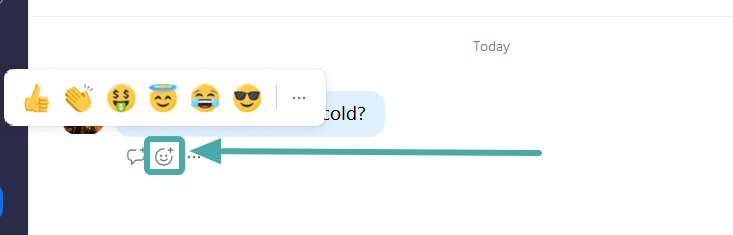
In addition to this, there are some hidden features as well. For example, try typing ‘Happy birthday’ and hitting send.
How to enable encrypted chats
This feature when enabled encrypts all chat messages sent between Zoom users. Even admin and hosts can only see the name of the user, and the date and time of their last message in Chat History. While users can still share files, screenshots and emojis, they will not be able to use the integrated GIFs, or edit sent messages
Follow this guide to enable encrypted chats in zoom chat.
Note: You must have admin privileges to make these changes.
Step 1: Sign in to the Zoom web portal and click on ‘Account Management’ in the left panel.
Step 2: Select IM Management. Now click on the IM Settings tab located at the top of the page.
Step 3: Scroll down to ‘Enable advanced chat encryption’ and toggle ON.
How to access chats while sharing screen
By default, Zoom hides the toolbar when a user is sharing their screen. If you wish to access the chat function while screen sharing using the desktop app, first look for the green tab with the Meeting ID on the screen.
This is where the toolbar is minimized. Note: By default, the toolbar is at the top of the screen, but it can be moved to the bottom too. Simply move the cursor over the Room ID and the toolbar will appear. Click ‘More’>’Chats’ to open the pop-out chat window.
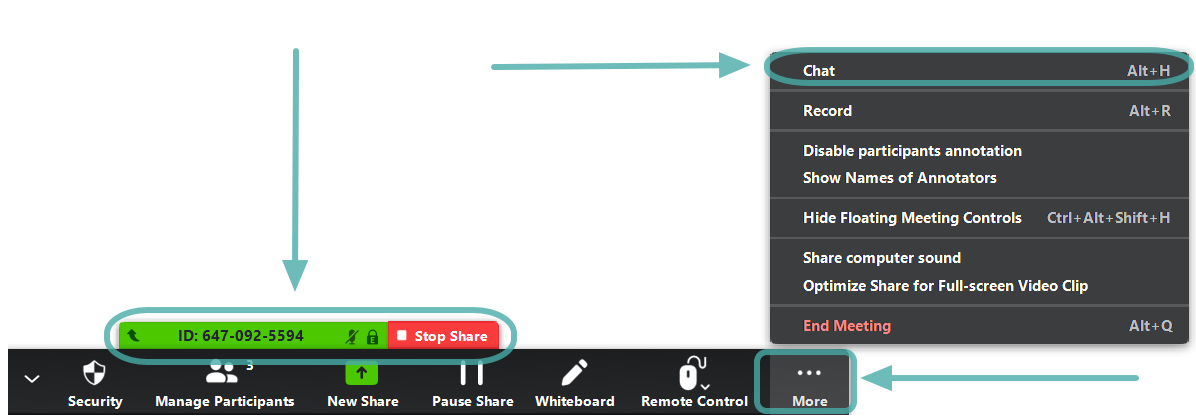
Don’t worry, no one can see what you are typing since Zoom only lets you share one screen at a time.
Note: The mobile version of the app, does not allow users to chat while sharing their screen. Users must end screen sharing, before pulling up the chat functionality.
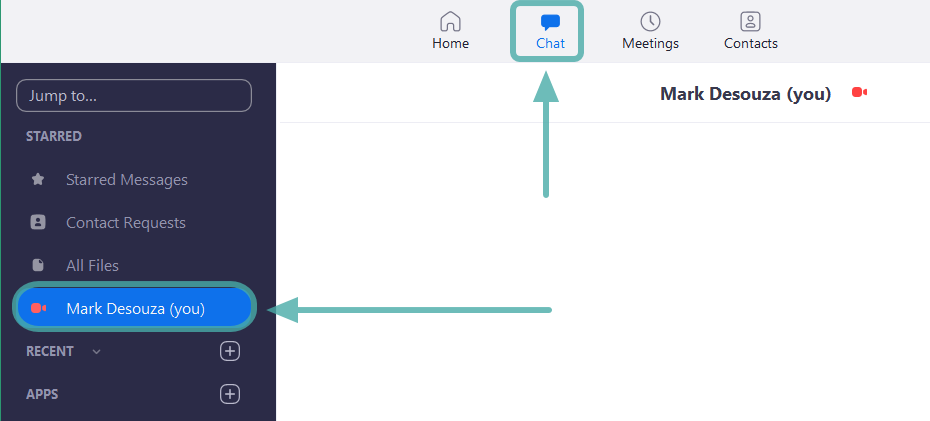
How to use personal chat space
Zoom offers users a personal space in their chat tab. This chat remains a blank workspace that you could fill with memos, images, or documents. This chat remains visible only to the user.
To access the personal chat space on Zoom, click on the ‘Chat’ tab at the top of the app. In the left panel, under ‘Starred’, click on your username. This will bring up a black chat page. Use the ‘Files’, ‘Screenshots’ and other options just as you would in a chat with another person.
How to save chats
Zoom allows the host, co-host or participants of a meeting to save all the chats that occurred within the duration of the meeting. By doing so they can later go through the in-meeting chats to make notes or share it with the group itself.
Follow this guide to save chats manually in a Zoom meeting.
Step 1: While in a meeting, click on the ‘Chat’ button at the bottom of the screen. This will pop out the chat panel.
Step 2: Click on the ‘More’ (three dots) button at the right corner just above the textbox and select ‘Save chat’. The chat will be saved locally on the device. By default, the chat is saved to the Documents folder. To access this chat, go to Documents>Zoom and locate the folder with the date and time corresponding to the meeting.
How to Autosave
Users can also set their Zoom account to autosave all chats within a meeting. This way they do not have to manually save chats at the end of each meeting. Follow this guide to enable autosave in-meeting chats.
Step 1: Sign in to Zoom.us and select ‘Settings’ from the left panel.
Step 2: Under the ‘Meetings’ tab, select ‘In Meeting (Basic)’ and scroll down to ‘Auto saving chats’. Toggle ON to have Zoon save your chats after every meeting.
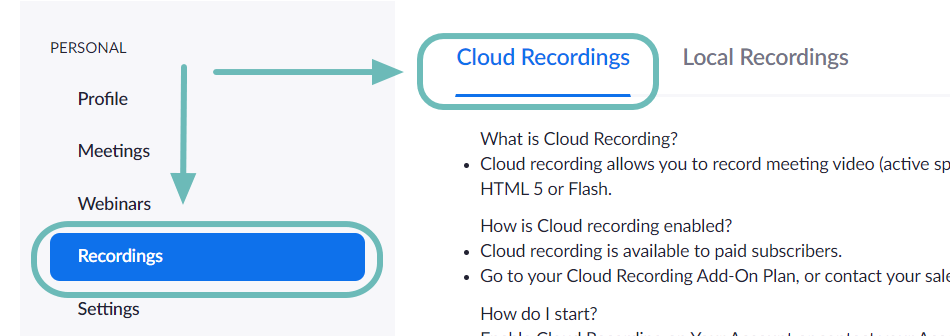
How to save on Cloud
If you have a paid account (Pro or higher) and have Cloud Recording enabled, you may choose to save chats on the Zoom cloud. This way you can access the chats no matter where you log in from. To save in-meeting chats to the Zoom cloud, follow this guide below:
Step 1: Sign in to Zoom.us and select ‘Settings’ from the left panel.
Step 2: Next to recording, (on the right side of the page) click ‘Edit’. Select ‘Save chat text from the meeting’ and hit ‘Save changes’
To access chats saved on the cloud, log in to the web client, and select ‘Recordings’ from the left panel. You can either download the meetings or share them.
How to set expiry date
Chats have an expiry date on them. After a certain time, they disappear from the chat window. Paid account users can decide the duration for which chats will remain before being automatically deleted.
To set the time duration, follow the steps below:
Step 1: Sign in to Zoom.us and go to Account Management > IM Management.
Step 2: Click ‘IM settings’ and scroll down to ‘Storage’
Step 3: Select the duration you would like to keep the chats, and hit ‘Save changes’
By default, Zoom messages stored on the cloud remain for 2 years and those stored on local devices remain for 1 year.
Zoom has definitely put in a lot of effort into its chat functionality and it shows. We hope you enjoyed reading this article. Are there any features that you have noticed that stand out of the pack? Let us know in the comments below. Oh and let us know if you tried the ‘Happy birthday’ easter egg yet!


2 responses to “How to use Zoom chat and useful tips”
”
Click the ‘Screenshot’ button located just above the text box”- not on my zoom screen.
Yes! I’ve tried the Happy Birthday Easter Egg! IT’s so cool! We revealed the secret while wishing me a Happy Birthday on 9/9. 🙂 This article was helpful, but they have added more updates, like code snippets and more. 😀 Have a great day!