One of the first world problems of today’s generation is how to wirelessly sync files between PC and Android without the internet. Sure, you can download third party apps like ShareIt or ShareLink that let you share files wirelessly, however, with them, you cannot sync the files/folder continuously.
Moreover, these apps allow you to share files, only when you manually open their apps on PC and Android. Obviously, this is time-consuming. For instance, when a user regularly needs to transfer screenshots from Android to PC, he/she has to open the sharing apps repeatedly on both PC and Android. Of course, you could use the cloud service apps to sync files but it requires a working internet connection. Duh!
So, does that mean you cannot sync files between PC and Android on a local network without internet? Umm… No. We present to you a simple method that lets you sync multiple folders and files between PC and Android on a local network without internet.
‘Cool hidden features of your Android device’
The method involves the use of an app, known as SyncMe Wireless app. It is a flawless app that perfectly does the job of syncing files between PC and Android on a local network without internet. All that is required is your PC and Android devices should be connected to the same WiFi network.
Without any further ado, let’s get started on how to use the app to sync files between PC and Android. The app works whether you possess a Wi-Fi modem or not. We have discussed both the methods below.
Note: To make it easy for you, we have broken down the procedure into separate sections. It may look scary but once you set it up, it’s extremely easy to use even for a novice.
1. Using Wi-Fi modem
It doesn’t matter whether you have a working internet on your modem or not, all that the SyncMe app cares for is the same Wi-Fi network. Once you are on the same Wi-Fi network, you have to first configure your PC (only once) for wireless file sharing followed by setting up the app on your Android device.
A) Configure Windows PC for wireless file sync
This further involves two steps:
a) Enable PC discovery
To do so, follow the steps:
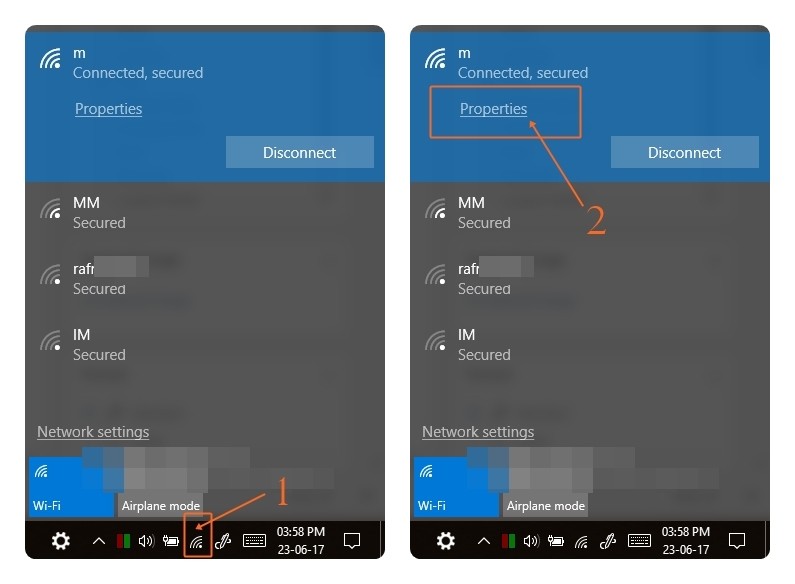
- Click on the Wi-Fi icon present in the taskbar of your computer.
- Click on your connected Wi-Fi network followed by clicking Properties under it.
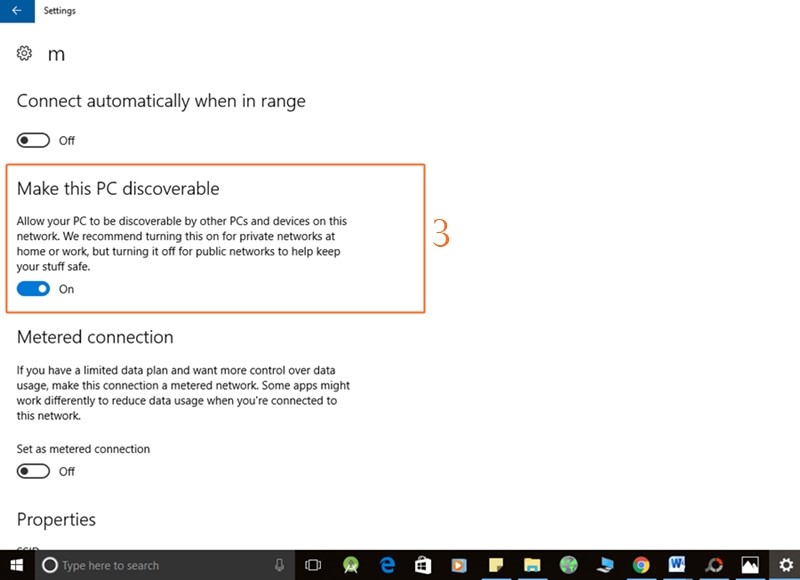
- On the window that opens, enable Make this PC discoverable and close the window.
Make sure you enable PC discovery for private networks only and not for public Wi-Fi networks.
b) Turn on file sharing on PC
After you have enabled the previous setting that lets other devices view your PC, you have to enable file sharing for actual data transfer.
Also read: How to sync a local folder with Google Drive on your Android device
To do so, follow the steps:
- In the taskbar, right click on the Wi-Fi icon.
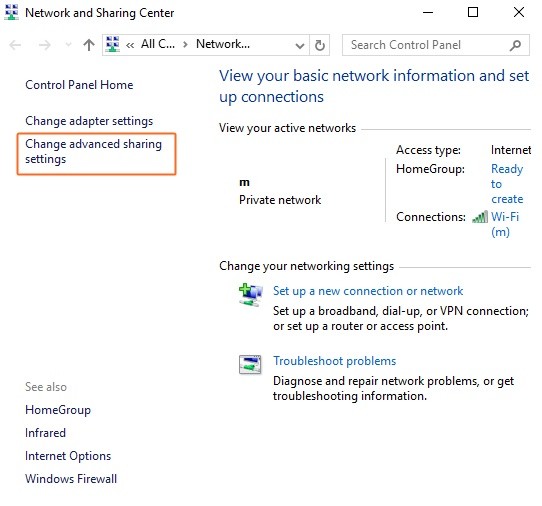
- Click ‘Open Network and Sharing Center’ from the menu. Alternatively, you can go to Control Panel where you have to click on Network and Sharing Center.
- On the Network and Sharing Center window, click on “Change advanced sharing settings” present on the left side.
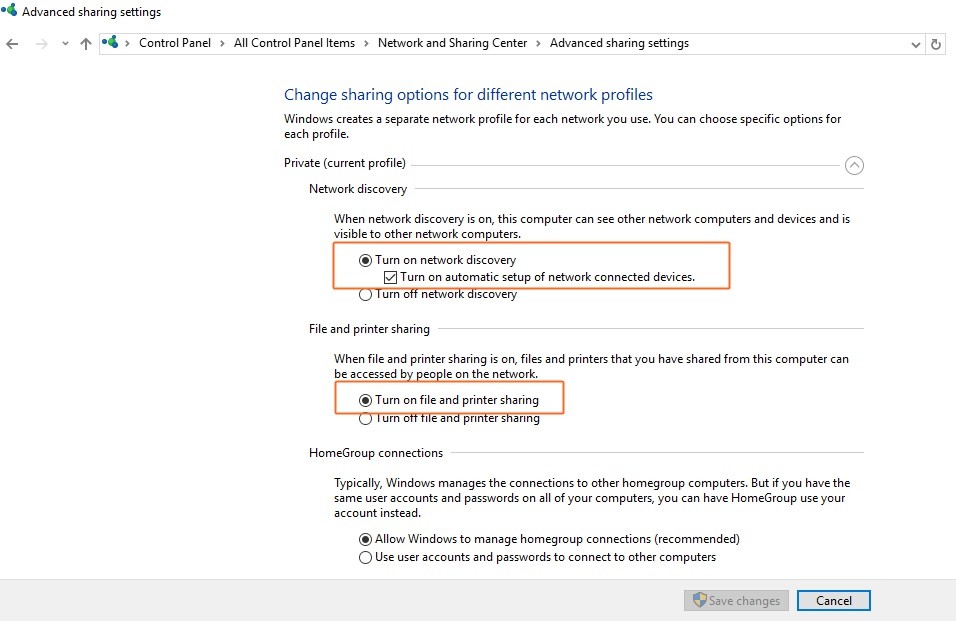
- In the advanced sharing settings, enable “Turn on Network discovery” and “Turn on File and Printer sharing” under the private (current profile) network.
- Save Changes.
That’s all that is required from your side on PC. Also, you have to do this only once. So, let’s configure your Android device now.
B) Set up your Android device
On your Android smartphone, download the SyncMe Wireless app from the Google Play Store.
→ Download SyncMe Wireless app
a) Add computers
After installing the app, follow the steps to connect/add a computer to SyncMe app.
- Open SyncMe app on your Android smartphone.
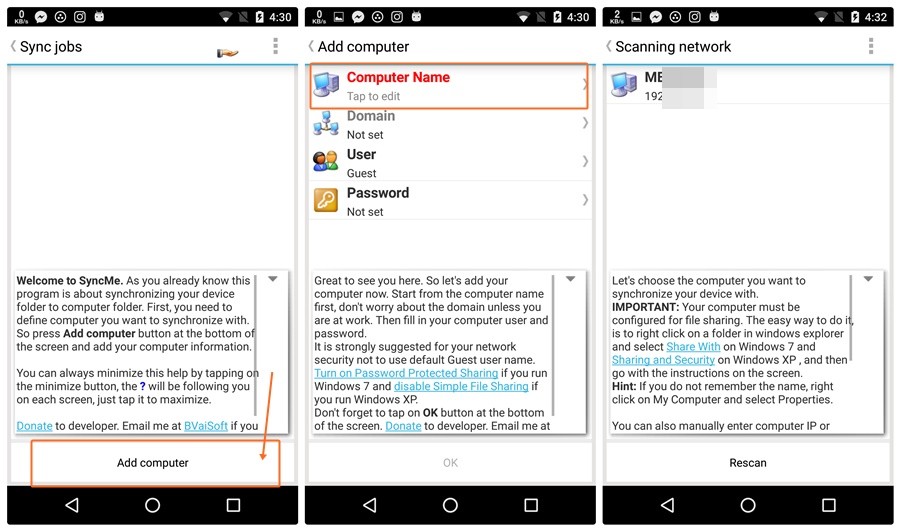
- Tap “Add computer” button present at the bottom of the screen.
- On the next screen, tap “Computer Name”.
- The app will automatically look for your PC. If all the steps in the PC setup were followed correctly, your PC name will pop up on the screen.
- Tap the PC name. Then tap “User” and enter your PC username. (Yes, PC username, which you use to log into your PC).
- Tap “Password” and enter the password for the username (Password for your PC username) that you entered in the previous step.
- Finally, hit ‘Ok’.
- If the credentials are correct, you will be taken to the next screen where you will see the name of your PC, however, if the credentials are wrong, you will get an error message.
Similarly, you can add multiple computers by following the above steps.
Also read: How to securely save files on cloud with encryption taking place on your own device
b) Sync folders
After adding a computer, now to sync data or folders between Android and PC, follow the steps:
- Open the SyncMe app.
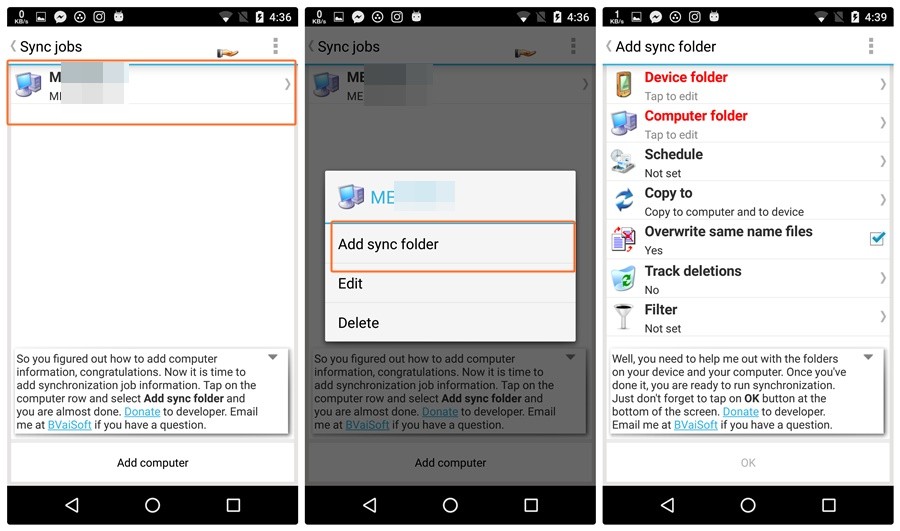
- In case you have added multiple computers, tap the computer name with which you want to sync a folder from Android device.
- Tap “Add sync folder” on the pop-up menu.
- Tap “Device folder” and navigate to the folder on your Android device from/with which you want to sync data from your PC. Tap “Select name of the folder” present at the bottom of the screen.
- Tap “Computer folder” and navigate to the folder on your PC from/with which you want to sync data from your Android smartphone. Tap “Select name of the folder” present at the bottom of the screen. (You can also create a new folder to sync data. To do this, tap the three vertical dots present in the top right corner followed by selecting “New folder” from the menu.
- Tap OK to create a Sync folder.
Now the folders that you have synced together, can sync the data either manually or automatically. Similarly, you can create multiple sync folders between Android and PC.
Check out: How to backup your Android Phone
When you add new data into the synced folder using the file manager, open the SyncMe app and tap the folder name and hit “Run” from the pop-up menu to manually sync the changes.
However, if you want your changes to sync automatically, you have to configure the schedule setting mentioned below. You would have noticed that there were some settings on the above screen like schedule, copy to, filter etc. You can configure the settings according to your need.
Use the schedule setting to configure the automatic scheduling of data. There are multiple schedule settings in the app viz. schedule frequency. Well, configure them as per your need.
Check out: How to sync clipboard between your computer and Android device
Another important setting, Copy to setting lets you configure how you want to copy data, whether one way (PC to Android, or Android to PC) or both ways i.e. any change you make on your PC or Android device would be reflected on another platform.
2. Using Wi-Fi Hotspot
The above method was for a normal Wi-Fi modem. However, there is another cool feature in the app. If you don’t have access to a private Wi-Fi modem, you can use Mobile Hotspot to sync data between Android and PC. No, you don’t need to have a working internet connection to create a hotspot on your mobile. Your Android device has the ability to create a Wi-Fi hotspot without any internet.
Check out: Android apps that transfer data wirelessly between Android and PC
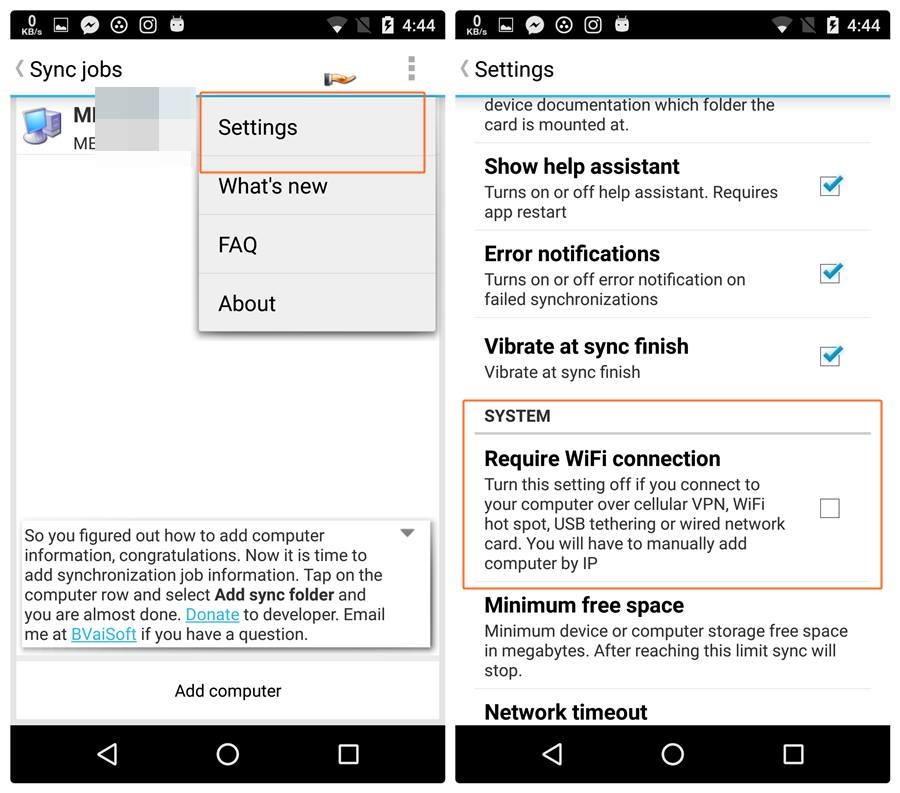
To use this method to sync data, you would first have to enable a setting in the SyncMe app. To do so, open the app, and tap the three vertical dot menu present at the top right corner. Tap Settings and uncheck “Require Wi-Fi connection”.
Now to create a hotspot from your Android device, follow the steps:
- Go to Android Settings.
- Tap More followed by Tethering & portable hotspot.
- Enable “Portable Wi-Fi” or “Mobile Hotspot”.
- Connect to this newly created Wi-Fi network on your PC.
After you are on the same Wi-F- network on your PC and Android, follow the same steps that we did in “Setup your Android mobile”, to add computers and Sync folders.
Before I conclude, let me warn you. Don’t be surprised when you see the last update date of the app. Ummm.. It was last updated in 2015, that’s two years back, but trust us, this is one of the awesome apps that we have discovered lately. Once you use the app, you won’t regret downloading it.
We hope you liked our guide and were able to set it up properly. And in case, you are facing some problem let us know in the comments below, we would be happy to help you.







There are some Android apps that will allow you to connect your device to your Windows PC wirelessly. This is a nice thing about Android is that works nicely with Windows.
There are some Android apps that will allow you to connect your device to your Windows PC wirelessly. This is a nice thing about Android is that works nicely with Windows.
great app, im having trouble syncing to a folder on the root of sdcard, apparently the app doesnt request permissions correctly… bummer, otherwise would have been perfect
great app, im having trouble syncing to a folder on the root of sdcard, apparently the app doesnt request permissions correctly… bummer, otherwise would have been perfect
This application does not synchronize. If I have 4 files in a folder on the pc and 6 in the android folder (the 4 of the pc and other 2 that I do not want), and I want to synchronize the pc with the android, it never erases the two files that I do not want in the android.
If it doesn’t work its because the app isn’t compatible with SMBv2/3 and you need to enable SMBv1 which you shouldn’t since it has security holes, hope they update it
Ironic that a website called “nerdschalk” writes about Windows without any mention of linux