- What’s the maximum resolution of images created using AI?
- How to upscale your AI-generated images at higher quality [using Upscayl]
- What happens when you upscale images using Upscayl?
- (Bonus) 4 Tools you can use to upscale your AI-generated images
- What’s the best way to upscale your Midjourney or AI-generated images?
What to know
- Most AI image generators produce images at a maximum resolution of 1024 x 1024 pixels or somewhere around it.
- If you plan on using your AI creations elsewhere like on a larger display or giant posters, you’ll need to upscale these images further and increase their resolution.
- To enhance your images for higher quality prints for free, you can use Upscayl – an open-source free software that can increase your image resolution natively by up to 16x times the original scale.
What’s the maximum resolution of images created using AI?
AI has come a long way in terms of image creation and if you’ve run around the kind of artworks that people have produced on Midjourney and other services, you’d realize how easy it is for you to create an art from scratch. You can create AI images with the utmost intricate details and they’ll look perfect when looked at on your desktop. However, if you’re planning to print your AI-generated images onto a larger canvas or simply want to use it on a larger display, you’ll have to upscale the images that you create on Midjourney or the service that you use.
We say that because, for all their artistic capabilities, AI image generators have some technical limitations that may stop creators from fully investing their time and money in these platforms. Most AI image generators like Midjourney and DALL-E limit the resolution of the output images (in the default 1:1 ratio) to a maximum of 1024 x 1024 pixels while others offer image creations at even lower qualities.
If you wish to use your images for creating posters, printed wallpapers, and banners, you’ll need images of higher quality. Upscaling is thus a necessity when you make images using AI professionally, not just for fun.
How to upscale your AI-generated images at higher quality [using Upscayl]
There’s an abundance of resources that you can use to upscale your images online but one tool that stood out to us is Upscayl. It is a free and open-source upscaling software that you can use on any computer (Mac, Windows, or Linux) to enlarge images without losing quality.
With Upscayl, you’re not just getting an application that increases your image resolution but a tool that uses advanced AI algorithms itself to understand details in an image and enhance their quality accordingly. You can use it to upscale your images up to 16x times which will be more than sufficient for most high-quality posters and prints.
Being a software that runs natively on your PC, all of the image processing is done on your machine, meaning your images stay private and aren’t shared with any external server. You can choose different upscaling procedures, change image scale and file format, and add custom models to enlarge images in the way you want.
To start using this tool, go to upscayl.org on a web browser and download the app version that’s compatible with your computer. Depending on the PC you own, you can download the Upscayl application on Windows, Mac, or Linux and install it. Once the app has been installed, you can start upscaling your AI creations by opening the Upscayl app on your computer.

Note: We’re using the Mac version of the Upscayl app on our device but the instructions that follow should more or less be the same regardless of which version of use.
Inside Upscayl, click on “Select Image” under Step 1 and choose the image you want to enhance using this app. You can also drag and drop an image from your computer on the left-hand pane inside the app’s screen.

If you wish to enhance more than one image at once, you can turn on the “Batch Upscale” toggle at the top. This will allow you to choose an entire folder that contains the images that you want to enhance.

Once your image has been added to the Upscayl app, you can choose the type of upscaling you want to apply to your image(s) by first clicking on the drop-down option under “Select Upscaling Type”.

You can leave the option set to “General Photo (Real-ESRGAN)” for most generations or set it to “General Photo (Fast Real-ESRGAN)” for generating upscales more quickly. There are other options you can explore to create different upscaled versions of an image.

By default, the Upscayl app will generate an enhanced version of the image that’s 4x times the size of the original image. If you wish to change this scale, click on the “Settings” tab at the top.

Inside Settings, you can choose an “Image Scale” from these options – “2x”, “3x”, and “4x” by moving the slider as per your preference.

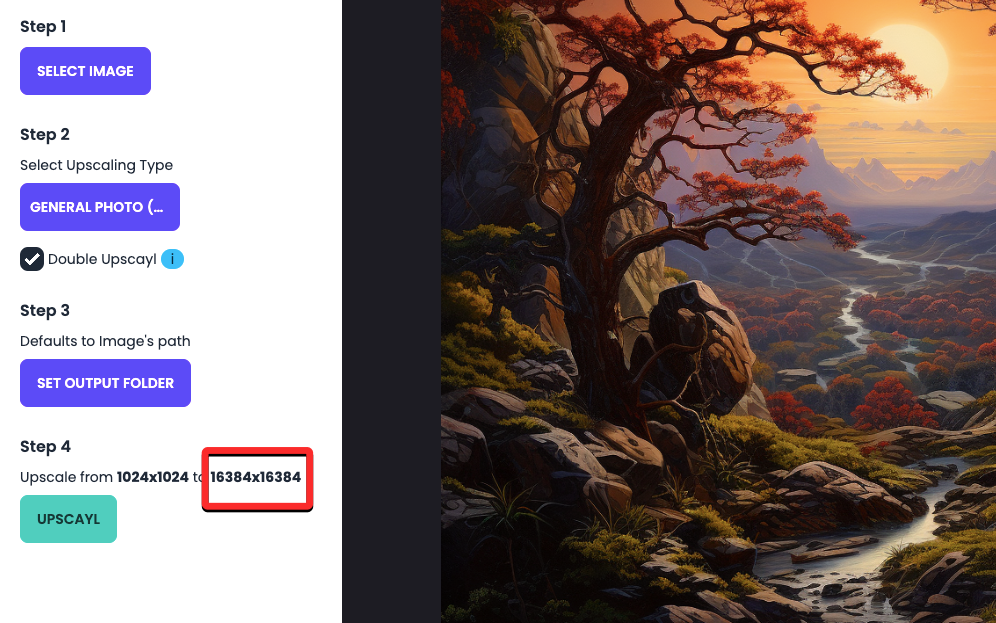
To enhance an image further beyond the maximum scale (i.e. 4x), you can go back to the “Upscayl” tab and check the “Double Upscayl” box under Step 2.

When you do that, the app will upscale the image twice using the preferred image scale. For instance, if you selected 3x as your preferred image scale, Double Upscayl will enhance the image at 3 x 3 = 9 times the scale of the original image. This means you can use Upscayl to upscale your images at 16x times if you choose 4x as your image scale and enable the Double Upscayl option.
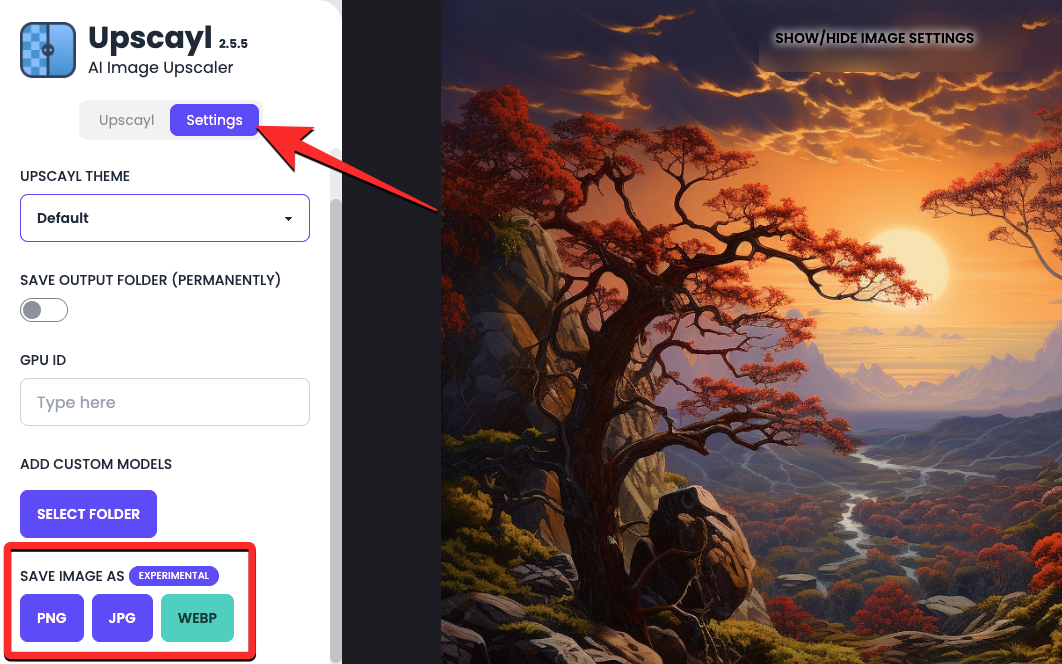
By default, all the images generated after upscaling on the Upscayl app are saved in PNG format. The app, however, lets you change the image format to JPG or WEBP which you’d be able to do by going to “Settings” > “Save Image As”.
You can now click on “Set Output Folder” to choose the destination for the enhanced image on your computer.

Once you’ve configured the options above, you can click on the “Upscayl” button at the bottom to start upscaling.

As soon as you do that, the app will start upscaling your image at your chosen scale. Depending on the scale and upscaling type, the app may take anywhere between a few seconds to a few minutes. In our testing, Upscayl managed to create a 4x scaled image using General Photo (Real-ESRGAN) in 15 minutes while the one generated using General Photo (Fast Real-ESRGAN) was completed in around 1 minute.

Once the enhanced image has been created, you’ll be able to see a side-by-side comparison of this image relative to the original image by sliding the vertical bar left or right.

What happens when you upscale images using Upscayl?
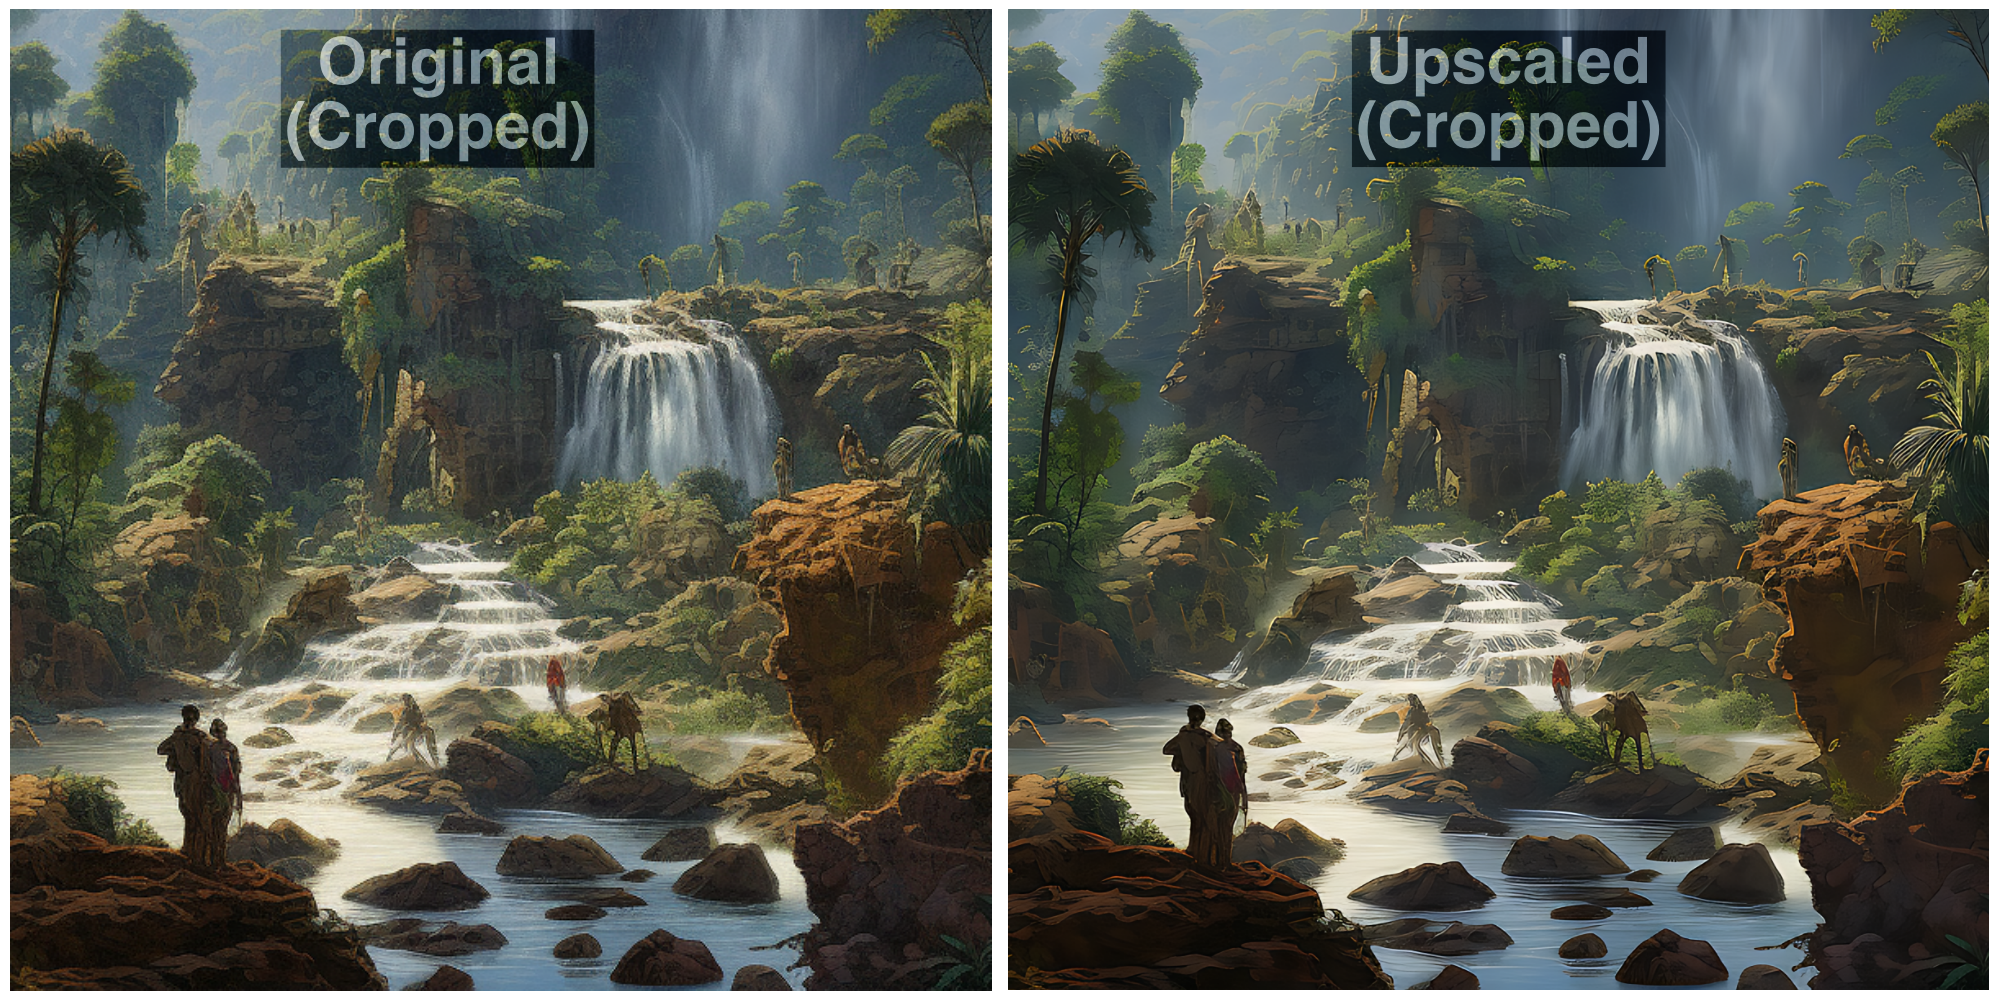
In our testing, we found that Upscayl does a really good job at enhancing our AI-generated images by adding details of its own to different portions of the images. The most obvious difference you’d see in the new image is that zooming into a picture won’t reveal any pixelation that may have been present in the original image. This is evident in the following landscape we created on Midjourney and upscaled on Upscayl.

On zooming into the same portion of the original and upscaled images, we found that Upscayl was able to smoothen out the details of the tree, the river, and the terrains in the background in a natural way. Even the outline of mountains in the background appears evened out without any loss or modification of details.
Upscayl also does a decent job to sharpen more minor subjects in an image. As you can see in this example, zooming in on the waterfalls shows lines of streams and the people around while keeping the overall texture of the image intact.
There’s a drastic change in quality when you try out Upscayl’s Double Upscayl mode which enhances images at 16x the scale of the original image. In the image below, you can see the side-by-side comparison of how the duck appears in the upscaled image. Relative to the original image, the upscaled version has sharper texture on the hair, the pixelation on the beak has been smoothened out, while parts of the duck’s helmet and armor have been sharpened and smoothened in different areas for a cleaner look.

In terms of digital art, you can see that the tool can modify the outlines of elements by removing any pixelation and sharpening the overall image for detailed quality.

(Bonus) 4 Tools you can use to upscale your AI-generated images
In case you don’t wish to install and use Upscayl on your computer, there are a bunch of other services that you can try out for enhancing the quality of your AI-generated artwork.
1. Let’s Enhance

Let’s Enhance (website) is an online tool that offers image upscaling using AI to remove pixelation, blur, and JPEG artifacts in an image while correcting the lighting and colors of the image to make them look more natural. Just like Upscayl, Let’s Enhance offers users the ability to scale up an image up to 16x times using which you can create images at up to 64 megapixels.
You can choose different upscale types, and versions, and specify custom image sizes to obtain your desired kind of results from this tool. Let’s Enhance offers additional options to adjust the light, tone, and color of the output image manually before processing your image. Unlike the above tool, however, your free usage will be limited to just 10 image generations exceeding which you’ll have to pay up to get more credits in your account.
2. SuperRes Diffusion

SuperRes Diffusion (website) is an upscaling colab that’s built on the Google Colab platform, meaning the scripts written to enhance your images are run from a web browser and processed through GPUs available from Google. The tool requires a computer, a web browser, a Google account, and access to your Google Drive storage.
Although you can configure the setup in your way, the process involves linking this colab with your Google account and giving the tool the ability to read and write on your Google Drive storage. Once that’s out of the way, you’ll be asked to import the file that you want to upscale. SuperRes Diffusion can be used to enhance your images by a scale of 4 and in most cases, this may take around 30 minutes (sometimes more) to get it done.
3. Gigapixel AI
![]()
Gigapixel AI (website) claims to enhance an image’s resolution in a natural way using its neural networks that can understand photorealistic details. For $ 99.99, the tool can increase the resolution of any type of image captured on a camera or created using AI by adding details to the elements inside them from its training data containing millions of portraits, landscapes, architectures, textures, and other items.
The tool also comes equipped with its own Face Recovery AI that promises to improve the resolution of human faces in an image by upscaling it up to 600%. All of this can be applied by either choosing the Auto mode that allows Gigapixel AI the ability to decide what details to add to enhance the quality of the image or you can manually correct different aspects like blur, compression, noise, and colors using its interface.
There are 6 different models to choose from – Standard, Art & CG, HQ, Lines, Low Res, and Very Compressed; all of which can alter your images differently every time and can process your images at various speeds. You can install Gigapixel AI as a dedicated app on Windows and Mac and the tool can also be added as a plugin if you prefer editing your images on Adobe Lightroom or Photoshop.
4. Adobe Photoshop Super Zoom

For users who already utilize Adobe Photoshop for their editing works, enhancing an image’s resolution is pretty straightforward. You can enhance the quality of your images using the Super Zoom option on Adobe Photoshop that’s available as part of the Neural filters (website) plugin. Super Zoom uses Adobe’s Sensei AI to magnify portions of an image and enhance its details for higher clarity and increased sharpness.
With machine learning, Photoshop will be able to understand the different details in an image so that it can add more pixel data in places where enhancements are necessary. By adding more pixels to the zoomed-in parts of your image, you will be able to create a final image that has a higher resolution than the original image. Since this feature uses your computer’s processing power, you can get faster results based on the capabilities of your CPU and GPU.
The Super Zoom feature can be accessed inside the Photoshop app on Mac and Windows by going to Filter > Neural Filters > Super Zoom. From here, you can choose the level of magnification which also expands your image’s scale by the same amount. There are additional options such as Enhance Image Details, Remove JPG Artifacts, Noise Reduction, Sharpen, and Enhance Face Details that you can toggle and adjust depending on your preference.
What’s the best way to upscale your Midjourney or AI-generated images?
Although AI makes it easy to generate images from scratch, creating a good picture does require you to invest some quality time and money (if you’re using services like Midjourney). So, unless you’re a professional who plans on selling high-quality art, it doesn’t make sense for you to spend more money to enhance these images for higher resolution.
If you’re a beginner or are only getting started, we suggest you use Upscayl to increase the resolution of your AI-generated images to create higher-quality prints. Upscayl can increase the resolution of your image by up to 16x and the process of upscaling is done natively on your computer, so you don’t need to worry about privacy.
That said, if you prefer using an online tool to get the job done, you can look into Gigapixel AI and Let’s Enhance, both of which can enhance your images without time and effort but not for free. If you’re an existing user of Adobe Photoshop, you can use the platform’s Neural Filters to try out the Super Zoom feature and other AI enhancements to increase your images’ quality right from your computer.
That’s all you need to know about upscaling AI-generated images for high-quality prints.


