Android 12 rolled out to the public last month and if you own a Pixel 3 or newer model of Google’s smartphone lineup, then you’re the first in line to receive the update. Android 12 brings with it a set of new features that don’t just add functionality to your smartphone but also change the way it looks and feels in hand. These features include scrolling screenshots, Material You, automatic face-baed rotation, facial gestures, device search, Magic eraser, and more.
Generally, it’s always a good choice to stay updated to the latest firmware but if Android 12 hasn’t made you feel at home, you have the option to downgrade to Android 11 at any time. You may want to do revert to an older version of Android to get rid of bugs in the system or simply because. So, if you’re someone who has updated their Google Pixel to Android 12 recently, this post will help you get your device back to running Android 11.
- Is it possible to revert back to Android 11 from Android 12?
- What do you need to know when downgrading?
- Things to make sure of before reverting to Android 11
-
How to go back from Android 12 to Android 11
- Step 1: Turn ON USB Debugging and OEM unlocking (on phone)
- Step 2: Download Android SDK Platform Tools (for Windows/Mac/Linux)
- Step 3: Download Factory Image for your Android phone
- Step 4: Establish a connection between the Android device and your computer
- Step 5: Get into Device Bootloader and unlock it
- Step 6: Flash factory image of Android 11
- Step 7: Relock your device bootloader
- Step 8: Reboot your phone into Android 11
- Step 9: Restore apps and backup
Is it possible to revert back to Android 11 from Android 12?
Yes, you can indeed switch your Pixel device to Android 11 or any other older version of Android after installing Android 12. This process, however, isn’t as simple as updating your phone to the latest version. It involves factory resetting your device, unlocking its bootloader, flashing an older Android image, and then restoring your backed-up data.
Although the steps to revert your phone back to Android 11 are fairly easy, you need to make sure you follow each and every one of them with the utmost care and at your own risk. You can also use this guide to flash any older version of Android on your Pixel smartphone and in the future, you can switch between older and newer versions of Android 12 itself using the same steps.
What do you need to know when downgrading?
Unlike updating to a new version of Android, rolling back your phone to an older version takes effort and there are a few things you should know before doing it.
First things first, downgrading to an older version of Android will wipe all current data stored on your Android device. This doesn’t just include all your device settings and app data but everything you ever saved on the internal storage of your Android phone. So, the first thing you do when you decide to downgrade is to back up all of your data from your device to the cloud or to some other device.
By default, your contacts, photos, device settings, call history, SMS, Google account data, and some app data will all be backed up on your Android phone to the cloud.
To check if a backup has been made or to create one manually, you can open the Settings app on Android 12 and go to Google > Backup. From here, enable the ‘Backup by Google One’ toggle and then tap on ‘Back up now’ to start copying your device data onto Google’s servers.
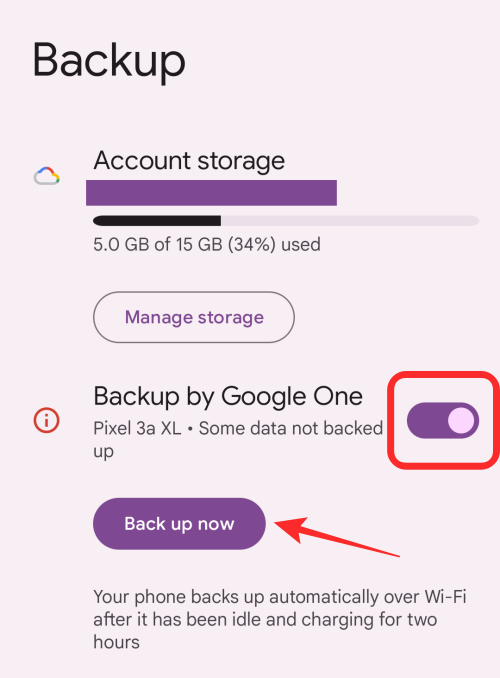
Since this data is more crucial to you when setting up your device back again, you can use this native feature to restore most of your stuff.
Besides device data, you may also want to back up data from third-party apps you may have on your phone. Since all apps behave differently. there’s no one way to back up data from all of them in the same manner. Most apps now work across all platforms thanks to their interconnected cloud services; so you may not need to back them up manually.
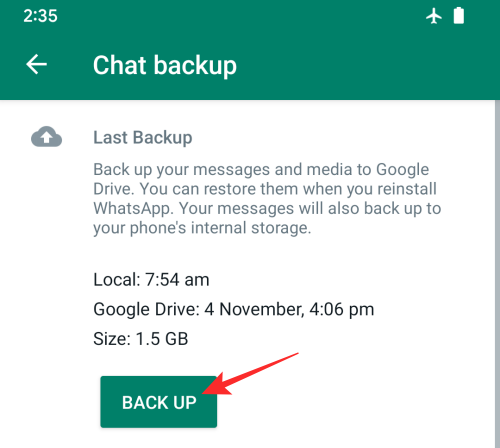
Some apps like WhatsApp offers users a manual way to backup data and then restore them at a later time. So, when you downgrade your phone to an older Android version, you need to make sure you have everything backed up before your phone’s data is erased.
In addition to backups, it’s also important that you know that the ability to downgrade an Android phone is only possible if the phone’s manufacturer allows you to modify its firmware, unlock the bootloader, and flash an Android image manually. For now, the easiest smartphones to downgrade to an old Android version are Google’s Pixel lineup.
Even if you own a Pixel device, you need to make sure you have a carrier-unlocked version of the phone to make sure the downgrade is possible. That’s because phones that are purchased from carriers may have an extra layer of protection that prevents you from modifying their software.
If your device was manufactured by Samsung, OnePlus, or any other company, your chances of rolling back to Android 11 depend very much on whether the company allows you to do it.
Things to make sure of before reverting to Android 11
Before you switch your phone back to Android 11, there are some things you may need to check or download to complete the downgrade process safely. These include:
- Back up your current device data to Google – Apps, Contacts, SMS, Device settings, and Call history.
- Sync your videos and pictures on Google Photos so they’re restored and easily accessible later.
- A working computer (Windows or Mac).
- A USB cable to connect your Android device to the computer.
- Move files from your device storage to your computer or Google Drive.
- Download all the necessary files necessary for the downgrade process to your computer, as mentioned in Step 2 and Step 3 in the guide below.
- Know your device’s make and model, so that you know which factory image to download. The guide below is based on Google Pixel devices but the steps will remain similar for other Android devices as well.
How to go back from Android 12 to Android 11
If you’ve made up your mind and want to revert back your phone to Android 11 from Android 12, then you need to follow the steps below, carefully without fail. As you proceed to roll back to an older version of Android, you should know that your phone’s warranty will be void and from here on out, you’re doing everything at your own risk.
Note: Since Android 12 is currently out mostly for Google’s Pixel lineup, we’ll stick to referring to it for a major part of this guide.
Step 1: Turn ON USB Debugging and OEM unlocking (on phone)
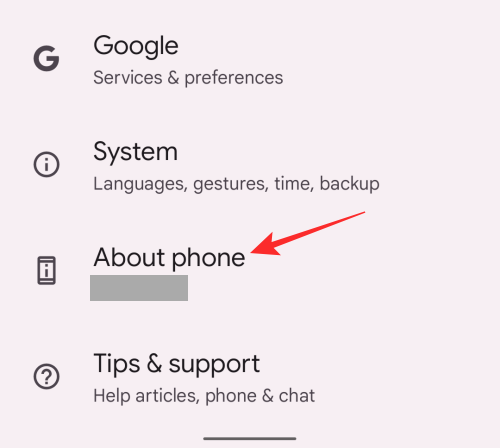
The first thing to do when modifying your phone’s software in any way is to enable USB Debugging and OEM unlocking on it. To do that, you first need to enable Developer options on your Pixel, in case you haven’t already. For that, open Settings on your phone and go to the ‘About phone’.
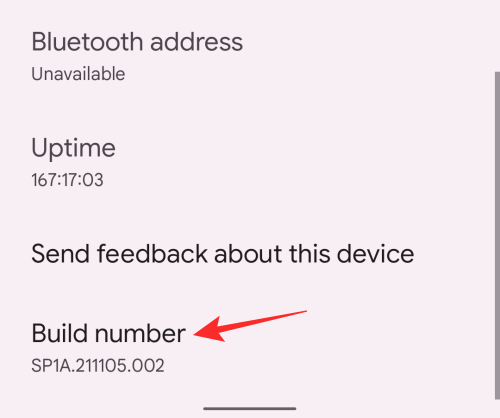
Next, scroll down and tap on the ‘Build number’ section repeatedly until you see the “You are now a developer!” message on your phone.
Once you’ve enabled Developer options on your device, it’s time to access it by going to Settings > System.
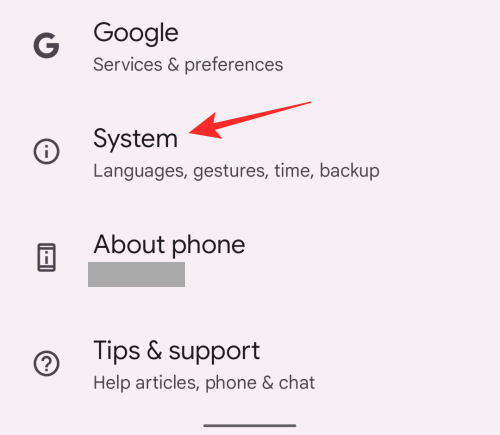
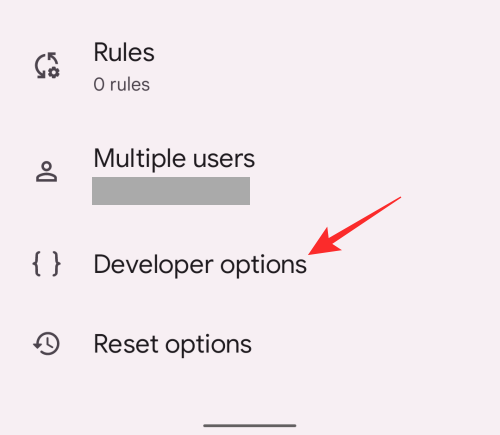
On the next screen, scroll down and tap on ‘Developer options’.
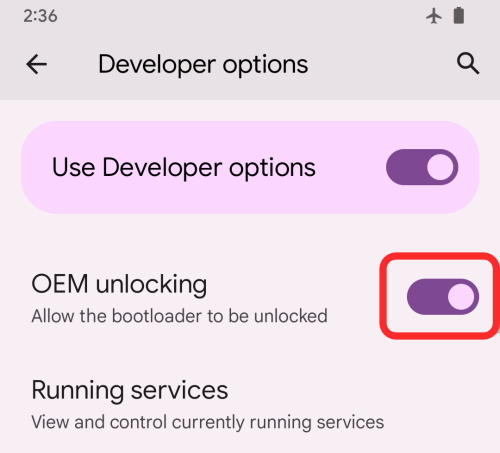
Inside Developer options, enable the toggle adjacent to ‘OEM unlocking’.
Once that’s enabled, scroll down on this screen until you reach the ‘Debugging’ section. Here, enable ‘USB debugging’.
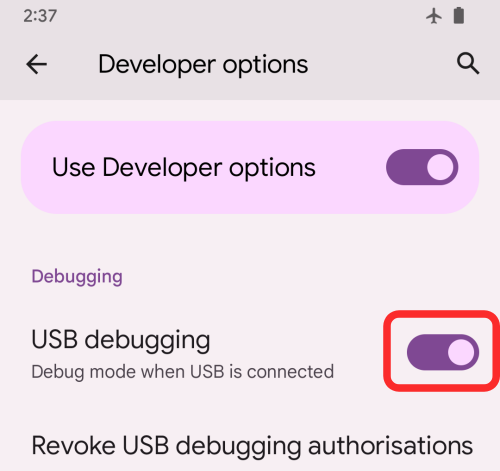
You have successfully enabled USB Debugging and OEM unlocking on your Android phone.
Step 2: Download Android SDK Platform Tools (for Windows/Mac/Linux)
In order to get any kind of software-based modification done on your Android phone, you will need the Android SDK Platform-Tools available on your desktop. For the uninitiated, Android SDK Platform-Tools is a utility that developers use to create and maintain their apps on Android. This utility can also be used to unlock the device bootloader, and flash a system image, which is essentially what we’ll be using it for.
Android SDK Platform-Tools are made to be used on a computer but to make it usable for everyone, it’s available across a multitude of platforms on your desktop. Depending on the device you own, you can download Android SDK Platform Tools on your computer by clicking the desired link below:
- Android SDK Platform Tools on Windows
- Android SDK Platform Tools on macOS
- Android SDK Platform Tools on Linux
Once you’ve downloaded the right package of Android SDK Platform Tools for your computer, you will have to unzip the contents from the ZIP before you can move on to the next step. When the package is unzipped, you should see the platform-tools folder appear in the same folder.
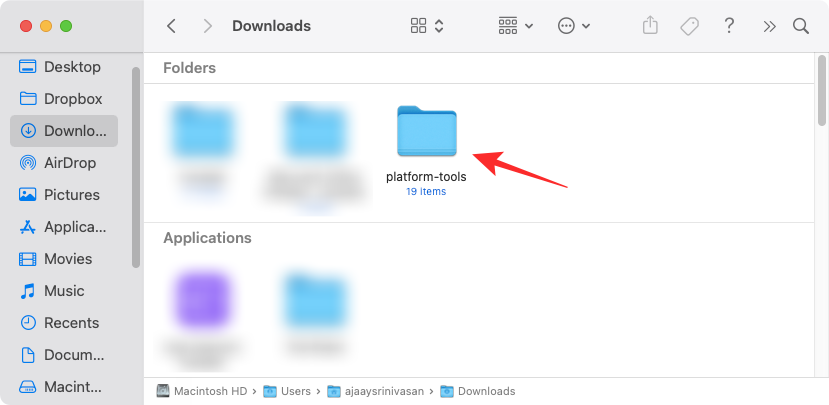
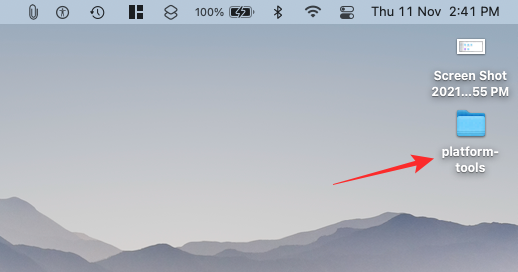
Make sure you remember the location of this folder or move it to a location that’s easily accessible, like your desktop.
Step 3: Download Factory Image for your Android phone
Downgrading your device to an older version of Android requires you to have the factory image for the specific Android version you wish to revert back to. A factory image is a pure build of Android that comes pre-installed with your smartphone or is a clear snapshot of an Android version that was rolled out to the device. This image is what the Android SDK Platform Tools will use to install a fresh copy of the Android version of your choice on your phone.
If you own a Pixel smartphone, you can get factory images for any of the previous builds of Android by going to this webpage that’s hosted by Google itself. For owners of devices from other OEMs, you need to check with your phone manufacturer to see if they allow downgrade of firmware and whether or not they provide official factory images for previous Android builds.
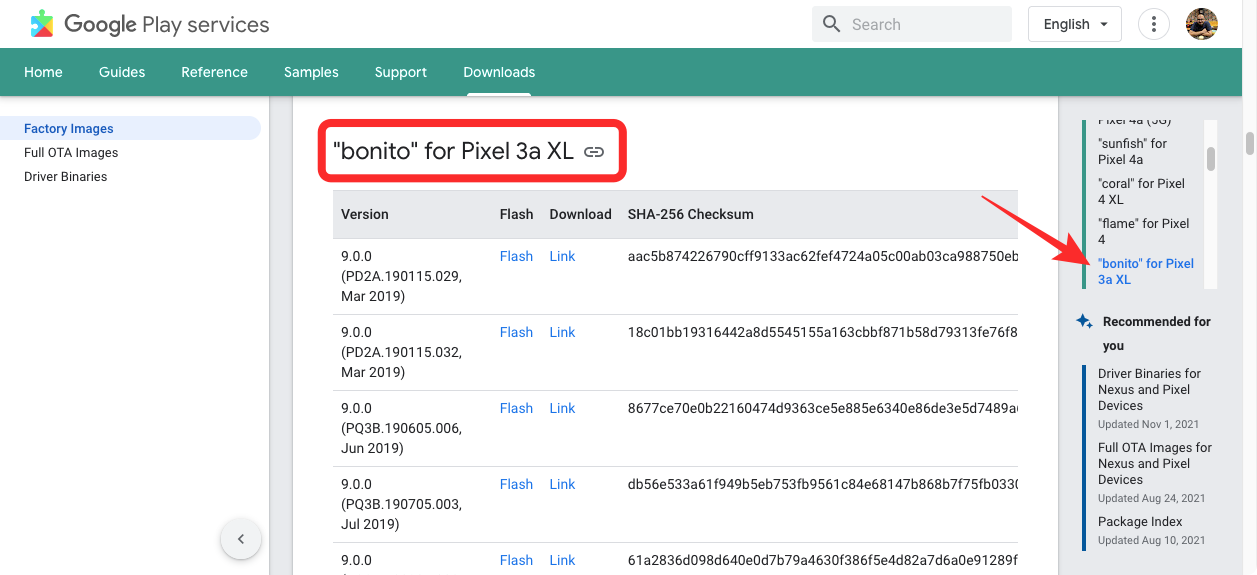
Pixel users can go to the Factory Images webpage and look for their device in the list provided below. From here, you can check all versions of Android that are available for the concerned device in order of old to new.
Once you’ve rounded up on the version of Android 11 you want to downgrade to, click on ‘Link’ adjacent to its version number.
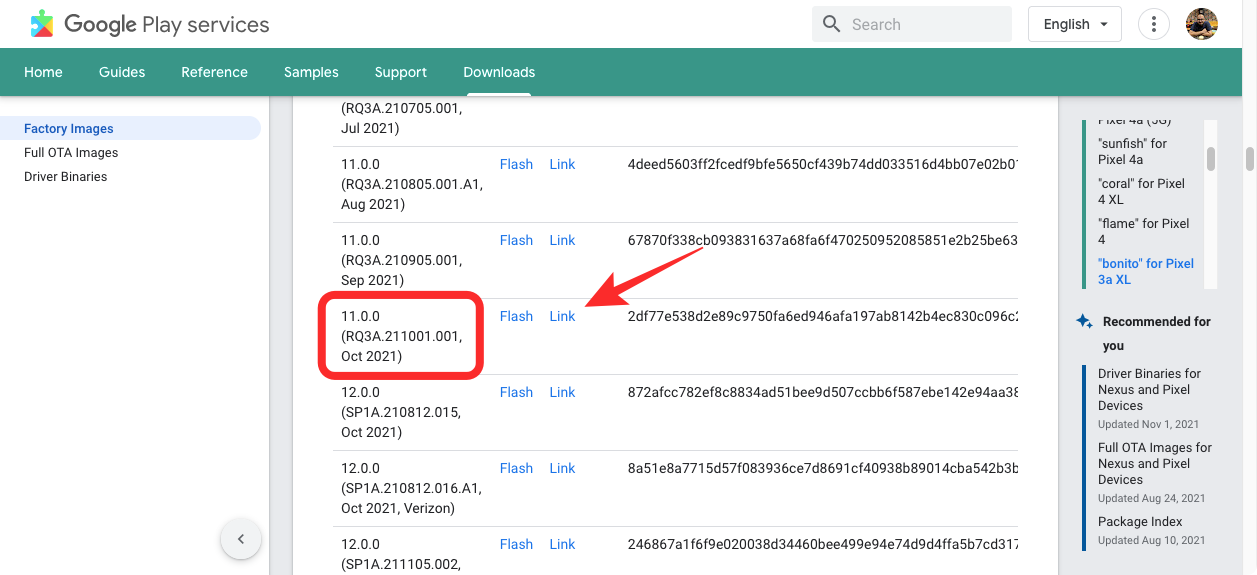
The selected factory image will now be downloaded to your computer in “.ZIP” format.
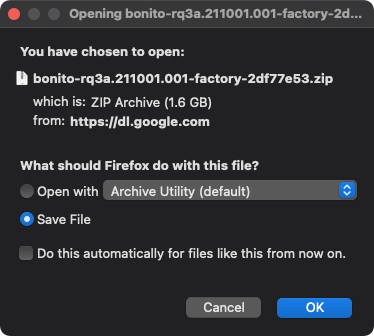
Once downloaded, you’ll need to extract the contents of this ZIP and move it to the main platform-tool folder that was created in the previous step.
Step 4: Establish a connection between the Android device and your computer
Now that you’ve taken care of everything you need to download, you can go ahead with the downgrading process by first establishing a connection between your Android phone and your PC. This can be done by using the data cable that was provided to you out-of-the-box with your phone.
Once you’ve manually connected your phone to your Windows/Mac/Linux computer, you can check whether your computer has successfully detected your phone. To do that, open Command Prompt (on Windows) or Terminal (on Mac). When Command Prompt or Terminal loads up, type “cd” followed by the path to the main platform-tools folder, and then press the ‘Enter’ key. Instead of manually typing this folder path, you can type “cd” and drag the platform-tools folder onto this window.

To check if your phone is connected, type the following command:
- on Windows:
adb devices - on Mac:
./adb device
If your phone has been successfully connected, its serial number should show up on the screen.
Step 5: Get into Device Bootloader and unlock it
When your Android device is connected to your computer, you can proceed to unlock its bootloader. To do that, you need to first get to the fastboot screen which you can do by following these steps:
- Press the Power + Volume Down buttons together until the Android error logo appears
- Press Power + Volume Up buttons together, then release the Volume Up key
An easier way to enter fastboot mode on your Android device can be done using Command Prompt or Terminal. To do that, enter the following command:
- on Windows:
adb reboot bootloader - on Mac:
./adb reboot bootloader
When your device is in fastboot mode, you can unlock your bootloader by following these commands:
- Inside Command Prompt (Windows):
fastboot flashing unlock - Inside Terminal (Mac):
./fastboot flashing unlock
Once that’s done, you will need to manually unlock your phone’s bootloader on the phone. After entering the above commands, use your phone’s volume buttons to select the ‘Unlock the bootloader’ option and then confirm the selection by pressing the Power button. This step will wipe all of your device data and once you do that, your phone will restart.
Upon successful restart, you will have to get to the device bootloader again by entering the commands below:
- Inside Command Prompt (Windows):
adb reboot bootloader - Inside Terminal (Mac):
./adb reboot bootloader
When your device restarts, proceed to the next step below.
Step 6: Flash factory image of Android 11
Once you’ve unlocked your device bootloader, you’re ready to install Android 11 on your phone using the factory image you downloaded earlier. If you’re a Google Pixel user, the installation of factory images are a simple affair since it can be done with a single command:
- Inside Command Prompt (Windows):
flash-all - Inside Terminal (Mac):
./flash-all.sh
After you enter the command, Android 11 should start getting installed on your phone. You need to make sure you don’t close the Command Prompt or Terminal window during the installation process or you may end up bricking your device. After Android 11 has been successfully flashed on your device, you’ll see a message confirming the installation.
When you see the confirmation message, you can disconnect your Android device from the computer.
Note: Do not close the Command Prompt or Terminal window because you still need it later.
After this, your phone will boot up as new and will require you to set it up to your liking. For the time being, you can skip the setup process to go to the next step.
Step 7: Relock your device bootloader
Once you’ve flashed a factory image of Android 11 on your device, there’s one more necessary action that is needed to be done – re-locking your Android bootloader. Relocking the device bootloader is important because it will help you continue getting future device updates on your Android phone. This may come in handy for when there’s a better build of Android 12 available for your smartphone or when you think you’re ready to upgrade to the next Android version.
If you do not relock the device bootloader, you’ll fail to get any new Android updates that are available for your device and you will also see a warning screen regarding the unlocked bootloader every time you restart your phone.
If you do want to continue getting future Android updates on your phone, you can relock your device bootloader by first enabling USB debugging as you did on Step 1 above. Unlike Step 1, however, here you’ll only have to enable USB debugging and not OEM unlocking since your bootloader is already unlocked.
After you have enabled USB debugging, you can go ahead and connect the Android phone back to your computer and access the Command Prompt or Terminal window again that you had opened.

If you had accidentally closed this window, you will need to follow the instructions mentioned inside Step 4 again to get it back to work.
When Command Prompt or Terminal loads up and detects your phone, you should load your device bootloader by entering the following command:
- Inside Command Prompt (Windows):
adb reboot bootloader - Inside Terminal (Mac):
./adb reboot bootloader
After your phone boots back up, you can re-lock its bootloader by entering this command:
- Inside Command Prompt (Windows):
fastboot flashing lock - Inside Terminal (Mac):
./fastboot flashing lock
The next step requires you to manually lock your device bootloader using your phone’s physical buttons. To confirm the locking process, use your volume keys to navigate to the ‘Lock the bootloader’ option on the screen and then go ahead with the selection by pressing the Power button.
After you successfully proceed with this step, you’ll see the “Locked” message appear on your phone. This step will erase data on your phone one more time.
Step 8: Reboot your phone into Android 11
When you re-lock your device bootloader, your Android phone will boot into Android 11 like new. Make sure you disconnect the device from your computer before you set up your phone. If your phone doesn’t boot into Android 11 automatically, you will have to long-press the Power button again to reboot it.
Your phone will now run on Android 11 and it will require you to proceed with the initial setup like you would do on a new phone. The setup process will include these things – device language, SIM card setup, internet connection through Wi-Fi or cellular data, Google account sign-in, and other stuff.
While you can set up this phone as new anytime, the best way to approach reverting back to Android 11 will be to restore your apps and content from a previous backup. If you wish to copy apps and restore your device from an existing backup, you can do so by proceeding to the next step.
Step 9: Restore apps and backup
If you had backed up your device data before switching back to Android 11, you can restore it after the downgrade process so that you don’t have to start from scratch. You can restore your phone from a backup either during the Android 11 setup process or after it.
To restore your phone during the initial setup, tap on ‘Next’ inside the ‘Copy apps & data’ screen and then tap on the ‘Can’t use old phone’ option at the bottom left corner.
If you have already gotten past the initial setup, you can still access the restore option by going to Settings > Finish setting up your Pixel and then tapping ‘Start’. This way, when you get to the ‘Use your old phone’ screen, you’ll have to select the ‘Can’t use old phone’ option to restore from a previous backup.
Next, select the backup you want to restore your phone to.
When you select a backup to restore, you’ll get options to choose which all data you want to access on Android 11. Here, select from any of the following options – Apps, Contacts, SMS, Device settings, and Call history. After making your preferred selections, tap ‘Restore’.
Your phone will now start restoring all your previous data from the selected backup and this process will be happening in the background. If there was an app that was left out, you can download it yourself from the Google Play Store. Some apps may require you to restore your account and other data manually within the app.
That’s everything you need to know about reverting back to Android 11 from Android 12.



THERE ARE NOT ENOUGH WARNINGS IN THIS TUTORIAL. YOU *WILL MOST LIKELY* BRICK YOUR PHONE! Don’t do this! I flashed the wrong ROM to my Pixel 4a and now it’s HARD BRICKED, meaning there’s literally nothing to do to fix it. ****YOU WILL LOSE YOUR PHONE***
There should be warnings, but it is user error if you flashed the wrong image to your Pixel. I did the same thing. I thought my phone was bricked, but I managed to unbrick it, and flash the correct image, and it is working as expected with Android 11 downgraded from Android 12. @Fernando if you would like assistance trying to unbrick your phone, please reach out.
hey i have s21 plus and i want to downgrade to android 11
It is extremely difficult to hard brick your phone. If you think you hard bricked it you can just sideload a ota file and it’ll fix it. Just because your not intelligent enough to follow the instructions properly doesn’t mean other people are. These instructions are the standard guidelines you’ll find everywhere. They work just fine.
the only problem with these instructions is that the options are never all the same… the first how to in this guide there’s already a difference: i dont have developer options!
I found this very helpful. I was reading this as I was watching a youtube tutorial side by side. I found that your article and the video complemented each other well as you highlighted some steps the video missed, and the video provided visual aid for the process. Thank you once again.
I m getting “This version is too old” on flash-all.sh.
I Downloaded the lastest version of Android 11 for my Pixel 4xl.
How to fix it?
A couple of notes for Mac/OSX users:
I had to use
./adb devices
With an ‘s’
If you get the message that “this version is too old” when running /flash-all.sh the issue is that the flash-all shell script and the scripts its trying to run are not in the same directory
So `cd` back into `platform-tools` and run:
export PATH=”$PWD:$PATH”
Either that or you can make sure that you unzip the contents of the operating system into `platform-tools`, however, I haven’t tried this and don’t know if this works, I just had it all in it’s own subdirectory
I’ve tried this several times following carefully from the beginning trying to install crosshatch on my pixel 3xl. when it restarts, it’s still android 12. My phone is from verizon unlocked. I can unlock the bootloader. the CMD shows everything going to completion, but then it’s still android 12 when it restarts. Any help?
I get through this process all the way until I enter “fastboot flashing unlock” and then my command prompt says and I am never able to actually unlock the bootloader. Any help would be greatly appreciated!
Android mobile phone mein nikalo
Brilliant. Reluctly, given the complexity I will carry on with what I been given.
I followed the directions exactly and didn’t brick my phone. Thank you so much for restating what’s in the Android developers docs in an easy-to-follow and plain way. Some extra pictures of the process would help. Also an explanation of what to do if, like me, you don’t have the correct Android USB drivers and need to download them.
Finally rid of Android 12. My god.