With the amount of time an average human spends looking at screens, light and dark modes have become of utmost importance. Windows 11 recently became the first Windows OS to ship with Dark mode and users have been using it around the world ever since.
While not perfect, Windows 11’s dark mode helps reduce eye strain, especially in dark environments. However, there might be times when you wish to increase legibility and view Windows in light mode instead.
You can do this from the Settings app however it ends up being a long and tedious process. If you’ve been looking for an easy way to switch between dark and light modes then here’s all you need to know about it.
Related: 4 Easy Ways to Customize and Change Icons in Windows 11
How to switch between dark and light modes easily in 6 ways
You can switch between the dark and light modes on Windows 11 using the methods below. We recommend you try using Windows 11’s native scheduling to switch between dark and light mode before trying one of the third-party alternatives.
You can also choose to create desktop shortcuts to switch between dark and light modes. Use either of the methods below depending on your preferences and current setup.
Method 1: Automate your appearance
You can schedule your dark mode on Windows 11 using the Task Scheduler. This way you won’t have to switch manually between modes. Your PC will automatically take care of this task in the background based on your set schedule. Follow the steps below to help you along with this process.
Step 1: Create a task to turn on light mode
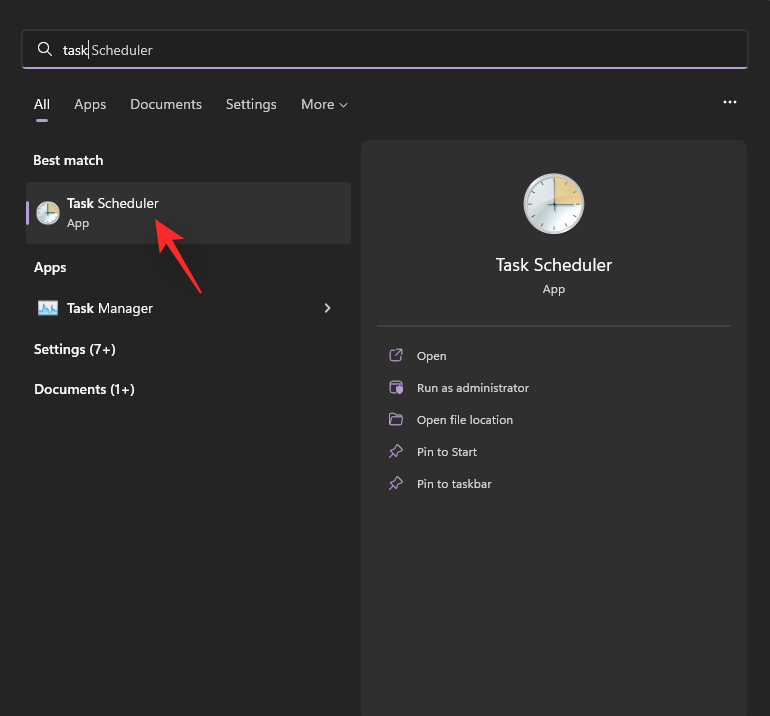
Open the Start menu, search for Task Scheduler and launch the same from your search results.
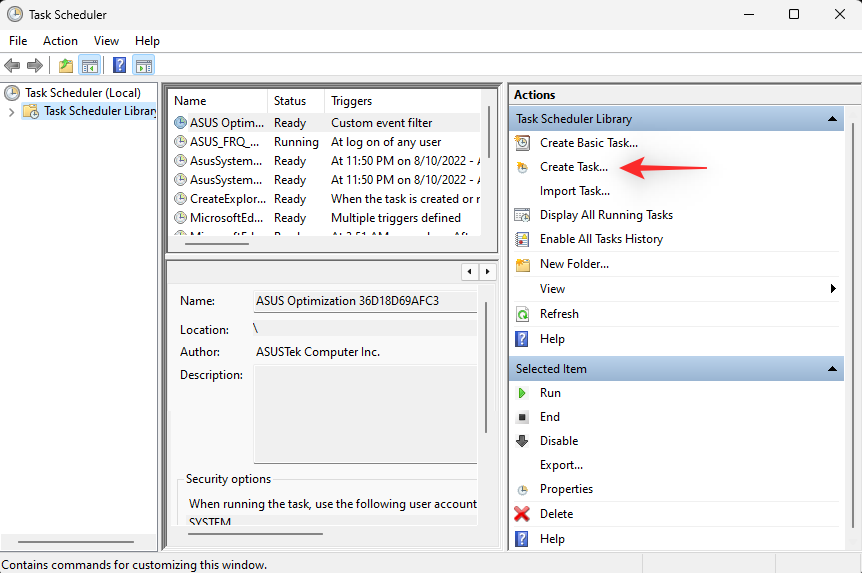
Now click Create Task on your right.
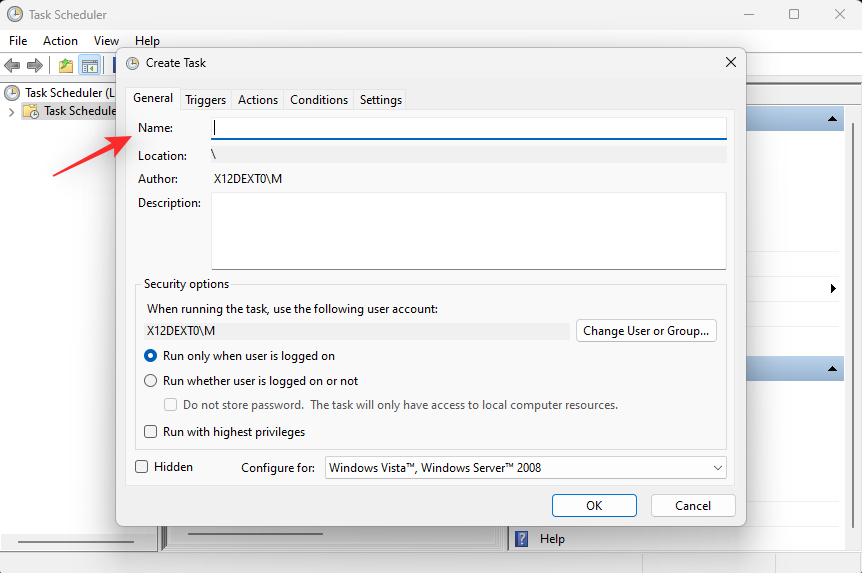
Enter an appropriate name for your task that helps you quickly identify it.
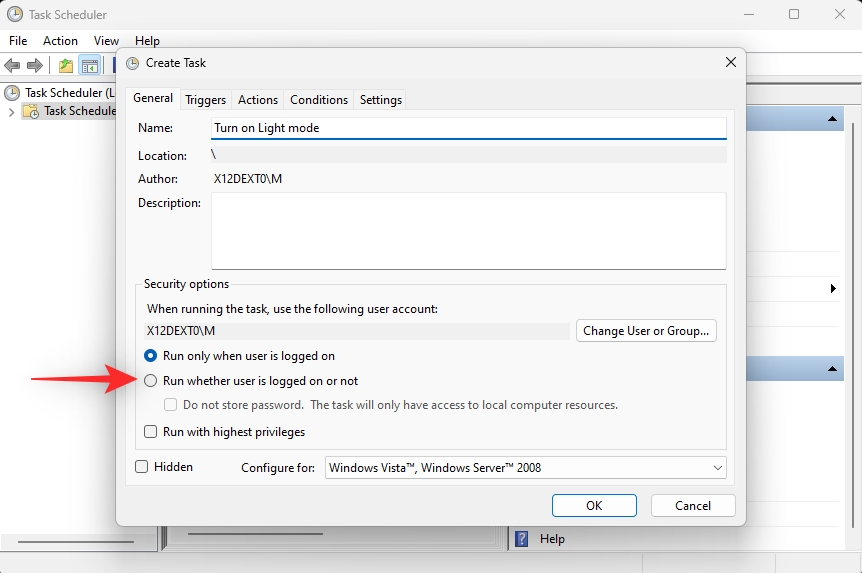
Click and select Run whether user is logged on or not.
Check the box for Do not store password.
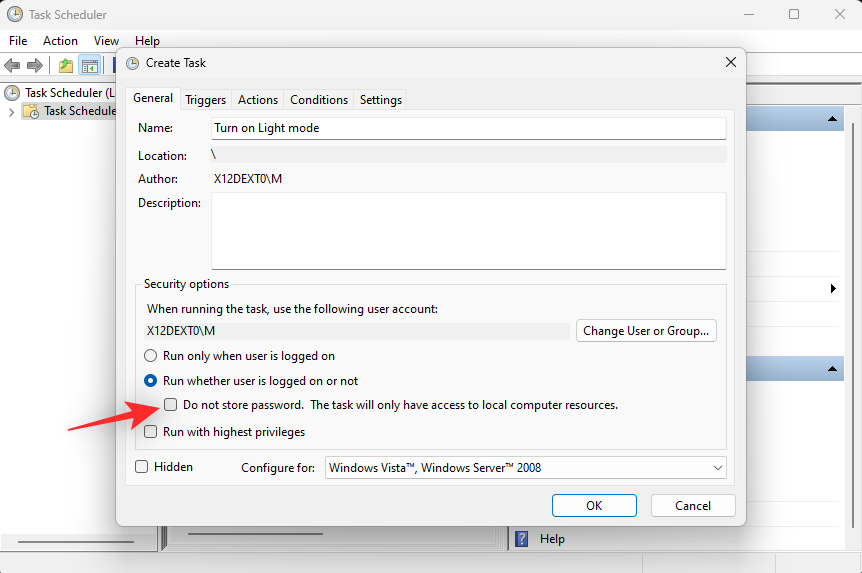
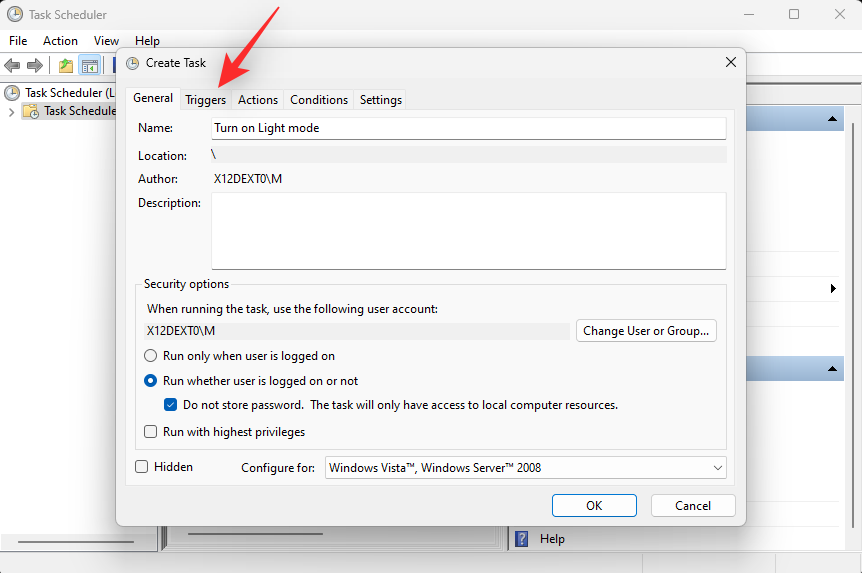
Now click and switch to the Triggers tab.
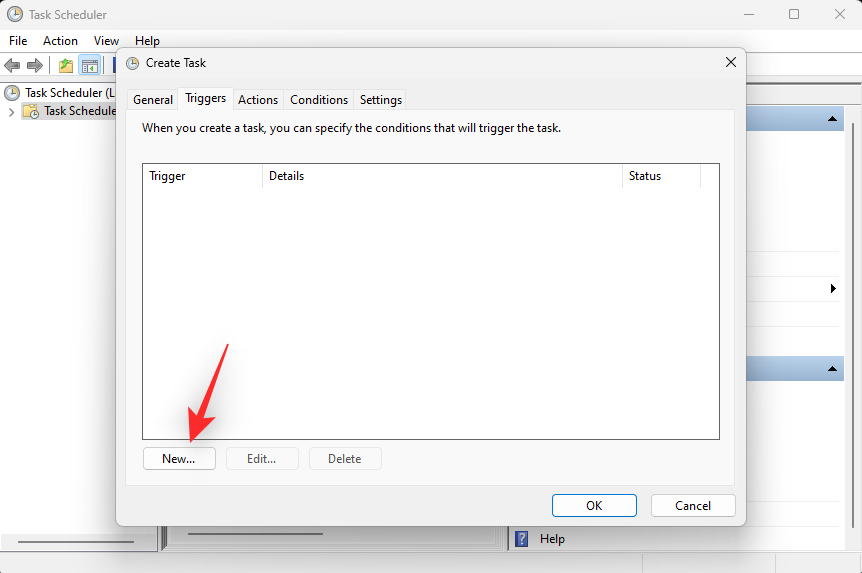
Click New.
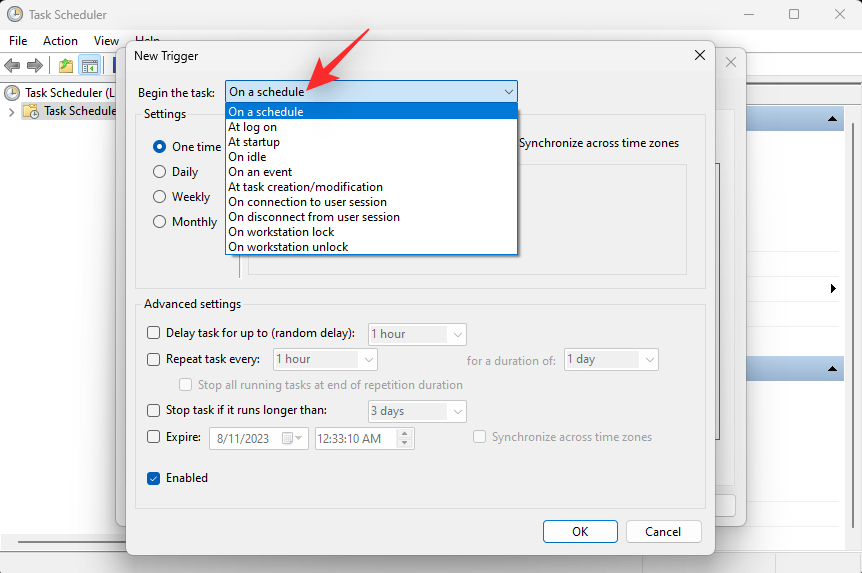
Click the drop-down menu for Begin the task and select On a schedule.
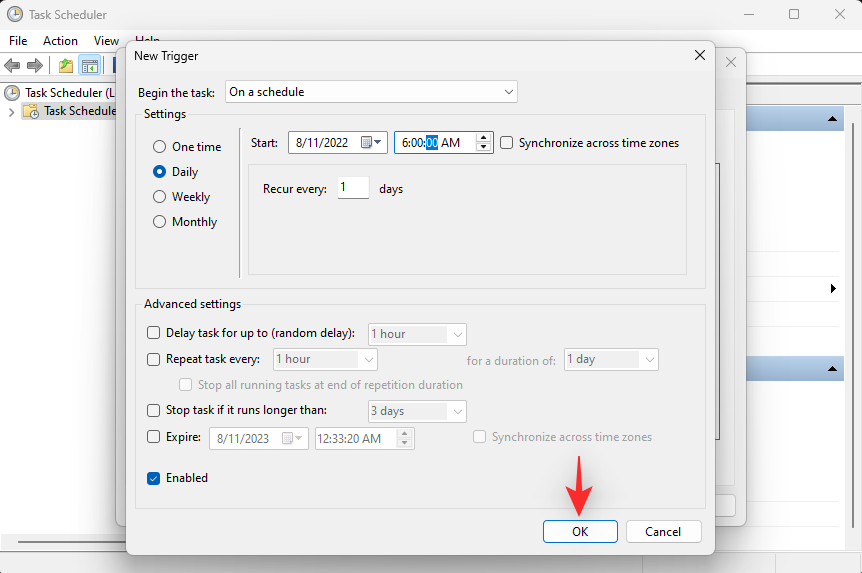
Now set a schedule depending on when you wish to turn on light mode. We will set a time of 6 AM each day to turn on light mode.
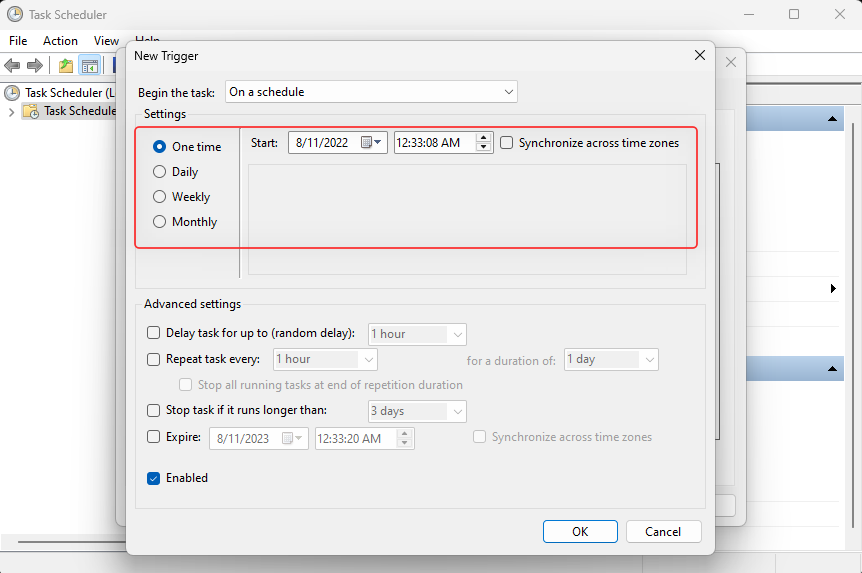
Click OK to confirm your choice.
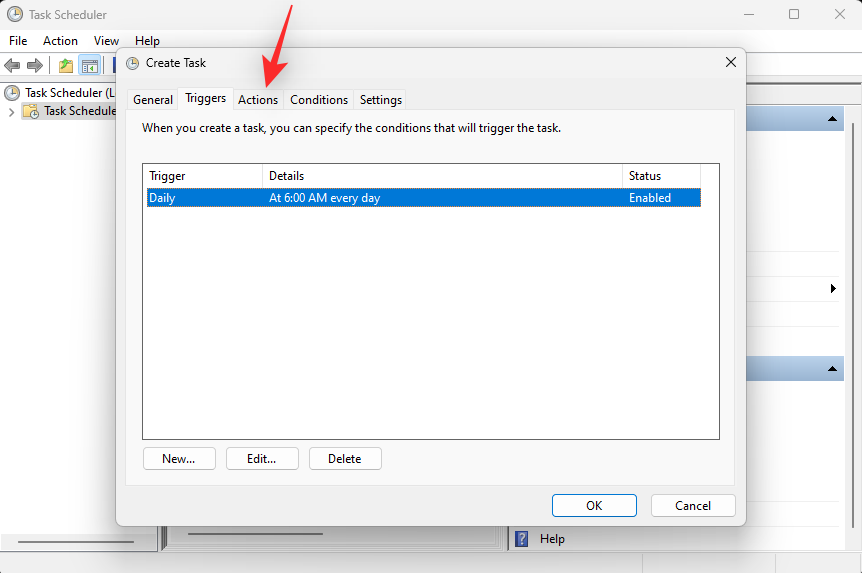
Now click and switch to the Actions tab.
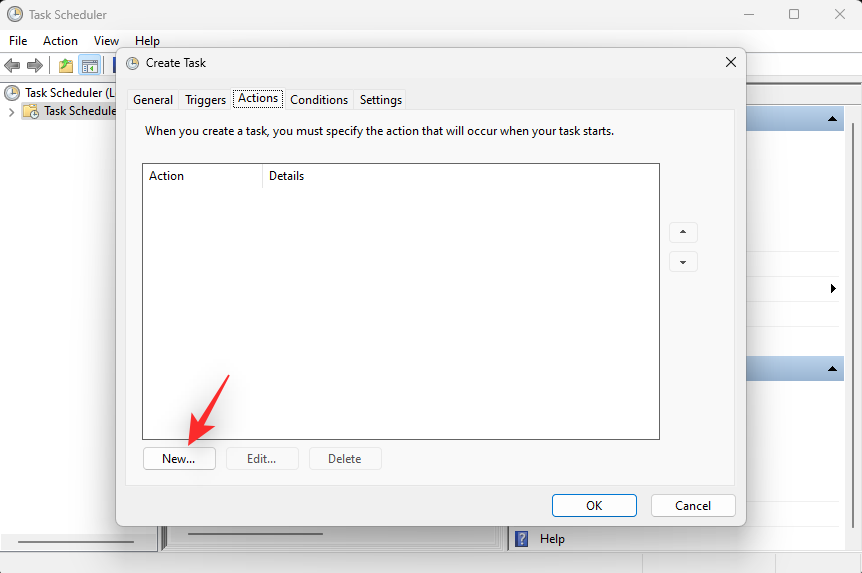
Click New.
Click the drop-down menu for Action and select Start a program.
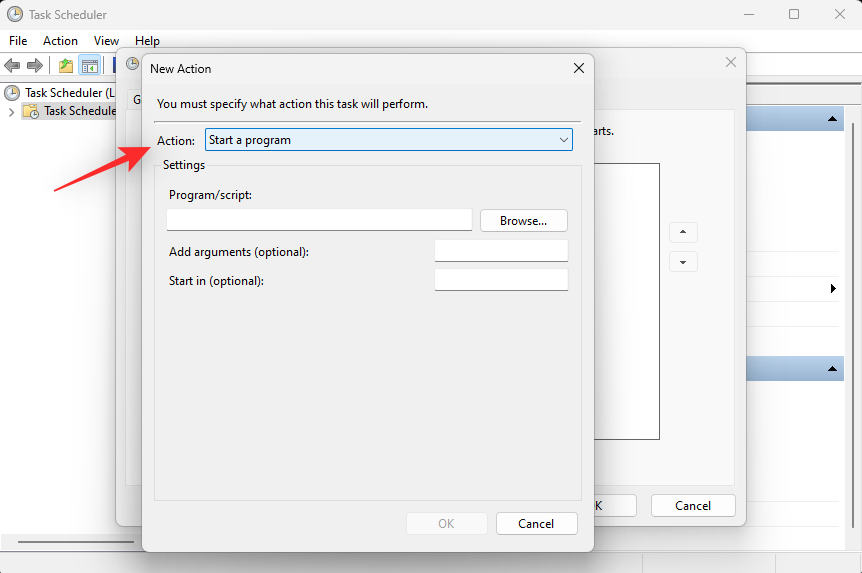
Now enter the following path for Program/script.
%SystemRoot%\system32\WindowsPowerShell\v1.0\powershell.exe
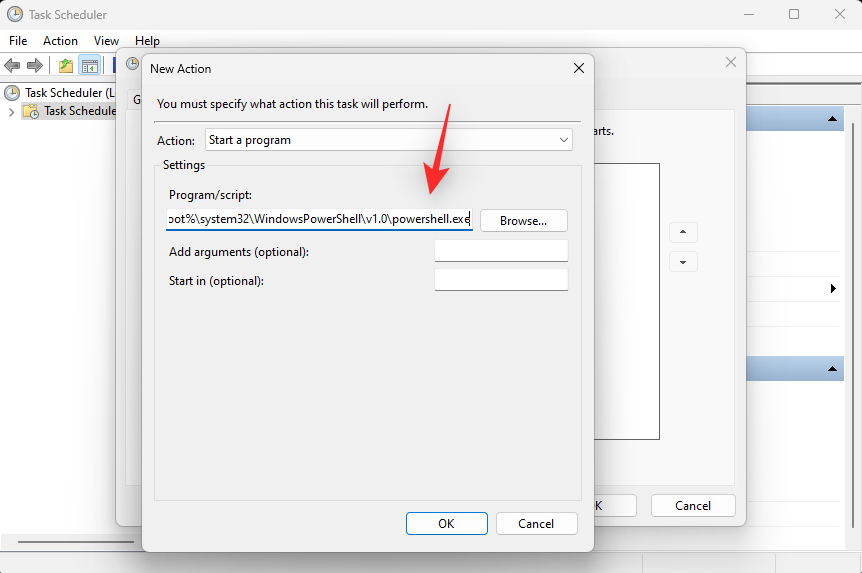
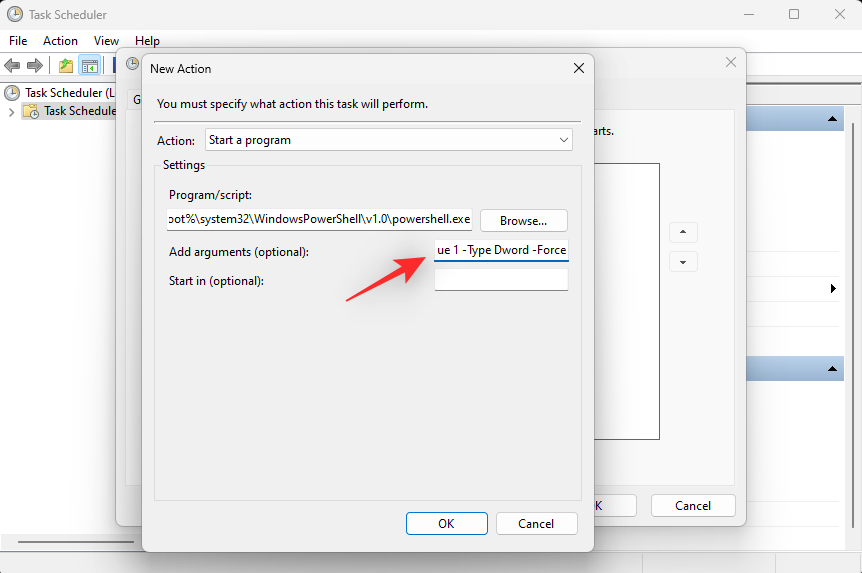
Copy paste the following in the text field for Add arguments (optional).
New-ItemProperty -Path HKCU:\SOFTWARE\Microsoft\Windows\CurrentVersion\Themes\Personalize -Name SystemUsesLightTheme -Value 1 -Type Dword -Force; New-ItemProperty -Path HKCU:\SOFTWARE\Microsoft\Windows\CurrentVersion\Themes\Personalize -Name AppsUseLightTheme -Value 1 -Type Dword -Force
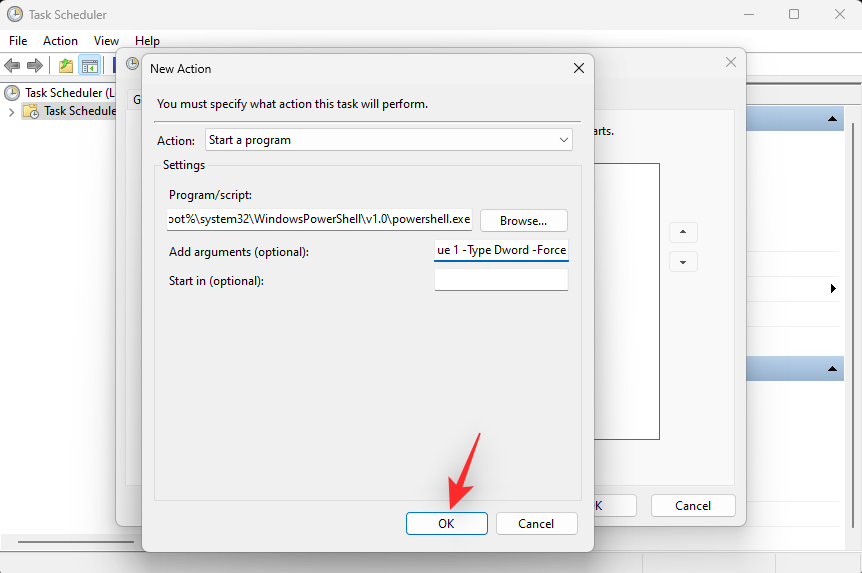
Click OK to save your newly added actions.
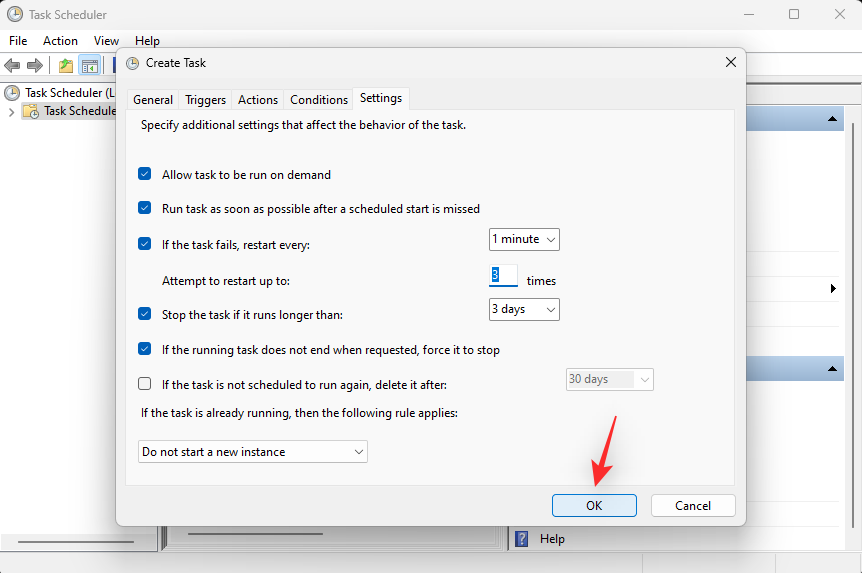
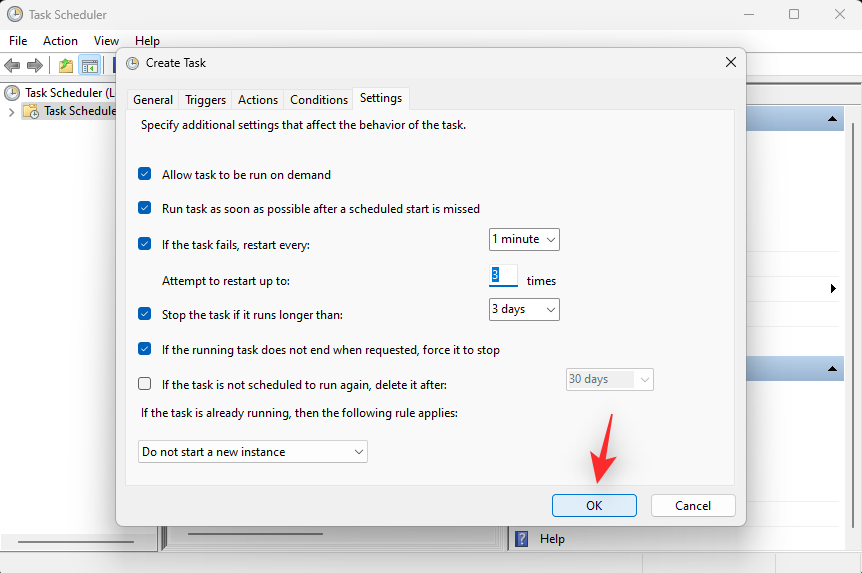
Click and switch to the Settings tab.
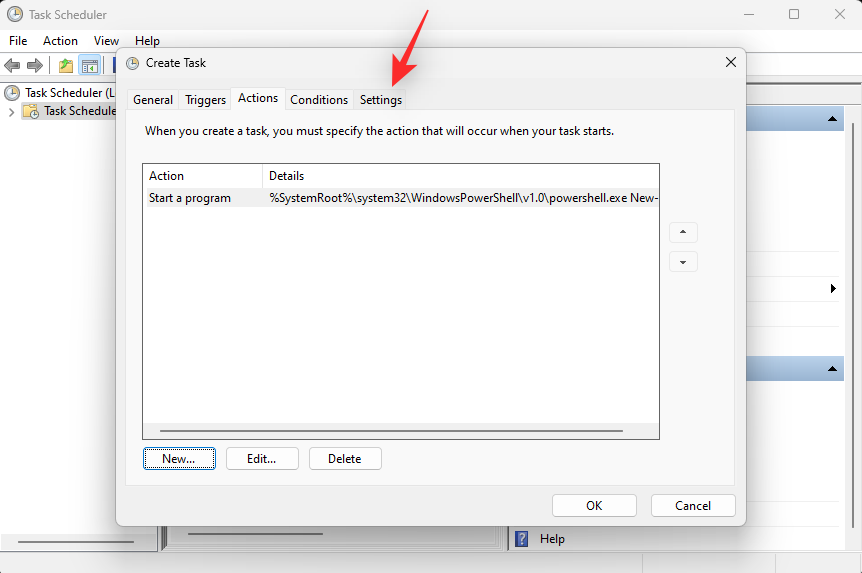
Now check the boxes for the following options.
- Allow task to be run on demand
- Run task as soon as possible after a scheduled start is missed
- If the task fails, restart every:
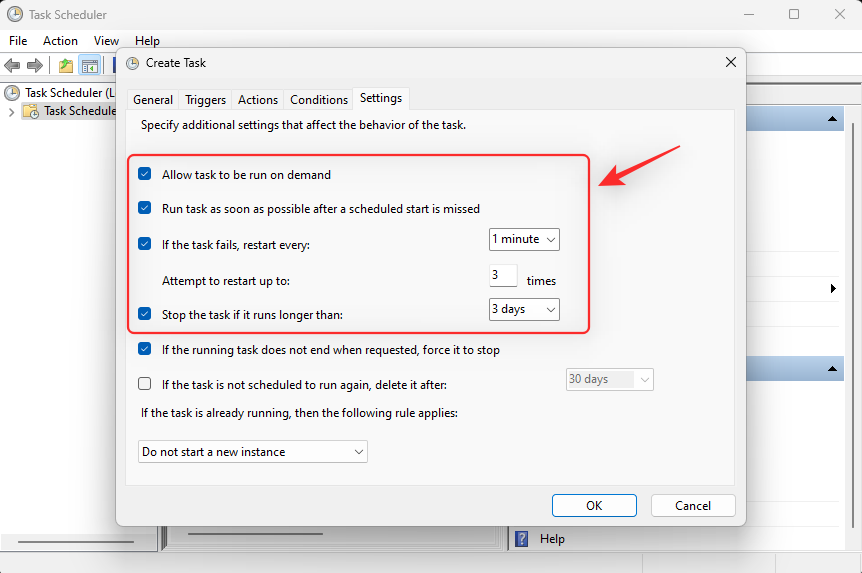
Once checked, click the drop-down menu for If the task fails, restart every: and select 1 minute.
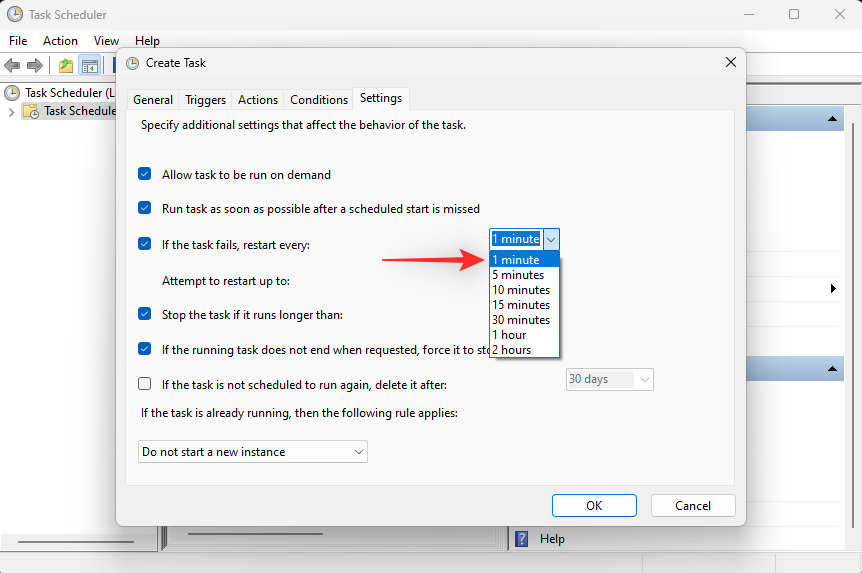
Similarly set 3 as the value for Attempt to restart up to.
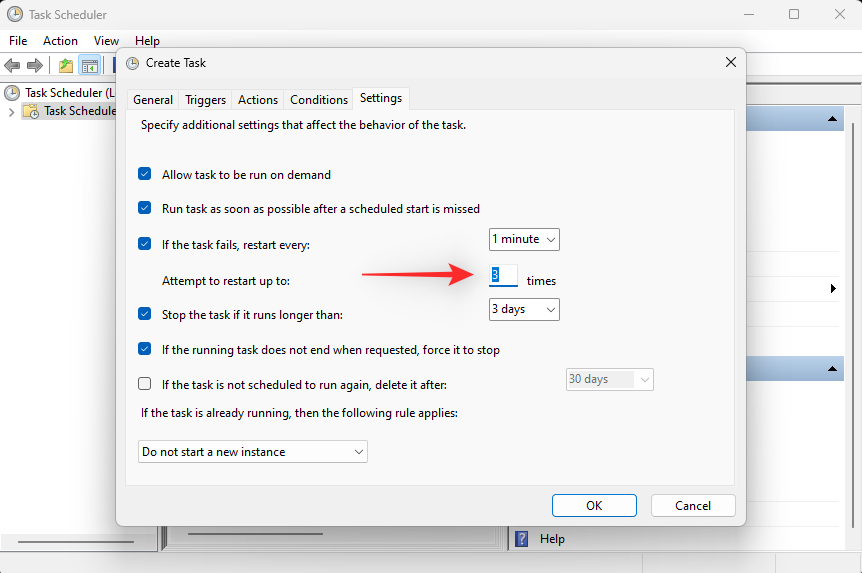
Click OK to save your changes.
And that’s it! Your new task will now be created. It will now automatically trigger and set light mode on your PC at the chosen time. You can now use the steps below to set up and schedule dark mode on your PC.
Related: What’s New in the Task Manager on Windows 11 22H2 Update
Step 2: Create a task to turn on dark mode
We will now create a task to turn on dark mode automatically on your system. Follow the steps below to help you along with the process.
Open the Start menu, search for Task Scheduler and launch the same from your search results.

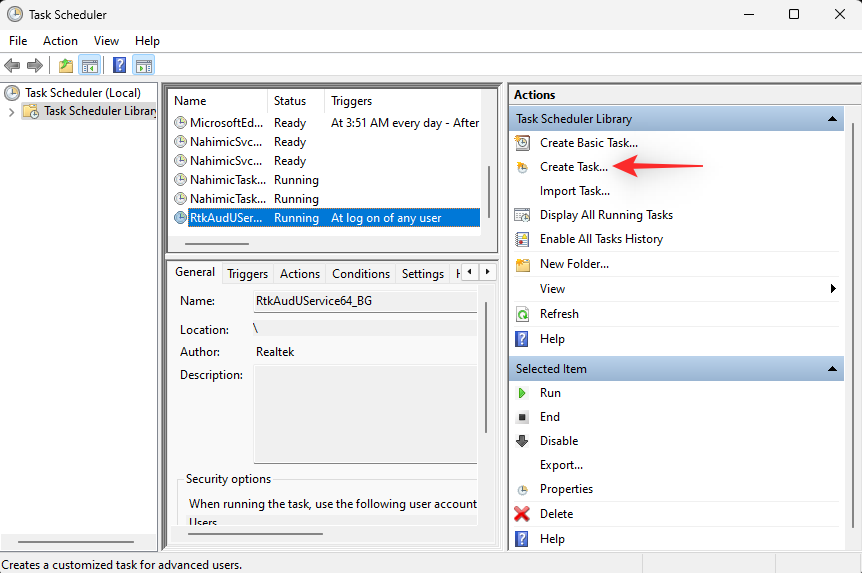
Now click Create task.
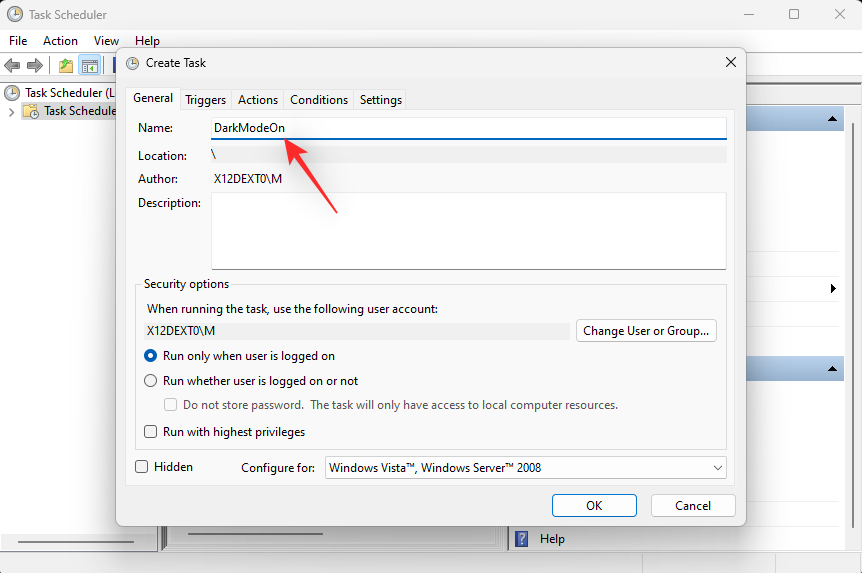
Name your task based on your preferences. We recommend you choose a name that helps you identify it easily and quickly.
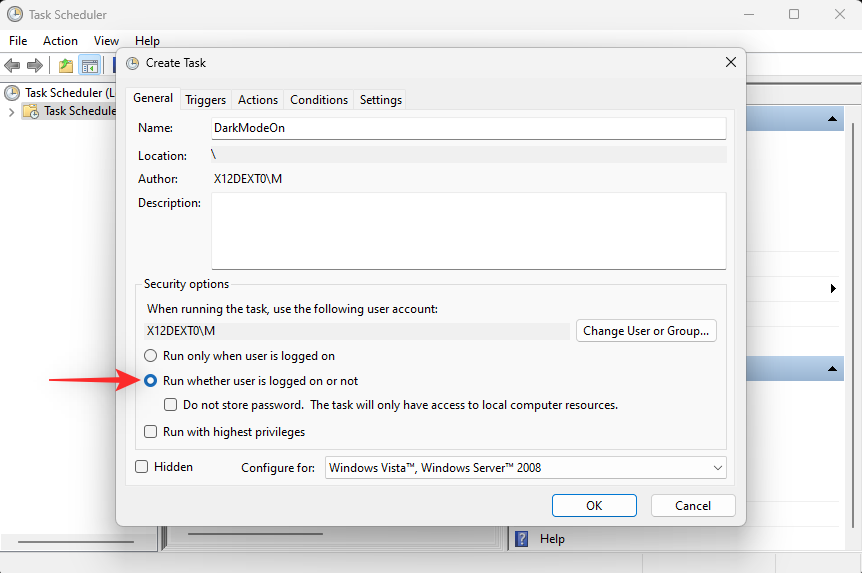
Click and select Run whether user is logged on or not.
Check the box for Do not store password.
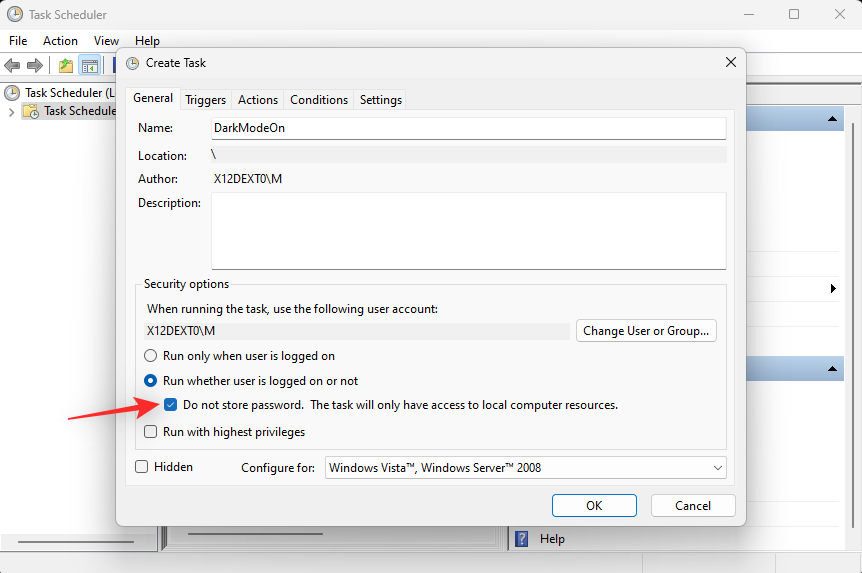
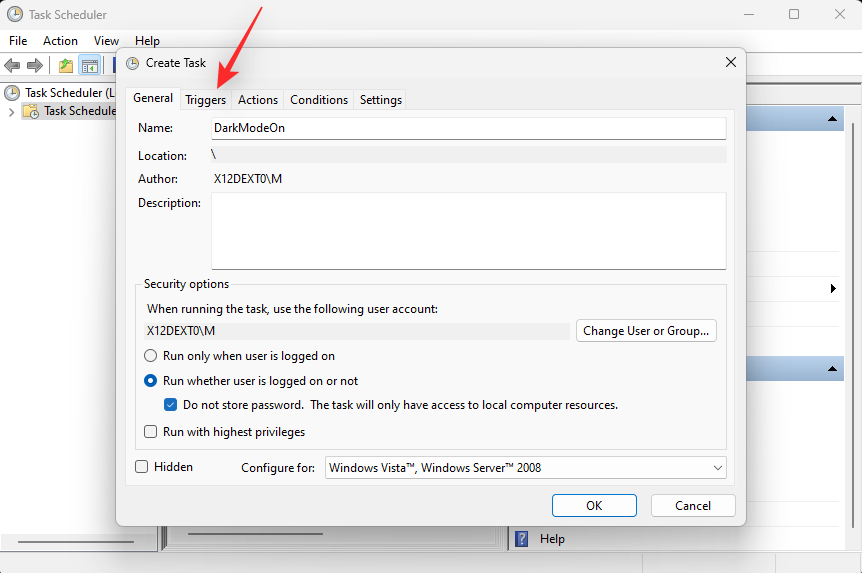
Click and switch to the Triggers tab.
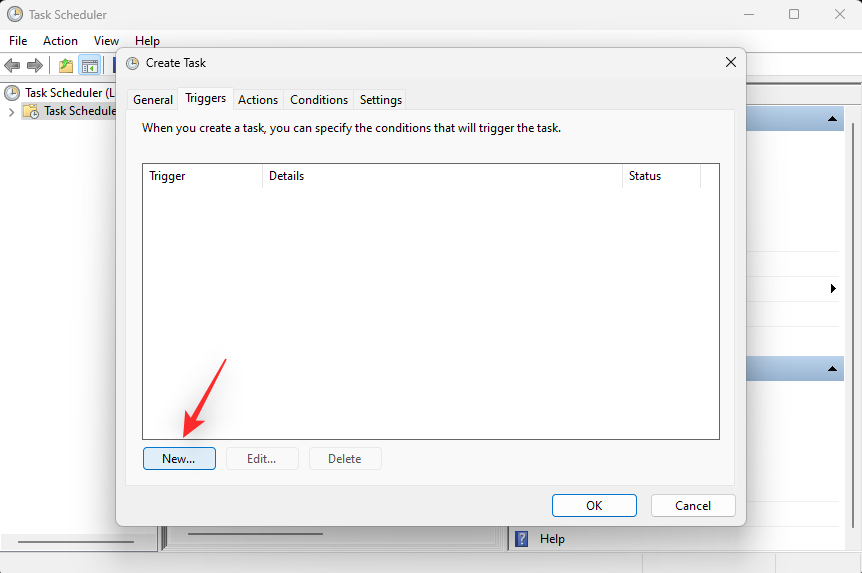
Now click New.
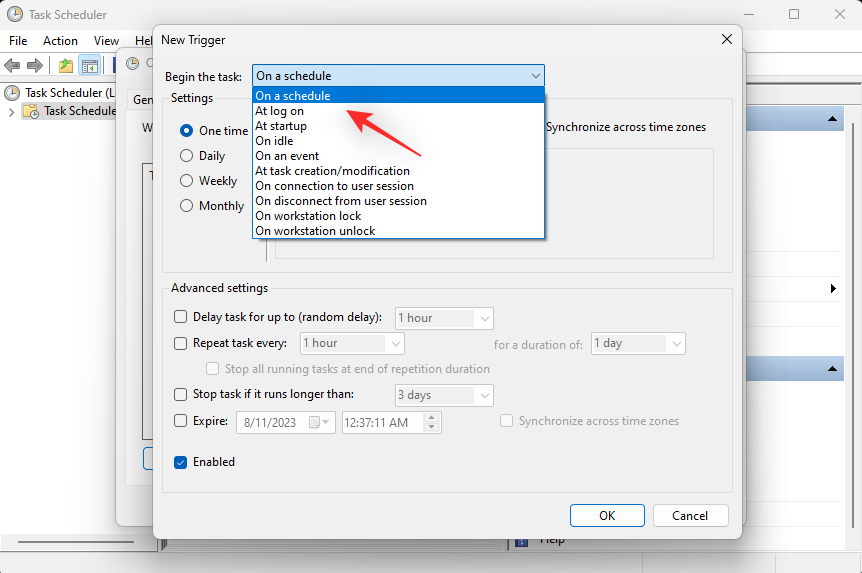
Click the drop-down menu for Begin the task and select On a schedule.
Now set an appropriate time to turn on dark mode depending on your light mode schedule. We will set a time of 6 PM to turn on dark mode.
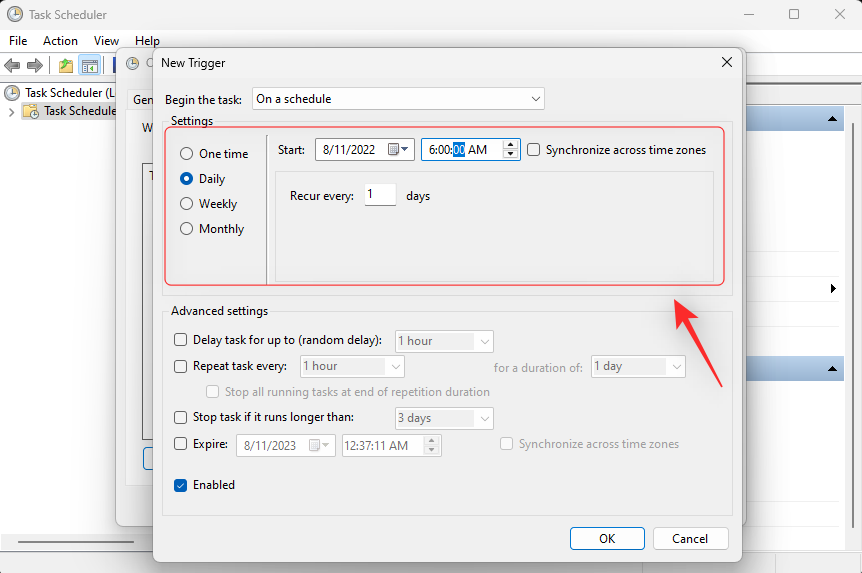
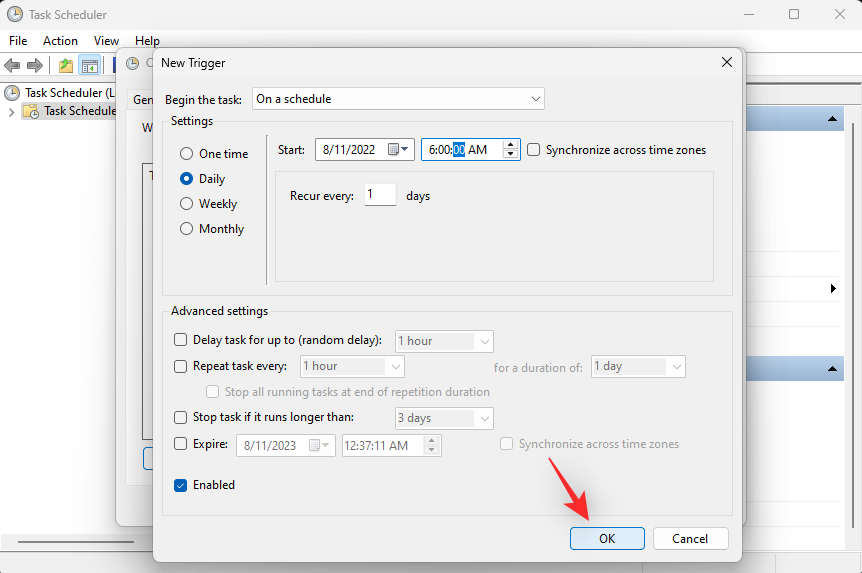
Click OK once you’re done.
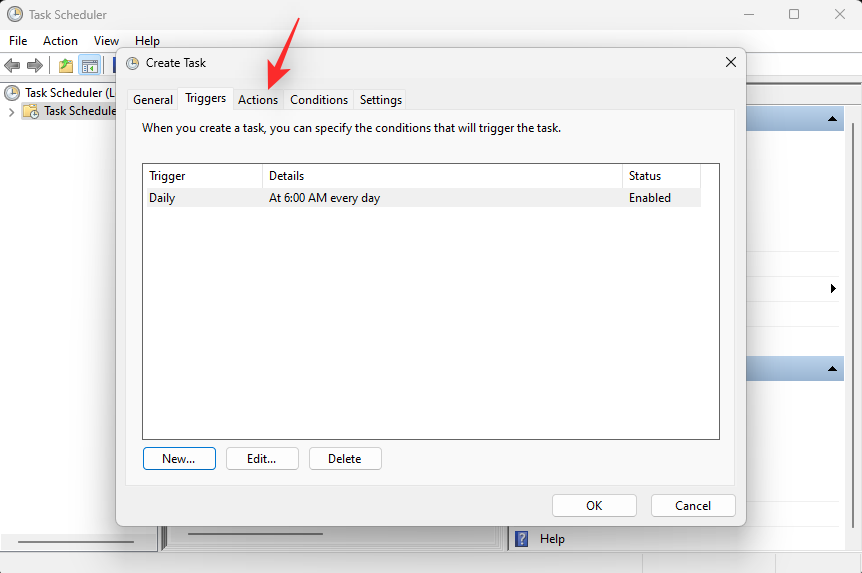
Now click and switch to the Actions tab.
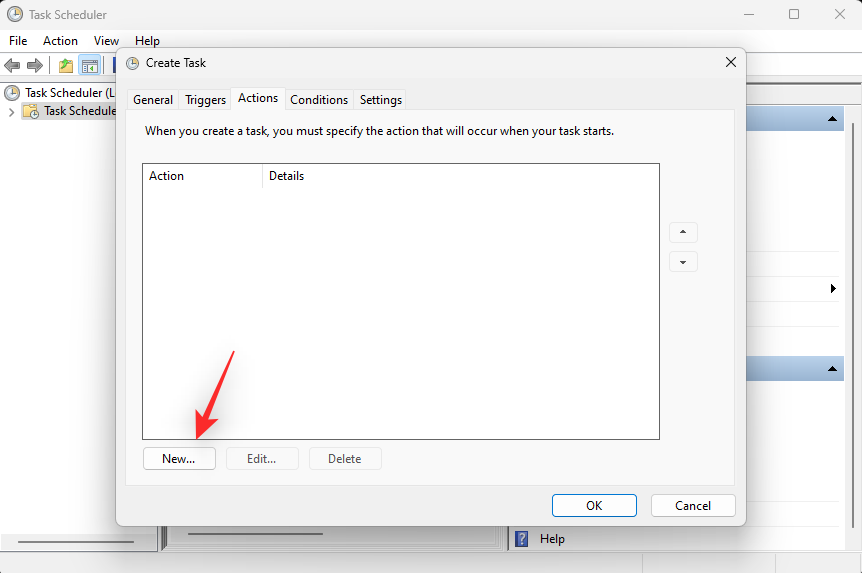
Click New.
Click the drop-down menu for Action and select Start a program.
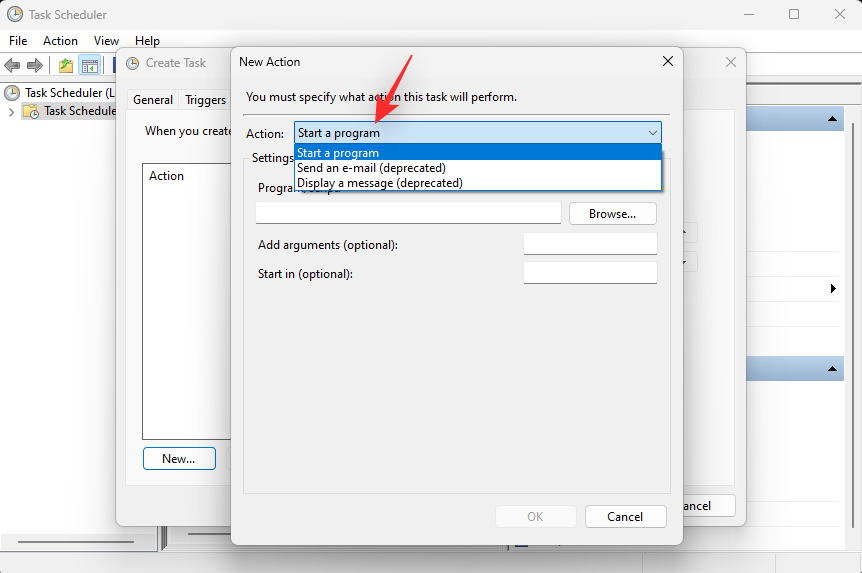
Now type in or copy-paste the path below under Program/script.
%SystemRoot%\system32\WindowsPowerShell\v1.0\powershell.exe
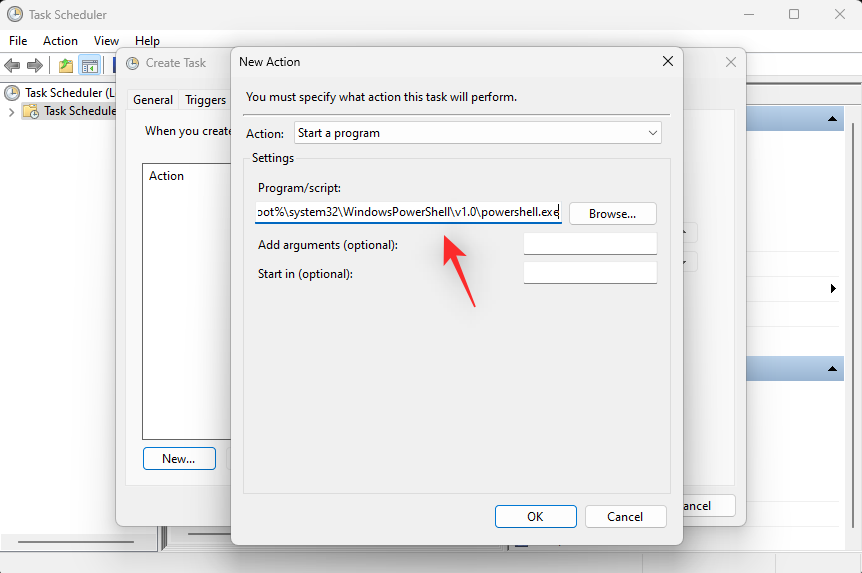
Type in the following beside Add arguments (optional).
New-ItemProperty -Path HKCU:\SOFTWARE\Microsoft\Windows\CurrentVersion\Themes\Personalize -Name SystemUsesLightTheme -Value 0 -Type Dword -Force; New-ItemProperty -Path HKCU:\SOFTWARE\Microsoft\Windows\CurrentVersion\Themes\Personalize -Name AppsUseLightTheme -Value 0 -Type Dword -Force
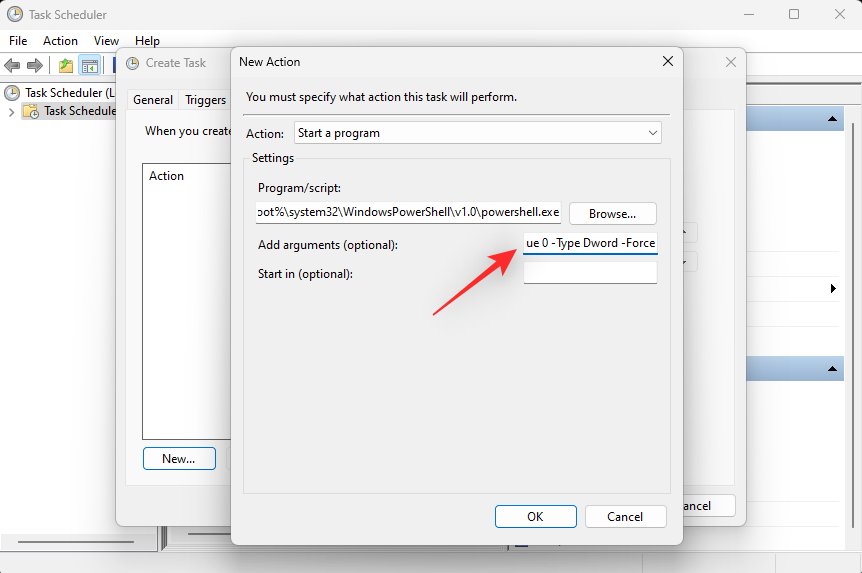
Click OK once you’re done.
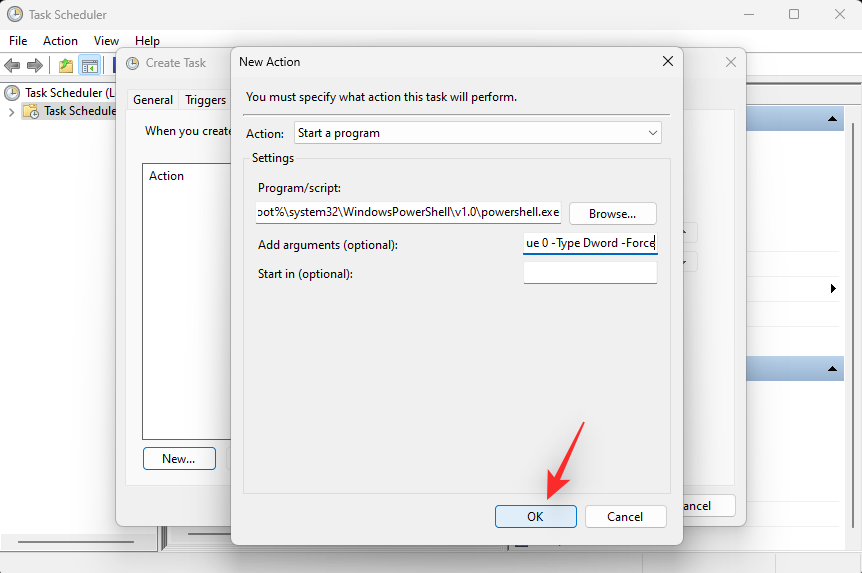
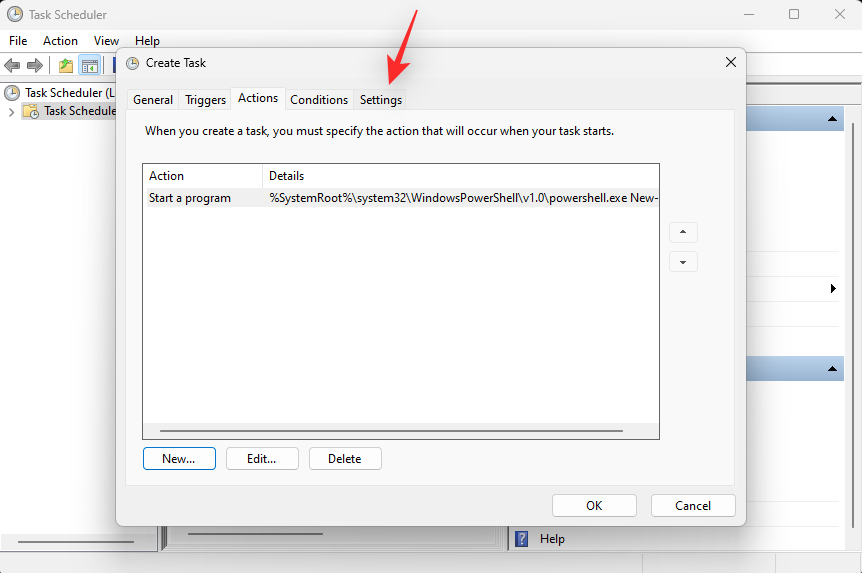
Now click and switch to the Settings tab.
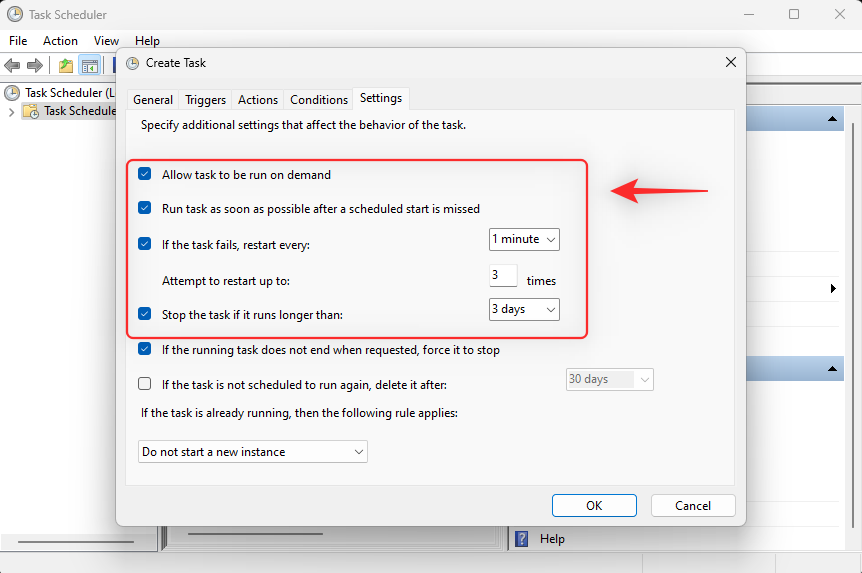
Check the box for the following options.
- Allow task to be run on demand
- Run task as soon as possible after a scheduled start is missed
- If the task fails, restart every:
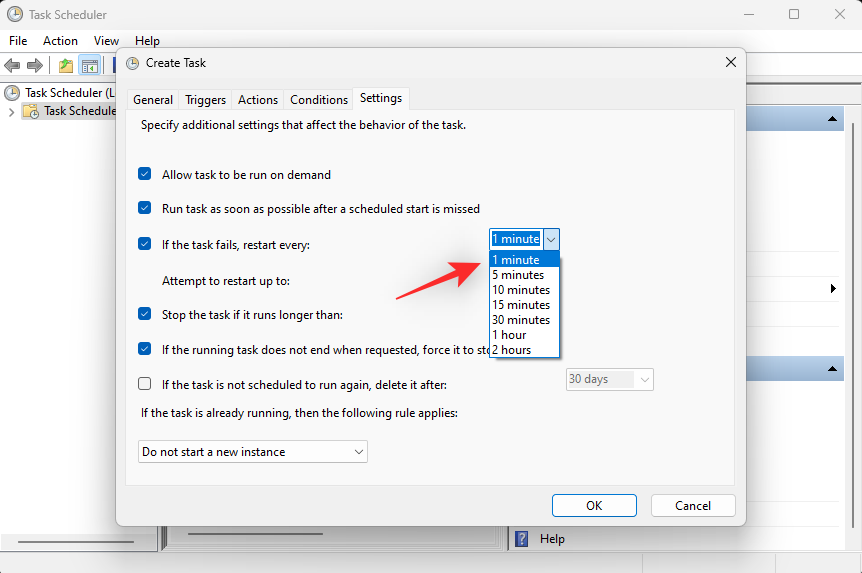
Set the task to restart every 1 minute using the drop-down menu.
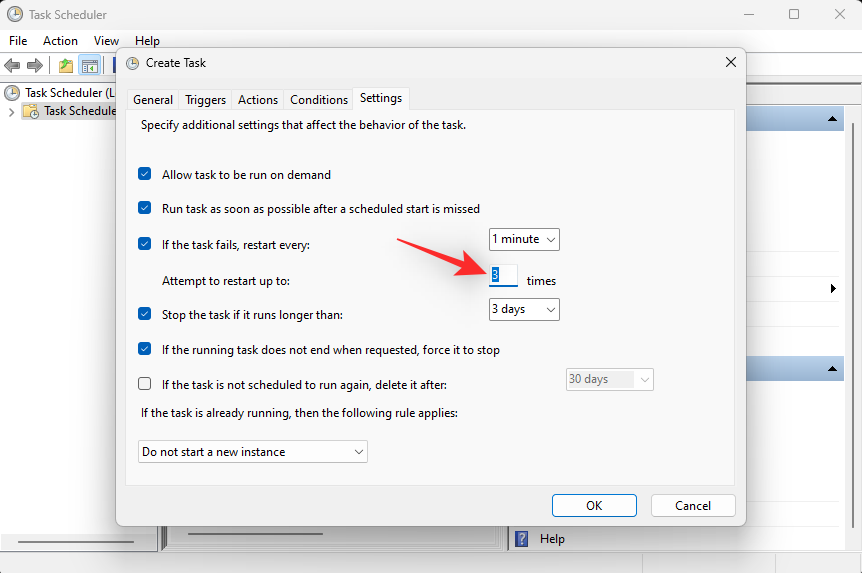
Now enter 3 beside Attempt to restart up to to restart the task up to 3 times if it fails to execute on your system.
Click OK.
Your new task will now be created and added to your task library. Your system will now automatically turn on dark mode based on your set schedule.
Method 2: Using Easy Dark mode (Keyboard shortcuts)
Easy Dark mode is a third-party app that helps you easily toggle the dark mode on your system. Follow the steps below to help you use Easy Dark mode on your system.
- Easy Dark mode | Download Link
Download and run Easy Dark mode on your device using the link above. You will now get an icon for the same in your taskbar. Right-click the icon to access available options.

Hover over Theme and select Light or Dark depending on your preferences.
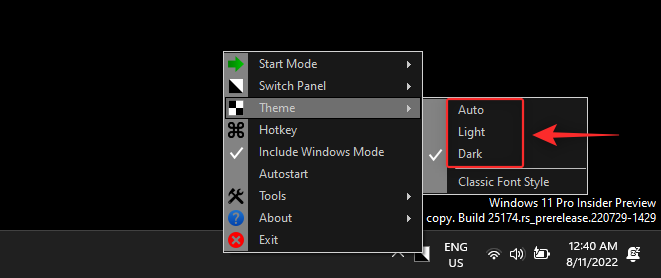
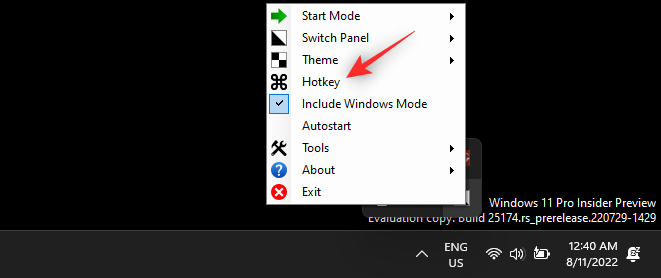
And that’s how you can use the icon in your taskbar to switch between light and dark mode on your system. You can even set dedicated hotkeys to help you switch between the two easily. Start by right-clicking the icon in your taskbar and selecting Hotkey.
Check the box for all the modifier keys you wish to use for your keyboard shortcut. You have the following options to choose from:
- Alt
- Control
- Shift
- Win
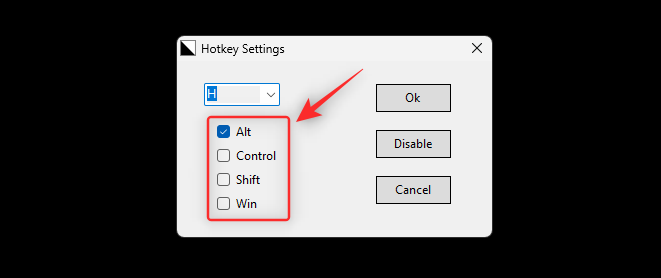
Now click the drop-down menu at the top and select a key that will be used in combination with the modifier key to toggle the dark and light mode on your system.
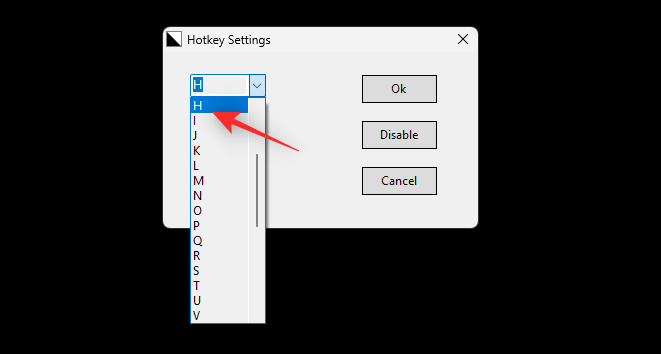
Click Ok once you’re done.
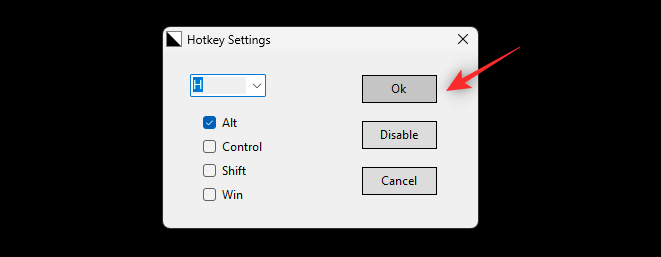
And that’s it! You can now use the hotkey set for your system to switch between dark mode and light mode easily.
Note: Some Windows 11 builds including insider builds might fail to reflect changes on your system immediately. In such cases, you will need to restart Windows Explorer to apply the necessary changes.
Method 3: Using Auto Dark mode (Keyboard shortcuts)
Auto Dark Mode is another third-party app that can help you switch easily between dark mode and light mode. Use the steps below to help you set up Auto Dark mode on your system.
- Auto Dark Mode | Download Link
Download the latest release for Auto Dark Mode using the link above. Double click and launch the same using the .exe file.
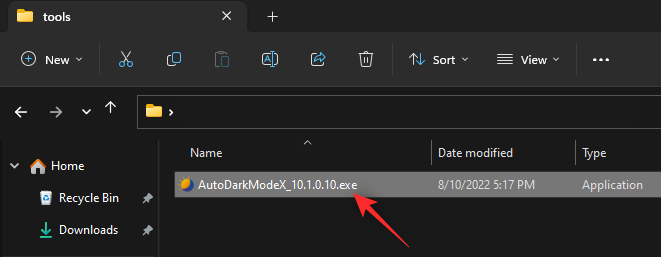
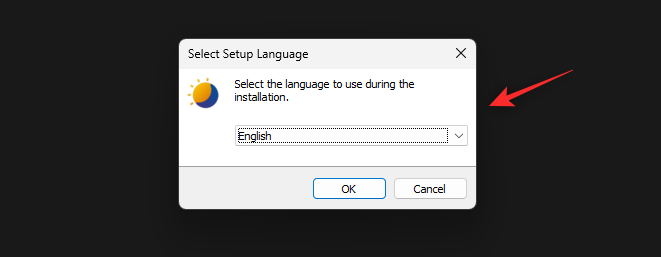
Now follow the on-screen instructions to install the same to your PC based on your preferences.
Auto Dark Mode should now automatically launch on your PC. You can now click Time and schedule dark mode on your PC if needed.
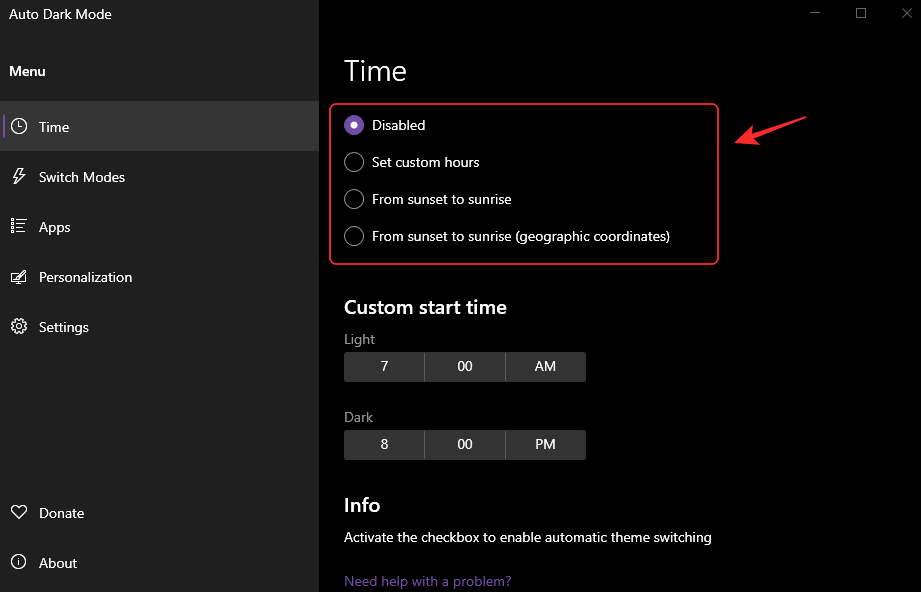
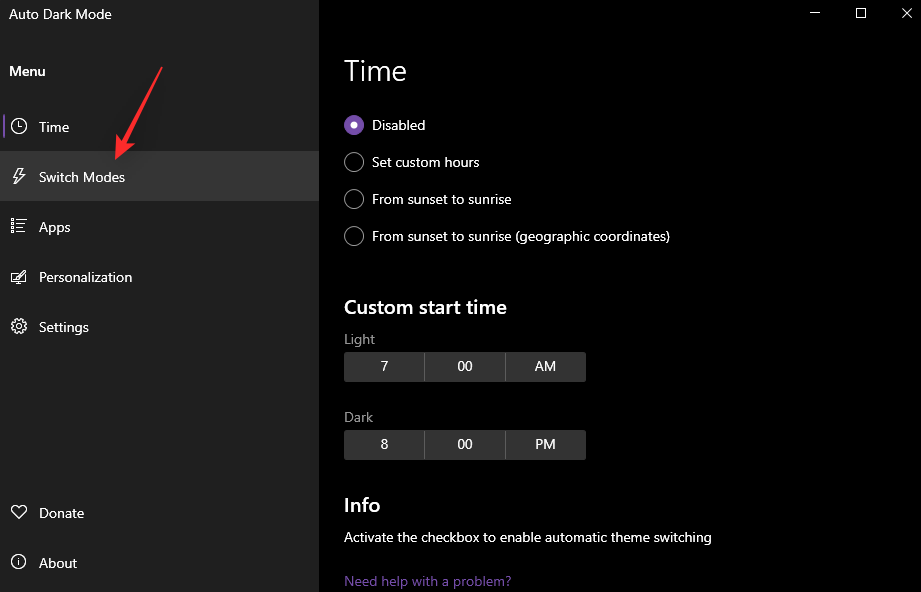
We can now set up our hotkeys to switch between dark mode and light mode. Click Switch Modes on your left.
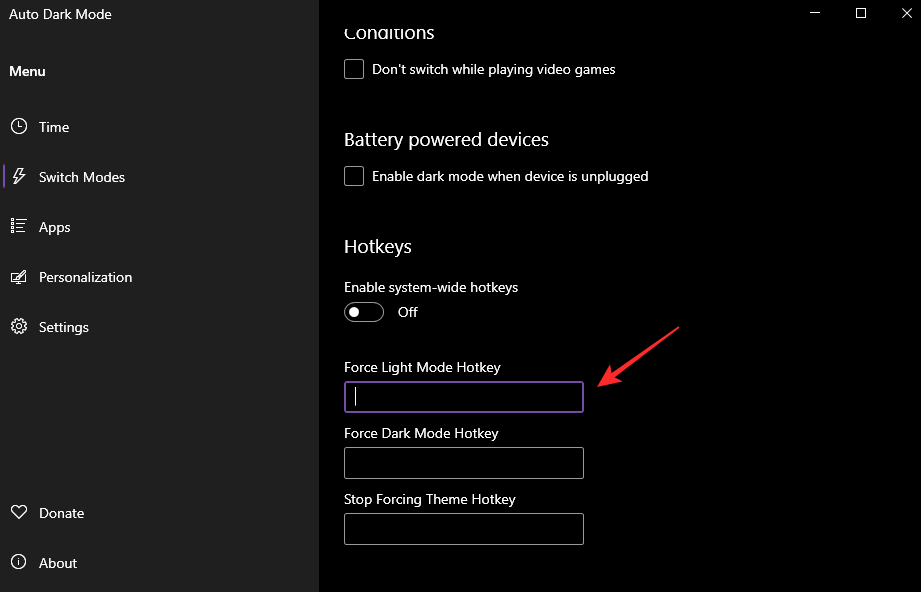
Now click the text box under Force Light Mode Hotkey. Press the desired keys you wish to use to enable light mode.
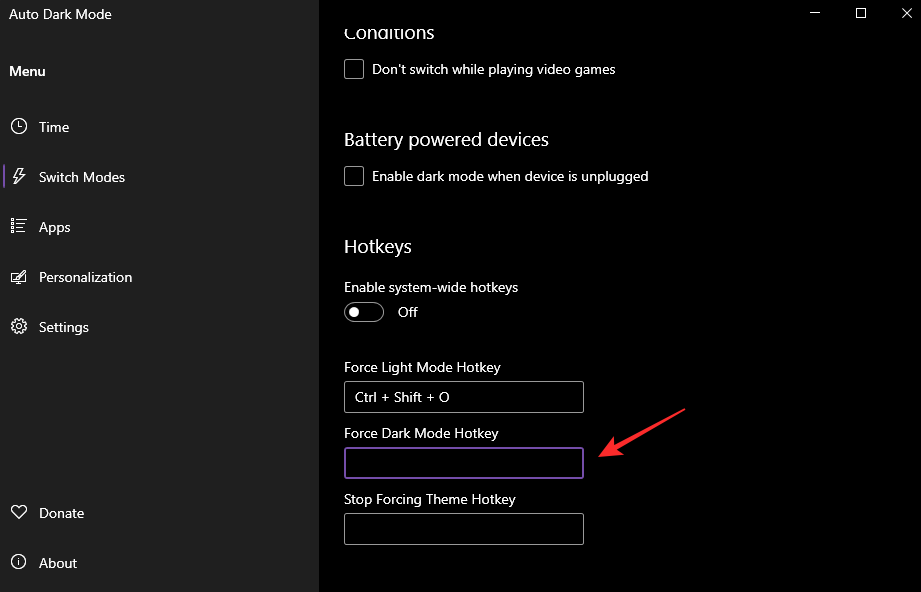
Similarly set your keyboard shortcut for Force Dark Mode Hotkey.
Click and enable the toggle for Enable system-wide hotkeys once you’re done.
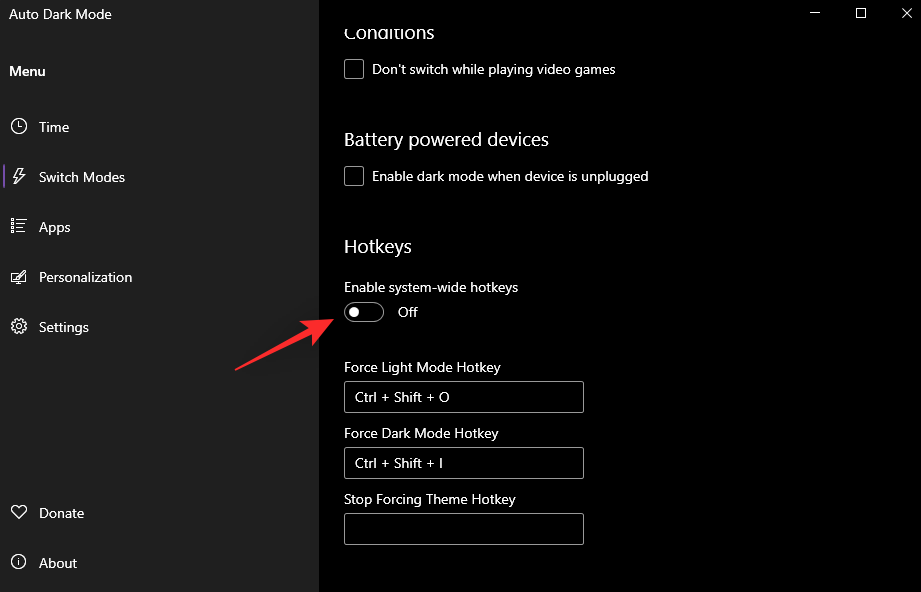
And that’s it! You can now switch between light and dark mode on your system using the dedicated hotkeys we set above.
Note: You might need to restart some apps for the changes to reflect on your screen.
Method 4: Manually create desktop shortcuts
You can also create desktop shortcuts that trigger tasks to toggle light and dark modes on your system. Use the steps below to help you along with the process.
Step 1: Create a task to turn on Light & Dark mode
You will first need to create dedicated tasks in the Task Scheduler that enable Light or Dark mode on your system. This process is similar to the one we used in the first method however, we won’t be scheduling our tasks this time. Use the steps below to help you along with the process.
Create a task to turn on light mode
Open the Start menu, search for Task Scheduler and launch the same from your search results.

Click Create Task on your right.

Enter a name for your task so that you can easily identify it later on. Ensure that it does not contain any spaces and you can remember it for a while.

Now click and select Run whether user is logged on or not.

Similarly, check the box for Do not store password.

Now click and switch to the Actions tab and click New.

Click the drop-down menu for Action at the top and select Start a program.

Now type in the following path under Program/script.
%SystemRoot%\system32\WindowsPowerShell\v1.0\powershell.exe

Type in the following beside Add arguments (optional).
New-ItemProperty -Path HKCU:\SOFTWARE\Microsoft\Windows\CurrentVersion\Themes\Personalize -Name SystemUsesLightTheme -Value 1 -Type Dword -Force; New-ItemProperty -Path HKCU:\SOFTWARE\Microsoft\Windows\CurrentVersion\Themes\Personalize -Name AppsUseLightTheme -Value 1 -Type Dword -Force

Click OK to save your changes.

Now click and switch to the Settings tab.

Check the box for the following options.
- Allow task to be run on demand
- If the task fails, restart every:
- Stop the task if it runs longer than:
- If the running task does not end when requested, force it to stop

Click the drop-down menu for Stop the task if it runs longer than and type in 1 minute.
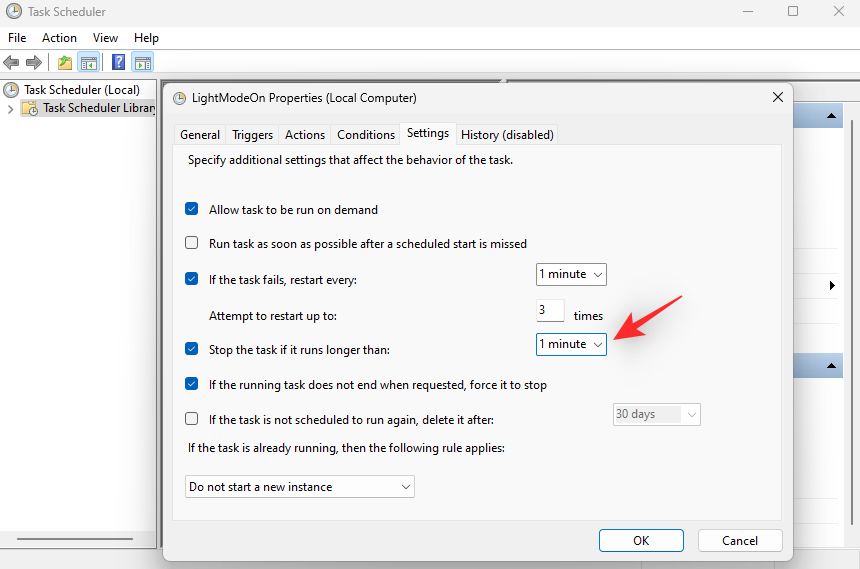
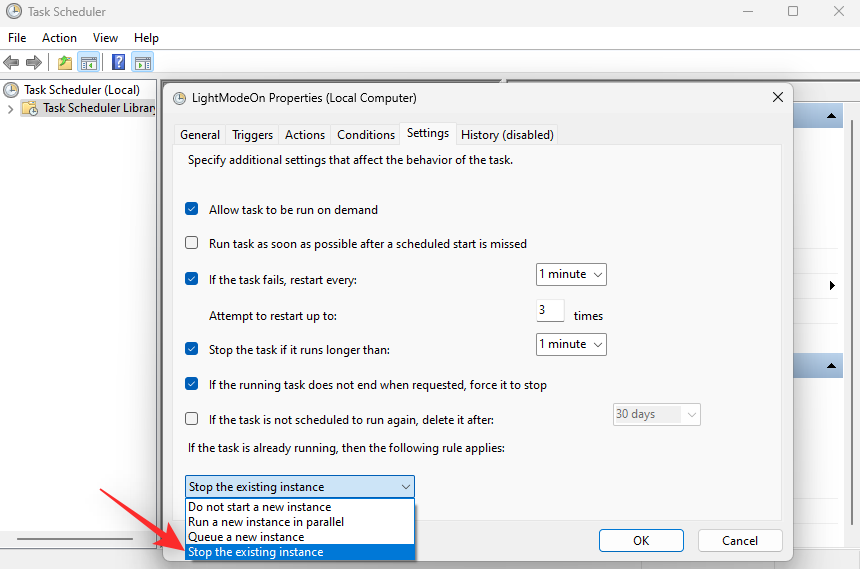
Now click the drop-down menu at the bottom and select Stop the existing instance. This will allow you to stop and restart the task again from your desktop shortcut itself.
Click OK.
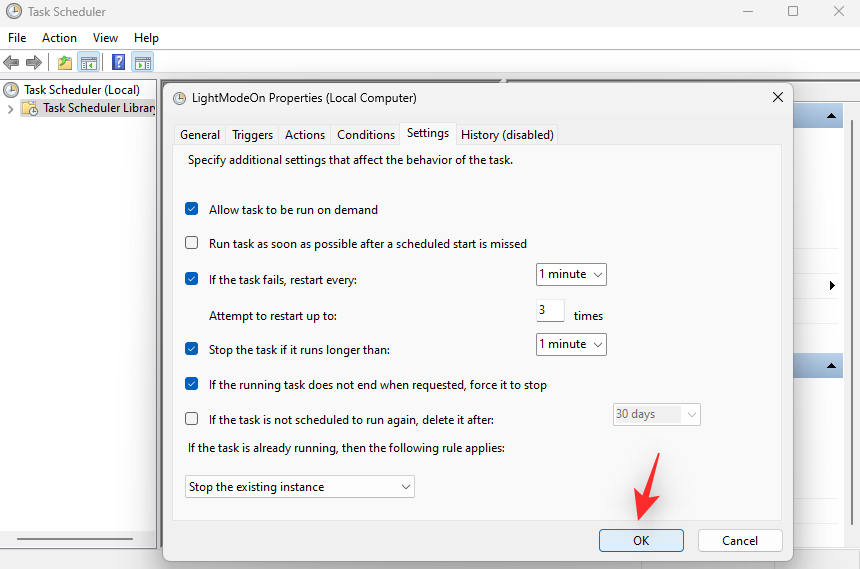
You will now have created your light mode task. You can now use the next section to set up your dark mode task.
Create a task to turn on dark mode
Open the Start menu, search for Task Scheduler and launch the same from your search results.

Now click Create task on your right.

Enter an appropriate name for your task at the top that can help you identify it later on. Do not use spaces when naming the task.

Click and select Run whether user is logged on or not.

Check the box for Do not store password.

Click and switch to the Actions tab at the top. Now click New.

Ensure Start a program is selected at the top. Now copy and paste the path below under Program/script.
%SystemRoot%\system32\WindowsPowerShell\v1.0\powershell.exe

Now add the following beside Add arguments (optional).
New-ItemProperty -Path HKCU:\SOFTWARE\Microsoft\Windows\CurrentVersion\Themes\Personalize -Name SystemUsesLightTheme -Value 0 -Type Dword -Force; New-ItemProperty -Path HKCU:\SOFTWARE\Microsoft\Windows\CurrentVersion\Themes\Personalize -Name AppsUseLightTheme -Value 0 -Type Dword -Force

Click OK to save your changes.

Now click and switch to the Settings tab.

Check the box for the following options. Once done, click the drop-down menu for If the task fails, restart every and select 1 minute.
- Allow task to be run on demand
- If the task fails, restart every:
- Stop the task if it runs longer than:
- If the running task does not end when requested, force it to stop
Similarly, click the drop-down menu for Stop the task if it runs longer than and type in 1 minute.
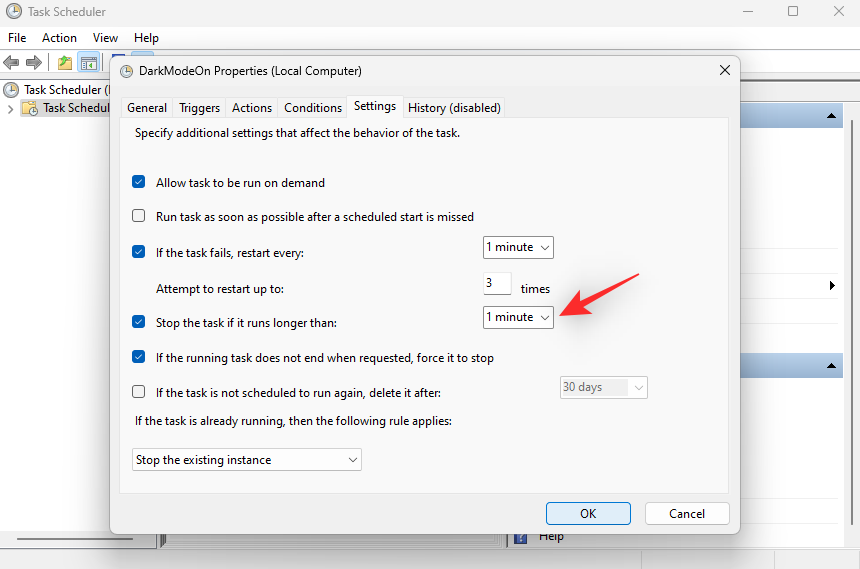
Now click the drop-down menu at the bottom and select Stop the existing instance. This will allow you to stop and restart the task again from your desktop shortcut itself.
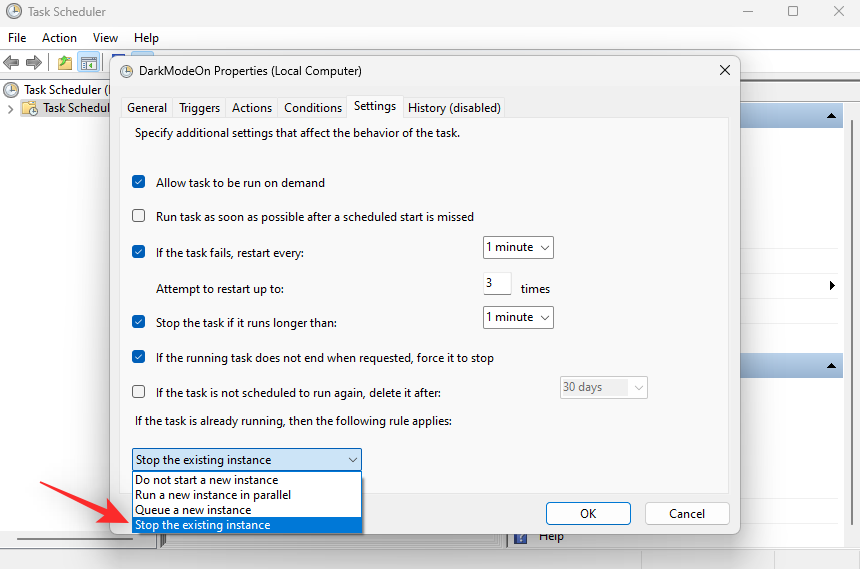
Click OK.
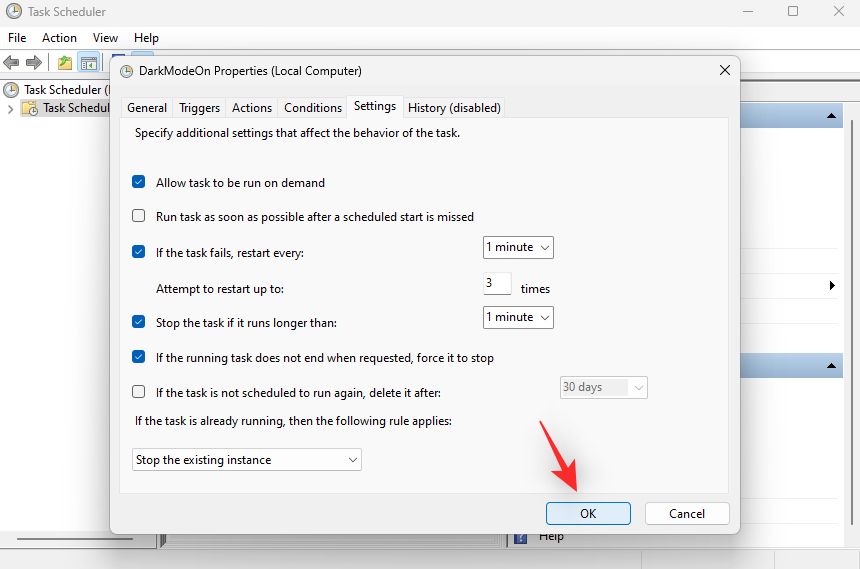
You will now have created a task to turn on dark mode. Use the next step to set up dedicated desktop shortcuts on your PC.
Step 2: Create a desktop shortcut to trigger the task
Right-click on an empty area on your desktop and hover over New.

Select Shortcut.
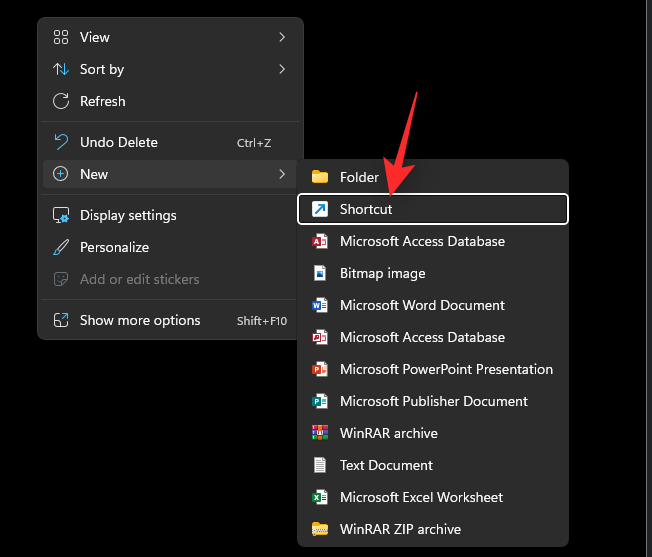
Now type in the following under Type the location of the item. Replace NAMEOFTASK with the name you set for your light mode task.
C:\Windows\System32\schtasks.exe /run /tn "NAMEOFTASK"
Note: Do not replace or remove the quotes (“”).
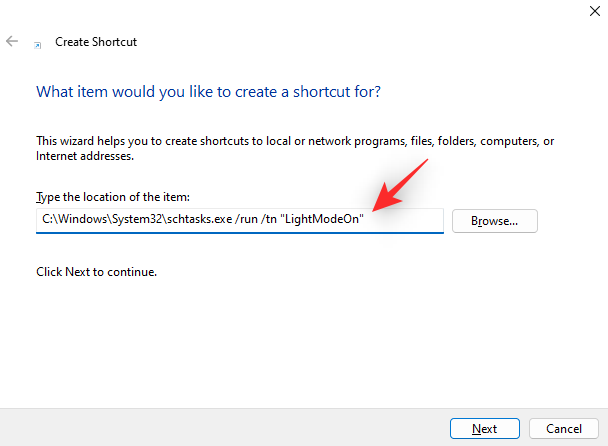
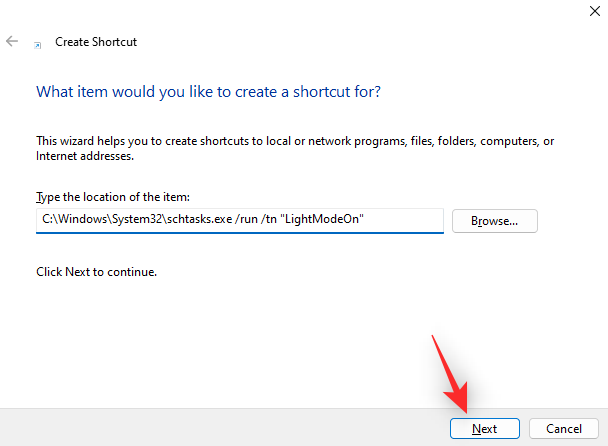
Click Next.
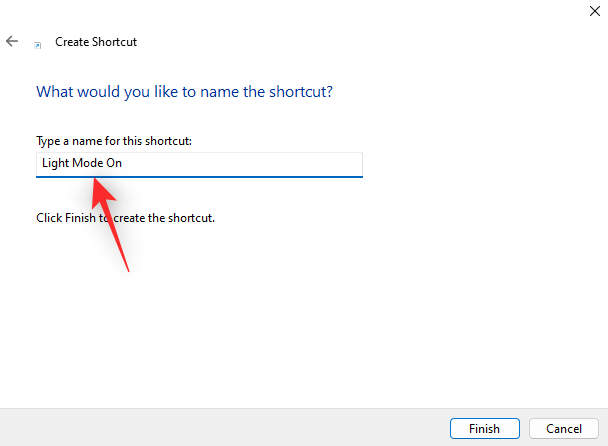
Choose and enter the desired name for your light mode shortcut.
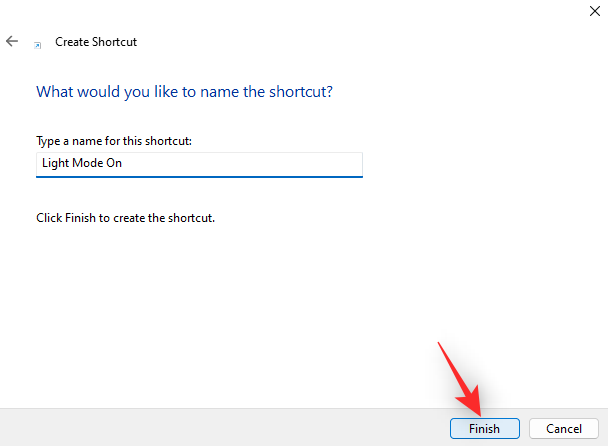
Click Finish.
Now repeat the steps above to create a desktop shortcut for your dark mode task as well. replace NAMEOFTASK with the name of your dark mode task this time.
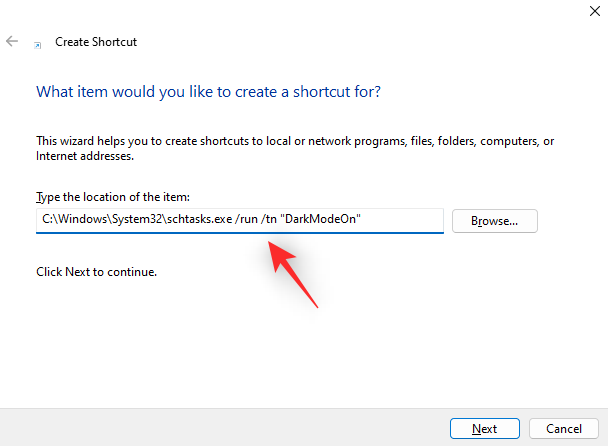
And that’s it! You will now have created desktop shortcuts to turn on light or dark mode on your system. Simply double-click either to enable dark or light mode on your system.
Step 3: Create a desktop shortcut to restart Windows explorer (optional)
In some cases, you might notice that changes to your theme do not take place immediately. This can be fixed by restarting open apps and restarting Windows explorer. You can choose to restart Windows Explorer from the task manager as usual. But if you plan to switch regularly, then having a desktop icon is a better option. Use the steps below to help you along with the process.
Right-click an empty area of your desktop and hover over New.

Now click and select Shortcut.

Type in the following under Type the location of the item.
cmd.exe /c taskkill.exe /f /im explorer.exe && start explorer.exe
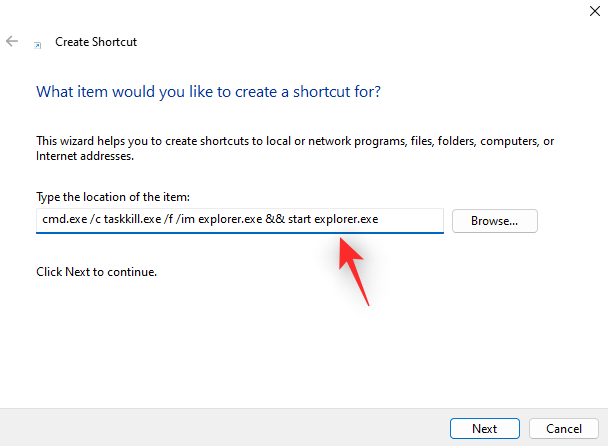
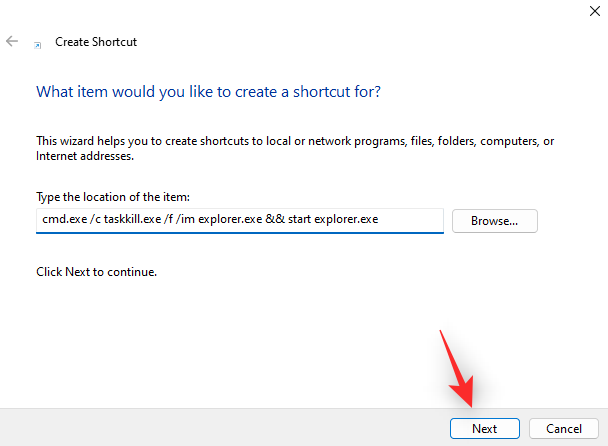
Click Next.
Now enter an appropriate name for your shortcut as needed.
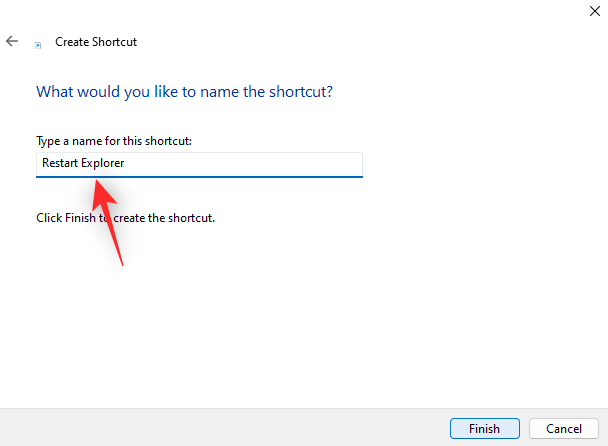
Click Finish once you’re done.
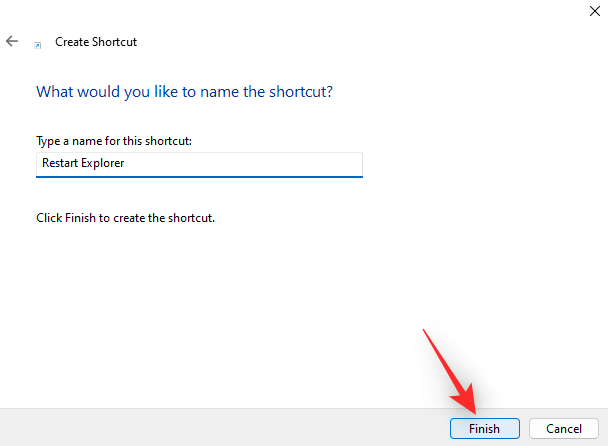
And that’s it! You will now have created a shortcut to restart Windows Explorer. You can now double-click this and restart Explorer automatically once you’ve changed your theme.
Method 5: Using PowerShell
You can also choose to turn on dark or light mode using PowerShell. Follow the steps below to help you along with the process.
Press Windows + R to launch Run.
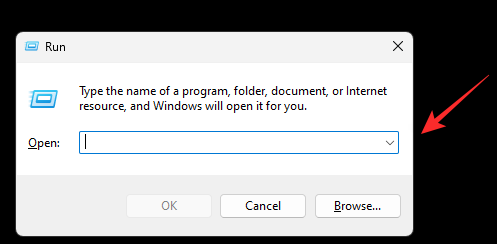
Type in the following and press Ctrl + Shift + Enter on your keyboard.
powershell
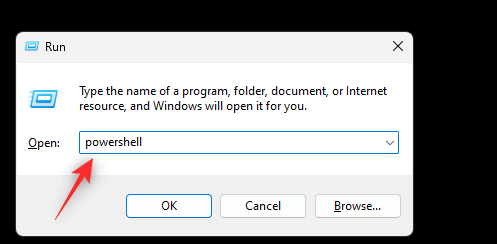
Now use the following command to turn on light mode for your apps.
Set-ItemProperty -Path HKCU:\SOFTWARE\Microsoft\Windows\CurrentVersion\Themes\Personalize -Name AppsUseLightTheme -Value 1 -Type Dword -Force

Subsequently, use the following command to turn on light mode for system apps and services.
Set-ItemProperty -Path HKCU:\SOFTWARE\Microsoft\Windows\CurrentVersion\Themes\Personalize -Name SystemUsesLightTheme -Value 1 -Type Dword -Force

You will now have switched to light mode on your PC. Similarly, if you wish to switch to dark mode, use the following commands mentioned below.
Set-ItemProperty -Path HKCU:\SOFTWARE\Microsoft\Windows\CurrentVersion\Themes\Personalize -Name AppsUseLightTheme -Value 0 -Type Dword -ForceSet-ItemProperty -Path HKCU:\SOFTWARE\Microsoft\Windows\CurrentVersion\Themes\Personalize -Name SystemUsesLightTheme -Value 0 -Type Dword -Force
Now use the following command to kill Windows Explorer.
taskkill /f /im explorer.exe

Use the following command to launch it again.
start explorer.exe

Once you’re done, use the following command to close PowerShell.
exit

And that’s how you can switch between light and dark modes using PowerShell on Windows 11.
Method 6: Using Registry Editor
Lastly, you can also switch between dark and light mode using the Registry Editor to edit appropriate values. These are the same values we modified in the task scheduler method above to automate this process. You can manually modify them and change your theme in Windows 11 using the Registry Editor. Follow the steps below to help you along with the process.
Press Windows + R to launch Run.

Now type in the following and press Enter.
regedit
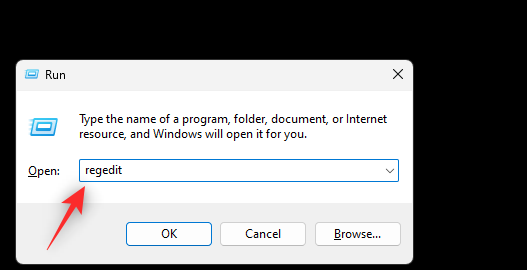
Registry Editor will now open on your PC. Copy paste the path below in the address bar at the top or navigate to the path using the left sidebar.
HKEY_CURRENT_USER\SOFTWARE\Microsoft\Windows\CurrentVersion\Themes\Personalize
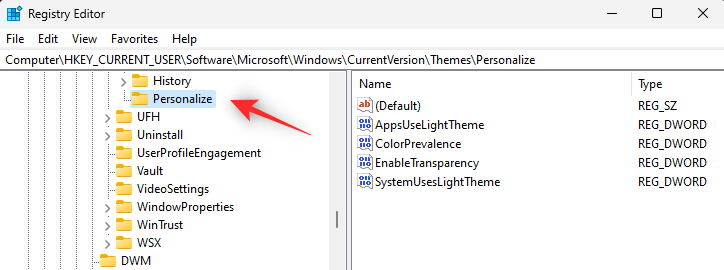
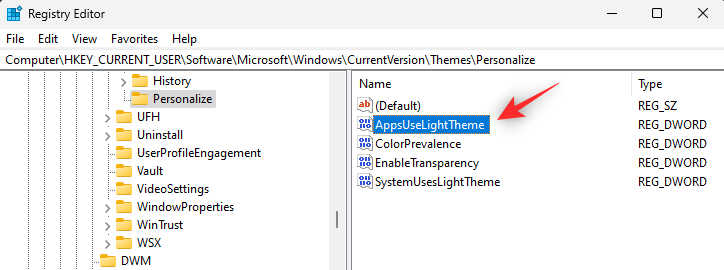
With Personalize selected on your left, double click AppsUseLightTheme on your right.
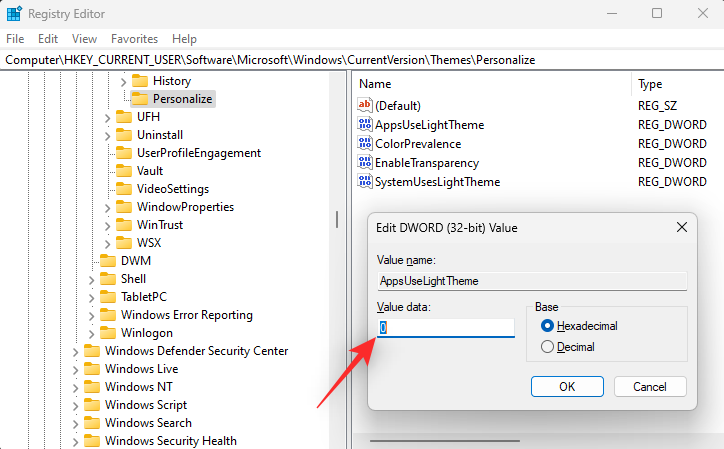
Set its Value data to one of the following values depending on whether you wish to use light mode or dark mode for apps.
- 1: For Light mode
- 2: For Dark mode
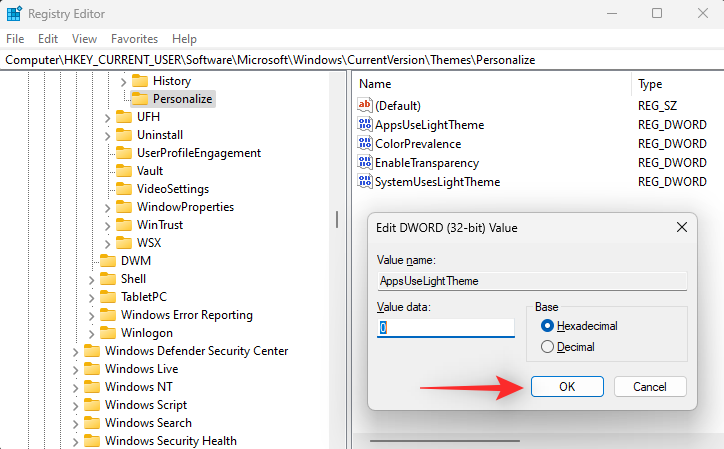
Click OK once done.
Similarly, double click SystemUsesLightTheme.
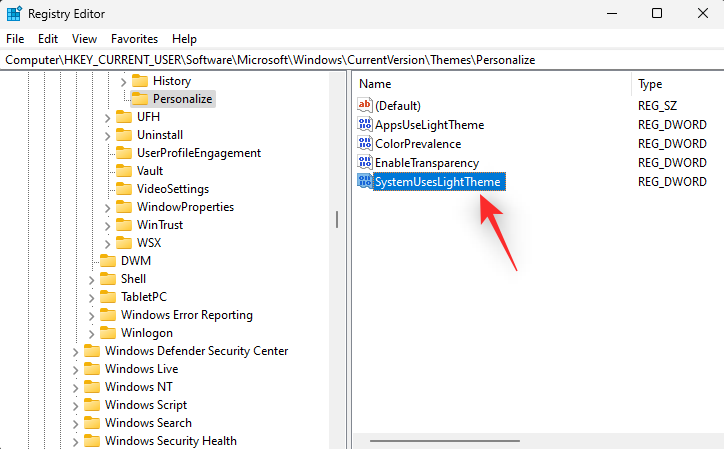
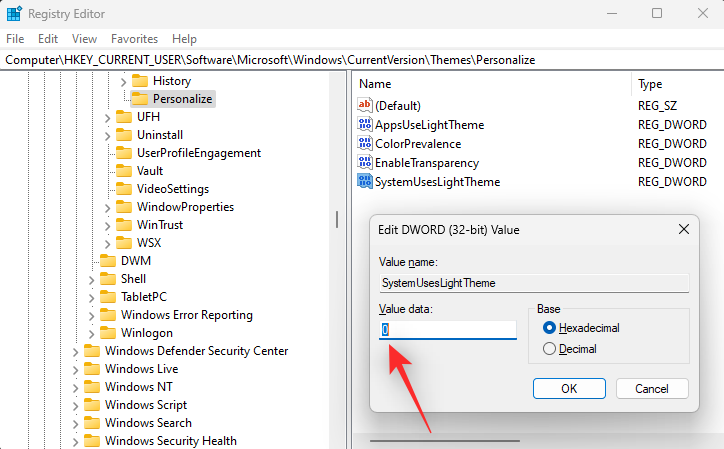
Set one of the following values depending on which theme you wish to use.
- 1: For Light mode
- 2: For Dark mode
Click OK.
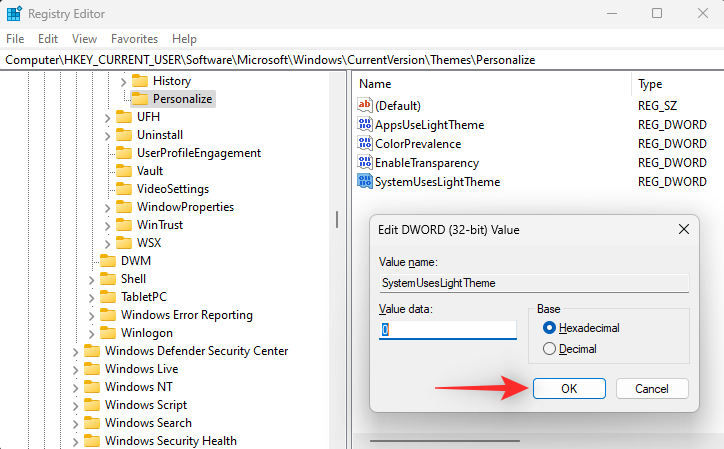
Close the registry editor and you will now have switched between dark mode and light mode on your PC using the registry editor.
Note: You might need to restart open apps and restart explorer.exe for the changes to fully take effect on your PC.
We hope this post helped you easily switch between dark and light mode on your PC. If you face any issues or have any more questions, feel free to reach out to us using the comments below.
RELATED

![How to Easily Switch Between Light and Dark Modes on Windows 11 [6 Ways]](/content/images/wp-content/uploads/2022/08/windows-11-easily-switch-between-dark-and-light-mode-fi.png)







Discussion