What to know
- The audio output can be changed from the Action Center to the right of the taskbar.
- The same Output options are also available from Settings > Sound > Output > Choose where to play sound.
- The Control Panel’s Sound properties window can also be used to change audio output. Right-click on a device and Set it as Default.
- The Xbox Game Bar, invoked with the
Win+Gshortcut, also lets you change the audio output.
While Windows new styling has been a welcome addition in Windows 11, it has confused some users as well. Naturally, with the UI modifications, there are bound to be relocations of certain elements. So if you have been having trouble finding the audio switcher in Windows 11 then you are not alone. Here’s where you can find the audio switcher in Windows 11.
Where is the audio switcher in Windows 11?

You can find the Audio Switcher on Windows 11 under the Action Center. As shown in the GIF above, click any one of the Action Center (WiFi, sound, or battery) icons on your taskbar, and then click the preferences icon next to the volume slider. Now, you can select the speaker of your choice.
How to change a Speaker on Windows 11
Use one of the methods given below to change the output device on Windows 11.
Method 1: Using Action Center
- Click any one of the WiFi, sound, or battery icons on your taskbar to access the ‘Action Center’.
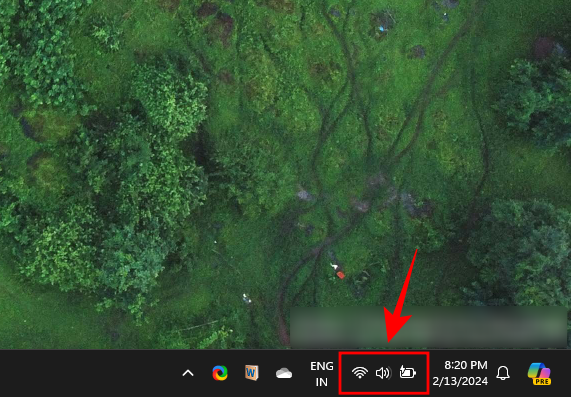
- Now click on the preferences icon beside the Volume Slider.

- You will now get a list of all the audio devices that can be switched for audio output.

- Click and select the device of your choice and Windows will automatically switch audio to the selected device.
Method 2: Opening Volume Mixer from Action Center
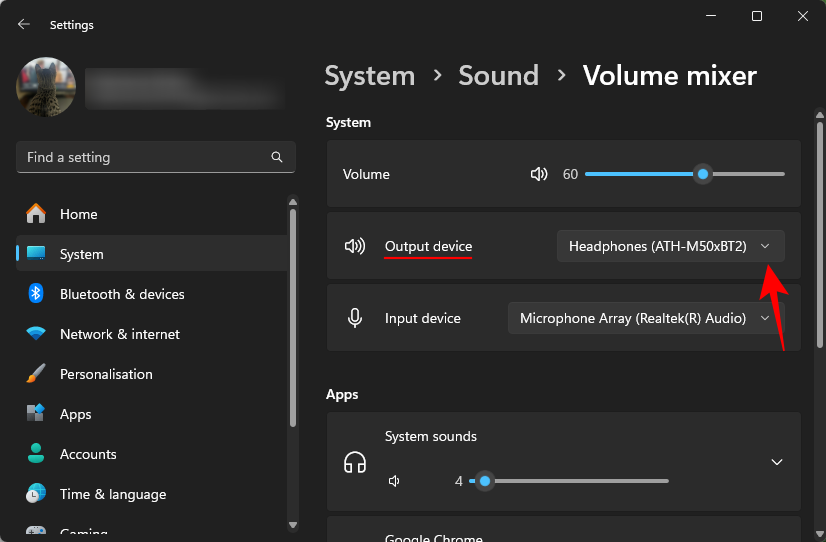
- Find the sound icon on the taskbar, and right-click on it.
- Now, click Open volume mixer.

- Click the dropdown for Output device and select your speaker from the list.
Method 3: Using the Settings app
- Press ‘Windows + I’ on your keyboard to open the ‘Settings’ app.
- Select System on the left, then Sound on the right.

- Under ‘Choose where to play sound’, choose the desired output device.
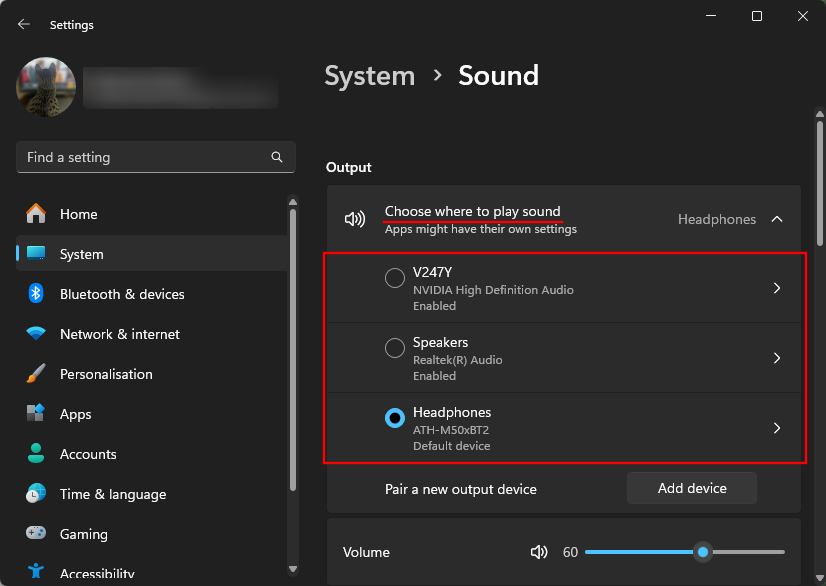
- Audio will now start automatically playing through the selected device.
Method 4: Using the Control Panel
- Open the Control Panel from the Start menu.
- Select Hardware and Sound.
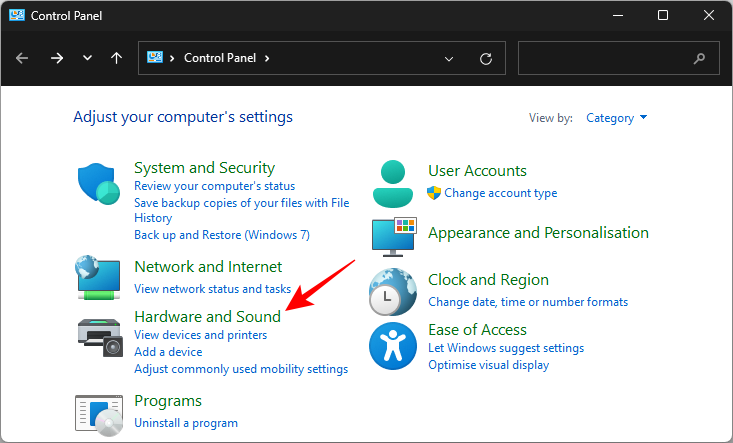
- Click on Sound.

- Right-click the device where you want to play sound and select Set as Default Device.

- Click OK.

Method 5: Using the Xbox Game Bar
The Xbox Game Bar, which comes pre-installed on Windows 11, also lets you switch audio output. Here’s how:
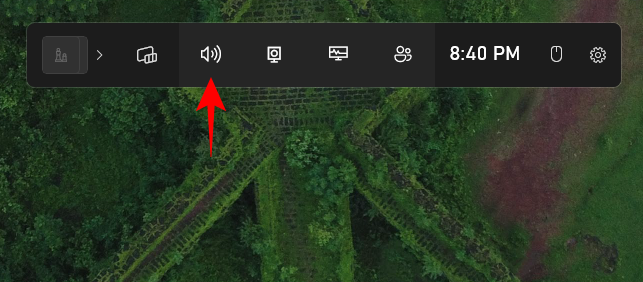
- Press Win+G to launch the Xbox Game Bar (or search and select it from the Start menu).
- If it isn’t already open, click on the speaker icon to open the Audio window.
- Under the ‘Windows Default Output’ option, click on the drop-down menu.
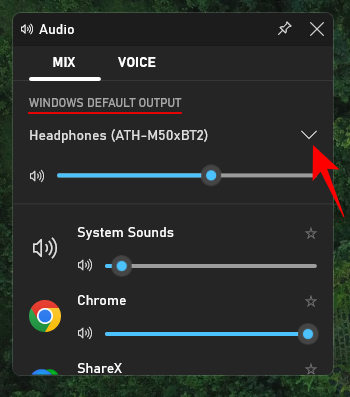
- And select your preferred audio output device.

We hope you were able to get familiar with switching audio devices in Windows 11 using the guide above. If you have any more questions, feel free to reach out to us using the comments section below.
Related:
- How to Left Align Windows 11 Taskbar
- How To Dual Boot Windows 11 with Windows 10: Step-by-step guide
- How to Download Windows 11 ISO for Insider Dev Channel Build Yourself
- Can’t Unpin an App on Windows 11 Dev Build? How To Fix
- ‘Your PC Does Not Meet the Minimum Hardware Requirements for Windows 11’ Error: What Is It and How To Fix It?




Once again Microsoft hiding frequently used settings and forcing users to browse through unnecesary dialogues to get the same functionality previously available, but now with 1 or 2 additional clicks. Jeez! These guys do not really get it. Users want to make theirs lives simpler and easier, the OS being a simple way to get to productivity, not the tool by itself. It should be as transparent and unobtrusive as possible.
100% agree with Sergio. I have 4 different audio devices I use depending on the circumstance and I hate the new picker. The old one was so elegant and so much faster to use.