Backups are essential for iPhones as they help bring them back to their previous configuration when you reset them or move on to a new device. On iPhones, you can copy back up all the data that’s on your device and store them on the cloud or locally on a Mac so that you may use it later.
When your iPhone’s data is backed up, you can restore it on your device after a repair or on another iPhone that you want to set up. In this post, we’ll help you figure out different ways to back up data from your iPhone.
How to back up data on an iPhone [2 methods]
Method 1: Using the iOS Settings app
When you make a backup of your device using iCloud, you don’t require a cable or the need to establish a connection between your iPhone and a computer.
Items that are backed up
iCloud backups can store the following items through WiFi:
- App data
- Apple Watch backups
- iPhone settings
- Home screen and app layout
- Messages received and sent using iMessage, text (SMS), and MMS
- Photos and videos stored on your iPhone
- Purchase history from Apple services, like music, movies, TV shows, apps, and books
- Ringtones
- Visual Voicemail password
What this means is, that iCloud won’t be able to back up the following items onto your Apple account: iCloud Music, App Store content, Apple Mail data, Face ID or Touch ID settings, Apple Pay data and settings, data already stored on iCloud, and data stored in other cloud storages, like Gmail and Exchange mail.
How to back up iPhone over iCloud
To start backing up your information on your iPhone without connecting it to any other device, you will first need to make sure that your iPhone is connected to the internet via a WiFi network, an unmetered one preferably. With that out of the way, you can now proceed to make your iCloud backup by following the steps below.
- Open the Settings app on your iPhone and select your Apple ID name.

- Inside the Apple ID screen, tap on iCloud.

- Next, scroll down on the iCloud screen, and select iCloud Backup.

- In the next screen, turn on the iCloud Backup toggle and then tap on Back Up Now.

- All your iPhone data will now start getting backed up on iCloud and to make sure everything gets uploaded properly, keep your device connected to your Wi-Fi network. You can check the progress of the backup at any time by coming back to this screen.

- When your backup is complete, the Backup screen will also show the last time it was able to successfully sync your iPhone data.

You can store up to 5GB for free on iCloud beyond which point, you can opt for additional storage that starts at $0.99/month for 50GB. You can check out additional iCloud Storage plans here.
Method 2: Using the Finder app on Mac
Items that are backed up
When you use your Mac to back up data from your iPhone, the backed-up data covers almost all of your device’s data and settings except for the following items:
- Face ID or Touch ID settings
- Apple Pay data and settings
- Content from iTunes, App Store, Apple Books
- Content synced using Finder or iTunes
- Data already stored in iCloud – iCloud Photos, iMessage, text (SMS), and multimedia (MMS) messages
- Activity, Health, Keychain data
- Apple Mail data
How to back up iPhone on Mac
Before you start backing up your iPhone data on a Mac, you need to make sure that both the iPhone and Mac devices are updated to their latest OS versions.
- With both the iPhone and Mac powered ON, connect them using a USB-to-Lightning cable that comes with your iPhone.
- After connecting your iPhone to your Mac, open the Finder app on the Mac.

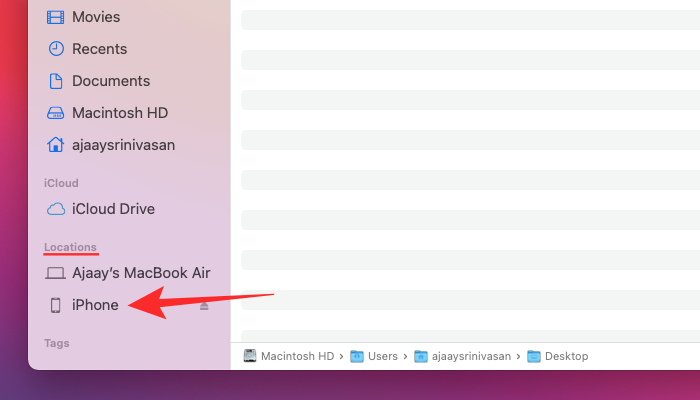
- Inside the Finder app, select your iPhone from the left sidebar. If not, click on Locations from the sidebar to expand it and select your iPhone from the expanded list.
- If this is the first time you’re connecting your iPhone to the Mac, then you’ll be prompted with a dialog asking you whether you “Trust iPhone”. You will need to click on Trust inside the Finder window on your Mac.

- In the next step, you will have to tap on Trust on the iPhone when it shows the “Trust This Computer” prompt.

- After that, enter your device passcode on your iPhone.

- Once this authentication is complete, you will be able to see your iPhone data inside the Finder app on your Mac. This is your iPhone device management screen which hosts all the controls that you will need to back up your iPhone.

- Inside this screen, click on the General tab at the top and select Back Up All the Data on Your iPhone to This Mac inside “Backups”.

- In case you also own an Apple Watch, you need to check the Encrypt local backup box on this screen so that the Finder also backs up your Health and Activity data from the Watch.
- After this, click on Back Up Now on the Finder screen. Your iPhone data will now start getting backed-up on your Mac and you will be able to see the progress on your device’s Finder screen.
- Once you have connected your iPhone and Mac using a cable and completed a backup, check the Show this iPhone when on Wi-Fi box under “Options” and then click on Apply at the bottom right corner.

This option will let you back up data from your iPhone onto your Mac wirelessly when both devices are connected to the same WiFi network.
That’s all we have on backing up your iPhone without iTunes. For more coverage on iOS, iPhones, and iPads, check out our dedicated iOS section.
RELATED


