Once upon a time, Facebook Messenger was part of the Facebook but then one fine day they pulled it out of Facebook and made it a standalone platform that now works, with or without a Facebook account.
It wouldn’t be news to you that Facebook’s standalone messaging platform, Facebook Messenger, is as popular as the Facebook itself. Not only because Facebook forces you to download the Messenger (ughh!), but because of the marvelous features present in the Facebook Messenger. In addition to the basic chat, audio and video calls, Facebook Messenger is capable of performing many other significant tasks such as creating reminders, group video calls etc. Also, Facebook Messenger works cross platform and has a standalone web version as well.
And with each passing day, a new feature is added to the Messenger like the recent live location sharing and “Messenger day”, which is a replica of Snapchat story. That said, it seems Facebook is trying to push the Messenger towards becoming your one stop productivity + communication platform. In connection with that, Facebook Messenger will soon have its own built-in full-fledged Assistant known as M, powered by Artificial Intelligence.
Also read: Google Assistant Tips and Tricks.
However, if you are unaware of what all the Facebook Messenger can do, we’re going to share the divine power with you. In this guide, we collect some best Android Facebook Messenger tips and tricks for you that will help you to discover the hidden talents of Facebook Messenger.
Enhance individual chat threads
Change conversation color
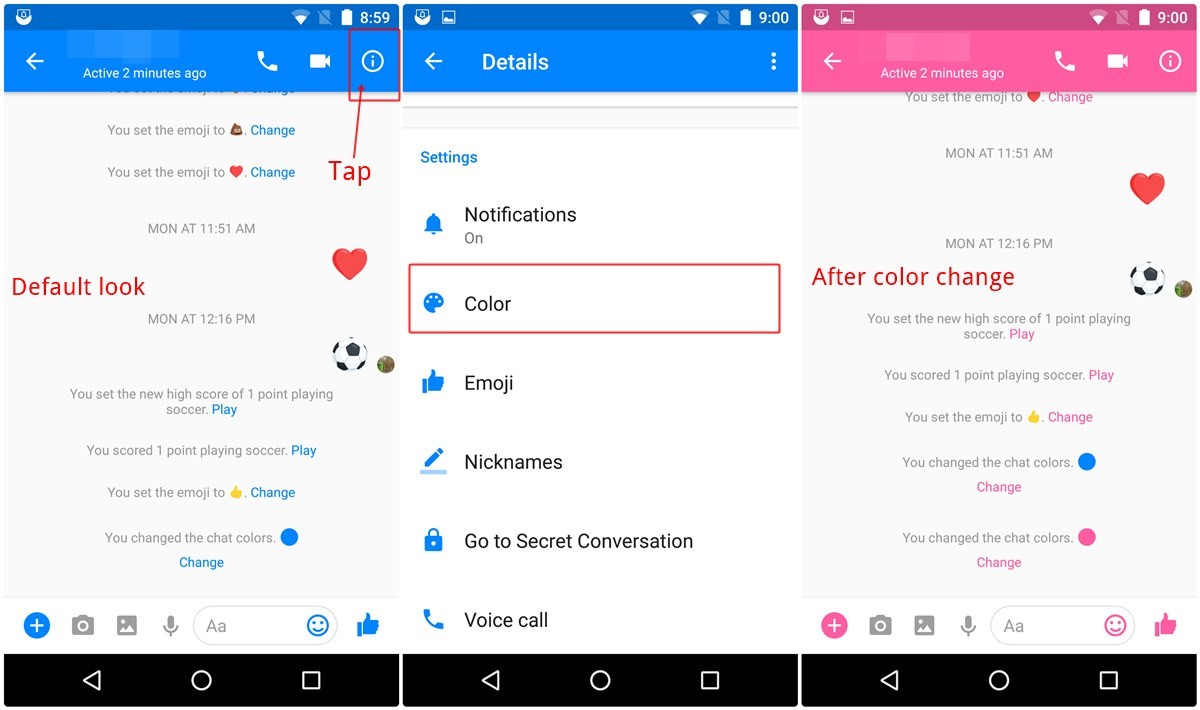
While the default blue color of Messenger chat is okaish, you can further add some flavor to the conversations by changing the chat color. When you change the chat color, the color of the top bar, text color and the icons changes. Moreover, the same is reflected on the other person’s chat as well.
To change the chat color, follow the steps:
- Open the individual Messenger conversation.
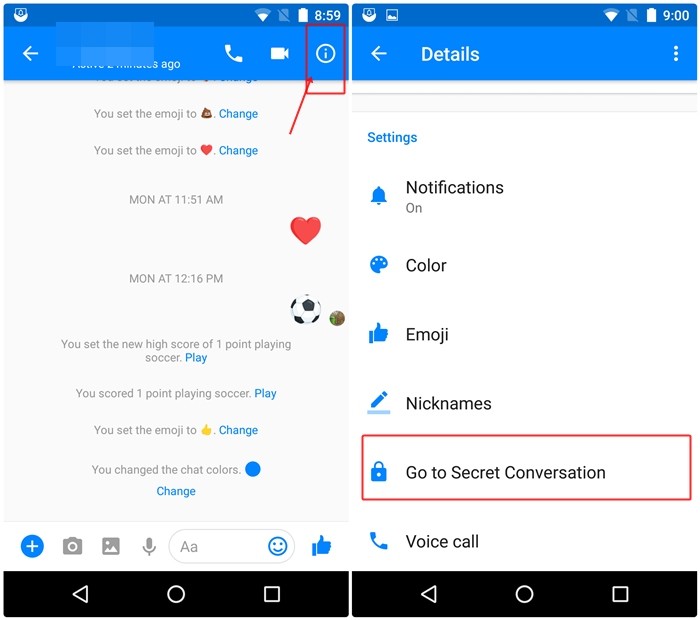
- Tap the i icon (information icon) present in the top bar. Here you will find all the settings for the individual chat.
- Tap “Color” and select the color from the palette of colors.
Change the size of emoji
Obviously, you must have noticed the “like” emoji next to the typing area. If you haven’t, what is wrong with you?
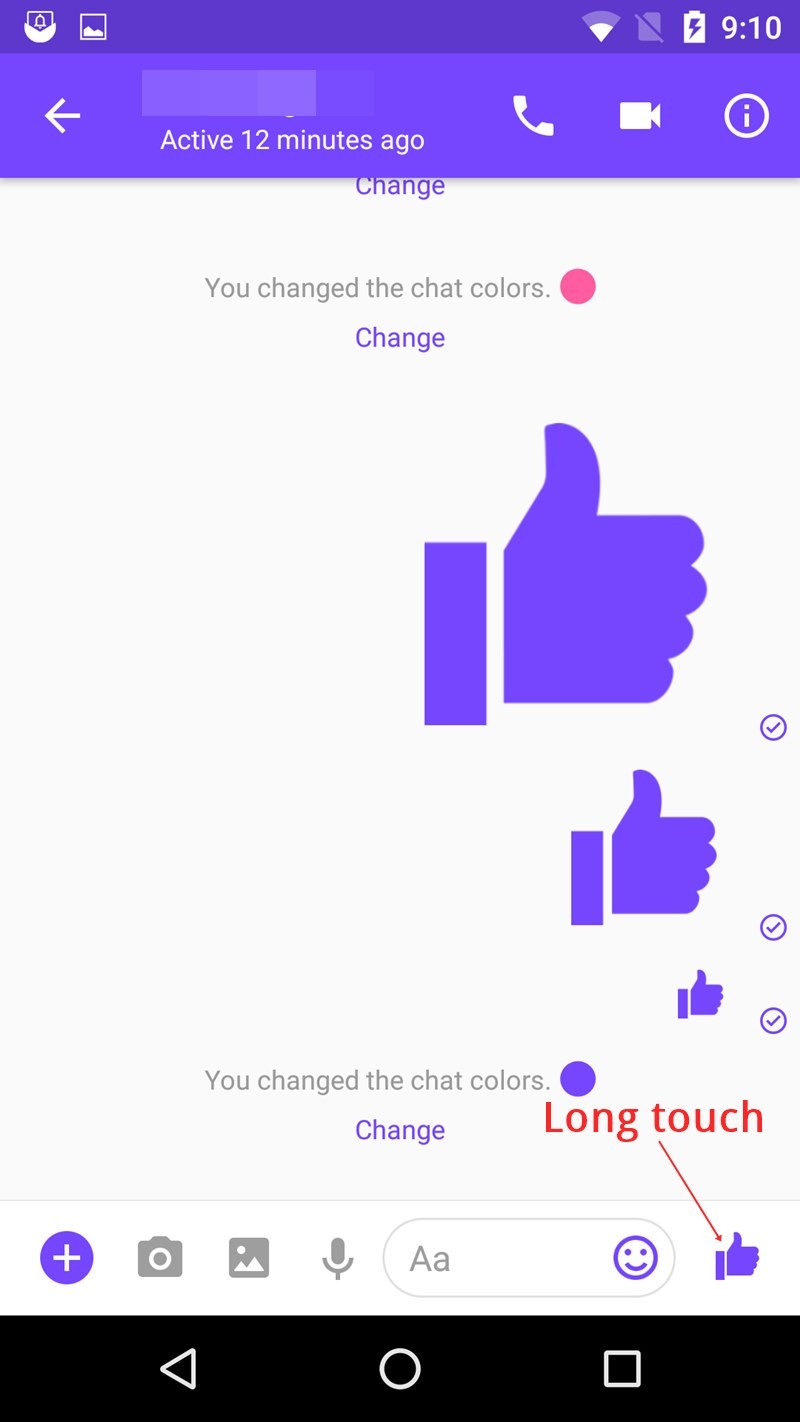
Anyway, if you tap it once, it is immediately sent to the recipient. So basically the emoji is there for fast access. However, if you long touch the “like” button, its size increases. *Mind blown*
You did not know that. Right?
There’s more to it. This was for the “Like” emoji. What if you want to keep some other emoji for fast access or want to send some other supersized emoji? You can do that as well.
To change the Emoji, follow the steps:
- Open the individual Messenger conversation.
- Tap the i icon (information icon) present in the top bar.
- Tap “Emoji” and select your preferred emoji from the list of emojis.
Although you get a lot of options to choose from, the entire list of emoji is not available yet. Once you select the Emoji, it will replace the default “like” emoji in the conversation. Similar to the “like” emoji, long touch the new emoji to send a supersized emoji.
Also read: How to detect when your Android device is being stolen?
Send animated emojis in the Facebook Messenger
Yes, you read that right. And not just one but multiple animated emojis all at once. Although this works for only a few emojis, it happens to be a fun thing to explore.
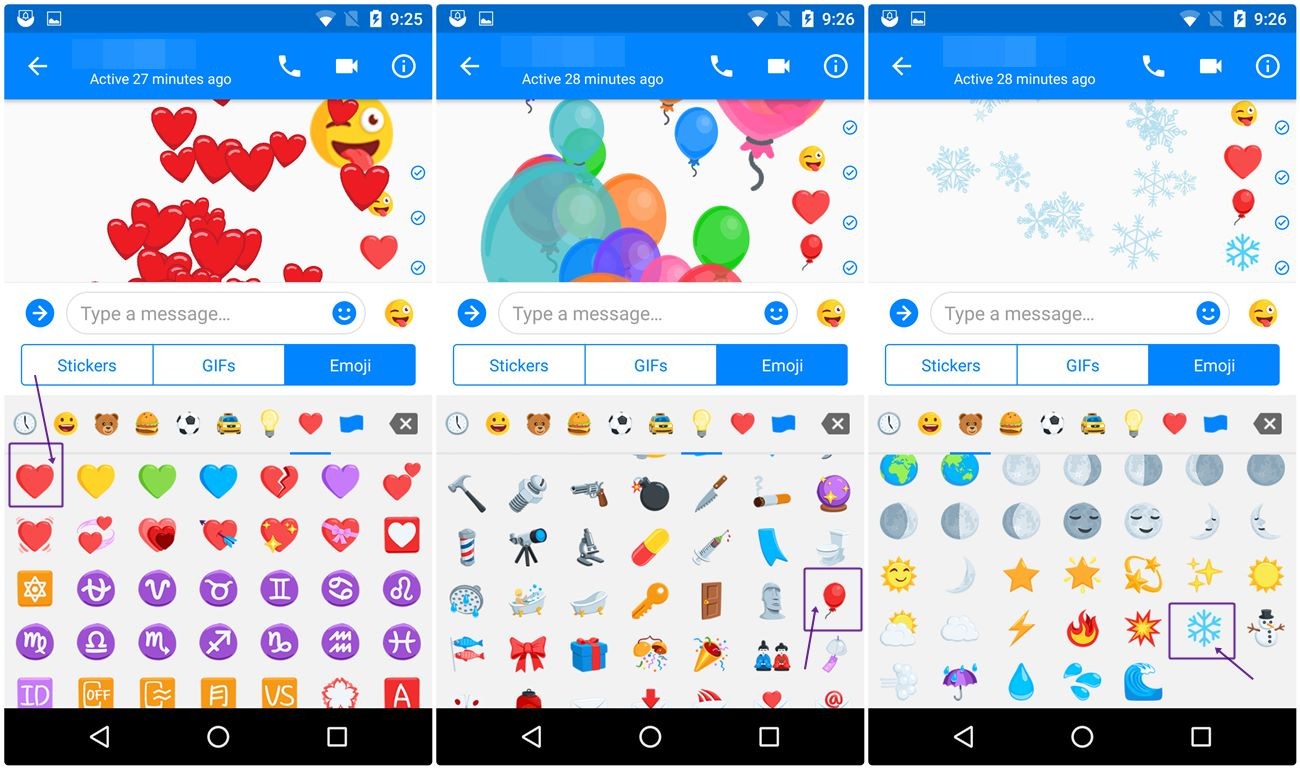
When you are chatting, send the heart emoji to the person and see your thread all bubbling up with hearts. Not one, but hundreds of them.
Similarly, send the snow and balloon emoji to see the mystic effect. And guess what? You will also hear a sound for the same.
However, please note that the other person should be online and be chatting with you to see the magical effect. If they are not online, they will miss the effect and a small static emoji will greet them.
As of now, only these three emojis are bestowed with the superpower. We hope Facebook expands the skill to other emojis as well. Imagine the fun.
Play games within the chat
Did you know you could play the games within the Messenger itself? As might be expected, the games are not some big heavy games, but with simple UI and easy to play games.
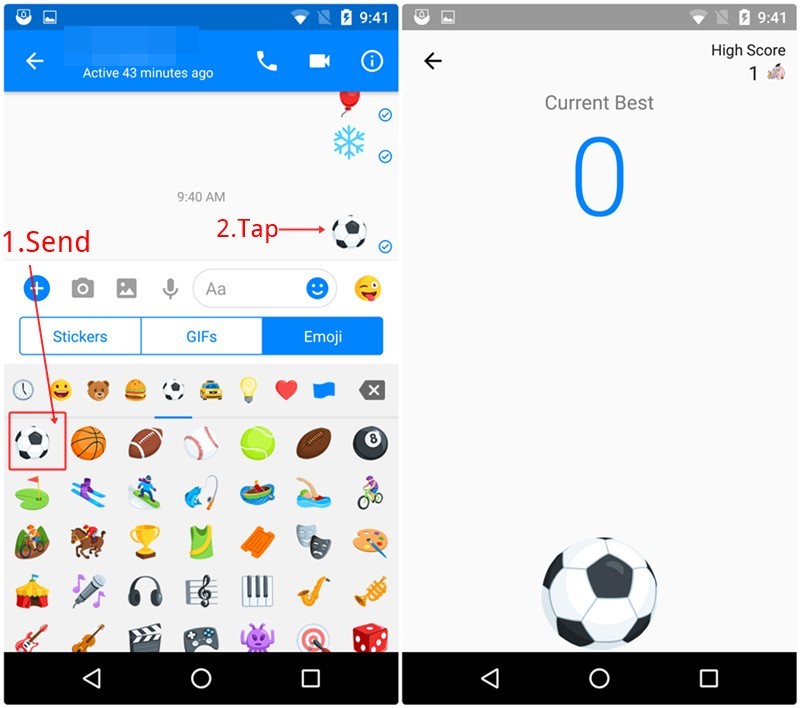
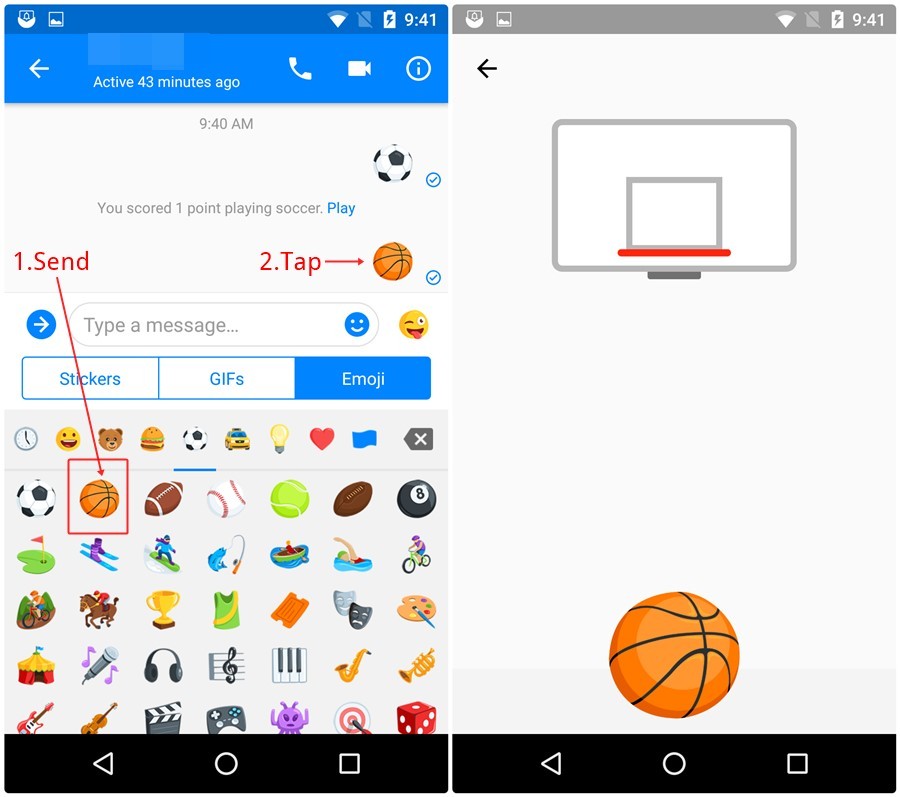
Currently, Facebook supports only two games – basketball and soccer. To play these games, send your friend a football or basketball emoji and then tap the emoji to start the game.
In the soccer game, you have to keep tapping the football to stop it from touching the ground, while in the basketball game, your goal is to put the ball in the basket from an appropriate angle.
You and your friend will see each other’s score, in addition to their own score.
Also read: 8 cool new WhatsApp Status Tips and Tricks
Send groovy photos in the Facebook Messenger
If you further want to enhance your conversations, you can chat via images that are garnished with peppy filters. Moreover, you can even doodle on the photos for more personalized touch.
To do this, follow the steps:
- Open the conversation.
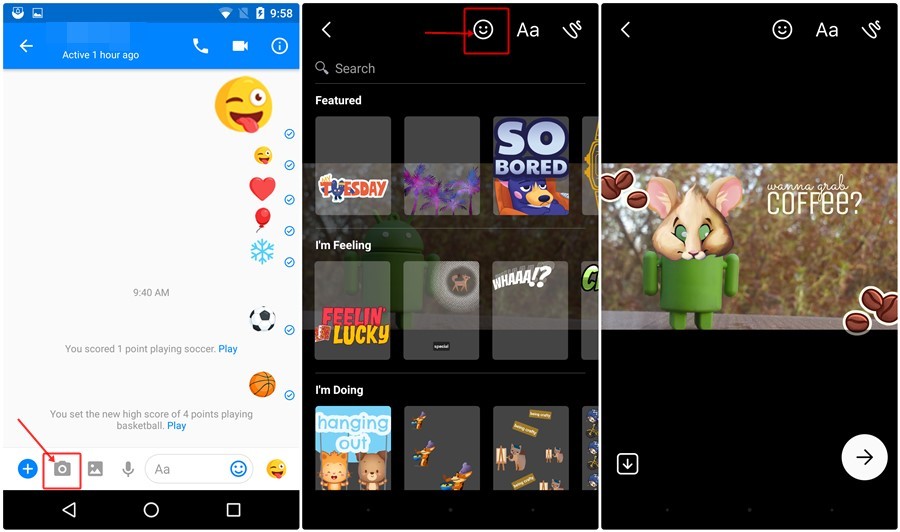
- Tap the camera button to either take a new photo or select a photo from the gallery.
- Tap the Smiley icon to add the lively filters to your photo. Tap the pencil icon to doodle on photos and similarly the text icon to add groovy captions. You can add these effects before or after capturing the photo.
Create quotes/ funky graphics
You know the option to create quotes with your own text is right there in the Messenger camera, but one would definitely skip it erroneously.
But not us.
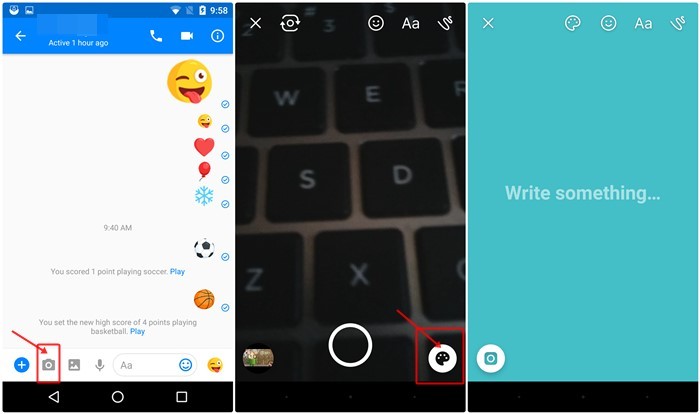
What looks like a color palette, aids you in converting boring texts to quotes with colorful and lively backgrounds.
When you open the individual conversation, tap the camera icon as you did in the last tip and then tap the icon in the bottom right corner, which looks like a color palette. A screen with a colored background will open asking you to “Write something”. Write your quote/text and hit done. You will get multiple filters to choose from. Tap to select the filter.
If you look at the top buttons you will see the first button is the color palette, tap it to change the background color of the image. The color will change automatically, there is no color palette to choose colors. Tap the sticker icon next to it to choose the filter for your photo. Aa changes the background of the text and the last icon (doodle) helps you in doodling.
Moreover, you can change the size and position of the different elements of the filter by tapping and dragging them.
Also read: Top 10 Snapchat tips and tricks
Self-destructing messages
While the Messenger boasts of having a one-to-one encrypted conversation using Secret Conversation feature – intended for you and the other person, the self-destructing messages in the Secret conversation are pretty awesome. As the name suggest, self-destructing messages automatically disappear after a certain time period.
However, you have to first enable the secret conversations in the Messenger settings to start using them and also the self-destructing messages.
To enable the secret conversations, follow the steps:
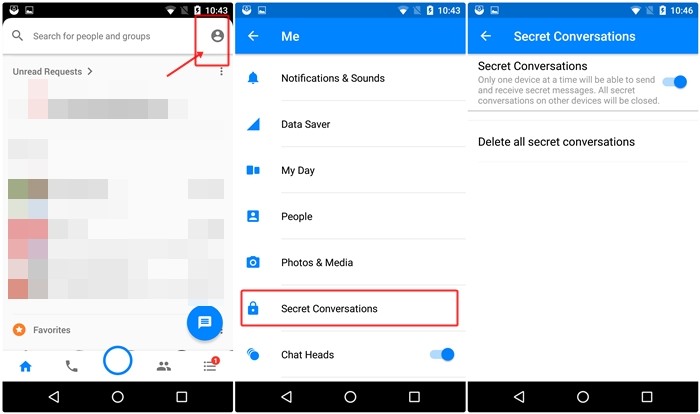
- Open the Facebook Messenger.
- Tap the small icon that looks like a human present in the top right corner to open Messenger settings.
- Scroll down and then tap “Secret conversations” followed by enabling them.
Now to start a secret conversation with any of your friends, follow the steps:
- Open the individual chat thread.
- Tap the i icon (information icon) present in the top bar and select “Go to Secret conversation”.
Keep in mind: Your friend will be notified about the secret conversation only if the secret conversation is enabled on their phone. So, it’s better to inform the other person before starting the secret conversation.
Also, when you enable the secret conversation, a new chat thread, separate from the original thread pops up in the Messenger. The secret conversation thread is black in color.
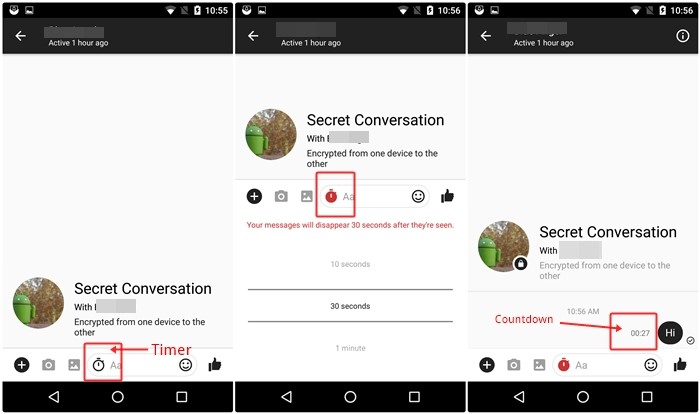
Now, coming to the self-destructing messages. Once you enable the secret conversation, you have to set the time after which the messages will disappear once the other person has seen it. The time varies between 5 seconds to 1 day. You can choose the time as per your liking.
To start the self-destructing messages,
- Open the secret conversation thread and tap the timer icon to set the time. Once you have set the time, the timer turns red indicating timer is on for the messages.
After that, when you send the message, the countdown will start after the other person has seen it and subsequently the messages will automatically disappear after the time period.
Basic conversation tips
Mute chat notifications
If you are constantly bothered by someone whom you can’t block due to various reasons, you can put the conversation on mute. You won’t get any notifications for that particular conversation until you unmute the conversation.
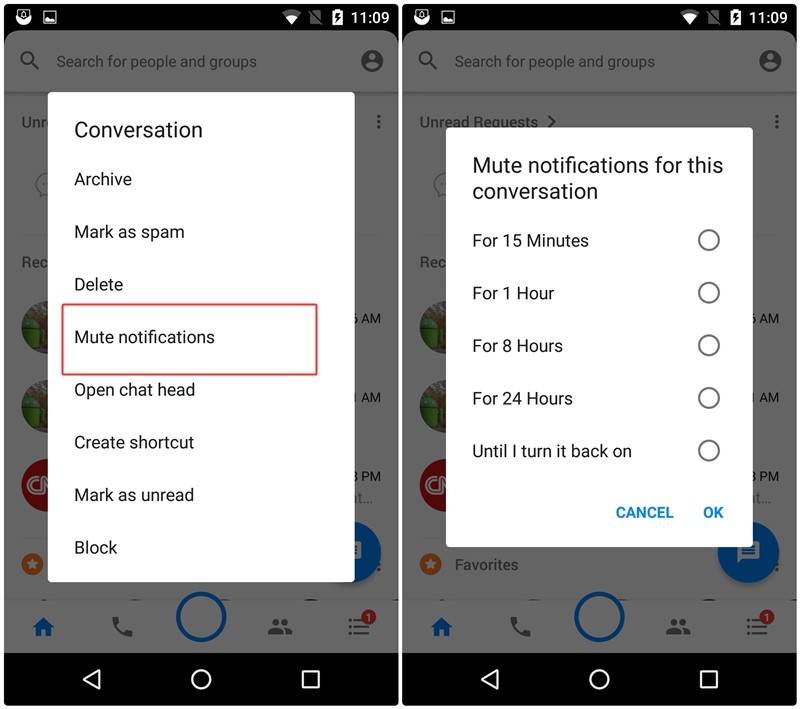
To mute notifications, long touch the chat thread that you want to mute and select “Mute notification” from the menu followed by setting the time for the mute.
Also read: Instagram tips and tricks for beginners
Delete individual messages in the conversation thread
You don’t need to delete the entire conversation to delete a particular message in the conversation. You can simply delete an individual message.
To do so, long touch the individual message that you want to delete and then tap “delete”.
Utility features
As already mentioned, Messenger is soon going to be your one stop service for all your productivity tasks. However, currently, you can perform following two major tasks with the Messenger.
Share your real-time live location
Facebook Messenger recently rolled out real-time live location sharing feature, soon after Google launched the same in the Google Maps. Live location sharing feature lets you share your continuous real-time live location with your contacts in the Messenger – works in both individual and group conversations.
To share live location, follow the steps:
- Open the conversation.
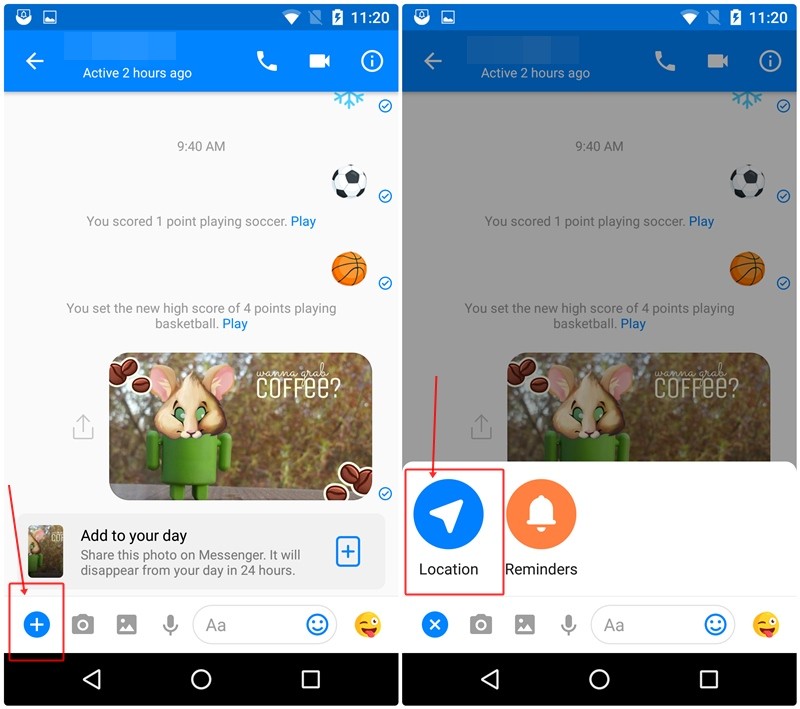
- Tap blue add icon present in the bottom left corner and select “Location” from the Menu.
In the previous UI, you would find location sharing under the three horizontal dots located in the extreme right corner. Moreover, here is a detailed guide on how to use Facebook Messenger live location feature.
Also read:Facebook app: Tips and tricks you should know
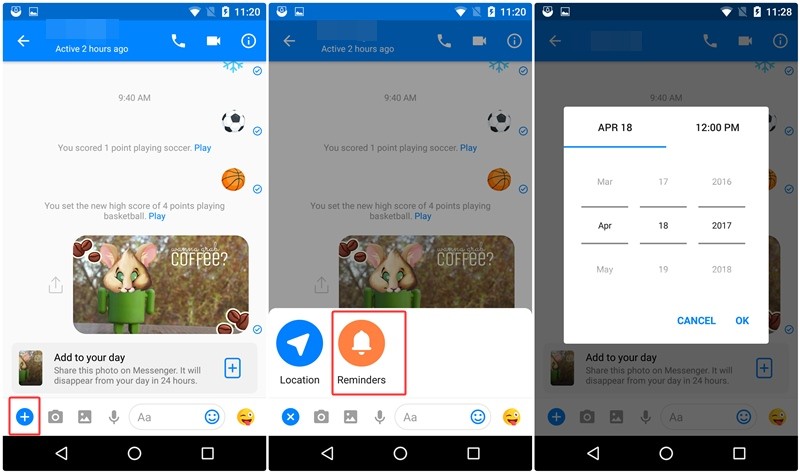
Create a reminder
Creating reminders mark the commencement of the fully featured M Assistant on Messenger. Not only can you manually create reminders, but when the Messenger detects an event or a meeting in your conversation – something that can be reminded of, it pops up a message in the thread asking whether you want to create a reminder for the same.
Having a built-in functionality to create reminders on Messenger comes handy. You don’t need a third party app to create a reminder, you can do that within the Messenger while conversing with the other person. Moreover, both of you will be reminded.
Amazing, right?
To create a reminder manually, follow the steps:
- Open the conversation.
- Tap blue add icon present in the bottom left corner and select “Reminders” from the Menu.
- Set the date and time for the reminder and press OK.
Again, similar to the live location sharing feature, in the earlier UI, you would find location sharing under the three horizontal dots located in the extreme right corner.
Tips for your account
Log out of Facebook Messenger
Since we are so habitual to the Facebook Messenger and never log out of it, most of the people never notice that the Messenger lacks the “logout” option. Yes, you read that right. There is no direct way to log out of the Messenger.
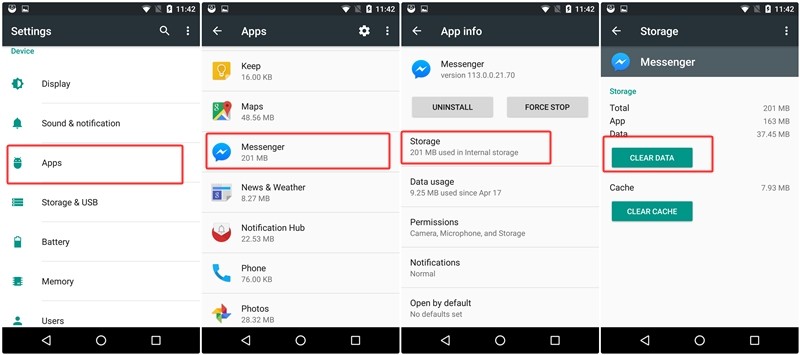
However, if you are from the 1% population who wants to log out of Messenger without uninstalling the app, here’s how to do it:
- Go to Android device Settings followed by Apps.
- Scroll and tap on Messenger.
- Then tap on Storage and hit Clear Data. That’s it.
The next time you open the Messenger after deleting the data, you will have to log in again.
Also read: How to use same WhatsApp account on two different mobile phones
Use Facebook Messenger without Facebook account
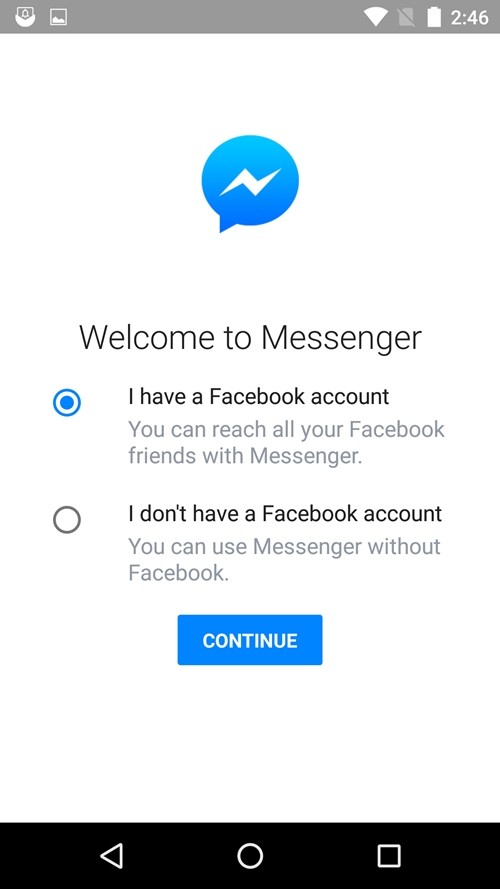
If you are not a Facebook user or you have deactivated your Facebook account, yet want to use the Messenger without the Facebook account, perhaps, because you are awe-struck by the amazing Facebook Messenger, you can do so by creating an account using your phone number. You will get all the amazing features of Messenger even if you sign up with your phone number.
To use Messenger without the Facebook account, select “I don’t have a Facebook account” on the Messenger login screen for new users.
In case you are already logged into the Messenger, log out using the above method and then Register/sign in using the phone number. However, if you want to use multiple accounts on Messenger one using your Facebook account and the second using phone number you can do that as well by the following tip.
Use multiple accounts with Facebook Messenger
Whether you want to use two Facebook accounts on one Messenger or one Facebook account and other account using the phone number, you can do that in the Messenger, as it supports multiple accounts.
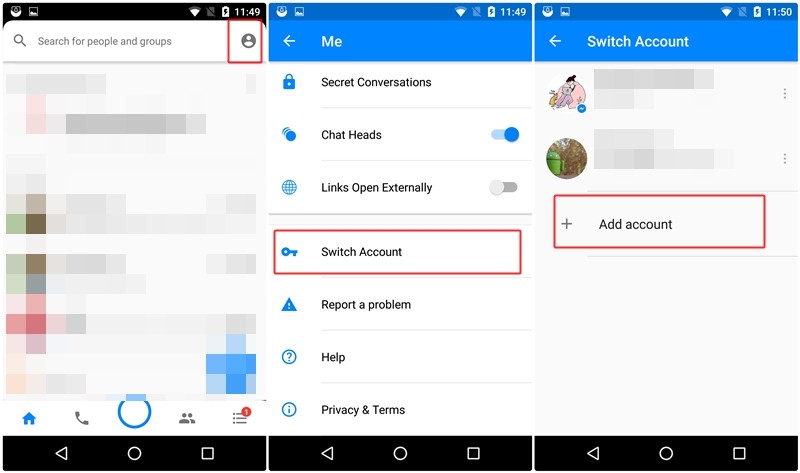
To add a second account to the Messenger, follow the steps:
- Open the Facebook Messenger.
- Tap the small icon that looks like a human present in the top right corner to open Messenger settings.
- Scroll down and tap “Switch account”.
- In the switch account, tap the “add” icon in the top right corner to add the second account or tap “Add account” (whichever is available).
- After you are successfully signed into the Messenger using the second account, you can switch between the accounts from the same “switch account” option.
Also read:Are you a parent of a toddler? Here’s how your Android device can help you
Share Messenger code
When you open the Messenger settings, you will see blue circles (kind of circles) around your profile picture.
Don’t believe me? Open your Messenger and have a look.
Well, these aren’t just for the sake of design. Similar to Barcode, they contain your information mainly your username and are called Messenger codes. Tap the profile picture and you are taken to the Messenger code screen.
If you want to chat with a person on Messenger, who is not on your Facebook friend list you can share your Messenger code with them to start a conversation on Messenger. They will scan the Messenger code in the Messenger screen and abracadabra, with no search involved you will be added to each other’s conversation list in the Messenger.
Where have we seen this? Hint: The name begins with Snap…..
Psst… If you scan the code for the person who is already in your Messenger list, your conversation thread with them pops up.
Covert features
Did you know there are two secret inboxes (kind of) in your Messenger?
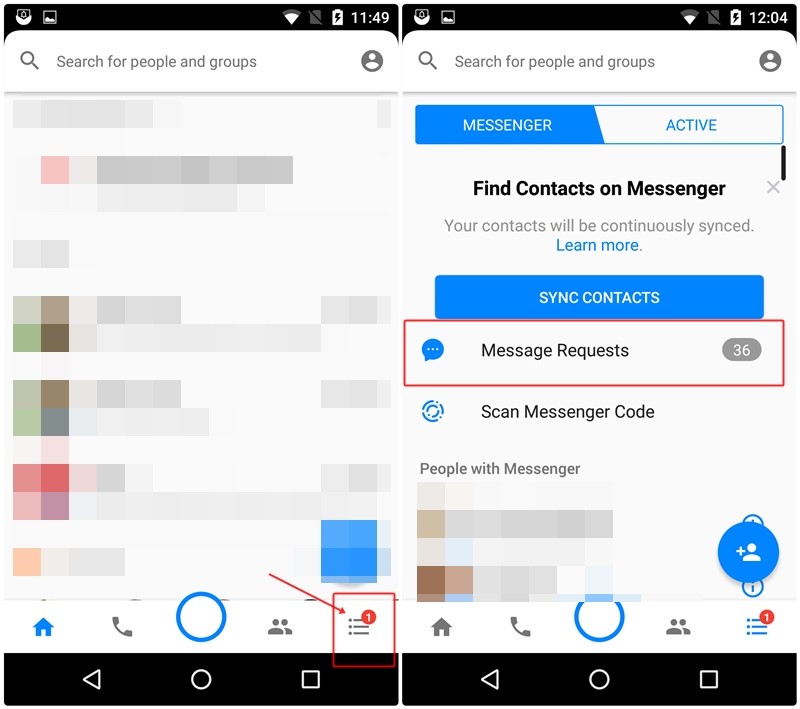
As you know, you can interact with people who are not on your Facebook list with the Messenger. However, before you start interacting with them, all the messages sent by people who are not in your friend list go to another folder known as “Message requests” folder, earlier known as the “other” folder. Moreover, to begin the conversation, you have to first approve the sender manually in the “Message requests” folder.
To access the “Message requests” folder, follow the steps:
- Open the Messenger
- Tap the ⋮≡ icon in the bottom right corner.
- Select “Message Requests” from the options.
And guess what? There is another inbox within the “Message requests” folder.
Yup!
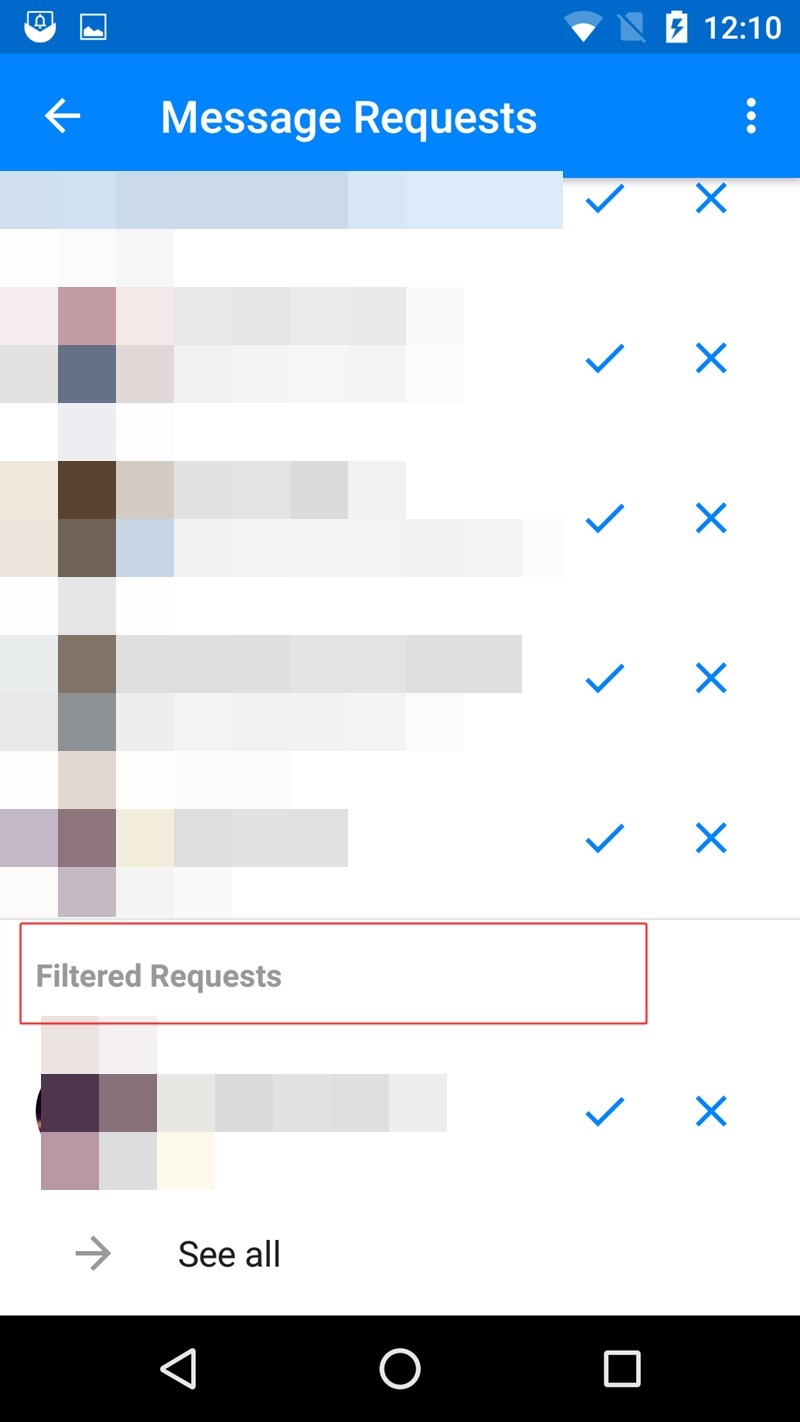
If Facebook thinks that you might know the sender, the message is kept in “Message requests” and you will be notified when you receive it. However, if Facebook thinks you might not know the person or the sender is a fake/spam profile, the messages are kept in “Filtered requests” within the “Message requests”.
To access the “filtered requests” folder, open the “Message requests” and scroll to find “Filtered Requests” below the Messages in the “Message requests”.
Next time, when you open Messenger, do look out for new messages under Message requests and Filtered requests.
Also read: Best pre-installed Android widgets that you should know about
Fed up of talking to humans? Talk to bots
Messenger bots or chatbots are computer programs that use artificial intelligence to compose messages for you. Although you are talking to a computer program, it seems you are in conversation with a human.
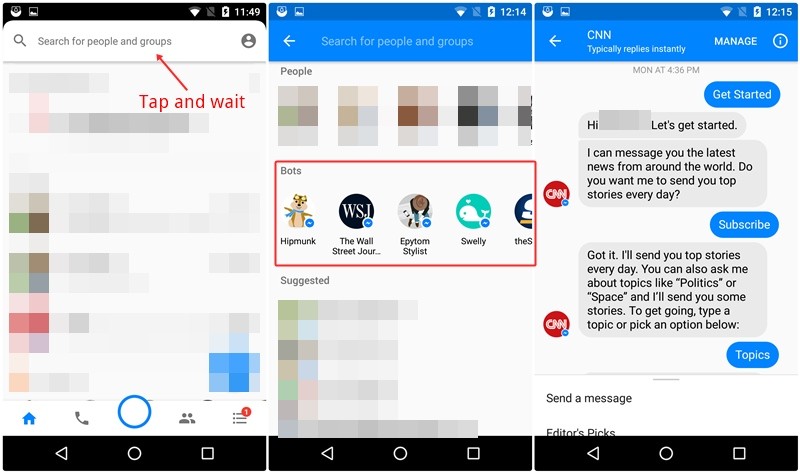
Bots are helpful, in addition to being full of fun. You can receive your daily dose of top news from around the world by subscribing to news bots like CNN. Similarly, you can play games with the bots and ask questions to the celebrity bots.
To access the bots in the Messenger, open the Facebook Messenger and tap the search area. Below the list of “People”, you will see the list of “Bots”. Only a few popular bots are listed here. There are 100’s of other bots available for Messenger, however, currently, Facebook doesn’t have any official list for the available bots. That said, you can find new bots in the Messenger by searching for them in the search box. Try your luck with different things and see which bot exists.
Moreover, the site botlist.co, which lists bots for different platforms/websites, has this bot list for Messenger, where you can check the available bots for the Messenger. Once you find an interesting bot, search for the same in the Messenger to chat with them.
Privacy Tips and Tricks
Disable chat heads
Similar to a coin that has two sides, the circular chat heads for Facebook Messenger has two sides as well– one being annoying and the second being helpful. Although helpful at the times you are chatting, the constant gawking makes one uncomfortable. If you are a regular user of chat heads and don’t want to disable them permanently, we get it. However, do you know there is a method by which you can close the chat head until the next message pops up?
To close the chat head, long touch the chat head. You will see a cross button at the bottom. Drag the chat head towards it. Voila! No awkward stares by the protruding profile pictures.
But, if you want to permanently send the chat heads to gallows, this is how to do disable the chat heads:
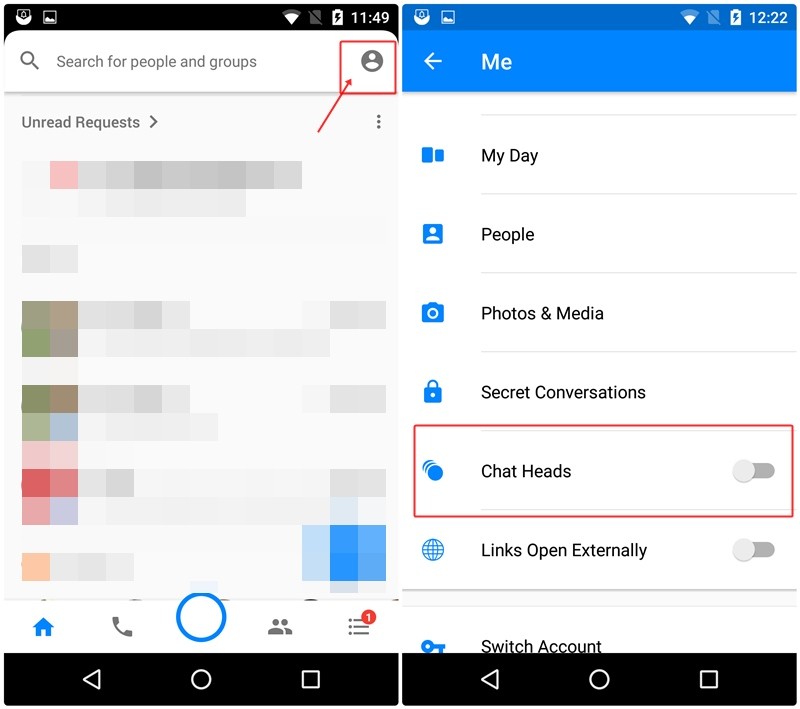
- Open the Facebook Messenger.
- Tap the small icon that looks like a human present in the top right corner to open Messenger settings.
- Scroll down and then disable “Chat heads”.
Also read: How to secretly record voice on your Android device
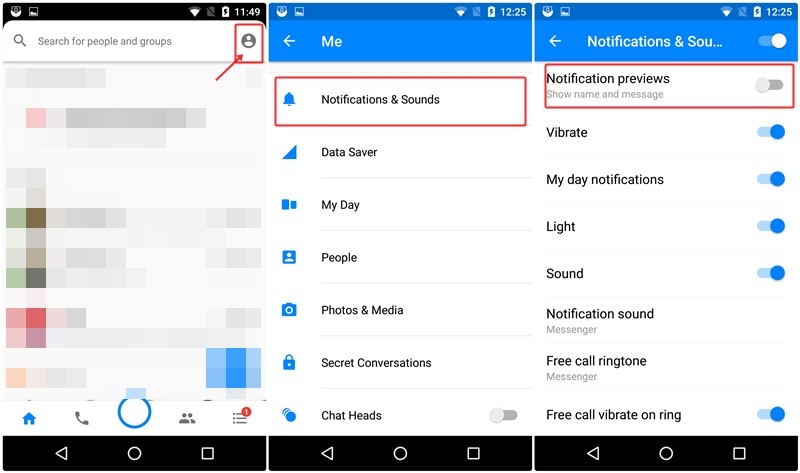
Disable notification preview for messages
When you receive a message on the Messenger, you will see the first line of every message in the notification panel, which is good, since you get to have a preview of the message and depending on that you can decide if you want to have the conversation or not.
But, this also creates privacy problems. Suppose you are having a private conversation with your friend and someone needs to use your phone. Be default, they will see the first line of every message you receive. This is where disabling the preview comes handy. When you disable the preview, you only see the name of the person and the number of messages received. Good, no?
To disable notification previews, follow the steps:
- Open the Facebook Messenger.
- Open Messenger settings by tapping the small human icon in the top right corner.
- Tap “Notifications & Sounds”.
- Turn off the “Notification Previews”.
In the same setting, you can change and edit other sounds and notifications for the Messenger.
Facebook Messenger groups and its features
Groups are extremely useful (also annoying at times), be it on WhatsApp, Facebook Messenger or any other communication platform.
Not only do the Messenger groups let you have a conversation with multiple people, but you can even have group video or audio chats. Moreover, you can create polls in a group, in case you are stuck on something and can’t decide between the options.
Hey! Wait. Do you even know you can create groups on the Messenger?
Nevertheless, let’s get started with the groups.
Create a Messenger group
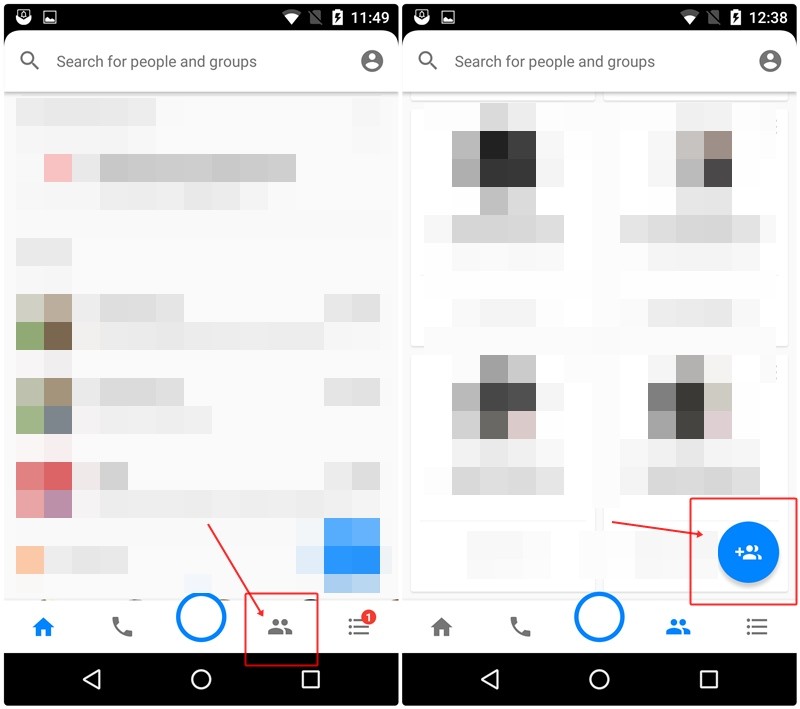
To create a group, follow the steps:
- Open Facebook Messenger on your Android device.
- In the bottom bar, tap the icon (two humans) on the right of the camera icon.
- Tap the blue circular + icon at the bottom right corner. Name your group and add people to the group from the list. When you are done, hit “Create group” in the top right corner.
Also read: Snapchat features borrowed by Facebook, WhatsApp and Instagram
Beautify the group
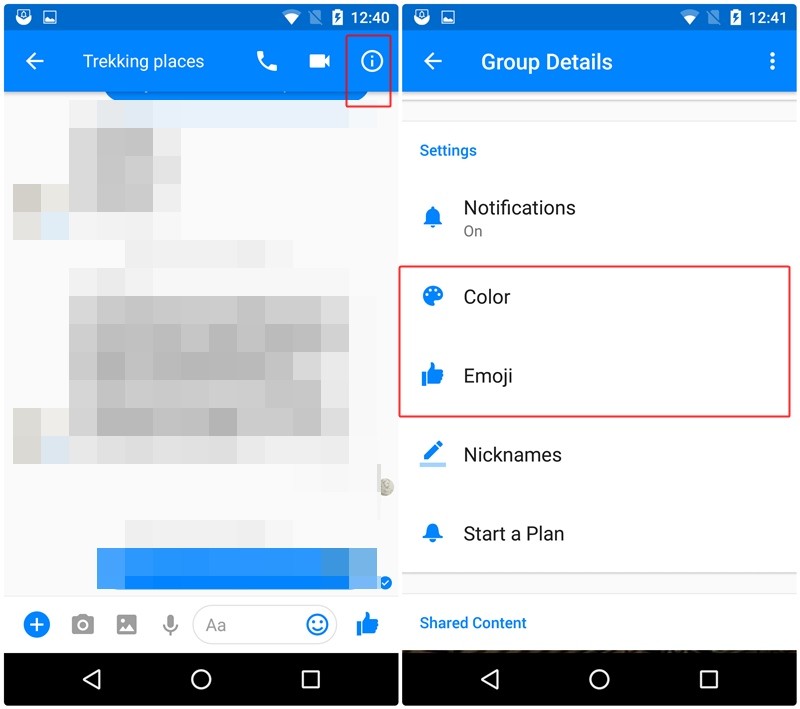
Similar to the individual chats, you can change the color and emoji of the group conversations as well.
To do so, follow the steps:
- Open the group conversation.
- Tap the i icon (information icon) present in the top bar. Here you will find all the settings for the individual groups.
- Tap “Color” to change the color of the conversation and “Emoji” to pick an emoji for easy access.
Leave the group and delete the conversation
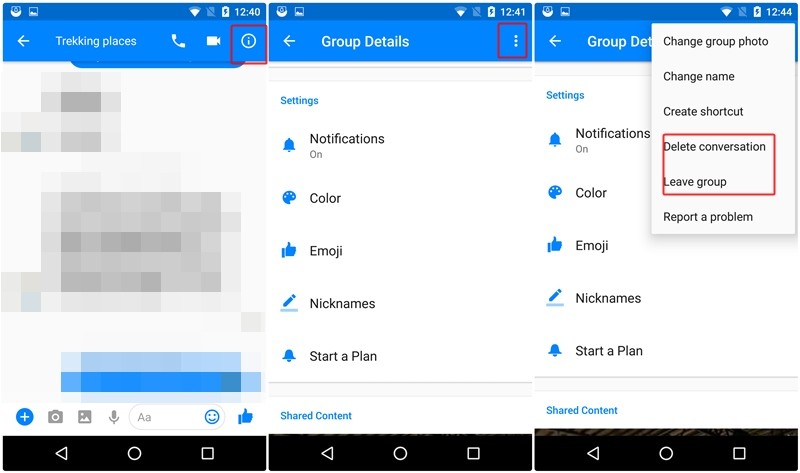
To leave the group, follow the steps:
- Open the group conversation.
- Tap the i icon (information icon) present in the top bar.
- Tap the three vertical dots in the top right corner.
- Select “Delete conversation” to clear and delete the chat and “Leave group” to leave the group.
You can also change the group name and group photo here.
Also read: How to create GIFs using WhatsApp
Create a shortcut for the group on home screen
For quick access to the group from home screen, you can add its shortcut on the home screen.
To do so, follow the steps:
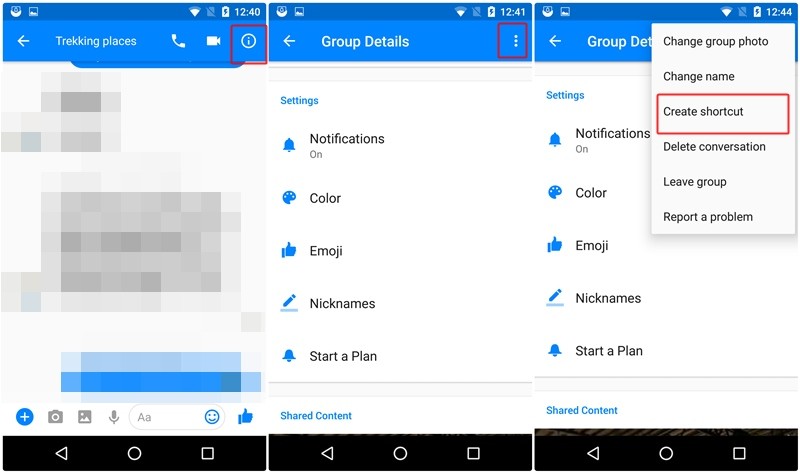
- Open the group conversation.
- Tap the i icon (information icon) present in the top bar.
- Tap the three vertical dots in the top right corner.
- Select “Create shortcut”.
A shortcut for the group is created on your Android home screen. You can also create shortcuts for individual threads in the same way. Long touch any conversation and select “create shortcut” from the menu.
Mute group notifications
To mute a group, follow the step:
- Open the screen for groups by tapping the icon next to the camera icon.
- Tap the three vertical dots at the top right corner of any group that you want to mute.
- Select “Mute notifications”.
You can mute notifications for 15 minutes, 1 hour, 8 hours, 24 hours, until the next alarm or until you turn it on.
Also read: How to scan documents using Android phone and store them online for easy access.
Create a poll
As mentioned before, you can create polls in the Messenger groups. We hope they bring this feature to the WhatsApp groups as well.
Anyway, to create a poll,
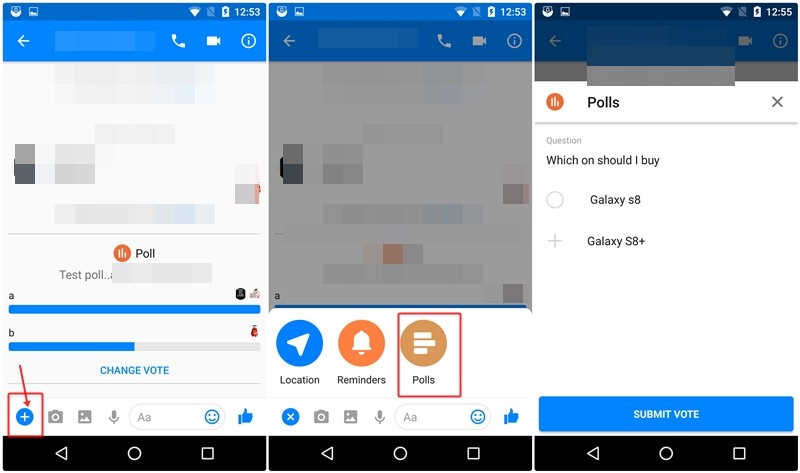
- Open the group conversation.
- Tap the blue add (+) icon in the bottom left corner and then select “Polls”. You are asked to write the question and the options for the same.
- You have to submit your vote to create the poll. Hence, press the “Submit Vote” button with your selection to create the poll.
Mention people in groups
Similar to the WhatsApp groups, you can now mention people in the Messenger groups as well. In case you are wondering how is that helpful, well, members of the group will get a separate notification when you mention them.
And to mention the members of the group, type @ in the typing area and you are presented with the member names. Select the member to mention them.
→ Download Facebook Messenger Android app
Do try out the Messenger tips and let us know your thoughts in the comment section below.







Best Messenger guide I’ve read so far!
I have to agree. Very thorough.
Best Messenger guide I’ve read so far!
I have to agree. Very thorough.
I stopped using official FB and messenger app the day the started forcing it down people’s throats. And now that I see all this, I realize how far the messenger has come! Gosh! it has expanded into a plethora of new features and functionality. Really appreciate it
It’s like seeing the best parts of whatsapp, skype and hike! all combined into a single app. I am downloading the Messenger app right now, and as @jillalgera:disqus said, this post is lovely.