XDA member shubhamchamaria, the same person who gave us the Easy Kernel-Recovery Flasher for the HTC One X+ is back, and this time with another really easy method which helps you unlock the bootloader on the One X+. An unlocked bootloader, and a rooted device are two prerequisites if you want to explore the world of Custom ROMs for your device, and bootloader locking can get real tricky for some devices.
But if you have a simple-to-use, but detailed step by step guide, you can have your bootloader unlocked in a few minutes and unshackle your device. Read on to know how you can unlock the bootloader on your HTC One X+.
Compatibility
The guide below is compatible only and only with the international version of the HTC One X+and not with the US variants of the device. Check your device’s model number in: Settings » About phone.
Warning
The methods and procedures discussed here are considered risky and you should not attempt them if you don’t know exactly what you’re doing. If any damage occurs to your device, we won’t be held liable.
How To Unlock the Bootloader on the HTC One X+
- This procedure will wipe all your apps, data and settings (but it will NOT touch your SD cards, so don’t worry about those). Backup your Apps and important data — bookmarks, contacts, SMS, APNs (internet settings), etc. This Android backup guide should help you.
- Download and install HTC Sync software on your computer in order to install the required drivers for the phone. You can skip this step if you have already have HTC Sync or HTC drivers installed on your PC
- You will need fastboot setup on your PC. | Download Fastboot
- Create a new folder in the root of the C: drive on your PC. Name it Fastboot
- Extract the contents of the zip file downloaded in Step 3, to the Fastboot folder you created in Step 4
- Now that your PC end is all set up, go to the HTC Bootloader Unlock section, and sign in.
- On the Bootloader Unlock page, select “All Other Supported Models” and then “Begin unlock bootloader“. Go through the steps till you reach Step 9.
- Power off your HTC One X+ completely by holding the power button down for at least 8-10 seconds to switch it off
- Now press the Volume Down + Power buttons simultaneously to get into Hboot or bootloader mode
- Use the device Volume buttons to select up or down to highlight Fastboot and then press the Power button to select Fastboot mode
- Now connect the phone to your PC via USB cable, and fire up a command prompt on your PC
- In the Command prompt, change the directory to the folder where you set up fastboot in Step 4 – C:fastboot
- Now type the following command into the command prompt window and press Enter.
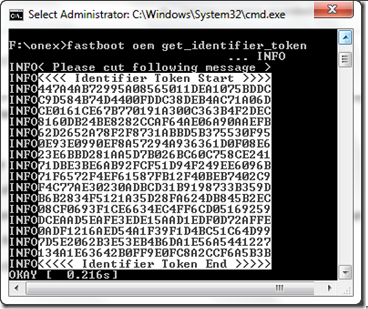
fastboot oem get_identifier_token - You will see a long block of text. Right-click anywhere on CMD prompt and select mark. Highlight and copy the text (select the text just like the way it’s selected in the screenshot below)

- Now switch to the HTCDev page on your browser and paste the text in the text box under the section My Device Identifier Token at the end of the page in Step 7, and press the Submit button.
- You will now get a mail from HTCDev with a unique Unlock_code bin file. Download and save the file in the fastboot folder that we created in Step 4
- Go back to the command prompt, after making sure you are cd’d to the fastboot folder, type in the following command:
fastboot flash unlocktoken Unlock_code.bin - Now on your phone, you will see the display change to a disclaimer. Just use your volume up/down keys to select Yes, and then the Power button to Select it.
Your phone will reboot, and you bootloader is now unlocked. The guide looks lengthy and complicated if you’re doing this for the first time, but is actually quite simple, and you can be done unlocking your bootloader in a few minutes. Go ahead and try it out, and give us a shout in comments below if you need any help. If you want to drop in a line of thanks to shubhamchamaria, you can hit the Via link below.


Thank you for this great step-by-step guide!
Worked like a charm for me.
Thank you for this great step-by-step guide!
Worked like a charm for me.
Hi when I get to step 12 it says that there is no directory with that name (fastboot), am I doing something wrong? Thanks kevin
Hi when I get to step 12 it says that there is no directory with that name (fastboot), am I doing something wrong? Thanks kevin