Google Docs lets you format content to your desired style to create the perfect document. You can insert footnotes, add watermarks, cross out texts, highlight elements, and make other adjustments to a document within the editing window easily.
If you’re looking for a way to adjust the margins of a document inside Google Docs, the following post should help you do just that.
How to change margins on Google Docs [3 methods]
There are three ways you can change the margins of a document inside Google Docs –
- The first method can be used to set margins manually instead of the default one-inch margin.
- The second method changes margins at the top, bottom, left, and right sides of a document with precise measurements.
- The third method lets you change margins for documents with more than one column.
Method 1: Using the Ruler tool
If you aren’t satisfied with the overall one-inch margin that Google Docs has selected for your document and you want to change how your document is presented, you can use the Ruler tool inside Google Docs to decrease or increase the top, bottom, left, and right margins. The Ruler is the quickest means to adjust margins so you can get the job done with little time.
On PC
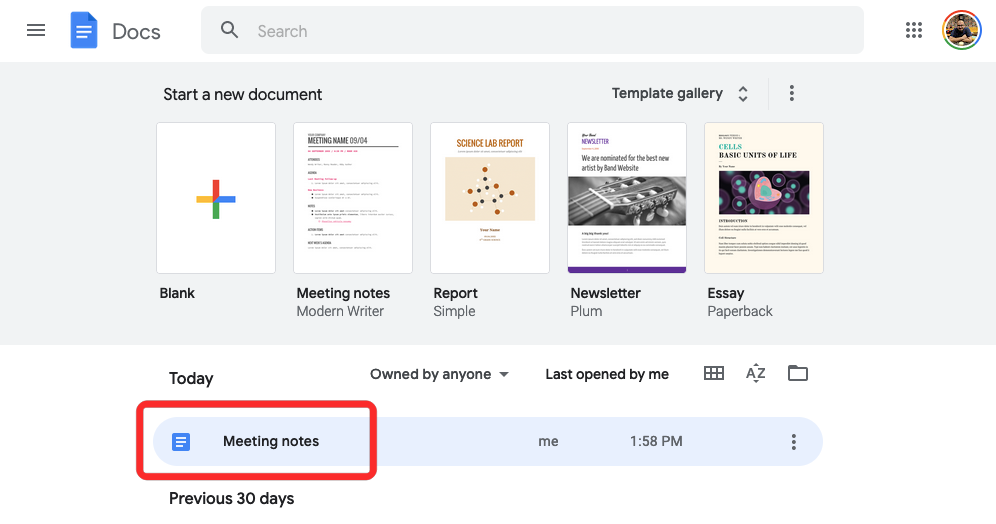
- To change margins on Google Docs manually on a desktop, go to the Google Docs homepage and select a document you want to edit.
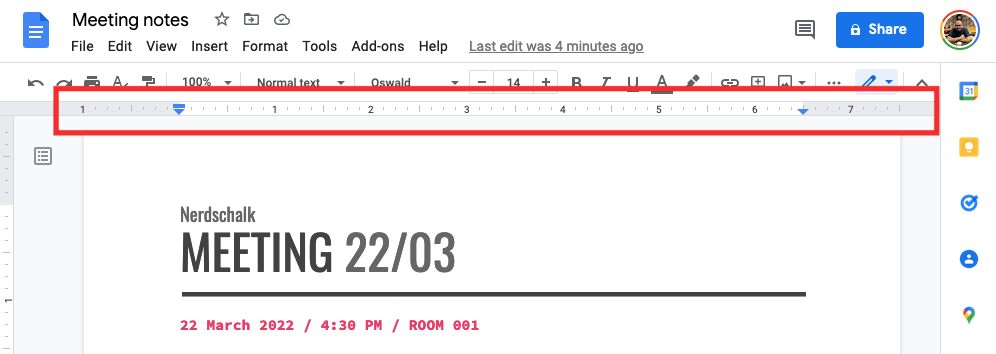
- When the document loads up, you should see the Ruler at the very top marked by an inch-scale with blue-colored down arrows on either side.
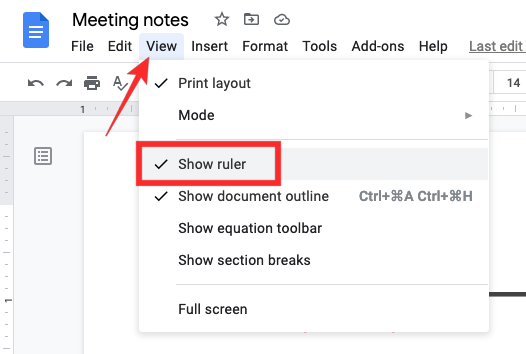
- If you don’t see a ruler at the top of a document, go to View > Show Ruler from the menu bar at the top. That should unhide the Ruler if it was previously hidden.
- Inside the Ruler, you’ll see grey and white areas. The grey areas represent the margins on either side while the white area in the middle shows the overall space that’s reserved to enter text inside the document.

Note: When the Ruler loads up, you’ll see a blue rectangle on the left and two blue arrows on the left and right sides. If you wish to adjust only the page margins of a document, you should avoid dragging the blue rectangle or triangle separately as that will end up altering the paragraph alignment inside the document.
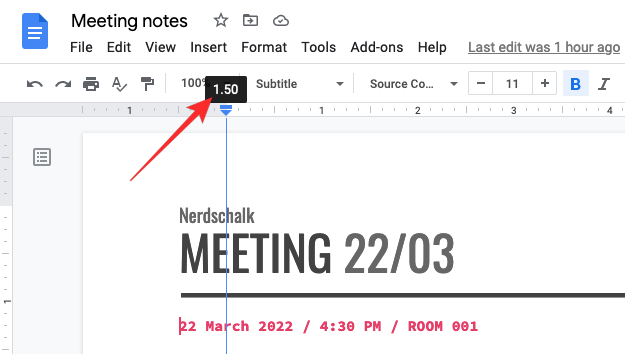
The blue rectangle and arrows are indent adjustments and do not help in changing your page margin. If you drag the blue rectangle, it will only change the position of the first line of text. If you drag the blue arrows on the left and right sides, it will adjust the left and right margins of a selected text inside a document, not entire pages. - We’ll now start by adjusting the left margin. For that, move your mouse pointer towards the gray area on the left side of the blue arrow. When you do that, the pointer will switch to a vertical cursor with a rightward arrow. Click anywhere on this grey area and with the left mouse button pressed, drag the pointer inward or outward to increase or decrease the left margin.
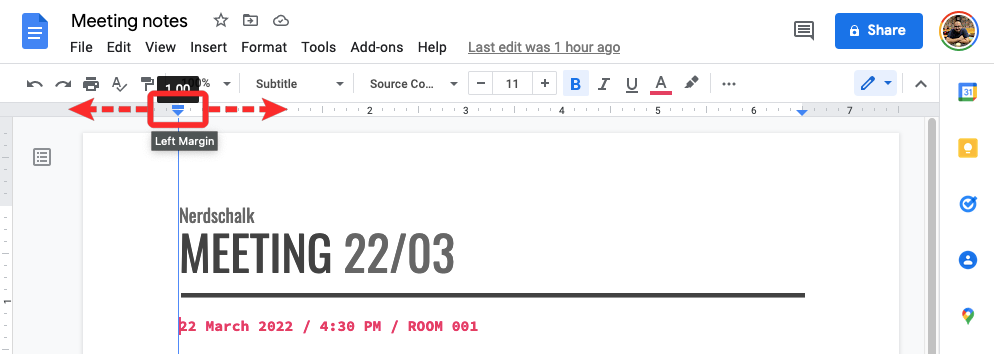
- When you drag the pointer towards either side, you’ll see a number show up above the blue rectangle. This number shows the size of the left margin, i.e., the spacing between the left edge of the document and the content on the left side. The number will change according to the size of the left margin you choose. When you’re done dragging the margin to your desired size, you can lift the mouse button to set it.
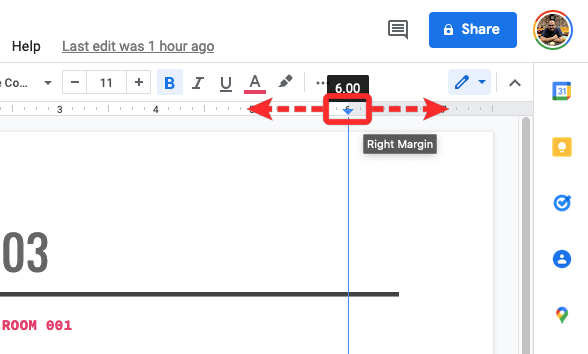
- Similarly, to change the right margin, hover the pointer over the grey area on the right portion of the Ruler until a vertical cursor with a leftward arrow appears. When this cursor appears, click and drag it outward or inward to increase or decrease the right margin of the document.
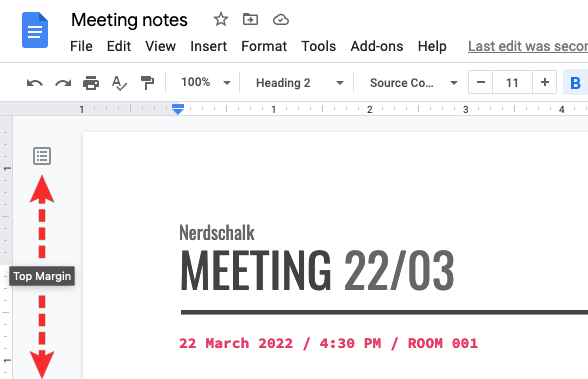
- You can also change the top margin by locating the vertical ruler that’s present on the left side of a document. Move your pointer to the area between the grey and white portions at the top left corner until you see a horizontal cursor with a downward arrow. Drag this cursor down or up to increase or decrease the top margin.
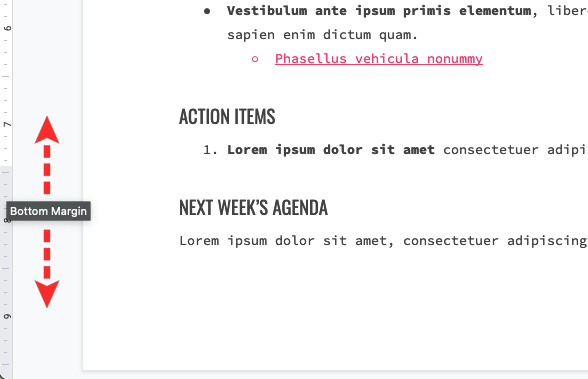
- To change the bottom margin, you first need to scroll down to the bottom of the first page and then move your pointer toward the Ruler until you see a horizontal cursor with an upward arrow. Now, drag this cursor up and down to increase or decrease the bottom margin.
- At any time you can change or revert to a previous setting by dragging any of these margins to your preferred size.
On phone (unavailable)
The Ruler tool isn’t available when accessing a document inside the Google Docs app on Android or iOS. So, you can only change margins using the Ruler when you access Google Docs on a computer.
Method 2: Using the Page Setup function
If you aren’t willing to manually fiddle with the Ruler tool and want to adjust all sides of your document precisely, you can use the Page Setup function inside Google Docs. Page Setup lets you tweak a document with inch-perfect alignment, so you have direct control over all four margins of a document’s pages.
On PC
- To access the Page Setup function, go to Google Docs homepage and select a document you want to edit.

- When the document loads up, go to File > Page setup from the menu bar at the top.
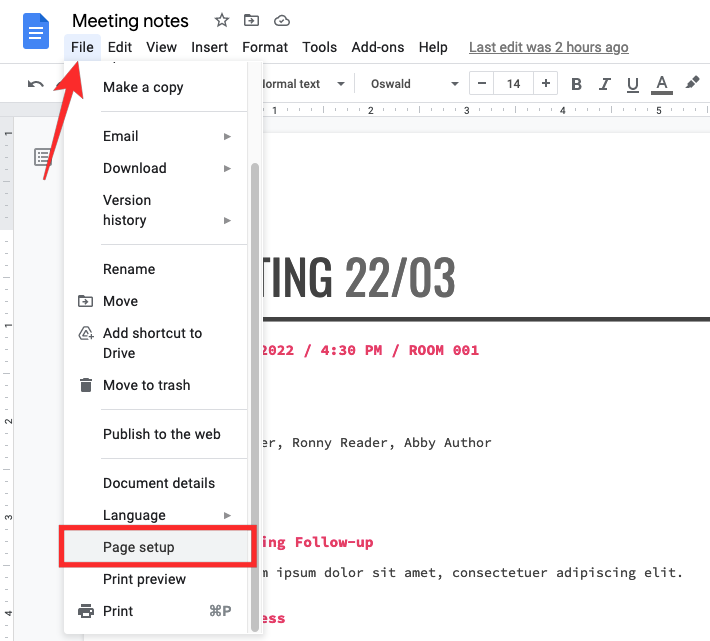
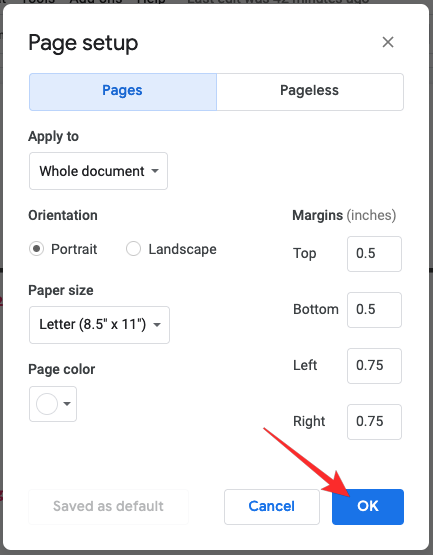
- A “Page setup” dialog box will appear on the screen showing you options to change orientation, paper size, and margins. Inside “Margins”, enter the values to apply as margins for all sides of the document inside the Top, Bottom, Left, and Right boxes.
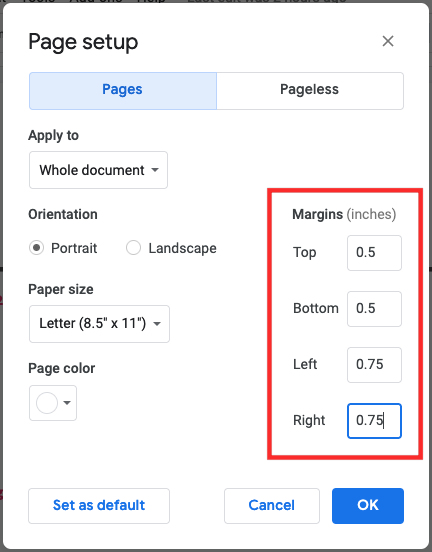
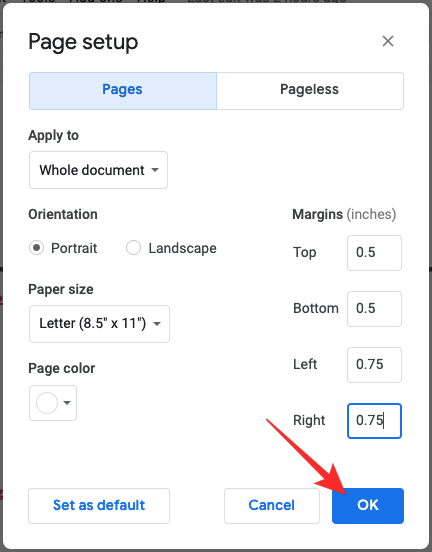
- To apply these new margins to the document, click on OK.
The document will now be formatted to your chosen margin.
On phone
Google Docs lets you change margins from its app on a smartphone but the functionality is limited to the Google Docs app on iOS, so you can only do it on iPhones and iPads. Although the Page Setup option is available on the Google Docs app on both iOS and Android, the Android version doesn’t offer you a way to modify margins. So, if you’re using an Android smartphone and you want to change the margins of a document, your best bet is to use Google Docs on a computer.
- To change the margins of a document, open the Google Docs app on iOS and select the file you wish to edit.
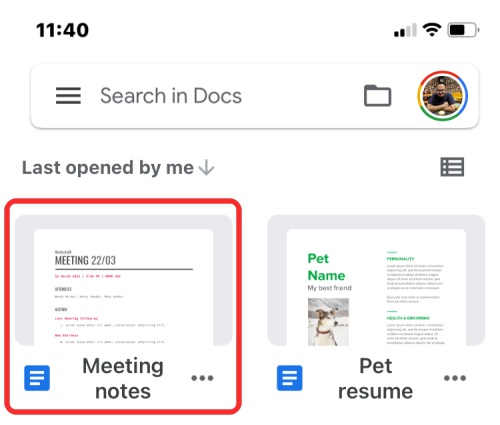
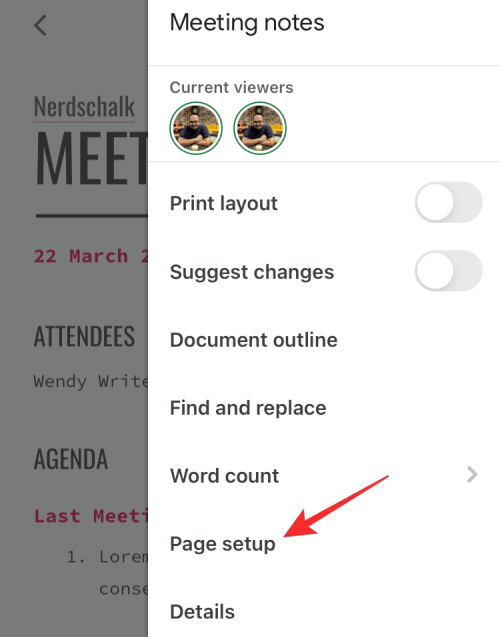
- When the document opens, tap on the 3-dots icon at the top right corner.

- In the menu that appears, select Page setup.
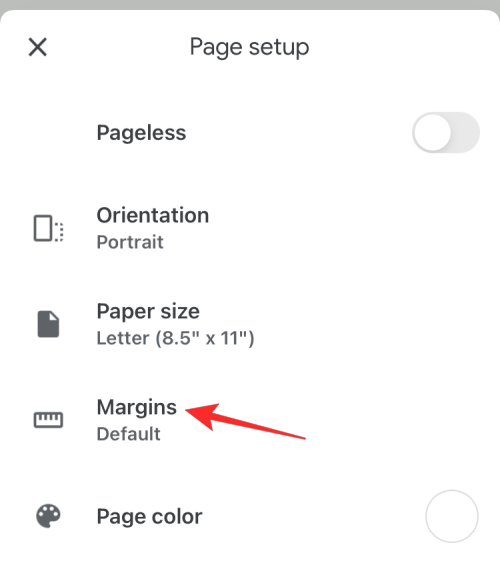
- Inside Page setup, select Margins.
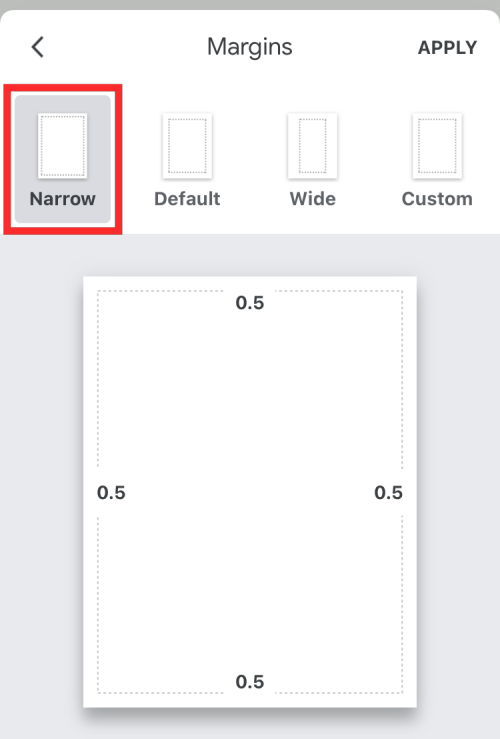
- On the next screen, you can select any of these four options from the top.
Narrow: Selecting this option will apply a margin of 0.5 inches on all four sides of a document.
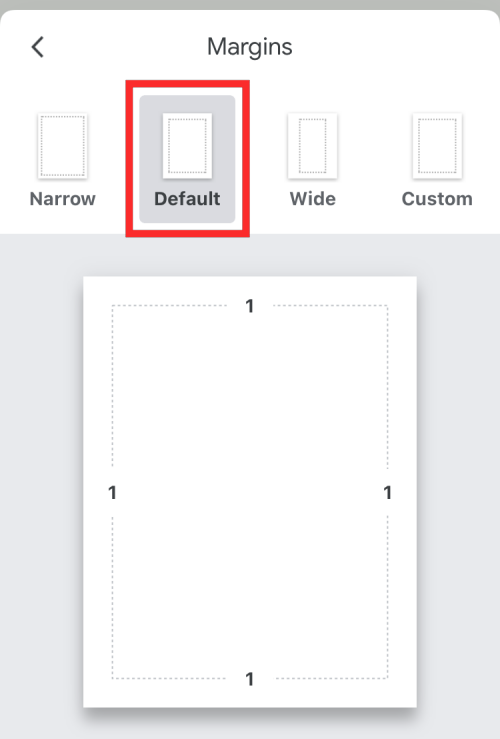
Default: This will apply a 1-inch margin on all four sides of a document.
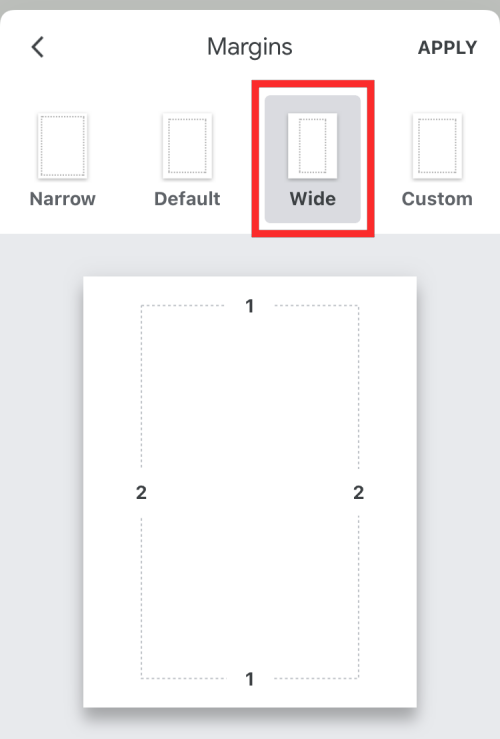
Wide: This option will set 1-inch margins on the top and bottom sides and 2-inch margins on the left and right sides.
Custom: By default, this adds a 1.5-inch margin on all four sides but you can modify it to your preferred size at any time.
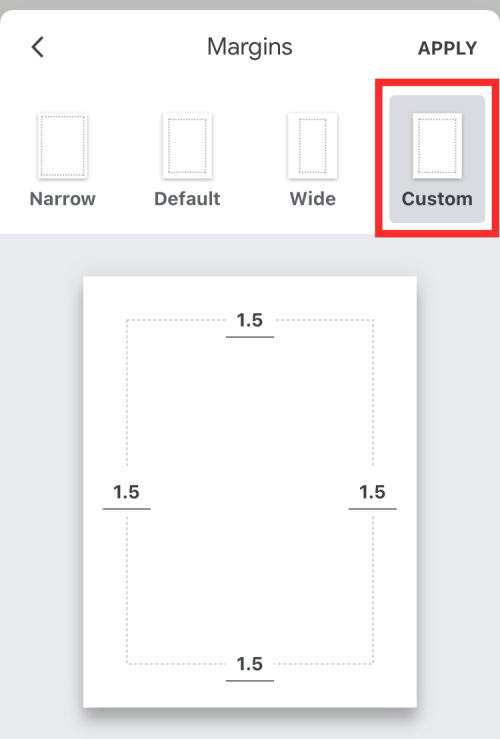
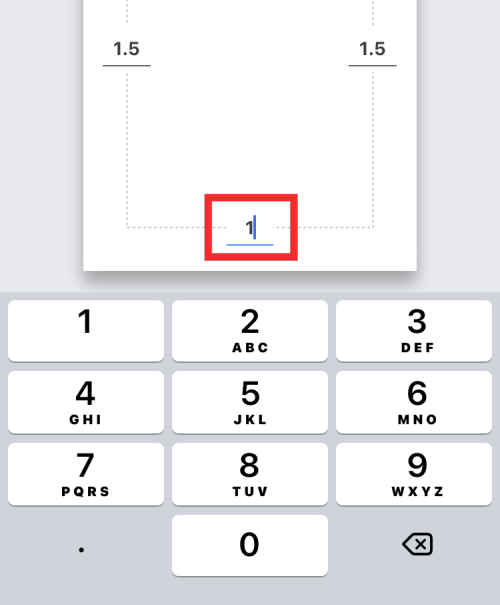
If you select Custom, you can choose different margins for the top, bottom, left, and right sides of the document by tapping on the number box on any side and entering your desired size for the margin.
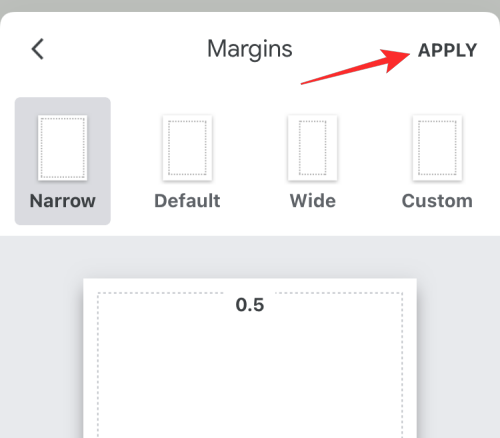
- Once you’ve chosen your preferred margin, tap on Apply at the top right corner to save changes.
Method 3: Using Ruler to adjust column margins
If your document is formatted with more than one column, using the Ruler tool like on Method #1 will only change the left margin of the first column and the right margin of the last column. However, you can still use the Ruler to adjust the column margins of a document.
On PC
- To adjust column margins, go to Google Docs homepage and select a document with multiple columns in the body. In this instance, we’re loading a document that has two columns.
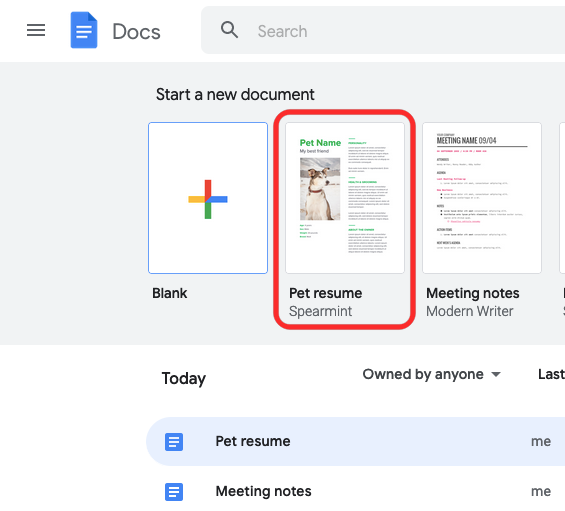
- When the document opens, use either Method #1 or #2 to set the margins at the top, bottom, left, and right portions like you would do on a document with a single column. After that, you can move on to adjusting the column margins which can only be done using the Ruler at the top.
- To adjust the margins of the first column, click anywhere on the second column. This will show the familiar blue rectangle and arrows in the Ruler above the selected column.
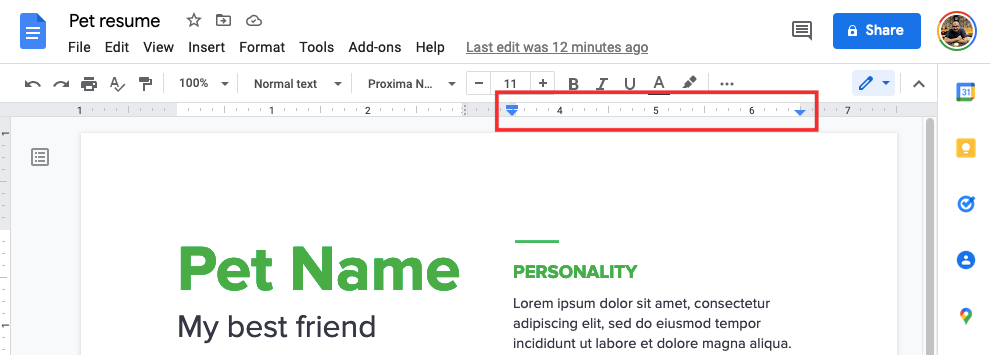
- With the right column selected, look for a vertical dotted line in the Ruler separating the white and gray areas above the first column. This dotted line will indicate where the right margin of the first column is placed. When you move your pointer to this dotted line, it transforms into a vertical cursor with double-sided arrows.
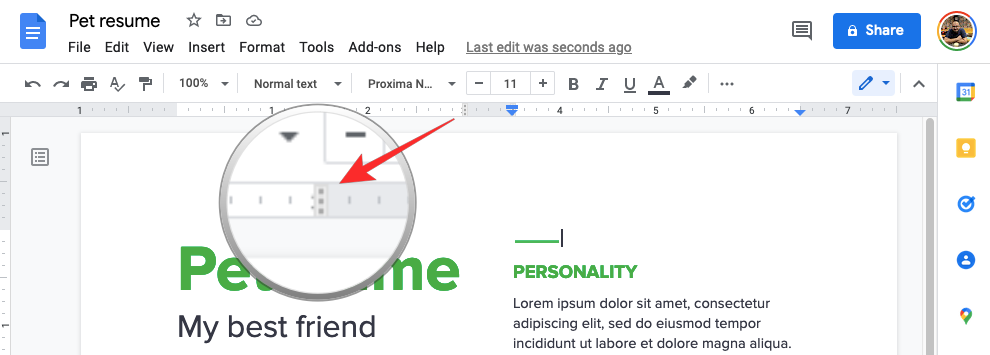
- To adjust the right column margin of the left column, click and drag this double-arrow cursor towards the left or right to increase or decrease the margin size.
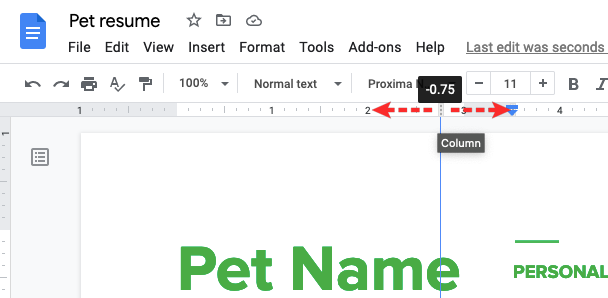
- When done, release the mouse button to apply the chosen column margin for the left column.
- Similarly, to adjust the margins of the second column, click anywhere on the first column so that the blue rectangle and arrows appear in the Ruler above that column.

- At the same time, there’ll be a vertical dotted line visible inside the Ruler between the grey and white areas.

- You’ll see the vertical cursor with double-sided arrows when you hover the mouse over this dotted line.
- To adjust the left column margin of the right column, click and drag this double-arrow cursor towards the left or right to set the margin to a suitable size.
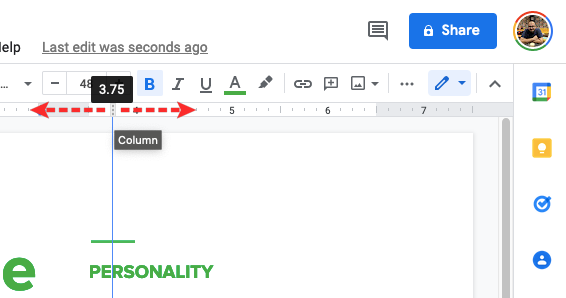
The new margin will be set once you lift the mouse button.
On phone (unavailable)
The Google Docs app on iOS or Android doesn’t have a column function, so there’s no way to adjust column margins if you use the app. If you want to change the column margins of a document, you’ll have to go to Google Docs on a computer.
How to set one-inch margins on Google Docs
The default margin size on all sides of a document you create on Google Docs is one inch. Many organizations stick to one-inch margins for creating official documents. If Docs doesn’t automatically create documents with one-inch margins, you can set a document to have one-inch margins.
On PC
- Open the Google Docs homepage and select a document you want to edit. When the document loads up, go to File > Page setup from the menu bar at the top.

- In the Page setup box that opens, enter ‘1’ as the value inside all four boxes inside the Top, Bottom, Left, and Right boxes under ‘Margins’.
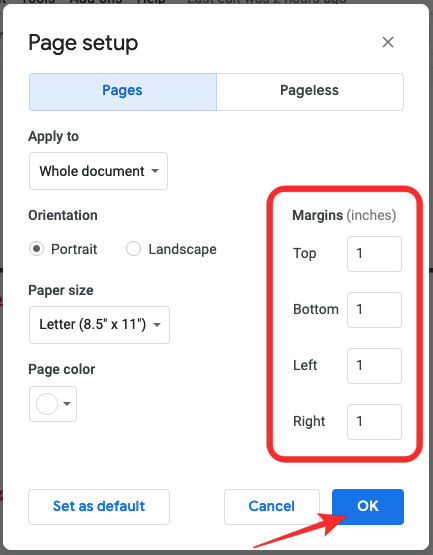
- If the unit inside ‘Margins’ reads “centimeters” instead of “inches”, enter ‘2.54’ as the value inside the specified boxes.
- To apply the new margins to the document, click on OK.
On phone
Setting one-inch margins on a document using the Google Docs app is much easier but it only works if you have an iPhone or iPad.
- Open the Google Docs app on iOS and select the document you want to edit.

- When the document opens, tap on the 3-dots icon at the top right corner.

- In the menu that appears, select Page setup.

- Inside Page setup, select Margins.

- On the next screen, select Default from the top. This is the option that sets a 1-inch margin on all four sides of a document. After that, tap on Apply at the top right corner to save changes.
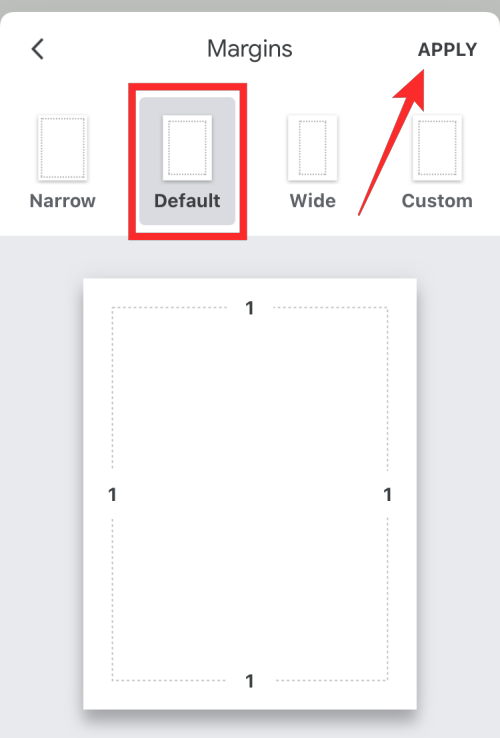
The document will now be formatted to one-inch margins.
How to set default margins for new documents
If you work regularly on Google Docs and you find yourself constantly changing the margins to custom size, then there’s a way to set your preferred margin size as the default value for all new and future documents you create on Google Docs.
- To set a margin as default for all new documents, open the Google Docs homepage on a web browser and select a document you want to edit.
- When the document loads up, go to File > Page setup from the menu bar at the top.

- In the Page setup box that opens, enter your desired values for the Top, Bottom, Left, and Right boxes inside ‘Margins’. All these values could be different from each other and can be anything other than the standard one-inch margin. After you’ve entered the preferred margin sizes, click on Set as default.
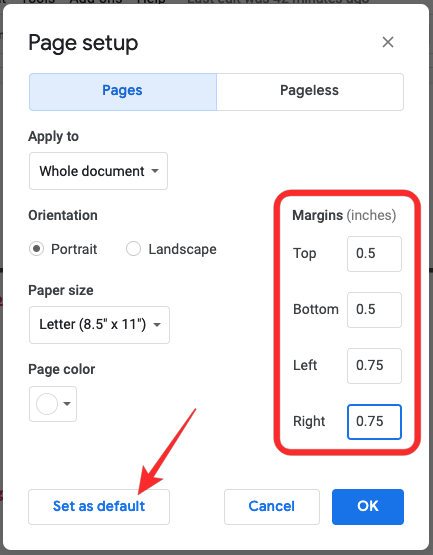
- Google Docs will now save your setting as default. Now, click on OK to make the changes.
From now onwards, all new documents you create on Docs will have the custom values you set.
The ability to set your chosen size as default for margins is only available when accessing Google Docs on a computer and not on the Google Docs app on a phone.
How to lock a document’s margins when sharing
Documents created on Google Docs can be easily shared with others for collaboration. If you don’t wish others to alter the margins of your document, the only way to prevent them from doing it is by restricting their document privileges.
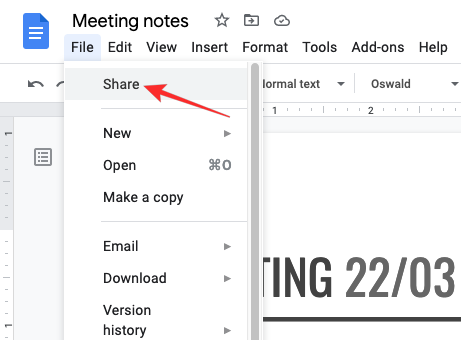
- Open Google Docs and select a document you want to share. When the document loads up, go to File > Share.
- Inside the ‘Share with people and groups’ box, enter the name or email address of the person you want to share the document with. After you add someone, click on the box on the right-hand side of the person’s name and select either Viewer or Commenter. If you wish to prevent this person from tweaking your margins, you should avoid setting them as Editor at all costs. To share the document, click on Send.
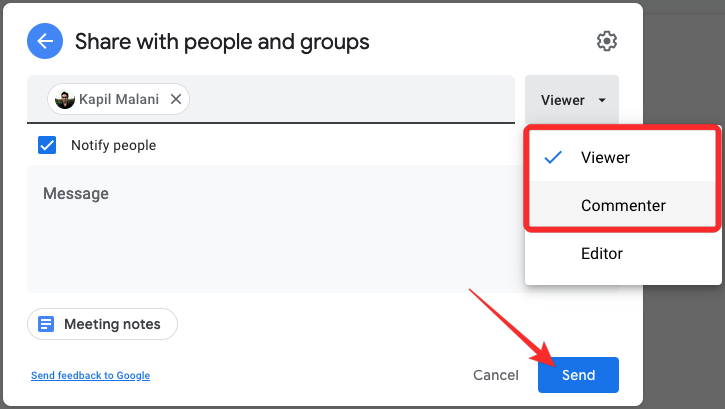
The recipient won’t be able to adjust the margins of the document or make any other changes to it.
Can you change the margins of external documents?
If someone has shared a document with you on Google Docs and you want to change its margins, it’s only possible if you have been assigned as an “Editor” by the sender. In that case, you can make adjustments to the margins of a document like it was created by yourself.
You won’t be able to change the margins of external documents if the person who shared them with you didn’t give you editing privileges and set you as either a Viewer or Commenter.
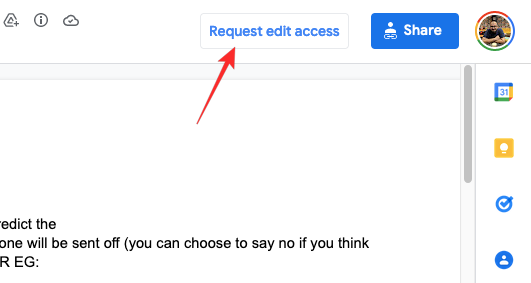
- If you wish to change margins in such cases, you will have to request the sender editing access by opening this document and clicking on Request edit access at the top right corner.
- Next, type a message you want to send to the document’s owner inside the “Ask owner to be an editor” box and click on Send.
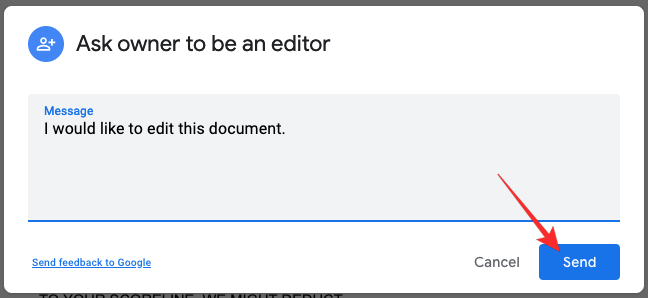
You will be able to adjust the margins once the owner grants you editing access.
Can you change the margins for different pages of the same document?
No. Google Docs doesn’t let you change margins for different pages of a document. If you wish to change the alignment of pages differently, the service offers you indents – the blue-colored rectangle and arrows inside the Rules.
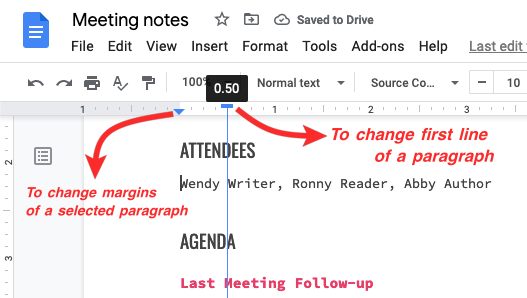
You can select a paragraph and move it leftwards or rightwards using the blue arrows from the Ruler. To realign the first line of a paragraph, select the paragraph and click and drag the blue rectangle from the Ruler. While this may not be a proper alternative, it’s by far the best choice if you’re looking to change a page’s appearance inside a document.
That’s all you need to know about changing margins on Google Docs.


Discussion