Instagram has slowly grown to be one of the most popular image-sharing platforms in the world. You can even share videos, shorts, and reels all the while enjoying the perks of their refined algorithm.
In addition to this Instagram recently introduced the ability to have more control over your feed, something that already existed but was taken away in 2016. So how does this new feature help you customize your home feed? Let’s find out!
How is the Instagram feed curated?
Instagram currently curates your feed based on your activity on the platform. The algorithm takes into account your behavior, your likes, your dislikes, your followers, people you follow, people your followers and you follow, how much time you spend on a post, and much more when curating your home feed.
This detailed curation allows the algorithm to serve you what is best for you while also ensuring that Instagram can serve ads that will be the most relevant to you.
This automatic curation has its drawbacks apart from privacy concerns. Mainly, the inability to view posts chronologically or to simply view posts from a certain set of people. Thankfully all that is about to change now, let’s find out more.
Related: Is There Any Way To See How Many Times Someone Views Your Instagram Story?
Can you change your Instagram feed?
Yes, you can now change your home feed on Instagram. The feature was recently teased by Instagram head-on Twitter through a video explaining the new options. The ability to change your feed still seems to be in the beta stages and is only available to a select few users for now.
However, Instagram seems to be planning a gradual rollout in the coming months, although the company hasn’t indicated a release date yet.
How to change your Instagram feed in 7 Ways
You can now use these latest features from Instagram in conjunction with existing features to customize your home feed in many ways. Choose either of the options below that seems to fit your needs and requirements.
1. Select “Following”
This is quite simple: tap the drop-down arrow in the top left corner of your screen and select ‘Following’. This will show you all posts from people you follow, sorted chronologically.
2. Sort posts from special people you follow
You need to have created a favorites list for this to work. If you haven’t marked users as favorite yet, simply head to a profile and mark them as favorite. Once you do so, a Pin icon will be added beside their profile which can then be used to identify your favorites. Posts from these accounts will also be marked with the same icon.

Now that you have a favorites list, go to your home page, tap on the drop-down menu in the top left corner and select ‘Favorites’. Your feed will now be sorted to display posts only from your favorites in chronological order.
3. Remove irrelevant posts by unfollowing users

At this point, if you are further looking to curate your feed then we recommend you unfollow users that are no longer relevant to you. We all follow new people on Instagram until they get buried deep in your following list only to be found years later.
It’s time to clean your account and unfollow users that are no longer relevant to you. This will help curate your feed and more importantly ensure that you get content that you care about.
Related: How to Save or Download Instagram Reels to Your Phone Gallery, Camera Roll or Storage
4. Improve Instagram suggestions by providing feedback
You can provide feedback when using the default home feed to help the AI curate your feed better. Reporting, unfollowing, and hiding posts from your feed are all cues for the algorithm which are taken into account the next time similar content is served to you.
Doing this regularly will help train the AI in serving you better content that is more relevant to you.
Tap the ‘3-dot’ menu icon on a concerned post and select your desired option.
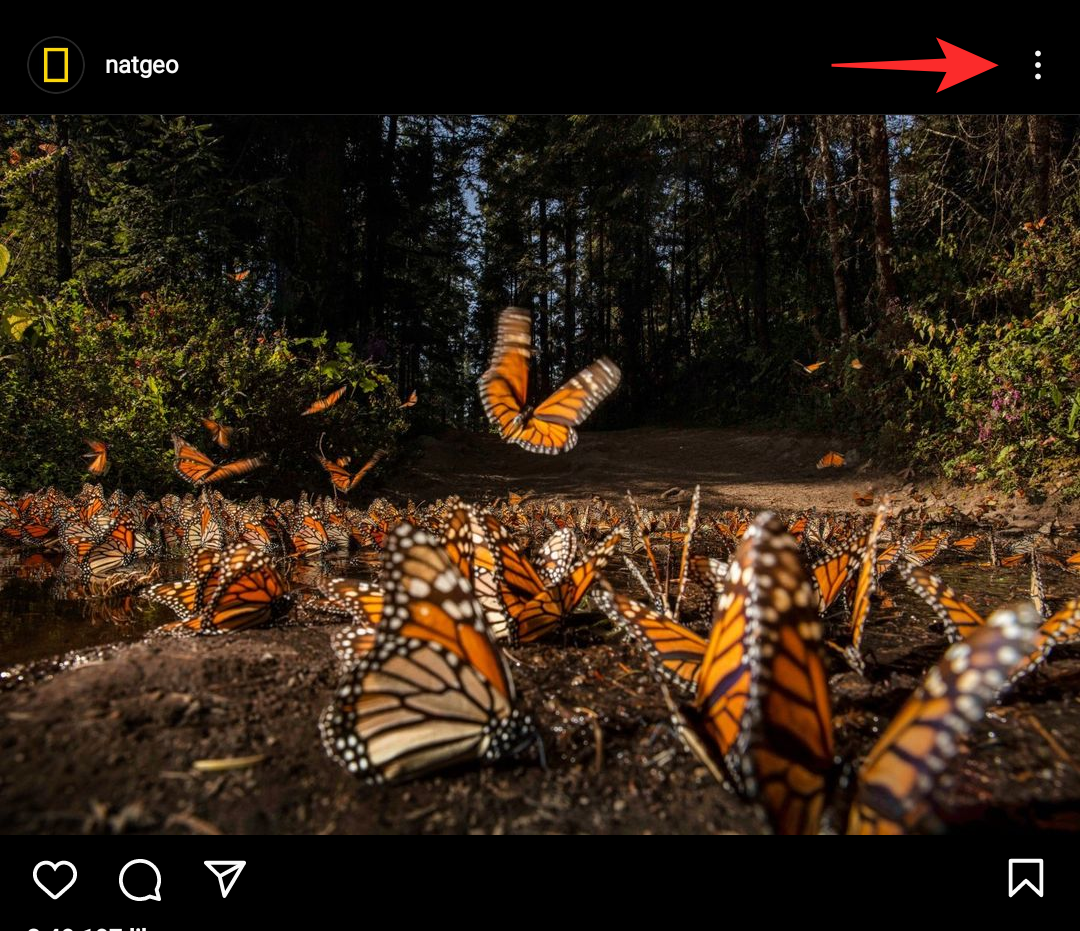
When reporting a post, ensure that you specify and do not misreport the post. In case you just wish to see less of such posts, select ‘Hide’.
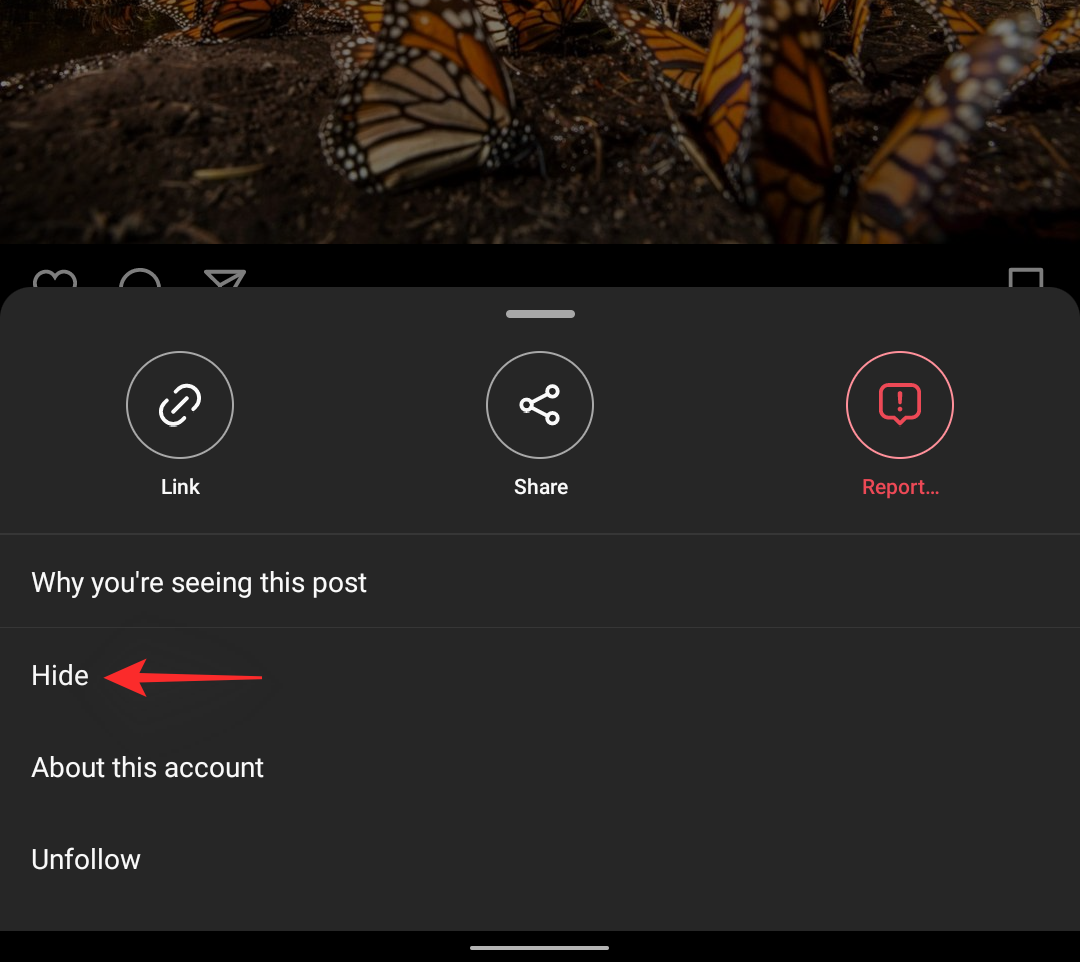
In addition to the following options, you can also tap on ‘Why you’re seeing this post’ to know more details about what made the AI show you this post.
5. Turn on notifications for important accounts
This is another way in which you can curate your home feed and ensure that you are up to date with the latest information from accounts that you care about. You can turn on notifications for certain accounts so that you are notified each time they publish something new.
To turn on notifications for an account follow the guide below to help you along with the process.
Open Instagram and visit the concerned account. Now tap the bell icon in the top right corner of your screen.

Now turn on the notifications you wish to receive for certain content posted by the selected account. You have the following options at your disposal.
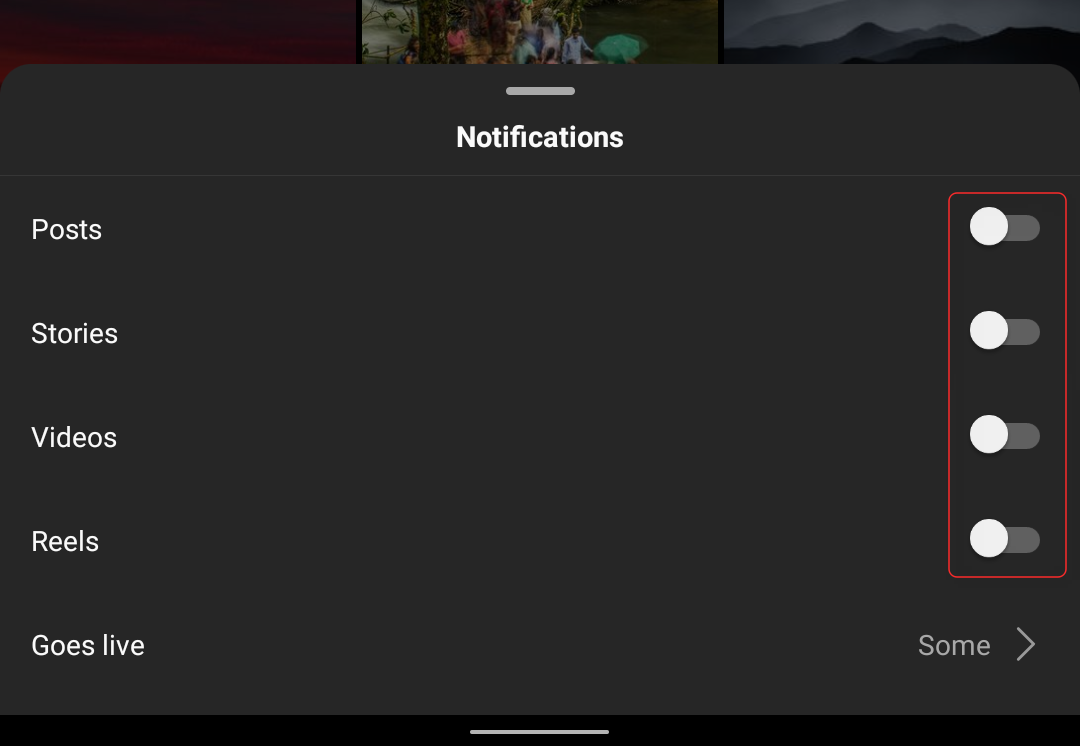
- Posts: You will get notifications whenever the account publishes new posts.
- Stories: Instagram will send you a notification each time the account posts a new story.
- Videos: You will receive a notification whenever a new video is published by the account.
- Reels: This option will allow you to receive notifications whenever new Reels are published by the concerned account.
- Goes live: Use this option to manage how you receive notifications about ‘Instagram Live’ sessions from the selected account.
- Get all notifications: You will be notified about each live session regardless of its content, topic and subject.
- Get some notifications: Instragram’s algorithm will send you notifications for live sessions hosted by the account where the content will be relevant to you. This could be regarding the things you follow, hashtags that you are most active on, things that you post about, and more.
- Turn off notifications: This option helps you turn off all live session notifications for the account regardless of their content.
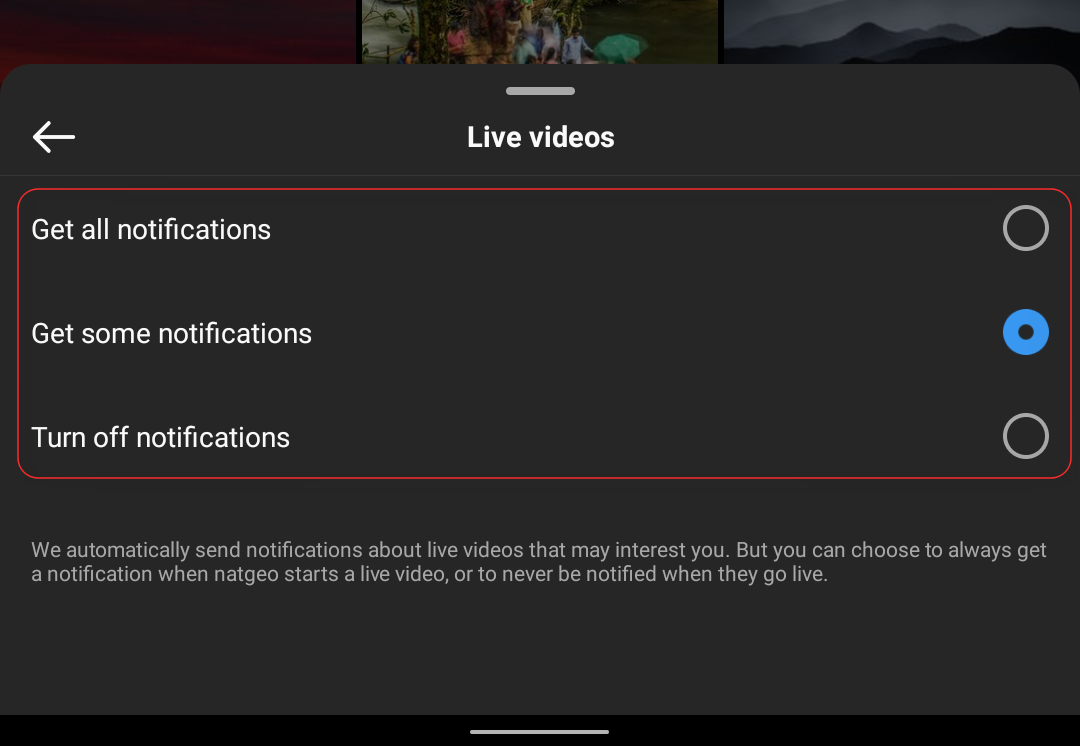
And that’s it! You will now have turned on notifications for the selected account and you will now be notified each time there is new content that interests you.
Related: How to copy an Instagram caption or comment
6. Reset your explore feed
Apart from reels and your home feed, you can also customize and reset your Explore feed on Instagram. This is a little-known fact but you can clear your search and explore history within the app whenever you want. This will help you reset your explore feed and get new suggestions while you are at it. Follow the guides below to clear your search history and reset the Explore page.
6.1 Reset explore page
Open the Instagram app and tap on your profile picture in the bottom right corner of your screen.
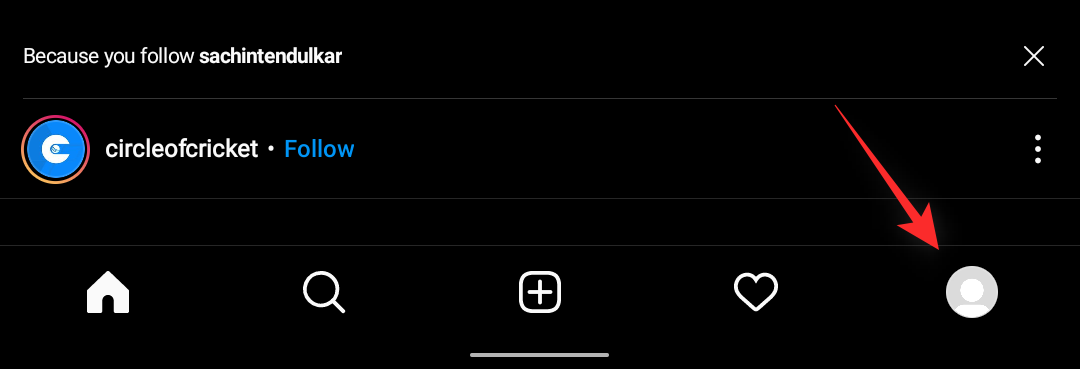
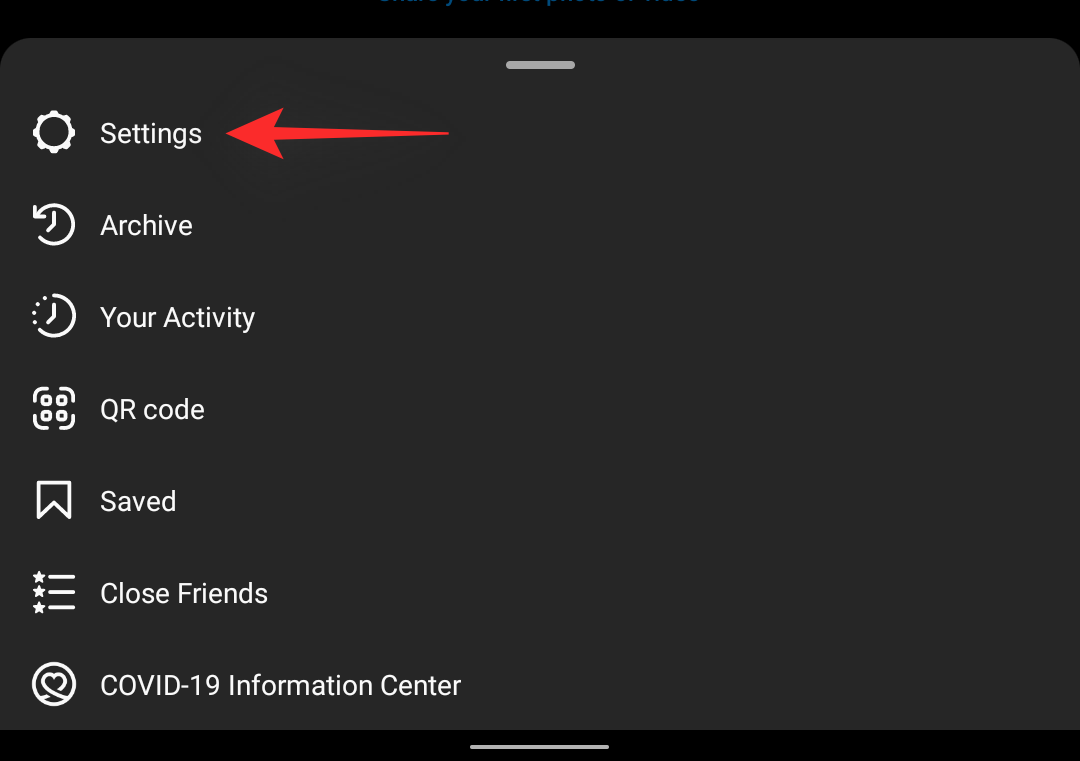
Tap the menu icon in the top right corner of your screen now and select ‘Settings’.
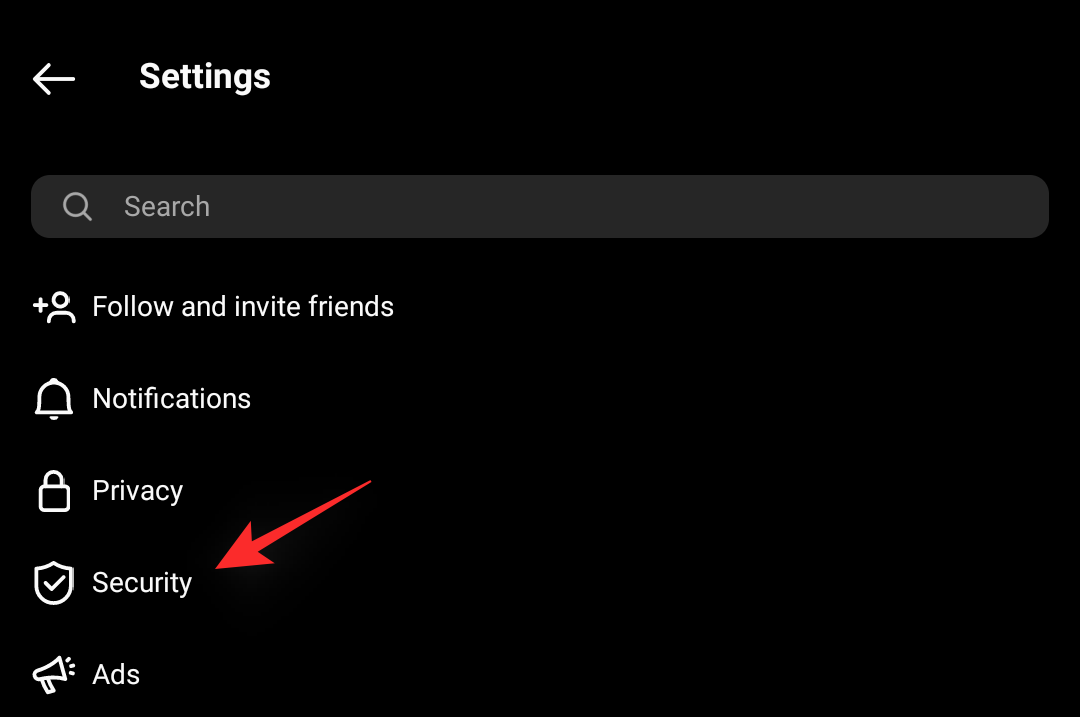
Tap and select ‘Security’.
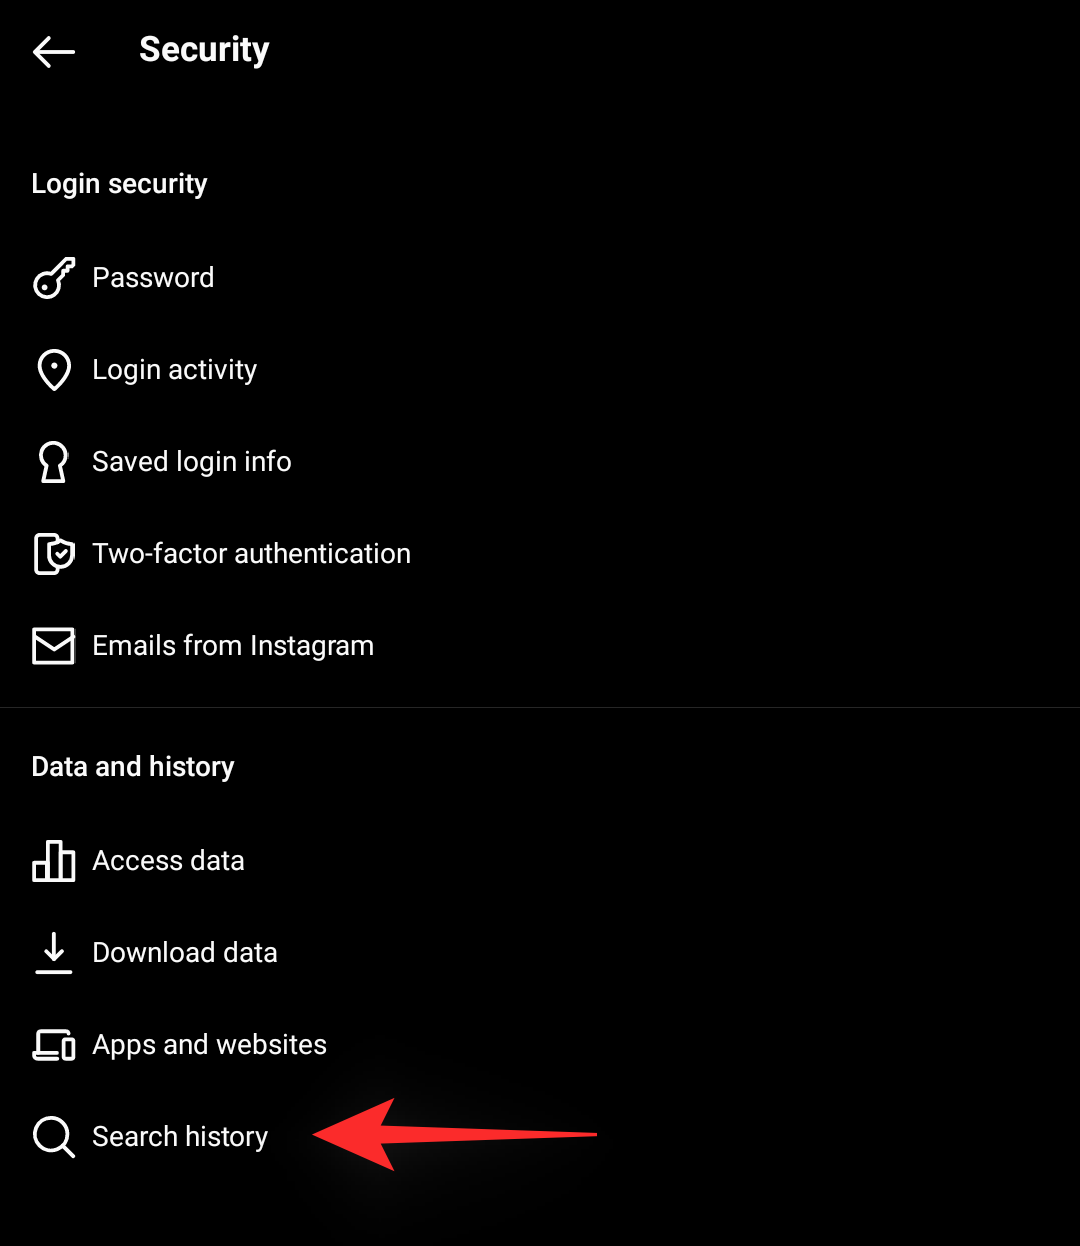
Now tap on ‘Search history’ at the bottom.
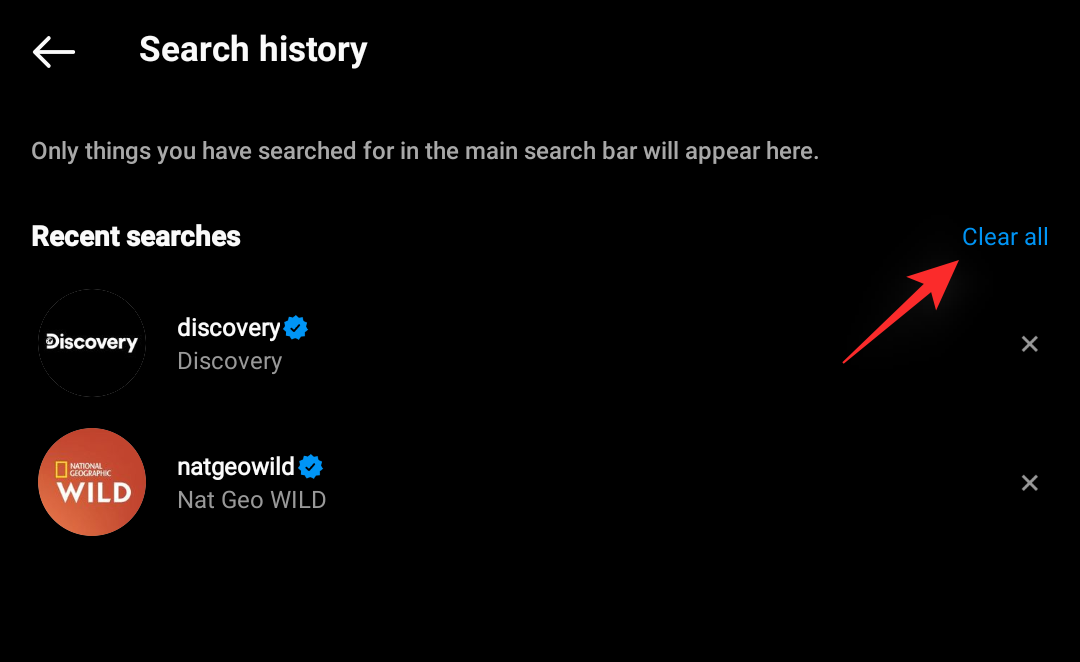
Tap on ‘Clear all’ to delete all your searches. You can also choose to individually remove your searches by tapping on the ‘X’ beside them.
Once done, close and re-open the Instagram app on your device. The explore page should now have been reset.
6.2 Curate explore page
If you don’t wish to clear your search history and completely reset the Explore page, you can choose to curate it instead. You can do this by clearing individual unwanted searches from your history and subsequently by letting Instagram know about the posts you don’t wish to see.
Follow the guide below to help you along with the process.
Open the Instagram app and tap on your profile picture.

Now tap the menu icon in the top right and select ‘Settings’.

Tap on ‘Security’.

Now tap on ‘Search history’.

Tap on ‘X’ beside a search term that you would like to remove from this list. This will affect your Explore page as well as how Instagram serves you new posts.
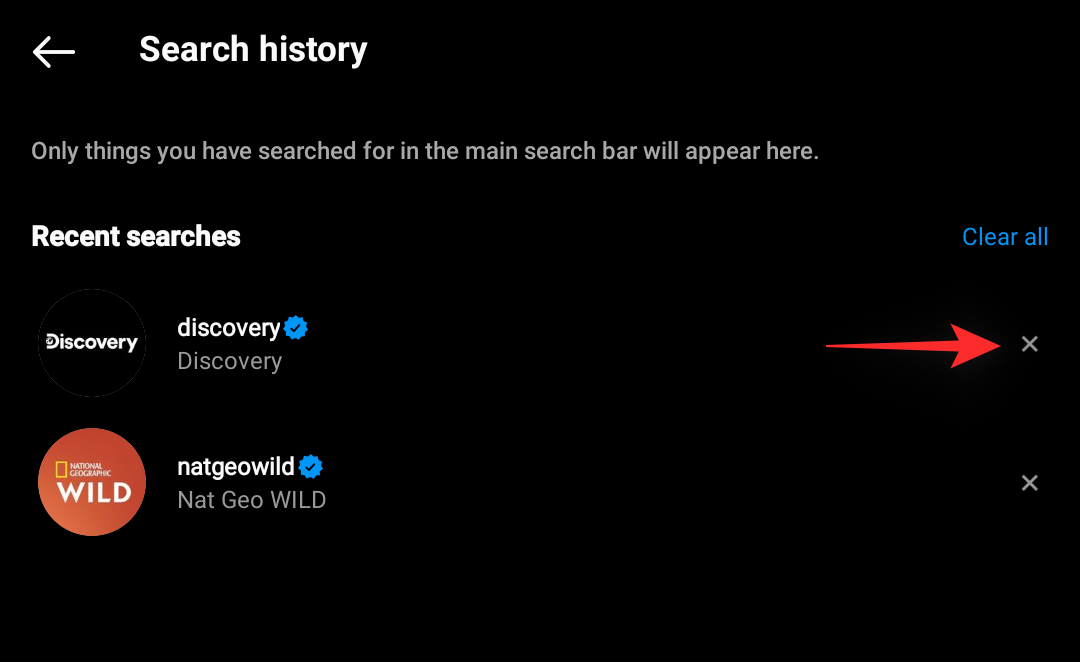
Once you are done, tap the Explore page icon at the bottom of your screen. Now look for a post that is not relevant to you, once found, tap on it.

Tap the ‘3-dot’ menu icon in the top right corner.

Select ‘Not interested’.
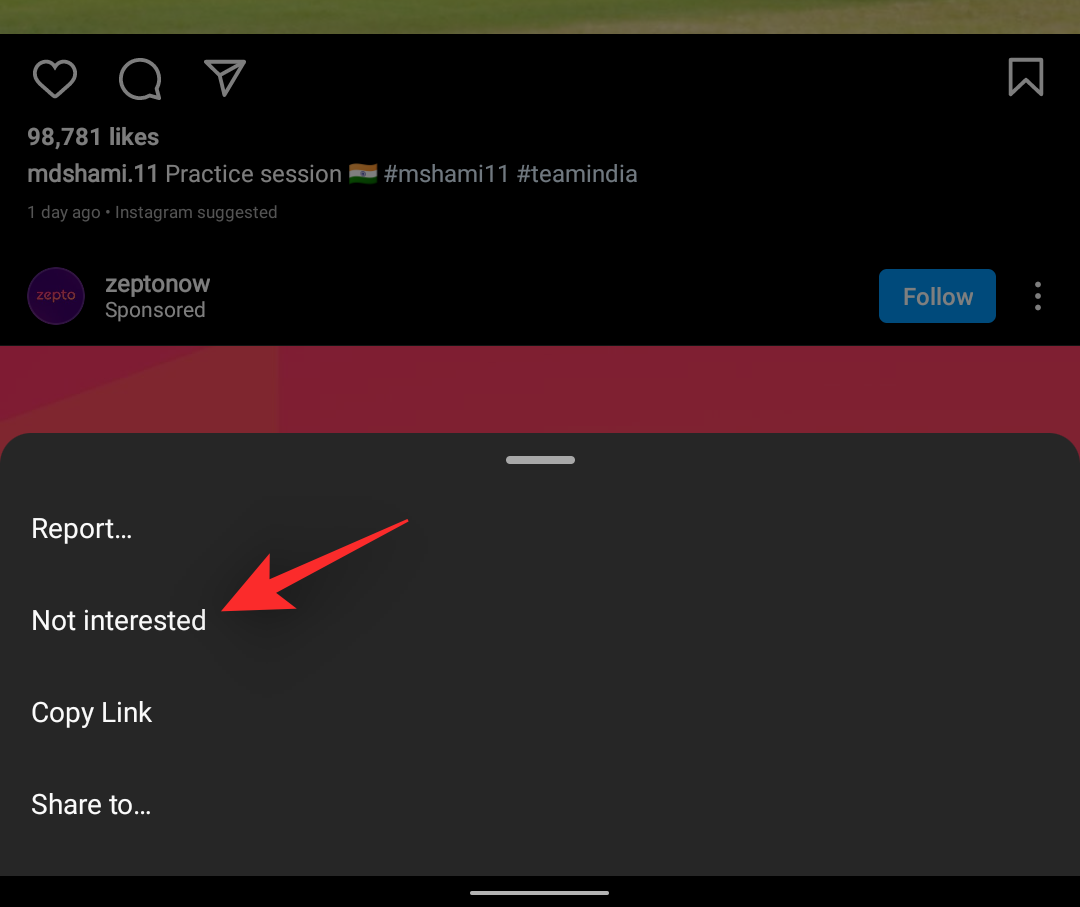
And that’s it! Repeat the steps above to let Instagram know about posts that are irrelevant to you and the algorithm should automatically curate your Explore page accordingly.
7. Manage Story and Reel notifications
Notifications are a great way to stay up to date with your home feed, however, if you are subscribed to someone who posts a lot, then this can end up being annoying.
You can manage your notifications easily within Instagram and even turn them on for users that are important to you. Follow the relevant guide below to help you along with the process.
7.1 Turn on Notifications
Open Instagram and visit a profile for which you would like to receive notifications. Tap on the bell icon in the top right corner.

Now turn on the notifications you would like to receive from the concerned user. You have the following options at your disposal.

- Posts
- Stories
- Videos
- Reels
- Live Videos
Once turned on, you can sit back and relax as you will now be notified every time the user posts something.
7.2 Mute/Turn off notifications
You can use the guide above to turn off notifications by simply tapping on the toggle again. But did you know that you can mute users on Instagram as well?
This will prevent you from seeing their latest posts and reels in case you wish to take a break from someone. Follow the steps below to help you along with the process.
Open Instagram and visit an account that you would like to mute, tap on ‘Following’ once there.
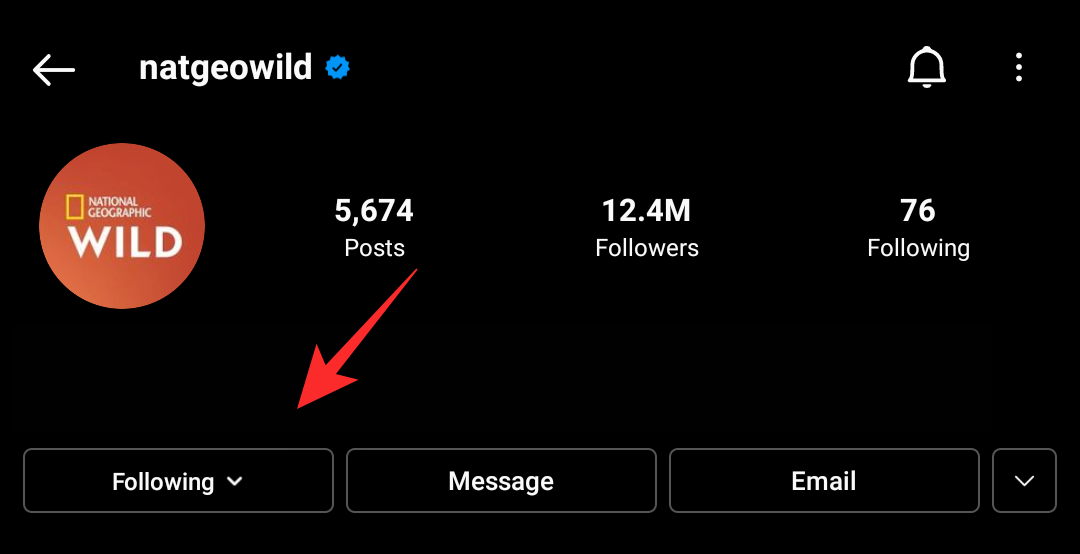
Note: You can not mute users that you do not follow.
Tap on ‘Mute’.

Now choose the content you wish to mute from the concerned account. You can choose from the following two options. Tap on the desired toggle to turn it on or off.
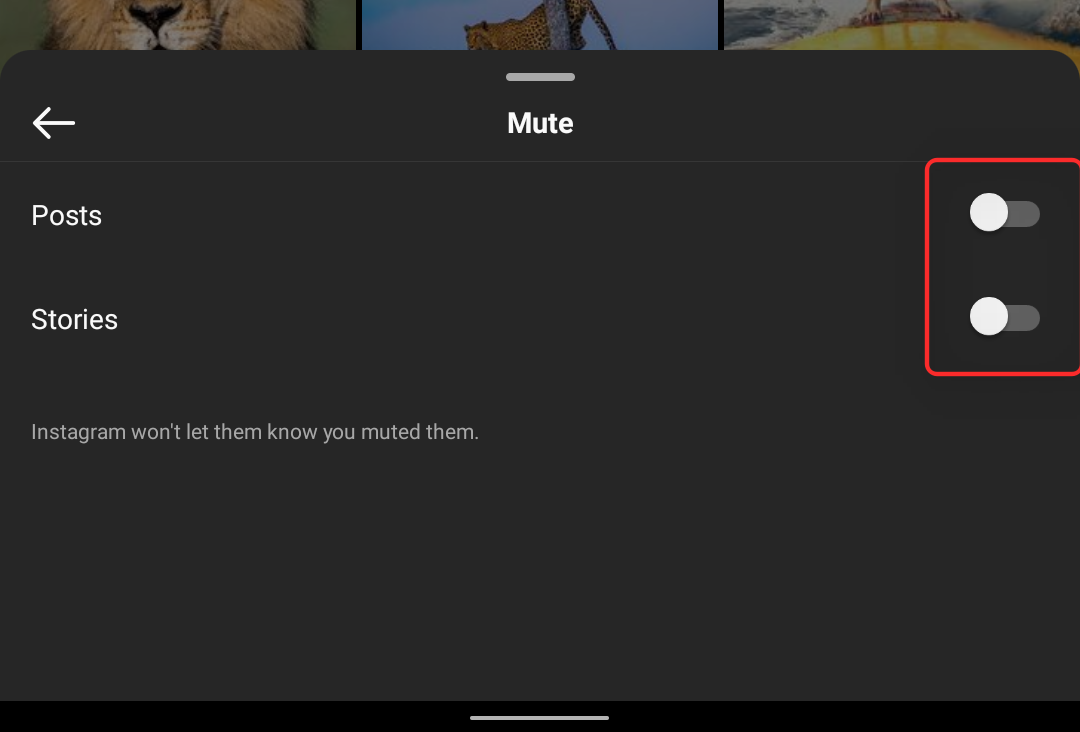
- Posts
- Stories
You can now close and re-open the app for the changes to take effect and you should no longer see posts and stories in your home feed from the concerned account.
FAQs
Instagram constantly keeps changing its UI and renaming elements which end up being quite cumbersome for everyone. Here are a few commonly asked questions about Instagram and its changes, that should help you get quickly up to speed.
How to remove favorites from Instagram?
Removing favorites as of now is the same as adding them. Simply visit the concerned profile and use the option at the top to un-favorite them. Once done, they will be removed from your favorites list and you will no longer receive their posts in your ‘Favorites’ feed.
When will I get the new sorting feature of Instagram?
We don’t know as of writing this post, Instagram has been tight-lipped about the release date though user reports make it seem it should happen in the coming months. The feature does not seem to be region locked as using a VPN does nothing.
Additionally, the latest alpha from Instagram seems to have the feature but random users can use it, and even more or not.
Judging by this, the feature is still in its early phases and could take at least a couple of weeks before seeing a final stable release.
Can you restrict someone without blocking them?
Yes, Instagram has this exact feature to restrict certain accounts that you don’t wish to block. Follow the guide below to restrict someone on Instagram.
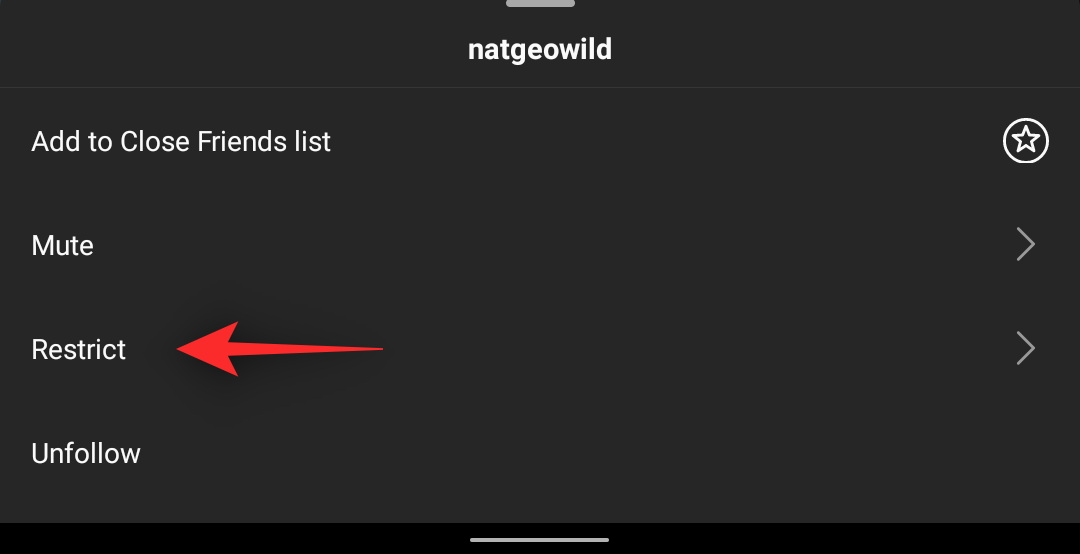
Open Instagram and visit the concerned account that you wish to restrict. Tap on ‘Following’ once you are there.

Select ‘Restrict’.
Tap on ‘Restrict account’ again to confirm your choice.
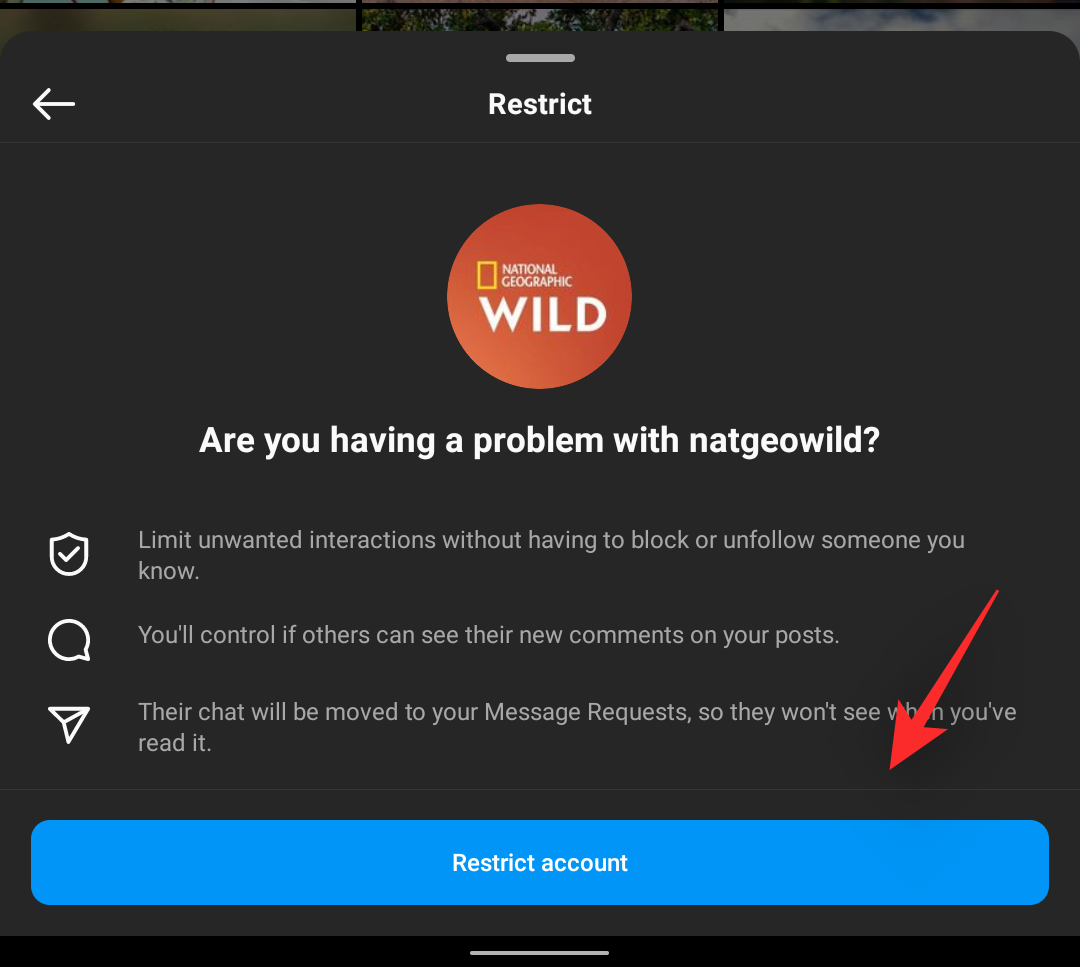
And that’s it! The selected account will now be restricted to Instagram. Their interactions with you and the content you post will now be limited on the platform.
Why do I see old posts at the top of my feed?
This is because you are using the default sorting algorithm for your home feed which was the only choice until now. Instagram uses your online as well as platform activity to show you posts that the algorithm thinks are more relevant to you.
This is why you get older posts from accounts you interact with at the top of your home feed when using the default sorting layout. You can change this and sort your posts chronologically using the guide at the top.
Can I remove certain users from appearing in my feed?
Yes, you can restrict users to stop seeing their posts in your feed. You can also block users if you wish to completely remove them from your experience. Additionally, you can also create a personalized list of favorites where you won’t have to view the concerned user’s content altogether.
Use either of these methods to prevent someone from appearing in your home feed. If you need any help, you can refer to our guides at the top of this post.
Can I hide posts from my feed?
Yes, you can easily hide posts from your feed. Tap the 3-dot menu icon in the top right corner of the post and select ‘Hide’. The post will then be hidden from your feed and you won’t see it again. You can change this by tapping on ‘Undo’ or further taking action on the content by reporting it.
If you wish to avoid contact with the concerned account in the future then Instagram will also give you shortcuts to help you unfollow and block the account.
How is hiding a post different from reporting?
Hiding a post hides only that post from your home feed. It could be something sensitive or something you care about that you don’t wish to view when browsing Instagram. Hiding is a personal choice and does not report the account/post to Instagram.
Reporting, however, is the act of bringing Instagram’s attention to posts that violate the rules and privacy of the platform.
This helps make the platform a better place while allowing you to get rid of malicious content posted by users. Reporting will not hide the post from your feed and you might re-encounter it on the Explore page as well.
We hope this post helped you easily customize your Instagram feed. If you have any more questions, feel free to drop them in the comments section below.
RELATED:


