

PC gaming is the limit. One of the reasons why it still trumps consoles is the wide array of graphics settings that users can change based on how they best want to configure their games.
For those with Nvidia graphics cards, all such settings are found in the Nvidia Control Panel app. In most cases, the default settings work well enough to optimize the game for performance, quality, or a balance between the two, based on your configuration.
But if you’re looking to maximize your game’s performance, knowing which ones to change and which ones to leave alone is crucial. The following guide will illustrate what each of these settings does, and how you can best set them up to enjoy higher in-game frames per second. So, let’s get started.
Related: 5 Top Ways to Check VRAM on Windows 11
Nvidia Control Panel vs Nvidia GeForce
Nvidia has two separate apps – Nvidia Control Panel and Nvidia GeForce. Both of these offer a wide range of GPU tweaks and customizations for all types of gamers. But they are not made equal.
Nvidia’s GeForce has a better interface, updates drivers automatically, records and broadcasts your games, and can optimize games for performance or quality. But if you wish to get into the thick of things and change such settings as antialiasing, texture filtering, vertical sync, etc., or force GPU settings globally for optimal performance, Nvidia’s Control Panel is still your best bet.
Update Nvidia graphics drivers
Before we start, it is highly recommended that you update your graphics drivers, especially if you don’t remember doing so recently. Nvidia regularly updates its GPU drivers to fix bugs and better optimize your gaming experience.
Method 1: Using the Nvidia GeForce Experience app
The easiest way to do so is via the Nvidia GeForce app. If you don’t have Nvidia GeForce for some reason, you can download it from here.
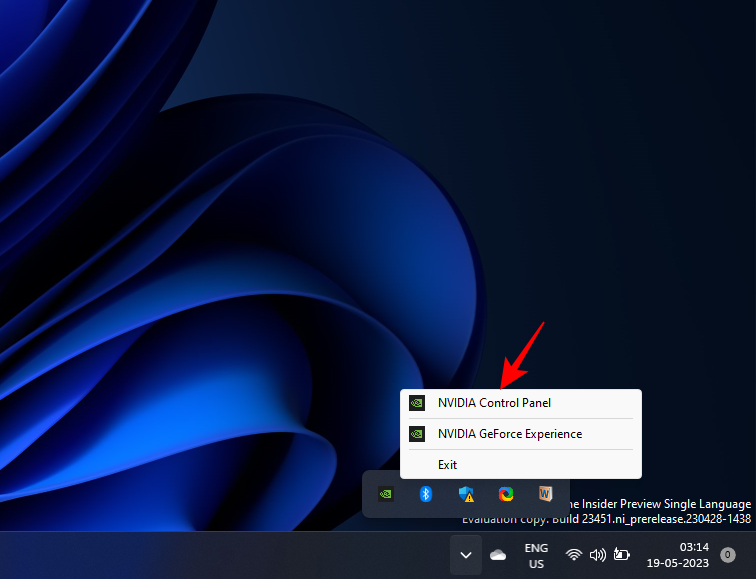
- In the system tray, right-click on the Nvidia logo and select Nvidia GeForce Experience.

- In the Drivers tab, go to the three-dot menu and choose Game Ready Drivers.
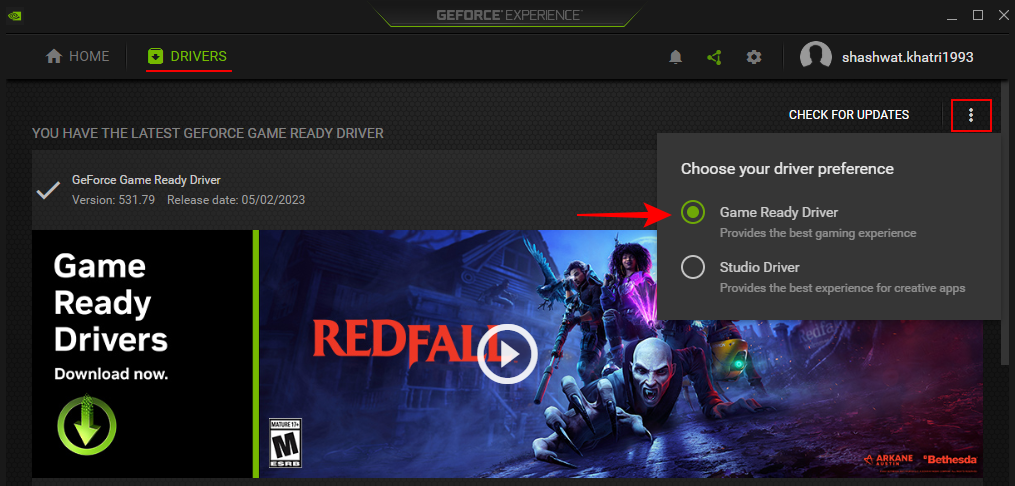
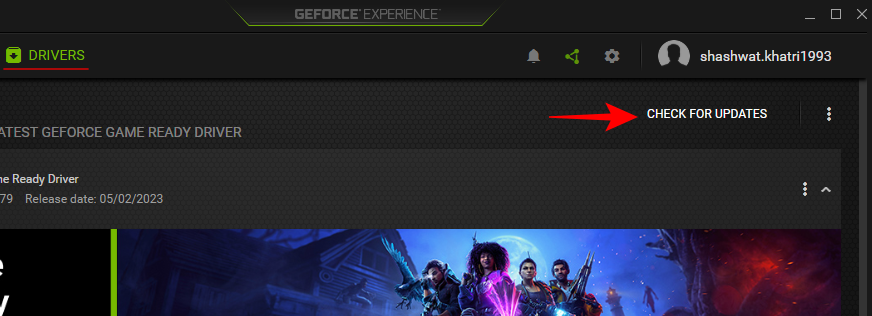
- Then click on Check for updates.
Method 2: Using Device Manager
Alternatively, you can update your GPU drivers from your system’s Device Manager.
- Right-click on Start and open Device Manager.
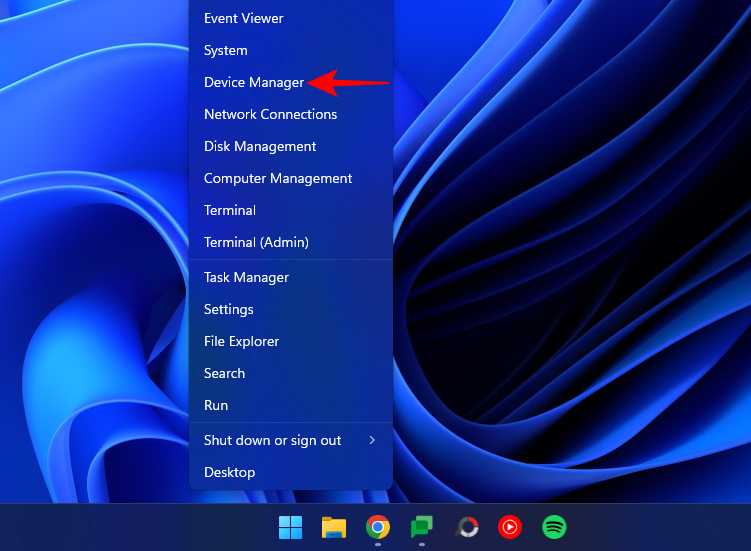
- Expand the ‘Display adapters’ branch, right-click on your GPU, and select Update driver.

- Select Search automatically for drivers and let Windows handle the rest.
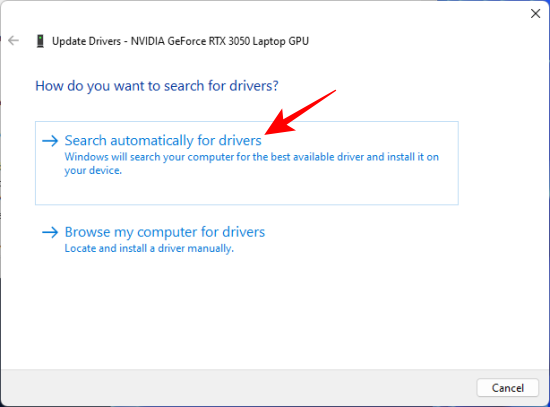
- Once done, restart your system.
Method 3: Using Nvidia’s website
- Go to Nvidia’s drivers’ page and pick your system and GPU configuration from the drop-down menus. Then click on Search.
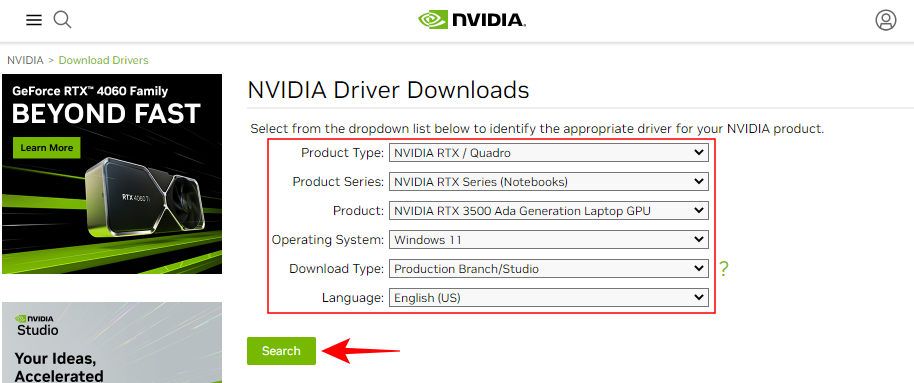
- Download the drivers and install them.

Apply the Best Nvidia Control Panel settings
Open the Nvidia Control Panel to start making the changes. Here’s how:
- Like the Geforce Experience app, Nvidia’s Control Panel is housed under its system tray icon.
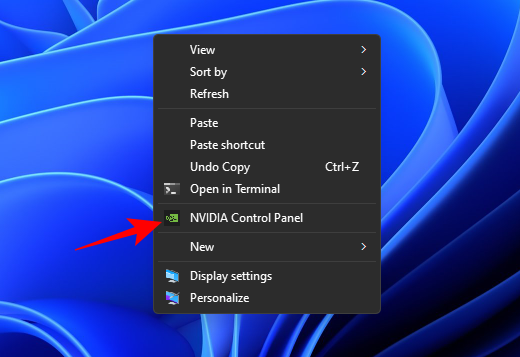
- You can also access it from the Desktop context menu (> Show more options).
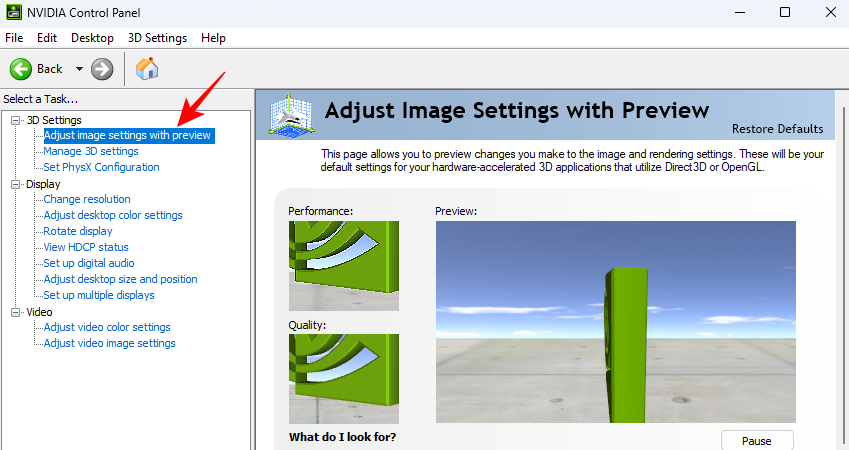
- Once it opens, go to Adjust image settings with preview under “3D settings” in the left pane if it’s not already selected.
- On the right, choose Use the advanced 3D image settings and click on Apply.
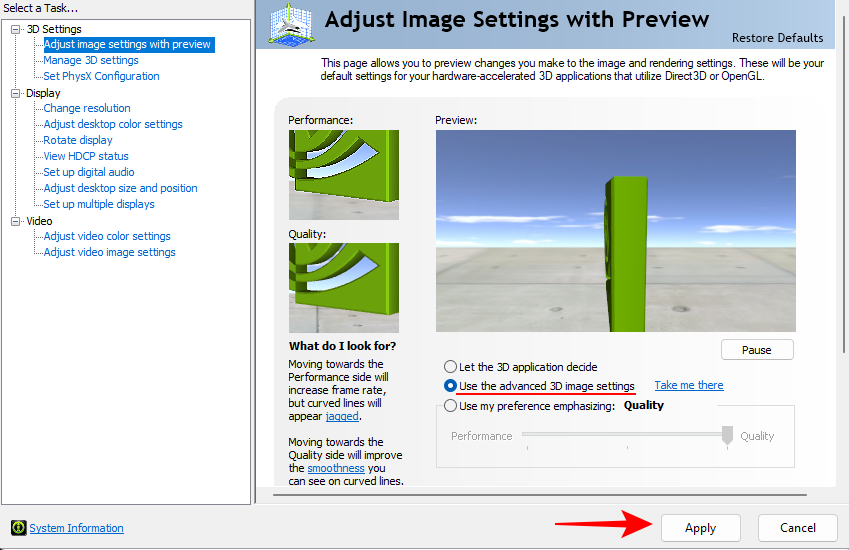
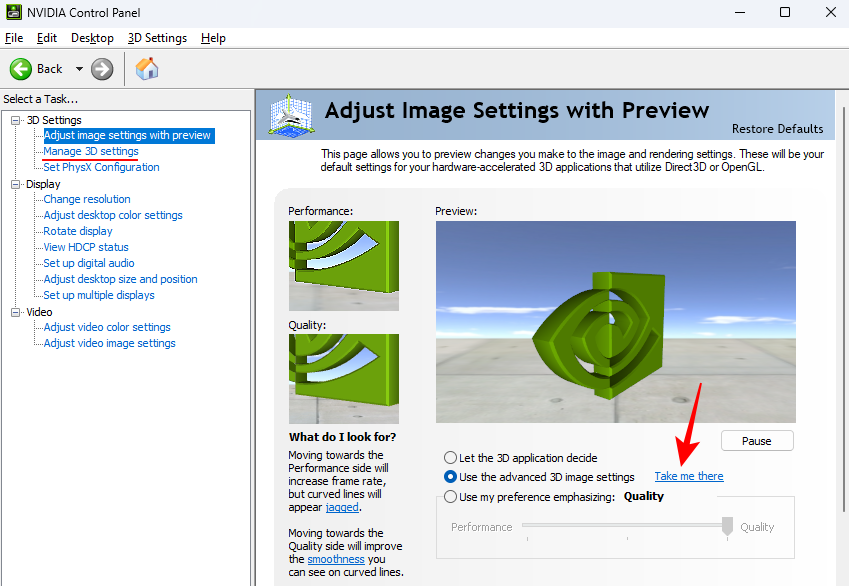
- Then click on “Take me there” to start tweaking the settings or click on Manage 3D settings in the left pane.
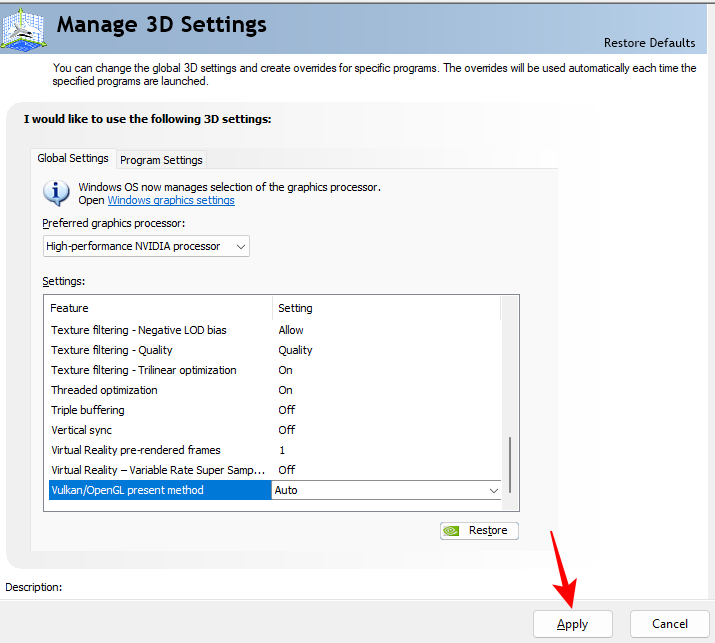
Manage 3D Settings (Global)
- Under “3D Settings”, the Manage 3D settings option is where most of the advanced GPU features lie. Before we get to these settings, make sure to select your ‘preferred graphics processor from the drop-down menu on the right.
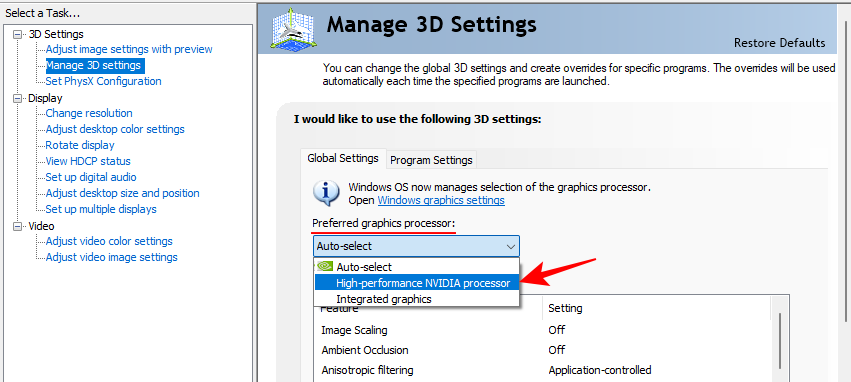
- Now, you can go ahead with changing the feature settings. To make matters simple, here’s a quick reference to how you should set these features.
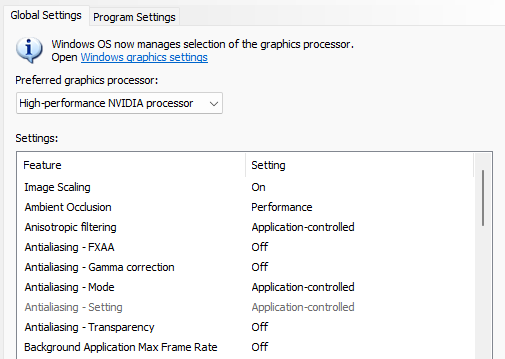

Depending on whether you’re on a laptop or a desktop, some of these may not be available to you. But don’t worry; just change the ones that do appear. Read on for a better understanding of what all these features do, and why it is recommended that you change them as shown above.
Note: For this guide, the focus is on ‘Global Settings’. But some settings are better tweaked on a per-program basis. For that, you will need to make the adjustments under the ‘Program Settings’ tab. We will make sure to mention which one of these settings you might want to test for different games.
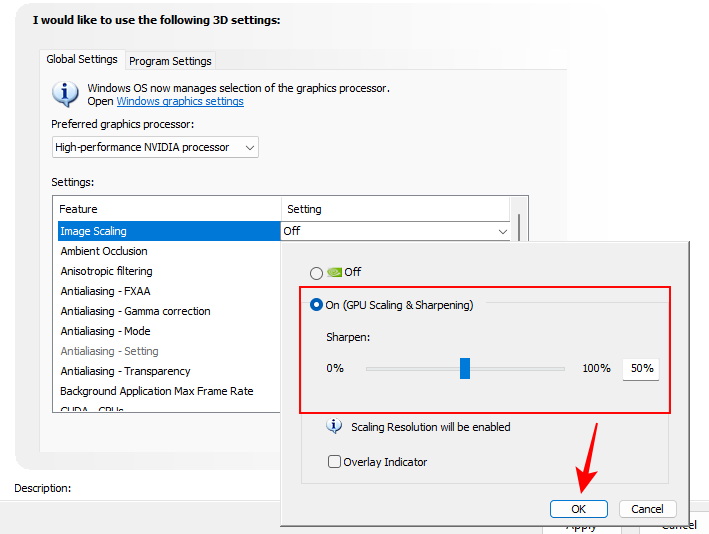
1. Image Scaling
Image Scaling can provide a considerable improvement in terms of FPS. When turned on, your games will run on a lower resolution, which boosts FPS, but you won’t really notice a drop in image quality. This is because your GPU will scale the image back up, as well as increase the sharpness, details, and clarity of images. This way you get just about the same level of image quality on top of the extra frames that come with playing on a lowered resolution.
Let the sharpness stay at 50% to get the most performance without sacrificing too much quality. It’s a neat trick that lets you eke out better performances on a host of games and one you should definitely keep on at all times.
Set it to On and then click OK.
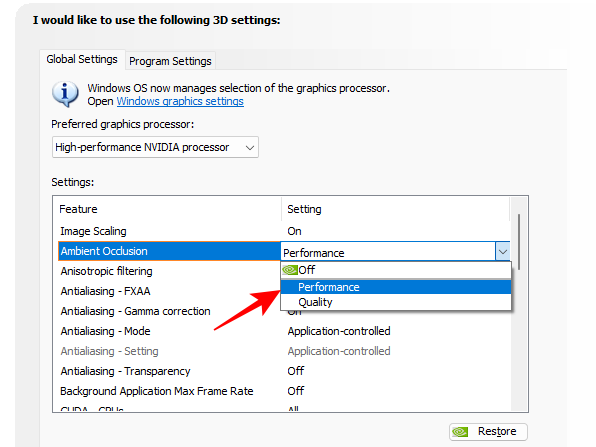
2. Ambient Occlusion
Ambient Occlusion adds subtle shadows to objects of different shapes and surfaces, as though they were lit up by indirect lighting, which improves the depth of field perception and makes images look realistic.
It also softens the light where it is too harsh and matches the shadow effects to where the object is in relation to the light as well as in the scene.
You can keep it turned off if you don’t want it to put a load on your GPU. But the better thing is to set it to “Performace”, which will ensure the GPU leans towards performance and delivers a good balance between buttery gameplay and realistic graphics.
Set it to Performance.
3. Anisotropic filtering
Anisotropic filtering improves the texture quality of 3D objects when light hits them at sharp, oblique angles. The result is reduced blurriness of objects and smoother visuals on the whole.
However, as one would have guessed, it comes at the expense of performance. If you’re looking for better graphics, then go ahead and max it out at 16x. But for improved performance, it’s best to let your game control this Nvidia feature since most games come with their own in-game anisotropic filtering options and will optimize it well enough depending on your GPU capabilities.
Set it to App Controlled.

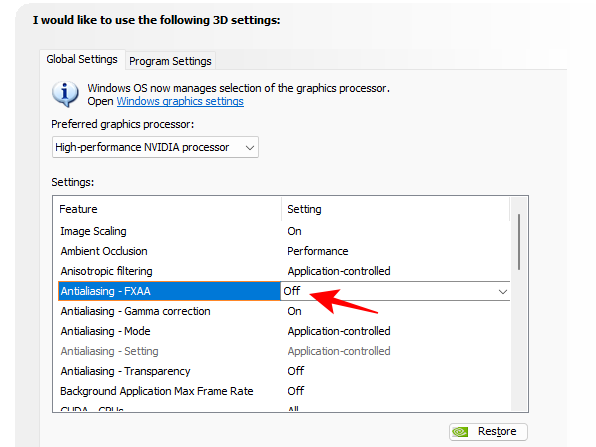
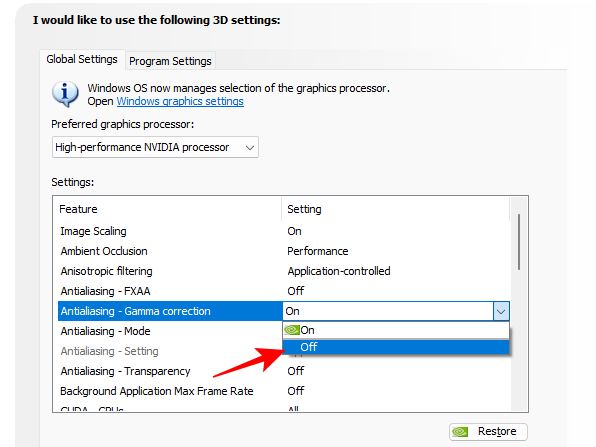
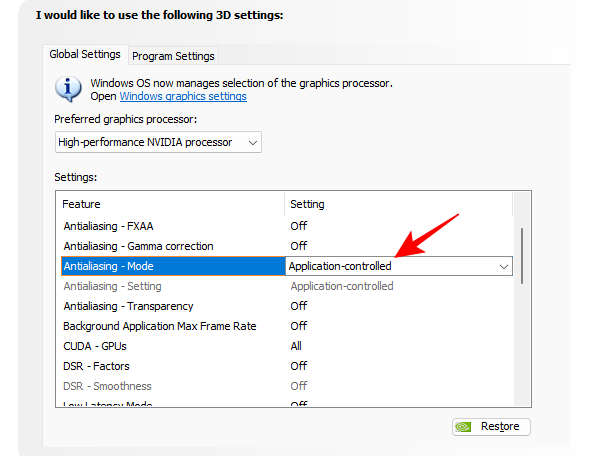
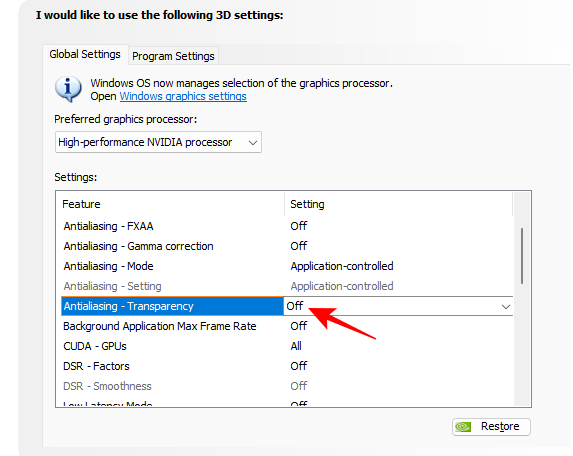
4. Antialiasing – FXAA, Gamma correction, Mode, Setting, and Transparency
Often, when your display isn’t able to generate high-quality images, you will experience uneven and rough edges on textures that should otherwise be pristine. This is known as Aliasing, or the stair-step effect. Nvidia has a few Anti-aliasing settings that correct this and improve image quality.
- Fast approximate anti-aliasing (FXAA) is one such setting that applies anti-aliasing algorithms to determine how much blurriness or line discoloration needs to be added to make the objects look smoother. Of course, this takes up GPU resources that would be better expended somewhere else. Besides, it’s not something that you should bother enabling globally. So if you don’t see a lot of jagged edges on objects when this feature is turned off, let it be.
FXAA – set to Off
- Gamma Correction is a subset of the anti-aliasing feature that specifically corrects the color quality of 3D images by determining how bright the images need to be made. But since it does so specifically for OpenGL programs, many users leave it turned off globally.
Gama correction – Off
- Antialiasing Mode and Setting are both general settings that determine exactly how the anti-aliasing feature is used to correct the aliasing phenomenon. It’s best to let the game decide what is ideal from a performance standpoint.
Mode and Setting – App Controlled
- The last of the AA features, Transparency applies to images with partly transparent textures, like leaves, or wires. In order to work, it needs the standard form of anti-aliasing to be turned on first. For the sake of performance, turn it off unless you have a good amount of GPU resources to spare.
Transparency – Off
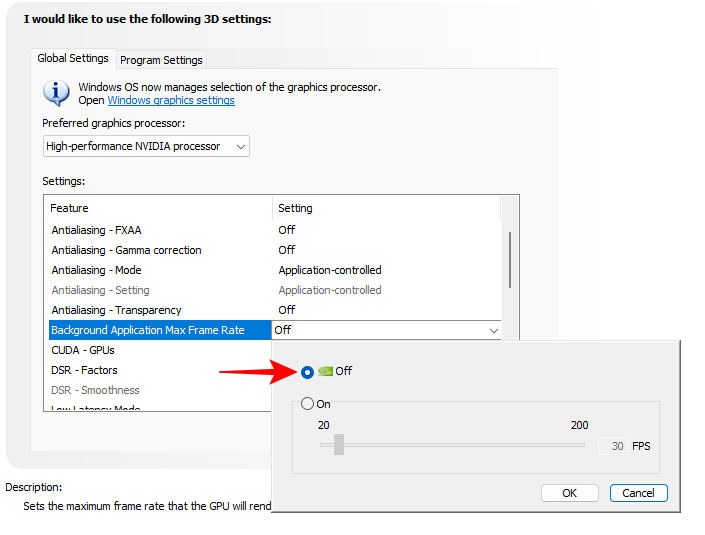
5. Background Application Max Frame Rate
As the name suggests, this setting controls how many frames per second you want to give to background applications. Unless you’re experiencing performance woes, you won’t need to turn this on. Needless to say, if you do decide to turn this on, set it to the bare minimum, which is 20 FPS. Or better yet, close the background applications if they’re not required.
Background Application Max Frame Rate – Off. If on, set to the lowest value (20)
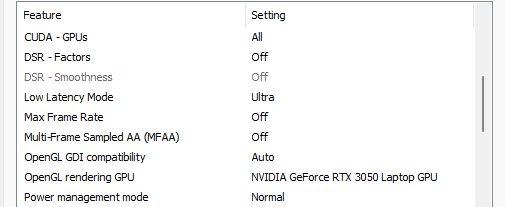
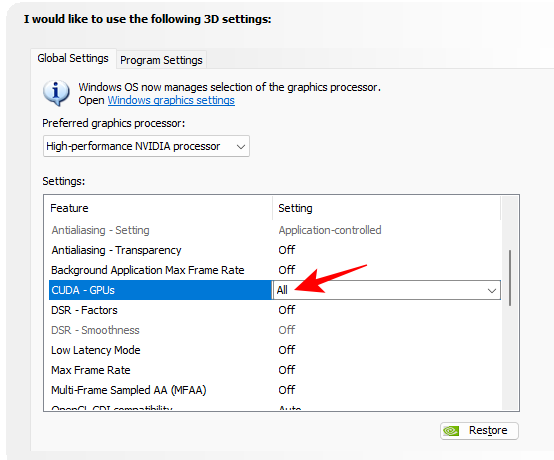
6. CUDA – GPUs
Compute Unified Device Architecture (or CUDA) is Nvidia’s general computing platform that lets applications utilize your GPU. The control panel setting lets you select which GPU (and its cores) can be used for graphical processing. Whether or not you have multiple GPUs in your system, keep it set to ‘All’.
CUDA-GPUs – All
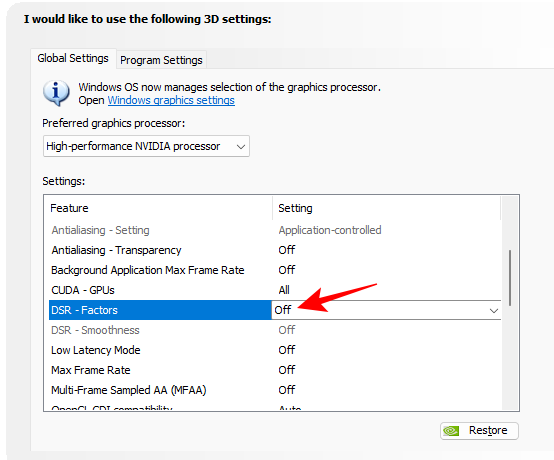
7. DSR – Factors and Smoothness
Dynamic Super Resolution, or DSR, enhances image smoothness by first rendering the game at higher resolutions and then scaling it back down to your monitor’s resolution. But this feature is best used only when there are no in-game antialiasing settings or when they are not enough.
Set to Off
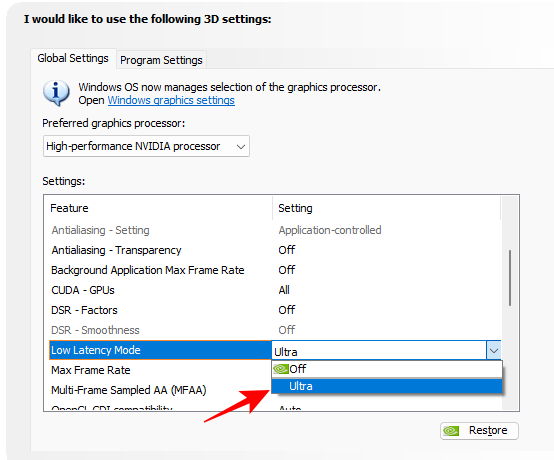
8. Low Latency Mode
Low Latency Mode is a Nvidia feature that limits the frames your CPU can prepare and deliver before they are processed by the GPU. As such, the frames are submitted ‘just in time’ for the GPU to process, thereby lowering the time it takes for the system to render images.
Set to On or Ultra
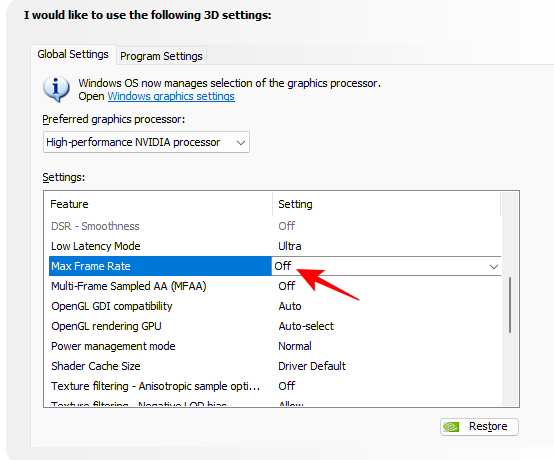
9. Max Frame Rate
As the name suggests, this feature places a limit on the frame rate that your GPU can render. But deciding to cap your game’s FPS is tricky. In most cases, you may not want to do this. But if you’re gaming online or looking to preserve battery life, then you might want to set a maximum frame rate to reduce latency.
Set to Off
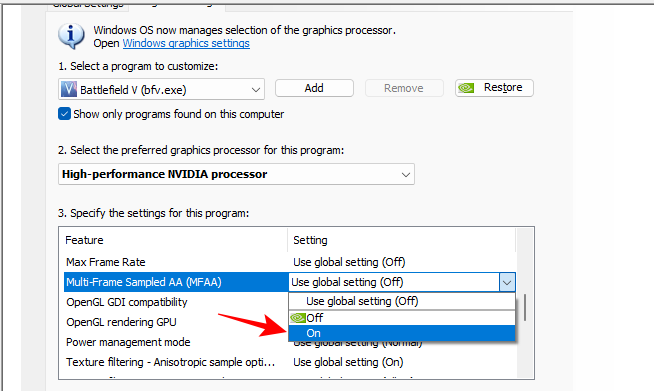
10. Multi-Frame Sampled AA (MFAA)
MFAA is another one of Nvidia’s tricks to reduce the jaggedy aliasing artifacts, where the image sample locations are re-programmed across pixels within the same frame as well as across frames.
The results vary considerably from game to game. In certain games, like Death Stranding, where there isn’t sufficient anti-aliasing, you might see an appreciable difference with MFAA turned on. But on most games, it’s not recommended.
If you’d like, you can try it out for different titles by moving over to the ‘Program Settings’ tab and turning it on for a particular game. But it’s best not to turn it on globally.
Set to Off

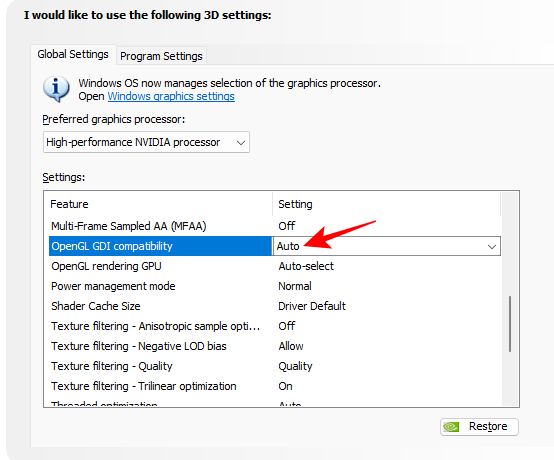
11. OpenGL GDI compatibility
This feature is particularly useful for laptops and notebook PCs as it lets one select between performance and power optimizations on OpenGL windows. However, choosing one or the other can come in the way of applications that use both OpenGL and GDI rendering. If you have a laptop, simply set it to ‘Auto’ and let the driver determine the correct behavior.
Set to Auto
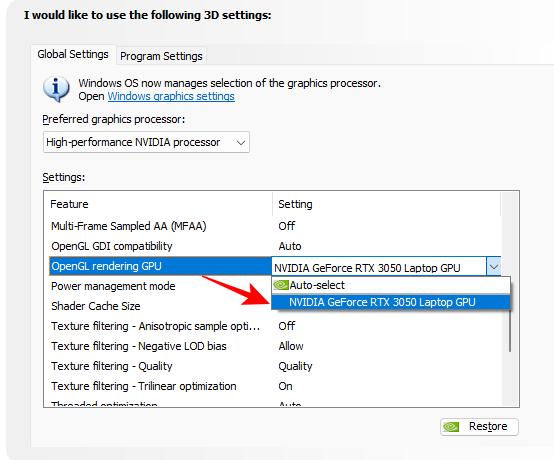
12. OpenGL rendering GPU
If you have more than one graphics card, this setting lets you select which GPU you want to use for OpenGL games and applications. Ideally, you would want to select your most powerful GPU for best performance globally.
Set to Nvidia GPU
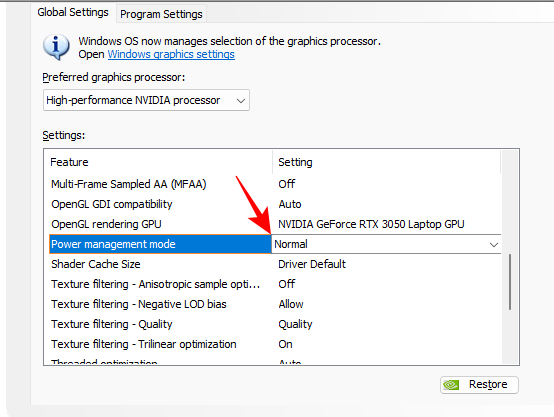
13. Power Management Mode
Laptop users should let this one be. Though setting power management mode to ‘Max performance’ will get you better performance in games, it puts undue load on your GPU all the time. You don’t want your GPU running hot consistently.
If you really want that FPS boost, you are better off changing this under “Program settings”.
Set to Normal (or ‘Prefer Maximum Performance’ under Program Settings)
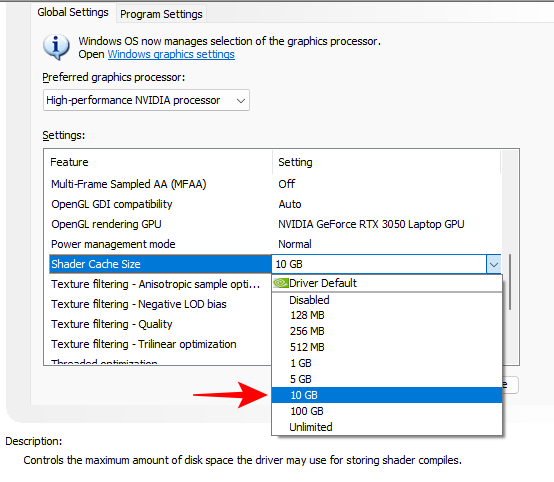
14. Shader Cache Size
Shader cache is generated when you run your game for the first time so that on every subsequent run, instead of performing shader compiles, the GPU can rely on the shader cache generated earlier and avoid the need to process from scratch. For best results, set the maximum shader cache size to 10GB, which is a good sweet spot.
Set to 10 GB
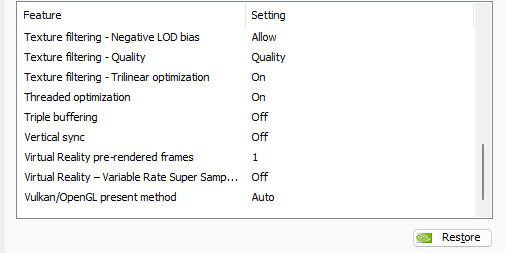
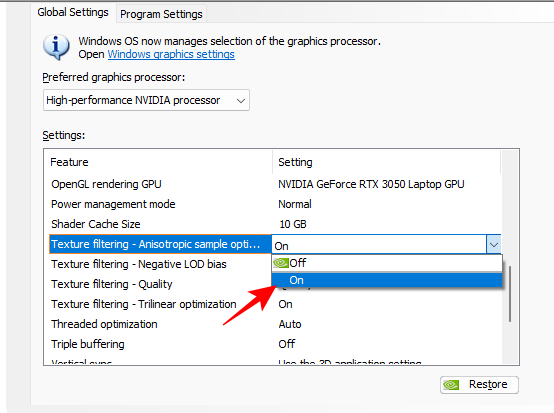
15. Texture Filtering – Anisotropic sample optimization, Negative LOD bias, Quality, and Trilinear optimization
Texture filtering is a super important NVCP feature that, as its name suggests, improves the quality of the textures by making them look less stumpy or box-like. Without it, even the aliasing effect looks worse.
- Anisotropic sample optimization is a good texture-filtering feature that greatly improves image quality without having much impact on performance. In the chase for a higher FPS count, we don’t want to compromise too much on image quality.
Set to On
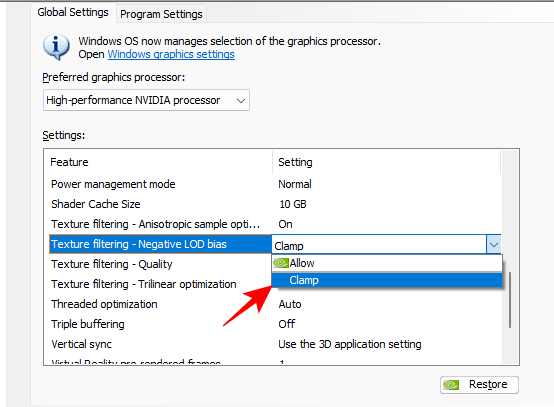
- Negative LOD bias, where LOD stands for level of detail, applies texture filtering to improve the image quality of objects such that they look sharper when they’re stationary. However, this can come at the cost of some performance so it’s better if you prevent applications from using this feature.
Set to Clamp
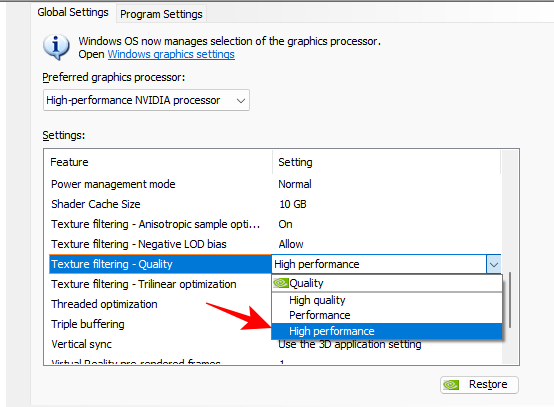
- Texture Filtering Quality is a no-brainer. It lets you adjust the level of texture filtering and set a preference for performance or quality.
Set to High Performance
- Trilinear optimization will optimize your games by allowing bilinear filtering where trilinear filtering is not required. This can save on precious GPU resources. Often, bilinear filtering where it’s necessary will actually sharpen the textures and also prove to be a performance booster.
Set to On

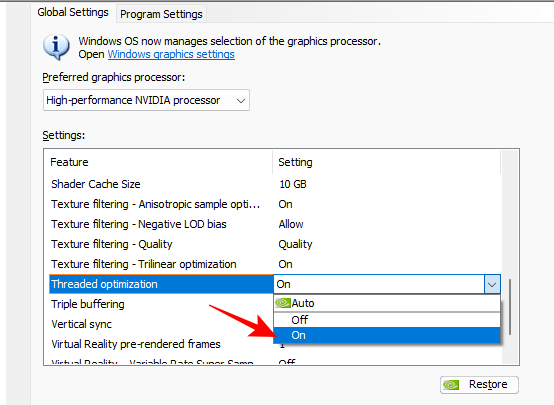
16. Threaded optimization
This setting basically lets games use multiple CPU cores to improve performance. You can let this stay at ‘Auto’. But if you want to ensure that all your CPU cores are being utilized by games, turn it on.
Set to On
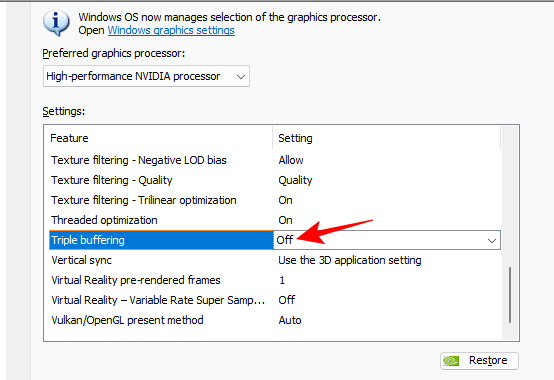
17. Triple buffering
Triple buffering is another good feature to turn on to improve frame rates. Its parallel frame buffering improves performance, especially for AAA titles, and also when Vertical Sync is also turned on. It can also come in handy if you are experiencing screen tearing.
The downside, however, as is often the case with advanced features that look to deliver performance, is GPU power consumption.
If you’d rather save your GPU resources for other performance-boosting settings, which we recommend, then turn it off.
Set to Off (On if you experience screen tearing).
18. Vertical Sync
Vertical Sync synchronizes the game’s frame rate with your monitor’s refresh rate. Because it can put a cap on your FPS, it’s better left turned off. But if you experience screen tearing, you may benefit from enabling V-Sync.
Set to Off (On if screen tearing)
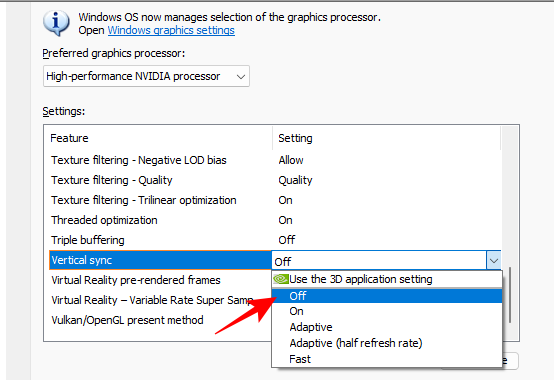
Note: If the screen tearing issue persists, it could very well be because of a faulty driver. So make sure you update your drivers first (or roll them back if screen tearing became apparent after the update).
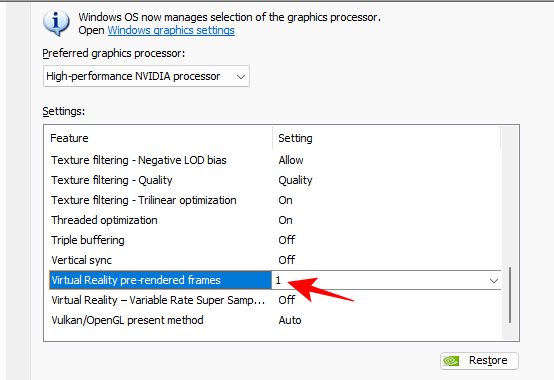
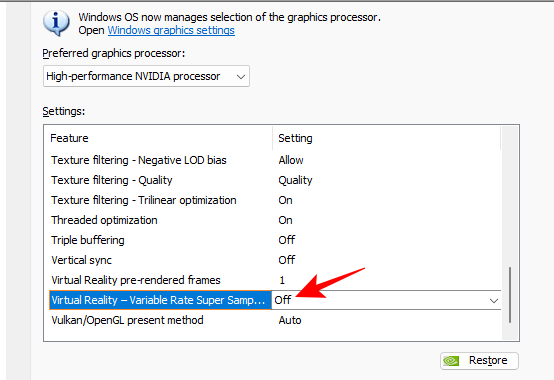
19. VR pre-rendered frames and Variable Rate Super Sampling
These two settings are for those gaming with virtual reality headsets.
- The first, VR pre-rendered frames, limits the frames that the CPU can queue up before the GPU gets to process them. This reduces the time it takes to render them. However, for games that rely more on CPU, such as CS:GO, you won’t find it of much use. For such games, set it to ‘Use the 3D application setting’. Otherwise…
Set to 1
- The VR Variable Rate Super Sampling setting on the other hand is chiefly to improve image quality by focusing its sampling on regions where it really matters for VR. But, by its nature, it will necessarily come at the expense of performance.
Set to Off
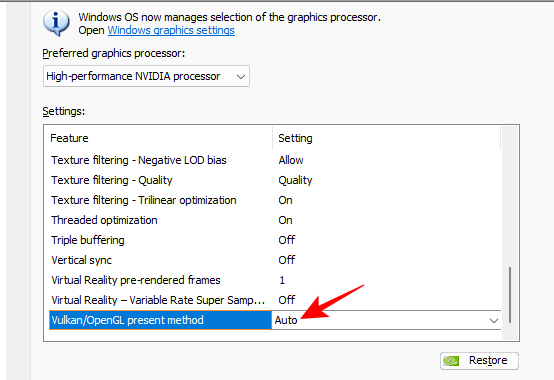
20. Vulkan/OpenGL present method
Lastly, we have the Vulkan/OpenGL present method, a relatively newer setting that Vulkan or OpenGL games can benefit from. However, the advantages are usually very minor and not worth setting globally. Besides, there’s always the possibility that you may run into problems of one form or another if you choose anything other than auto.
Set to Auto
Once all these features are set, don’t forget to click on Apply.
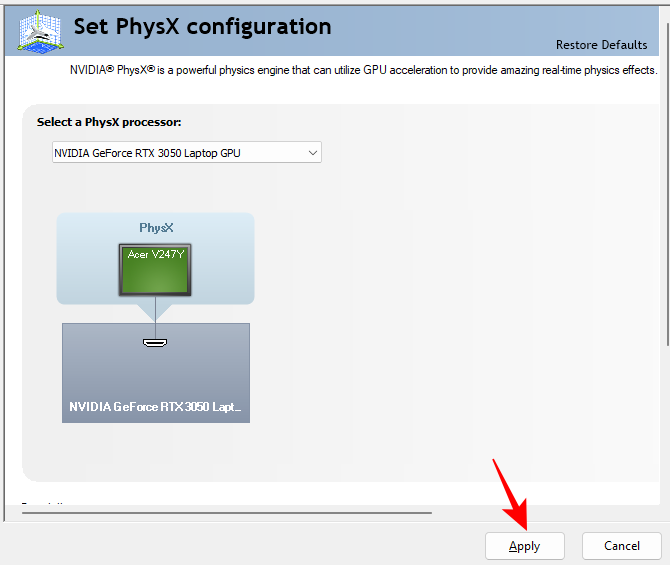
Set PhysX Configuration
Games that support PhysX processing, and there are many that do, will benefit tremendously if you select your GPU as the main PhysX processor. Here’s how to do this:
- Click on Set PhysX Configuration in the left pane under “3D settings”.

- Then click on the drop-down menu and select your NVIDIA GPU.
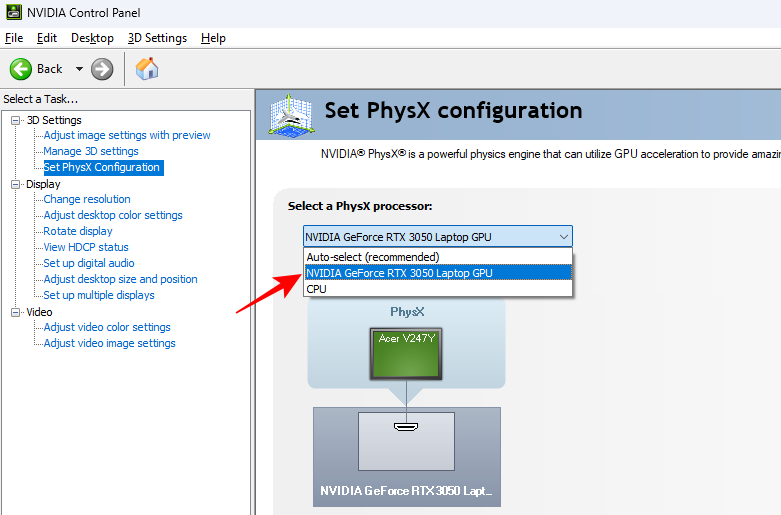
- Finally, click on Apply before moving on.
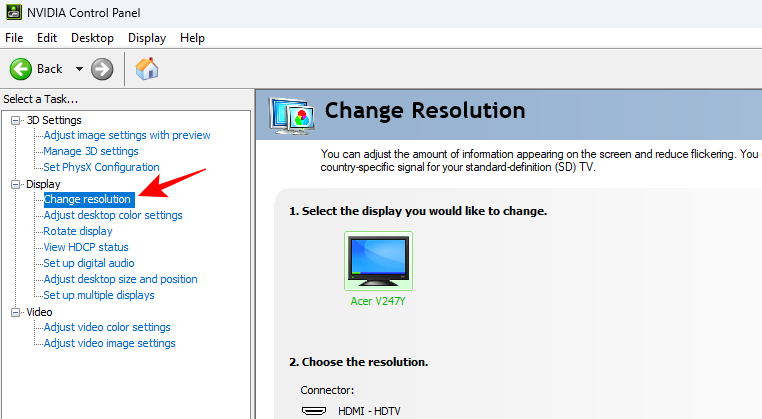
Change Display Settings
To change your display settings, you will have to have an external monitor attached. You won’t see these ‘Display’ settings if you’re on a laptop without an additional screen.
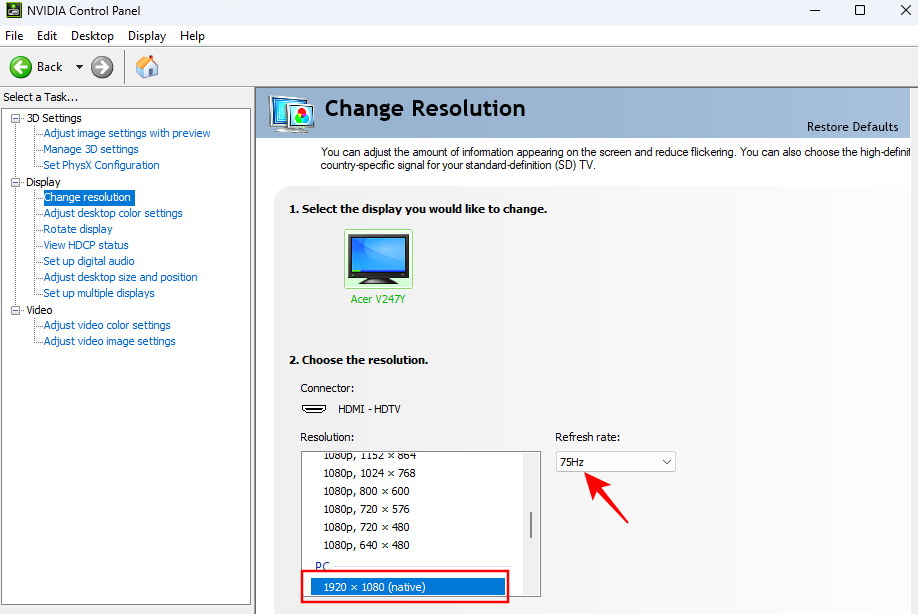
- Click on Change resolution under ‘Display’.
- Then on the right, make sure to select your native resolution and the highest ‘Refresh rate’ available for your monitor.
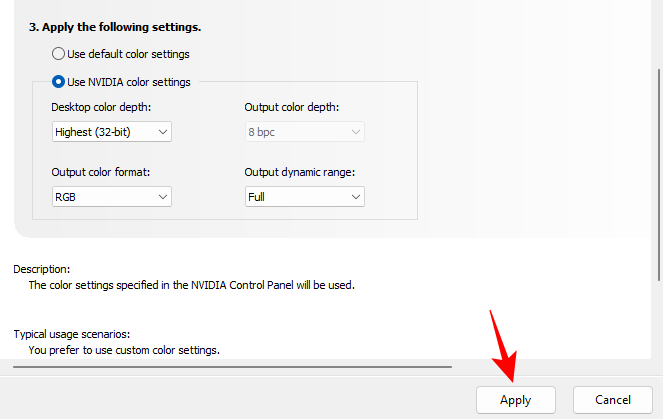
- Then, scroll down and click on Use NVIDIA color settings. Then make sure that the ‘Desktop color depth’ is set to Highest (32-bit), the ‘Output color format’ is RGB, and the ‘Output dynamic range’ is set to Full.
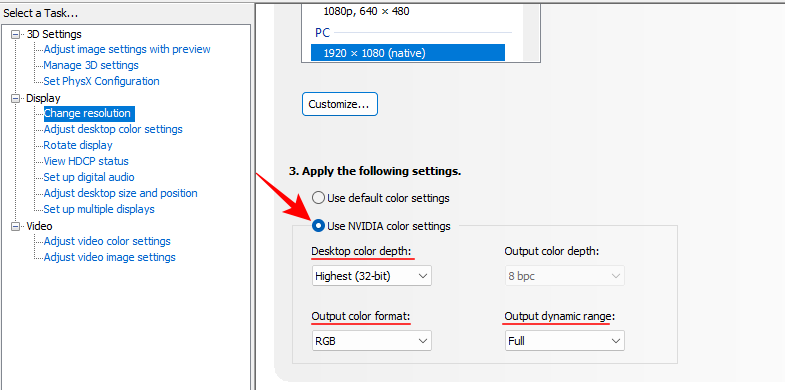
- As always, click on Apply.
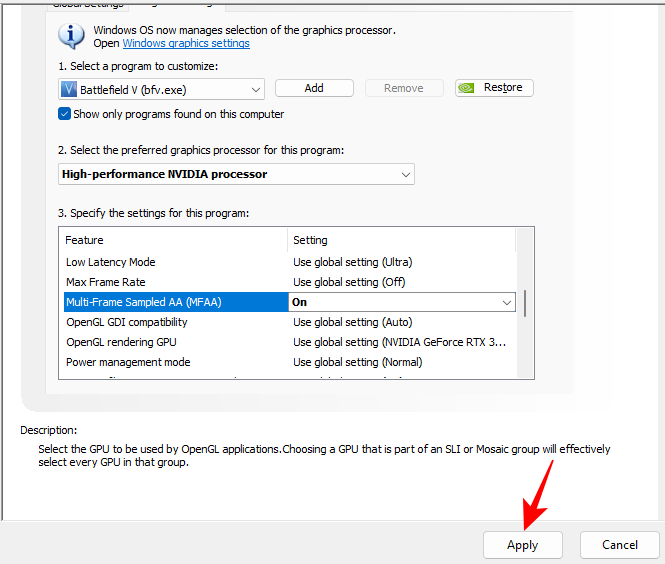
Manage 3D Settings for specific games/programs
If there are certain features, such as MFAA or Vertical Sync, that you would like to experiment with on particular games, here’s how you can do so:
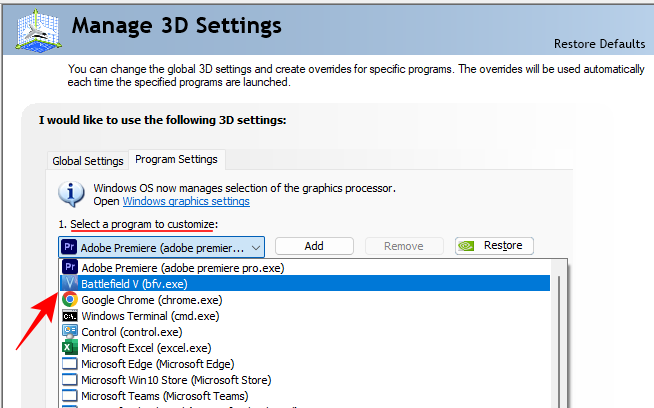
- Click on the ‘Program Settings’ tab.
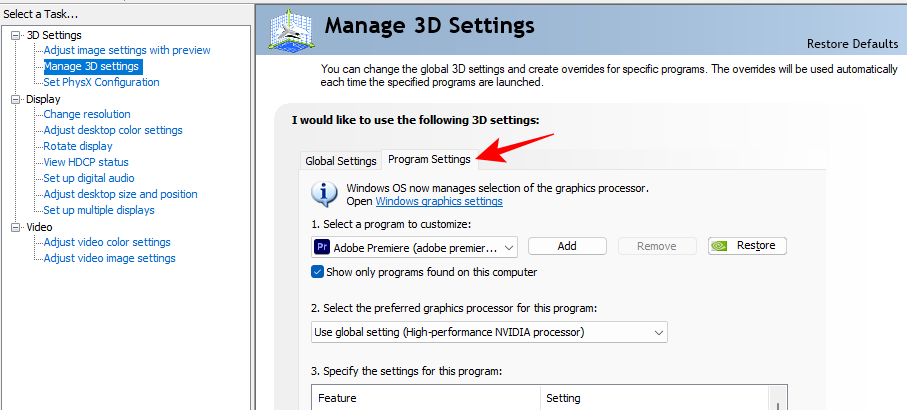
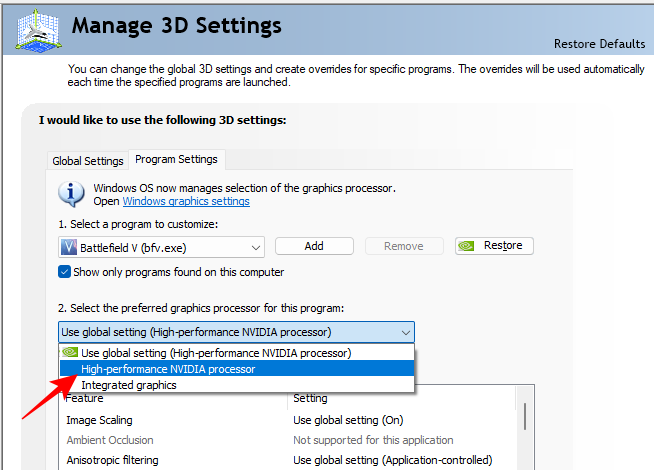
- Here, select your game from the drop-down menu.
- Select your Nvidia GPU for the program from the drop-down menu.
- Change the feature that you want to change.
- Finally, click on Apply.
Nvidia GeForce Experience settings
Though we’ve chiefly focused on the NVCP, the GeForce Experience app is worth a mention too, if only for its simplicity.
- When you select a game, you can click on the wrench icon to further optimize your game.
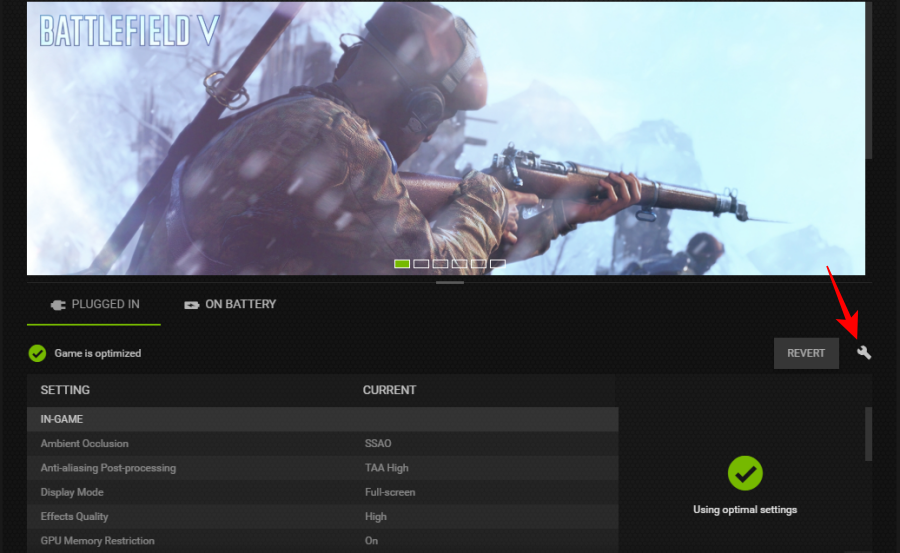
- Here, you will see that the game can be optimized for performance or quality over a spectrum. Dragging it to the left or the right will turn some features off or on. If you’re looking for better performance, you will mostly be sliding it to the left.
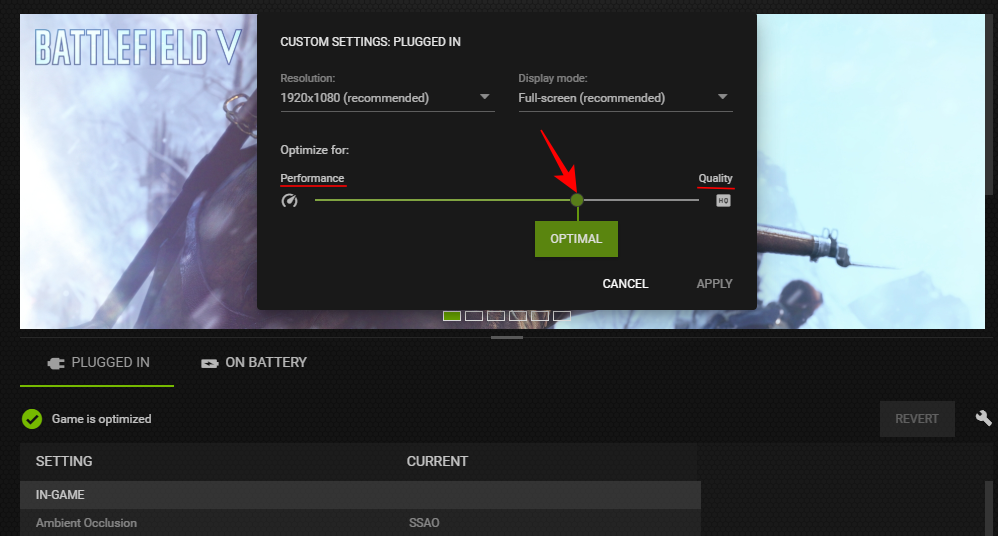
- The fun bit is that as you do so, you can see exactly which settings are being changed.

- And if you hover over one, you will even see what each of these settings does.

For such visual demonstration alone, the GeForce Experience is a great app.
Of course, these will need to be changed individually for every game since there are no global settings that you can apply once and rest back.
But because it gives you only what you need to know to improve in-game performance and there aren’t a lot of settings that you can change, the GeForce Experience might be more suited to certain gamers that want to game casually without getting into the technicalities of NVCP.
FAQ
Here’s a look at a few commonly asked questions about how to configure Nvidia’s Control Panel settings for best performance.
How do I maximize my NVIDIA GPU performance?
To maximize your Nvidia GPU’s performance, change the feature settings under “Manage 3D settings” in Nvidia’s Control Panel app. Refer to the guide above to know which settings to change for best performance.
What is the best NVIDIA scaling settings for gaming?
To get an FPS boost, the Image Scaling setting should be turned on with Sharpness at 50%. You can try going up to 70% without any significant loss in FPS.
For those on the green team, Nvidia’s Control Panel is still the go-to app to fine-tune and adjust the GPU settings and other nitty-gritties to get the best possible gameplay experience. We hope this guide proved useful to you in getting the most out of your Nvidia GPU. Until next time!
Related: Geforce Error Code 0X0003: How To Fix Geforce Experience Issue


Discussion