Smartphones are the means to things beyond just communication. You use it to get work done, get your daily scoop of news, entertainment, listening to music, stay in touch with your loved ones, and capture all the best moments around you. With so many use cases, your phone also stores a lot of information that you may want to protect when switching phones or in the worst case, lose it.
iPhone users have the option to choose between an iCloud backup or a Mac backup. If you have a lot of data to back up and the iCloud’s free 5GB storage isn’t enough for you, then your next best option is to back up your iPhone on a Mac. In this post, we’ll help you back up your iPhone data on a Mac using iTunes or Finder and then show you how you can restore it with ease.
What iPhone data can you back up on a Mac?
When you use your Mac to back up data from your iPhone, the backed up data covers almost all of your device’s data and settings except for the following items:
- Face ID or Touch ID settings
- Apple Pay data and settings
- Content from iTunes, App Store, Apple Books
- Content synced using Finder or iTunes
- Data already stored in iCloud – iCloud Photos, iMessage, text (SMS), and multimedia (MMS) messages
- Activity, Health, Keychain data
- Apple Mail data
Your iPhone backup can also be restored to a different iPhone or iPad as well but in doing that, you’ll have to keep in mind that some types of content won’t get transferred.
How to Back up your iPhone on a Mac
If you want to keep the data on your iPhone safe and secure, then backing it up on your Mac is the best possible way to make sure you don’t lose any information during the transfer process. Mac backups can also help you set up a new iPhone in such a way that all the content from your previous iPhone including its settings is copied.
You can back up your iPhone on a Mac in two different ways but you don’t get to choose which one yourself. If you’re using a Mac that’s running on macOS Mojave 10.14 or earlier, then you’ll have to go ahead and use iTunes to back up your iPhone on your Mac. For devices running macOS Catalina 10.15 or higher, you can use the native Finder app to get things started.
Prerequisites
Before you start backing up your iPhone data on a Mac, you need to make sure of the following things:
- Your Mac is updated to the latest macOS version
- iPhone that you’re backing up is running the newest iOS version
- You have the USB-to-Lightning cable that comes out-0f-the-box with your iPhone [This is needed to establish a connection between the iPhone and Mac]
Using iTunes
You should follow this procedure only if you’re using a Mac that’s running macOS Mojave 10.14 or earlier. Before you start backing up your device, switch ON both your Mac and iPhone and connect the two using a USB-to-Lightning cable.
Now, launch iTunes on your Mac from the Launchpad or the Applications folder inside Finder.
When you connect the iPhone to the Mac, you’ll be asked whether you want to give the Mac access to your iPhone. Confirm this by clicking on the ‘Continue’ inside iTunes.
To establish a connection, you will also have to tap on the ‘Trust’ button on your iPhone when prompted with the “Trust this Computer” dialog and then enter your iPhone’s passcode. 
Once you have allowed your Mac permission to access your iPhone, a phone icon will appear at the top left corner of the iTunes window. Click this icon to see the contents of your iPhone inside iTunes.
Now, click on the ‘Summary’ tab from the left sidebar, if this tab isn’t automatically opened. 
On the right-side pane, scroll down and locate the ‘Backups’ section.
Inside the ‘Backups’ section, click on the ‘Back Up Now’ option under ‘Manually Back Up and Restore’ to store your iPhone’s data directly on your computer. 
You can additionally back up Health and Activity data from your Apple Watch by checking the ‘Encrypt local backup’ box.
iTunes will start creating a backup of your iPhone and the status of the backup will appear at the top of the iTunes window. Once your backup has been created, click on the ‘Done’ button at the bottom right corner. You can now unplug your iPhone and continue using it.
Using Finder
To start backing up your iPhone, power ON both the iPhone and Mac, and unlock them. After the devices are booted up and unlocked, connect them using a USB-to-Lightning cable that came with your iPhone.
After a successful connection, open the Finder app on the Mac. 
In the Finder app, click on your iPhone which will be visible in the left sidebar. If not, click on the ‘Locations’ section from the sidebar to expand it.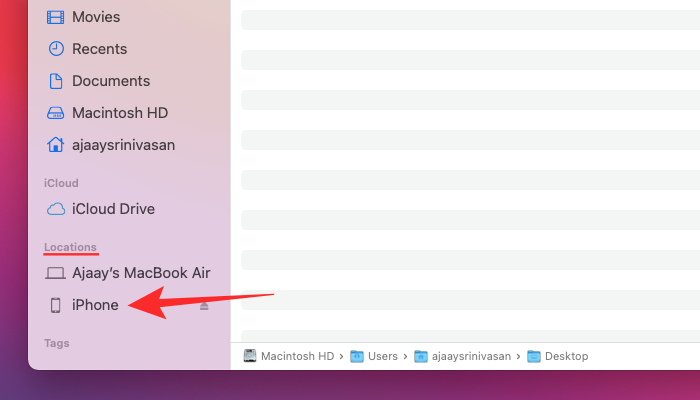
Additional step (for first-time users): If you’re connecting your iPhone to a Mac for the very first time, then you’ll be prompted with a dialog asking you whether you “Trust iPhone”. You will need to click on ‘Trust’ on your Mac.
In the next step, you will have to tap on the ‘Trust’ option on your iPhone when it prompts you with the “Trust This Computer” dialog.
After clicking on your iPhone or selecting the ‘Trust’ option, enter your device passcode on your smartphone.
You will now be able to view your iPhone data inside the Finder app on your Mac once the authentication is successful. This is the screen that shows your iPhone device management and stores all the tools you need to back up your iPhone.
On this screen, select the ‘General’ tab at the top and click on the ‘Back Up All the Data on Your iPhone/iPad to This Mac’ option under the ‘Backups’ section.
You can additionally back up Health and Activity data from your Apple Watch by checking the ‘Encrypt local backup’ box. When you do that, you will be asked to set a password and then confirm by clicking on the ‘Set Password’ option in the dialog that appears. 
Click on the ‘Back Up Now’ option on the Finder screen. This will start backing up your iPhone on the Mac and you will be able to view the progress on your Mac’s Finder screen.
How to Restore an iPhone backup on a Mac
The backups you created can be used to restore your iPhone when your device is misbehaving or if you’re resetting it as new. Backups can also be restored when switching to a new device from an older iPhone. How you restore an iPhone from a backup saved on your Mac depends on the method you used to back up your iPhone data.
If backup was created on iTunes
You will need to rely on the iTunes app on your Mac again if you created an iPhone backup on a Mac running macOS Mojave 10.14 or earlier. To restore an iTunes backup, connect your iPhone to the Mac using the USB-to-Lightning cable.
Now, open the iTunes app on your Mac and then clicking on the phone icon that appears at the top left corner.
You will now be able to see the information about your iPhone on the screen. Here, click on the ‘Summary’ tab from the left sidebar, if this tab isn’t automatically opened.
Inside the ‘Summary’ screen, scroll down and locate the ‘Backups’ section.
Here, click on the ‘Restore Backup’ option.
A new dialog will appear on the screen showing you a list of backups you have stored on the Mac alongside the date on which they were created.
From this list, select the backup you want to restore your iPhone to and then click on the ‘Restore’ button.
Select the backup you want to restore and enter the password that the backup was created with if you had saved your backup with encryption. 
To confirm the restore, click on ‘Restore’.
iTunes will start restoring your iPhone with the backed up data. To make sure that the restoration process is successful, keep your iPhone plugged into the Mac until the end.
If backup was created on Finder
Similar to how you do it using iTunes, restoring your iPhone from a backup on Finder is pretty easy. You will need to connect your Mac and iPhone using the USB-to-Lightning cable and then open the Finder app.
Inside the Finder app, you should be able to see your iPhone in the left sidebar. If not, click on the ‘Locations’ section from the sidebar to expand it. When you find your iPhone listed here, click on it.
If your iPhone is protected with a passcode, you will be asked to enter it. When you do that, you will be greeted with the iPhone device management screen.
In this screen, select the ‘General’ tab at the top and click on the ‘Restore Backup’ option under the ‘Backups’ section. 
You will now be shown a list of backups that were created on your Mac along with the date of their creation. Select the backup you want to restore your iPhone from, preferably the most recent one.
Also, enter the password that you may have set for the backup if you had enabled encrypted backup at the time of its creation. 
After that’s taken care of, click on the ‘Restore’ option to start the restore process.
The restoration process will now begin and your iPhone will restart when the backup has been successfully restored.
After this, you can go ahead and disconnect the iPhone from your Mac and check whether all your data has been accounted for.
Why can’t I restore a backup on your iPhone?
While restoring an iPhone with a backup on a Mac is a daily simple task, you might sometimes run into problems doing the same. If you’re having issues restoring a backup, it could be because of any of the following issues:
- Either your Mac or iTunes isn’t running their latest versions
- Your backup file may be corrupted, incompatible, or too old
- You did not disable Find My iPhone before restoring your device
- Your phone may not be unlocked
- A wrong password was entered while restoring an encrypted backup
- If there isn’t enough disk space on your iPhone or Mac
- Backup may have been created on another Mac
- If backup files got deleted from your Mac accidentally
- The connection between iPhone and Mac broke down because of a faulty cable
Can’t restore a backup? Try these fixes
If you’re encountering issues when restoring an iPhone backup, then you can perform these fixes to solve them.
- Restart both your iPhone and Mac: Often times, a simple restart can solve a ton of problems you may be encountering on your device. You can try restoring a backup after restarting both the Mac and iPhone.
- Update your Mac/iTunes: For a backup to be created or restored, your Mac should be running the latest version of macOS or iTunes. You can update your macOS system by going to the Apple icon > About this Mac > Overview > Software update. The iTunes app can be updated by opening the Mac App Store and going to ‘Updates’.
- Update your iPhone by going to Settings > General > Software Update.
- Disable Find My iPhone by going to Settings > Your name > iCloud > Find My iPhone and sliding the ‘Find My iPhone’ switch OFF.
- Choose the right Mac to restore from if you have multiple Macs and you backed up manually on one of them.
- Enter the right password for your encrypted backup and if you don’t recall it, create a new backup with another password.
- Clear space on your device when creating or restoring a backup. You need ample space in both your Mac and iPhone to store and transfer your backup without an issue.
- Create a new backup if an older backup has gotten corrupted or is incompatible. Apple doesn’t allow you to restore any amount of data from a corrupted backup.
- Try a different USB-to-Lightning cable to connect your Mac and iPhone. This helps establish a better connection between the two devices.
- Restore using an iCloud backup: iOS lets you back up your iPhone data wirelessly to iCloud so that you may restore them at anytime anywhere without using your Mac.
RELATED