


Hatch world eggs and use Equip Best for pets, then earn aura rolls through stone throws and daily quests, roll an aura, and equip it.
Auras boost your overall stats in +1 Stone Skipping, but you begin without one. Pets provide another set of bonuses, with their respective multipliers adding together.
Getting those bonuses into your loadout means hatching pets and equipping an aura, with free daily quests providing rolls alongside stone throwing. This guide covers pet hatching and equipment, aura rolls and effects, and the egg prices and optional purchases attached to both systems.
How to get and use auras and pets in +1 Stone Skipping
Start with eggs and pet equipment, earn aura rolls, equip an aura, then take your loadout to training and the Throw Zone.
1 – Get eggs and hatch pets
Eggs are the starting point for obtaining pets.
STEP 1/24
4%
Visit the lobby egg area
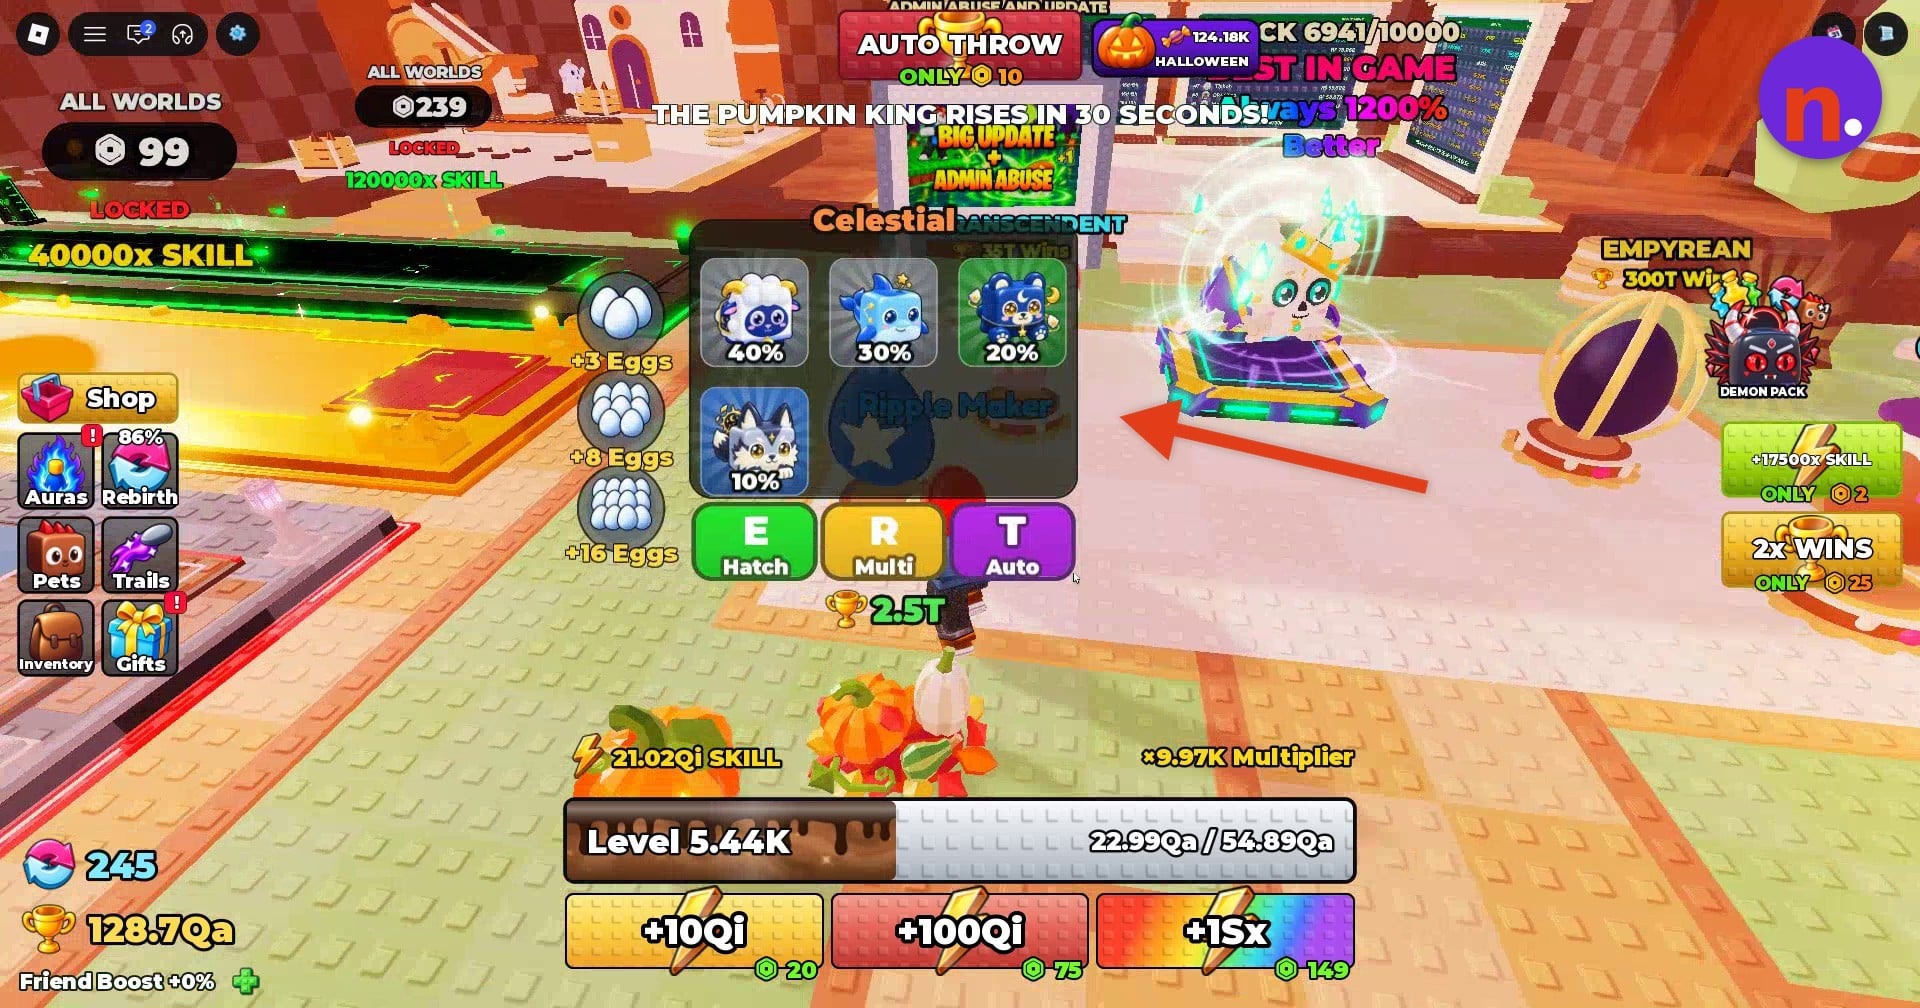
Approach the egg stands and open the Celestial Egg menu to see its pet pool and hatch odds.
STEP 2/24
8%
Compare the Transcendent pool
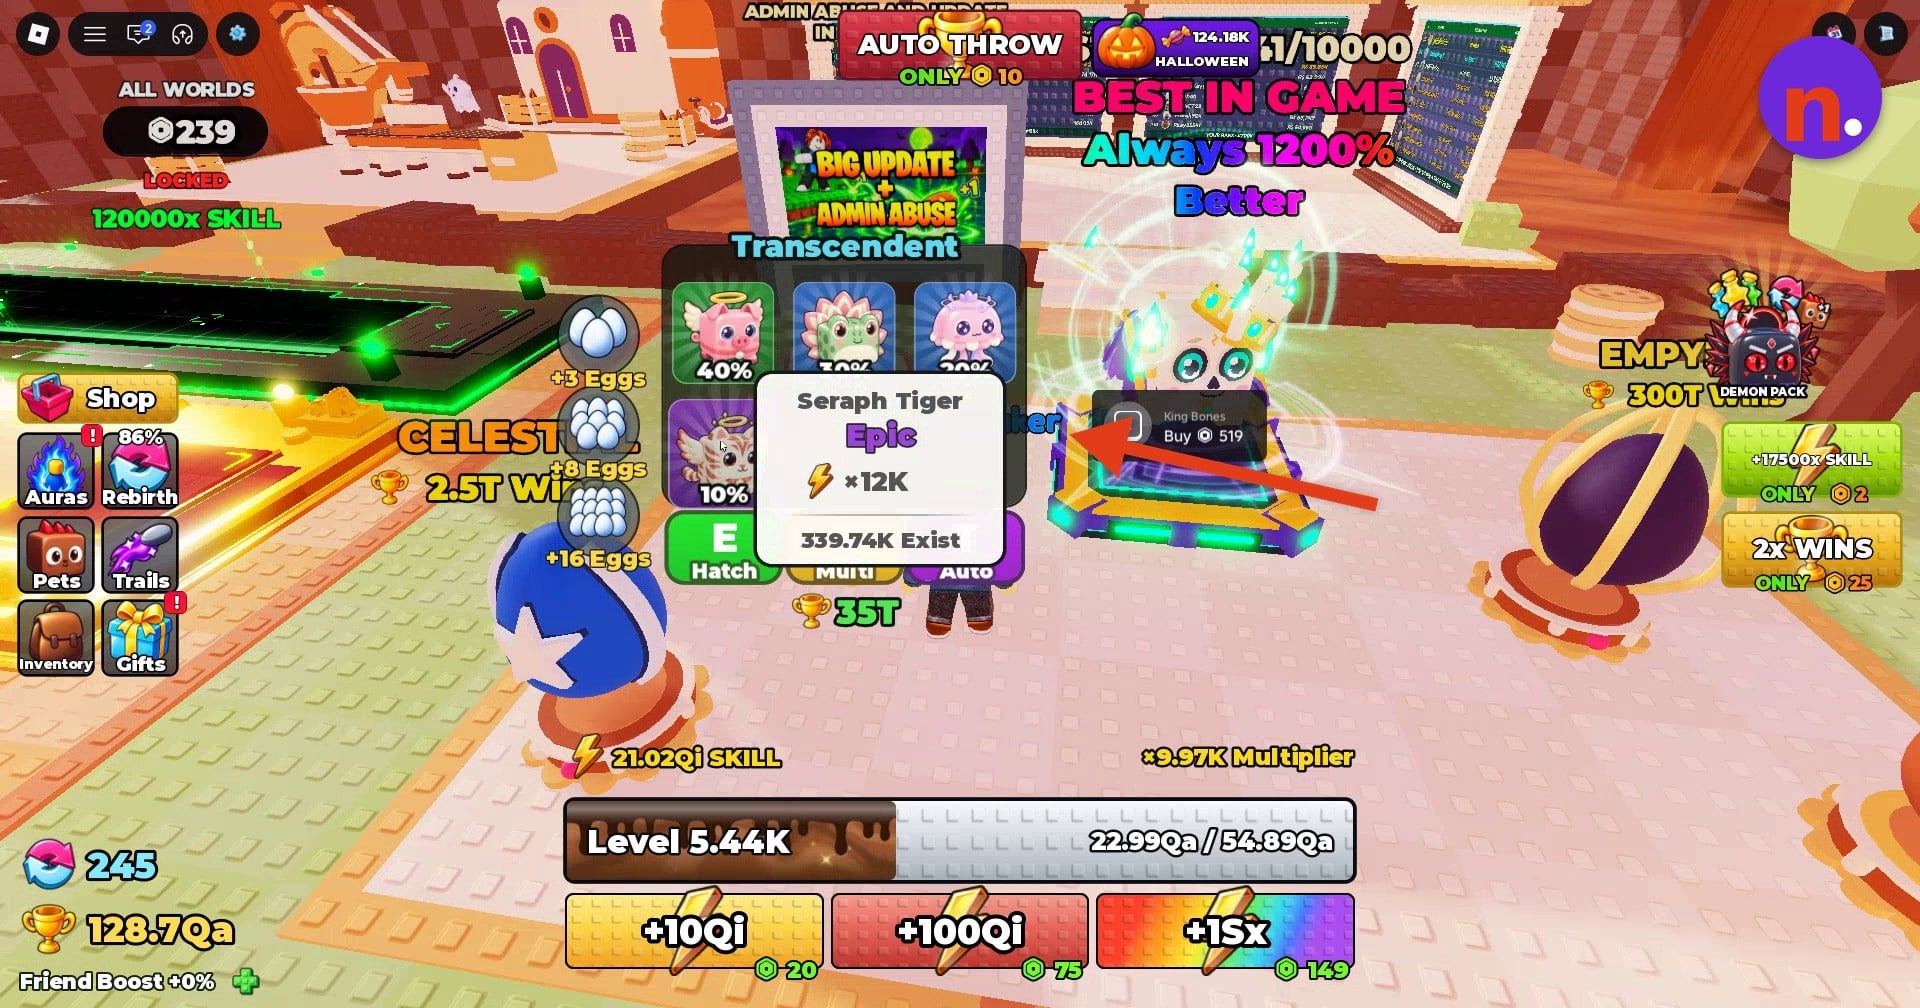
Open the Transcendent Egg menu to view its available pets before choosing which egg to obtain.
STEP 3/24
12%
Obtain an egg
Farm eggs or purchase them in your current world.
STEP 4/24
17%
Use the egg-stand controls
At the Celestial stand, press E for Hatch; the same menu offers R for Multi and T for Auto.
STEP 5/24
21%
Hatch an owned egg
Turn back and walk toward the inventory menu. Open the inventory’s Eggs tab and select an owned egg in My Eggs for hatching. A Celestial Egg is one option; its possible pet results are listed separately below.
STEP 6/24
25%
Return to the game world
Return from the hatch result to see your newly hatched pet in the game world.
2 – Equip pets and inspect boosts
Owned pets need to be equipped through My Pets.
STEP 7/24
29%
Open your pet collection
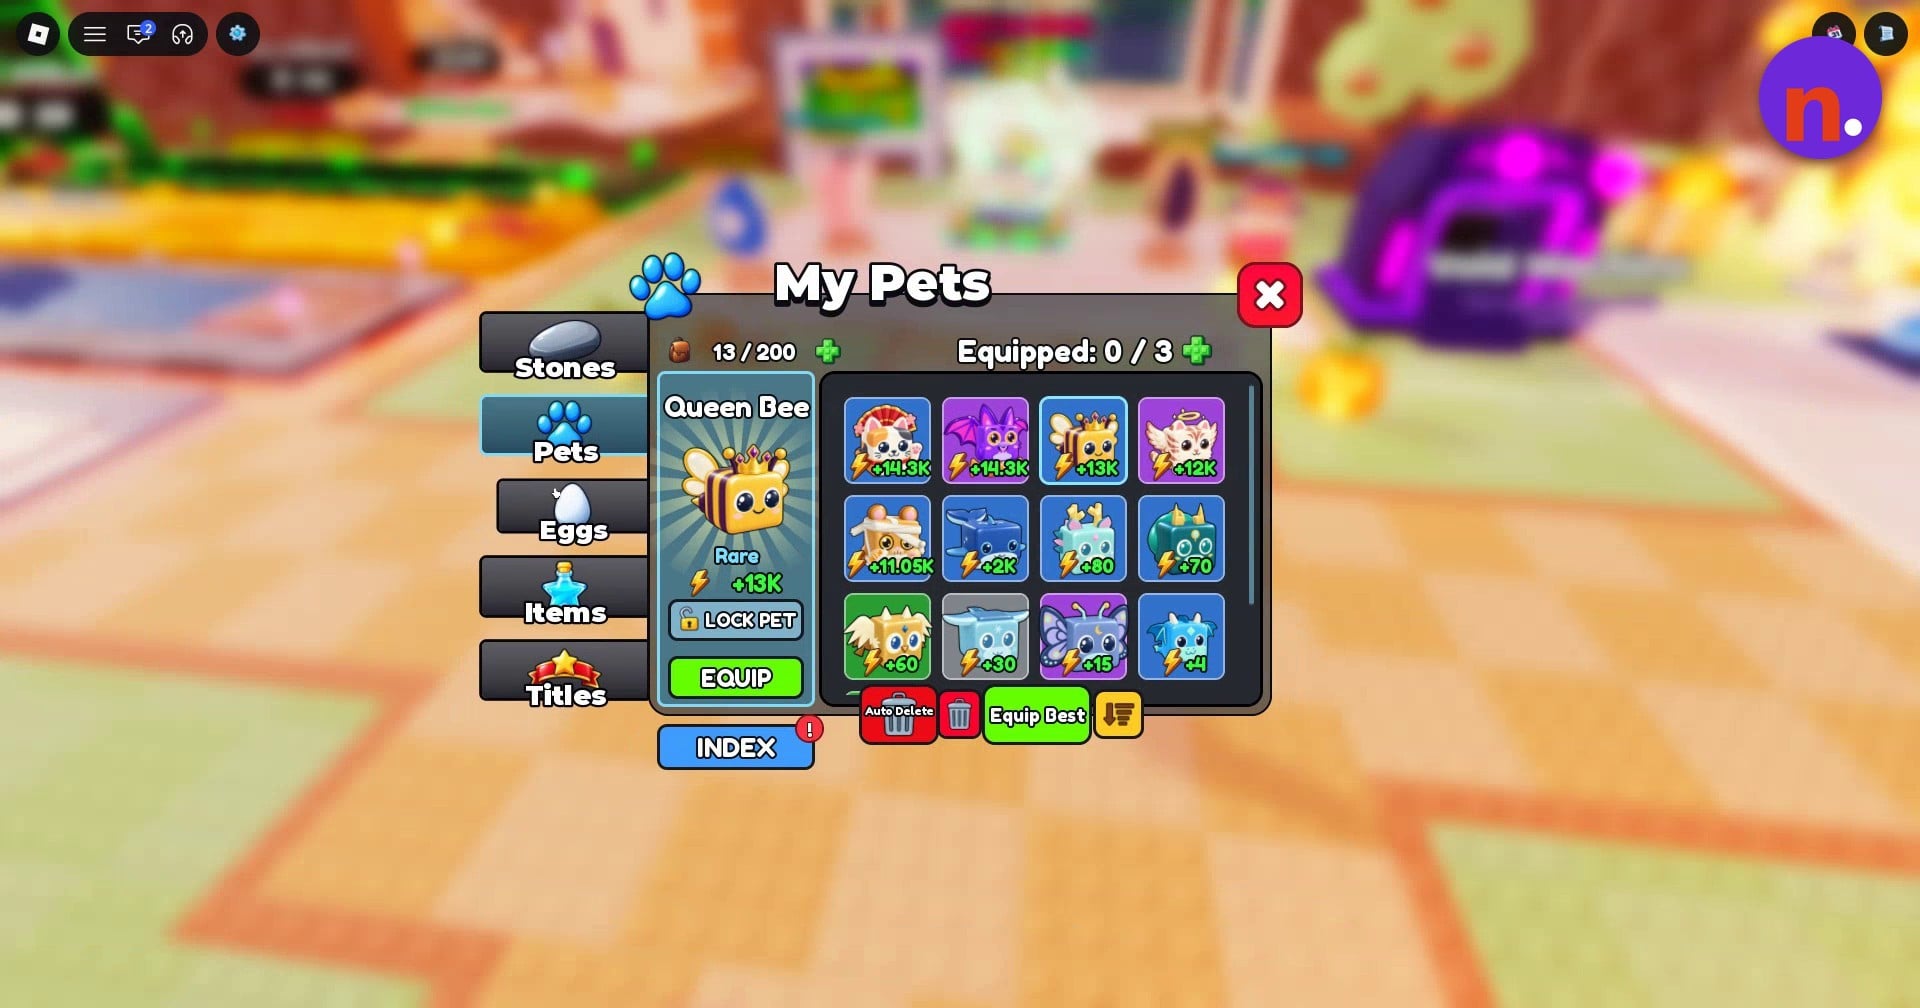
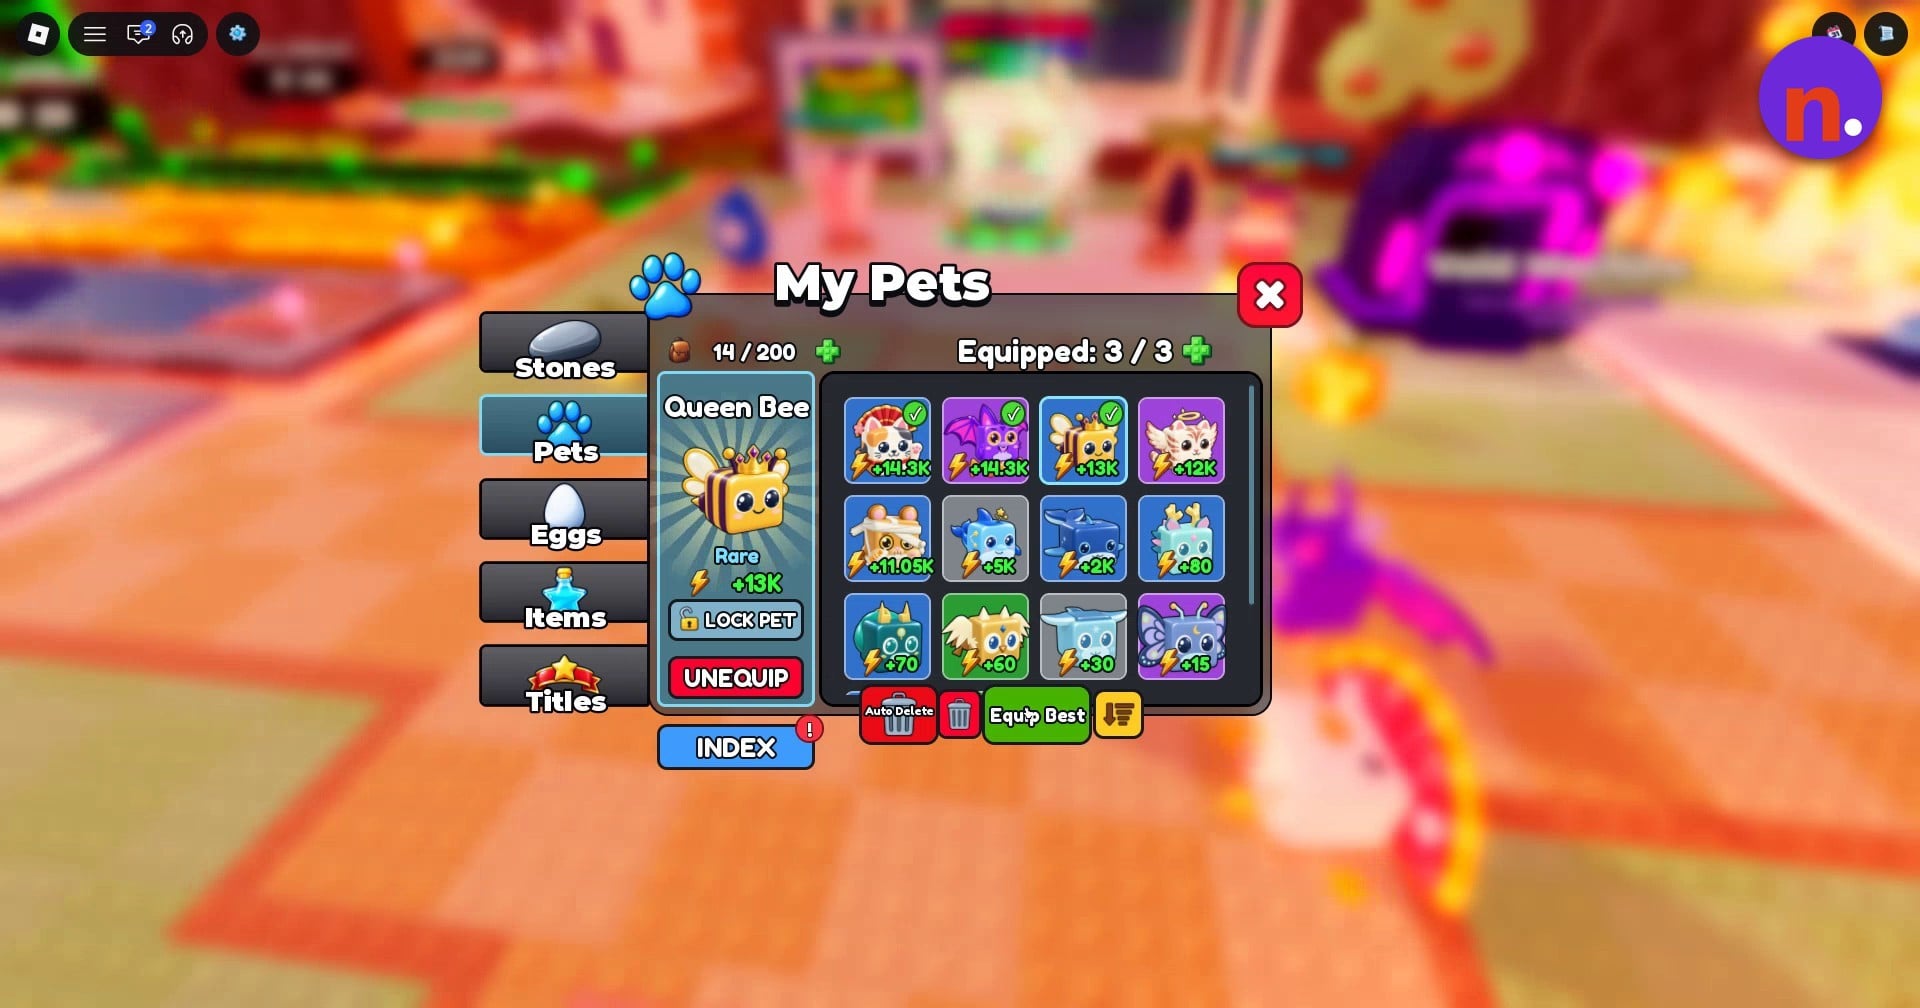
Select Pets to open My Pets and view your owned pets. The inventory holds 200 pets, with three free equipped slots.
STEP 8/24
33%
Read individual pet details
Select a pet to view its stats. Use EQUIP or UNEQUIP for individual changes; LOCK PET and Auto Delete are also available management controls.
STEP 9/24
38%
Use Equip Best
Click Equip Best, then read the Equipped banner to see how many slots are filled. With all available slots occupied, it reads 3/3.
STEP 10/24
42%
View your boosts
Open the inventory’s Items tab to see your boosts alongside your pet setup.
STEP 11/24
46%
Finish reviewing your inventory
Revisit the Eggs tab, then close the inventory menu to return to the game world.
3 – Earn and claim aura rolls
Stone throwing and Daily Quests provide routes to rolls.
STEP 12/24
50%
Keep throwing stones
Repeated throws can award aura rolls through chance pulls, separate from completing the daily throwing target.
STEP 13/24
54%
Open the daily targets
Select Get Rolls, then Daily Quests to view the throwing, ricochet, and egg-hatching objectives. Expect the daily reset around 24 hours after your first spawn for the day, using the reset countdown as your timing reference.
STEP 14/24
58%
Return from Gift Rolls
If you open the Gift Rolls shop while reviewing your options, close that window and return to Daily Quests under Get Rolls.
4 – Roll and equip an aura
Choose the intended slot before using a roll.
STEP 15/24
62%
Open your aura collection
Select Auras to open My Auras, where you can view Possible Auras and your current storage slots.
STEP 16/24
67%
Review an owned aura
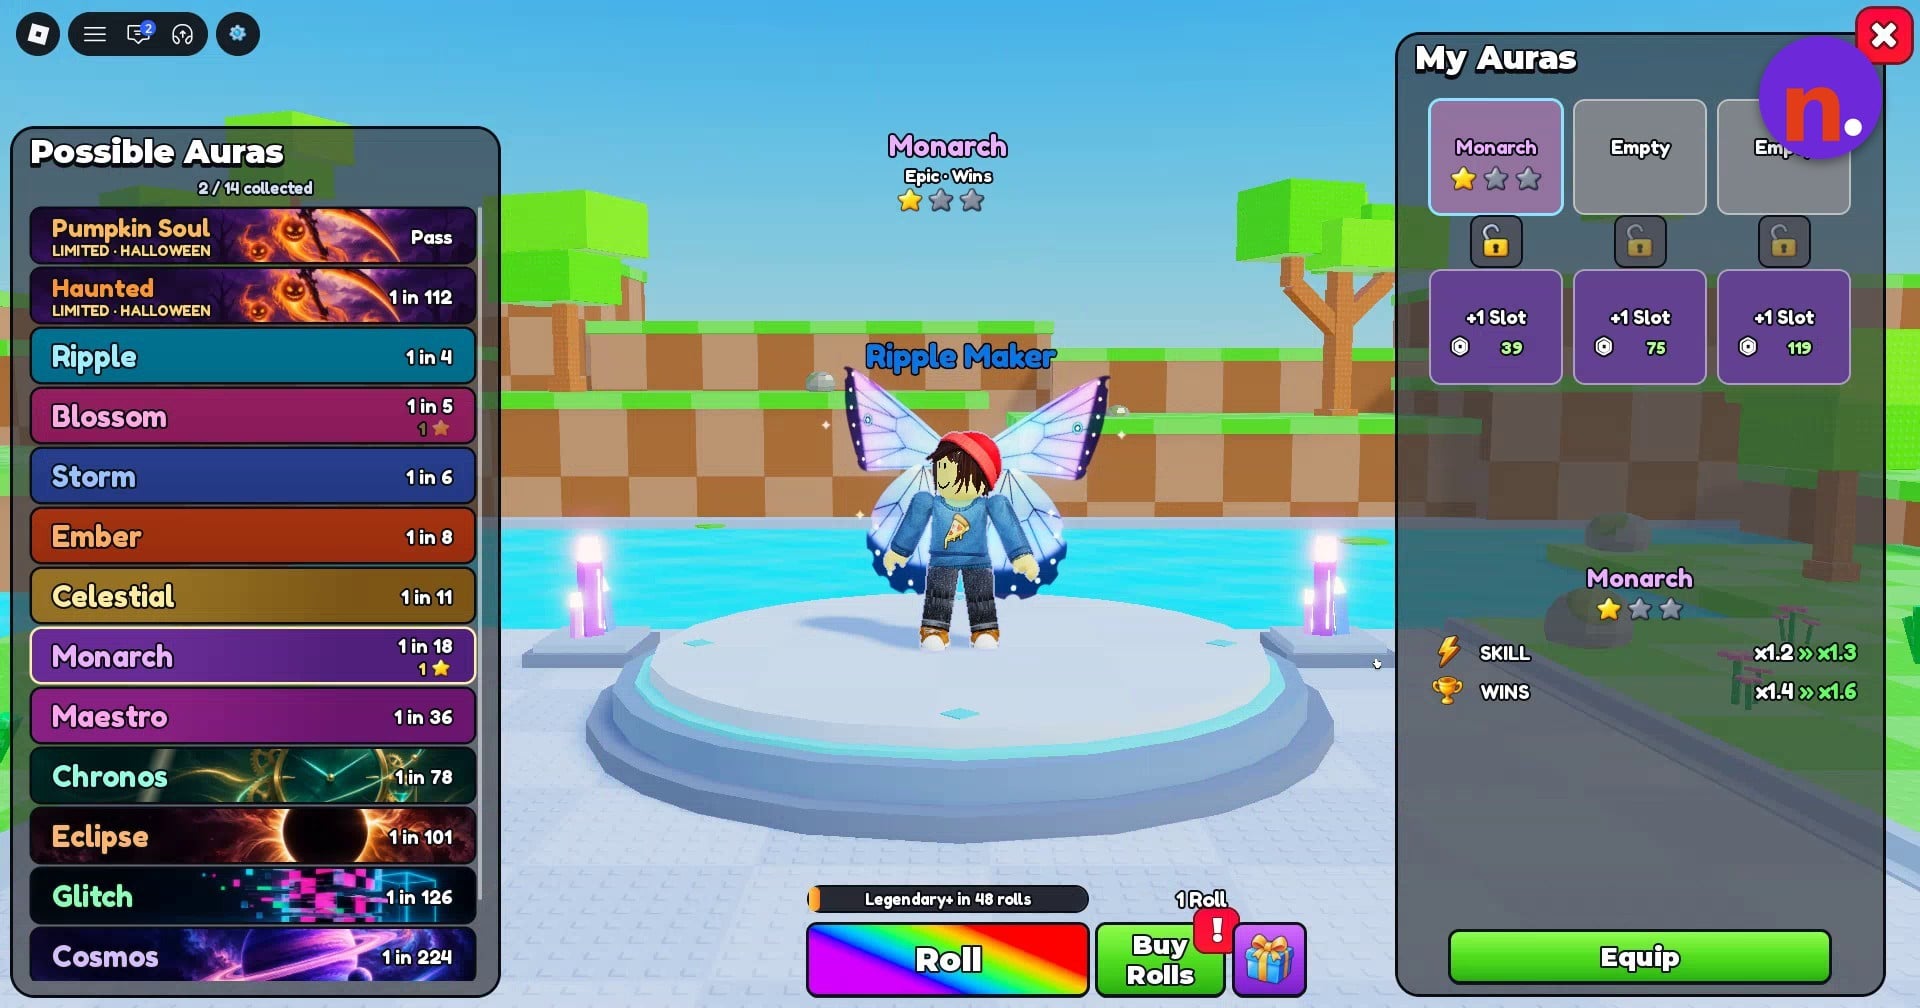
Select an owned aura, such as Monarch, to read its details. Unequip it if you want to remove it from your current loadout.
STEP 17/24
71%
Roll into the intended slot
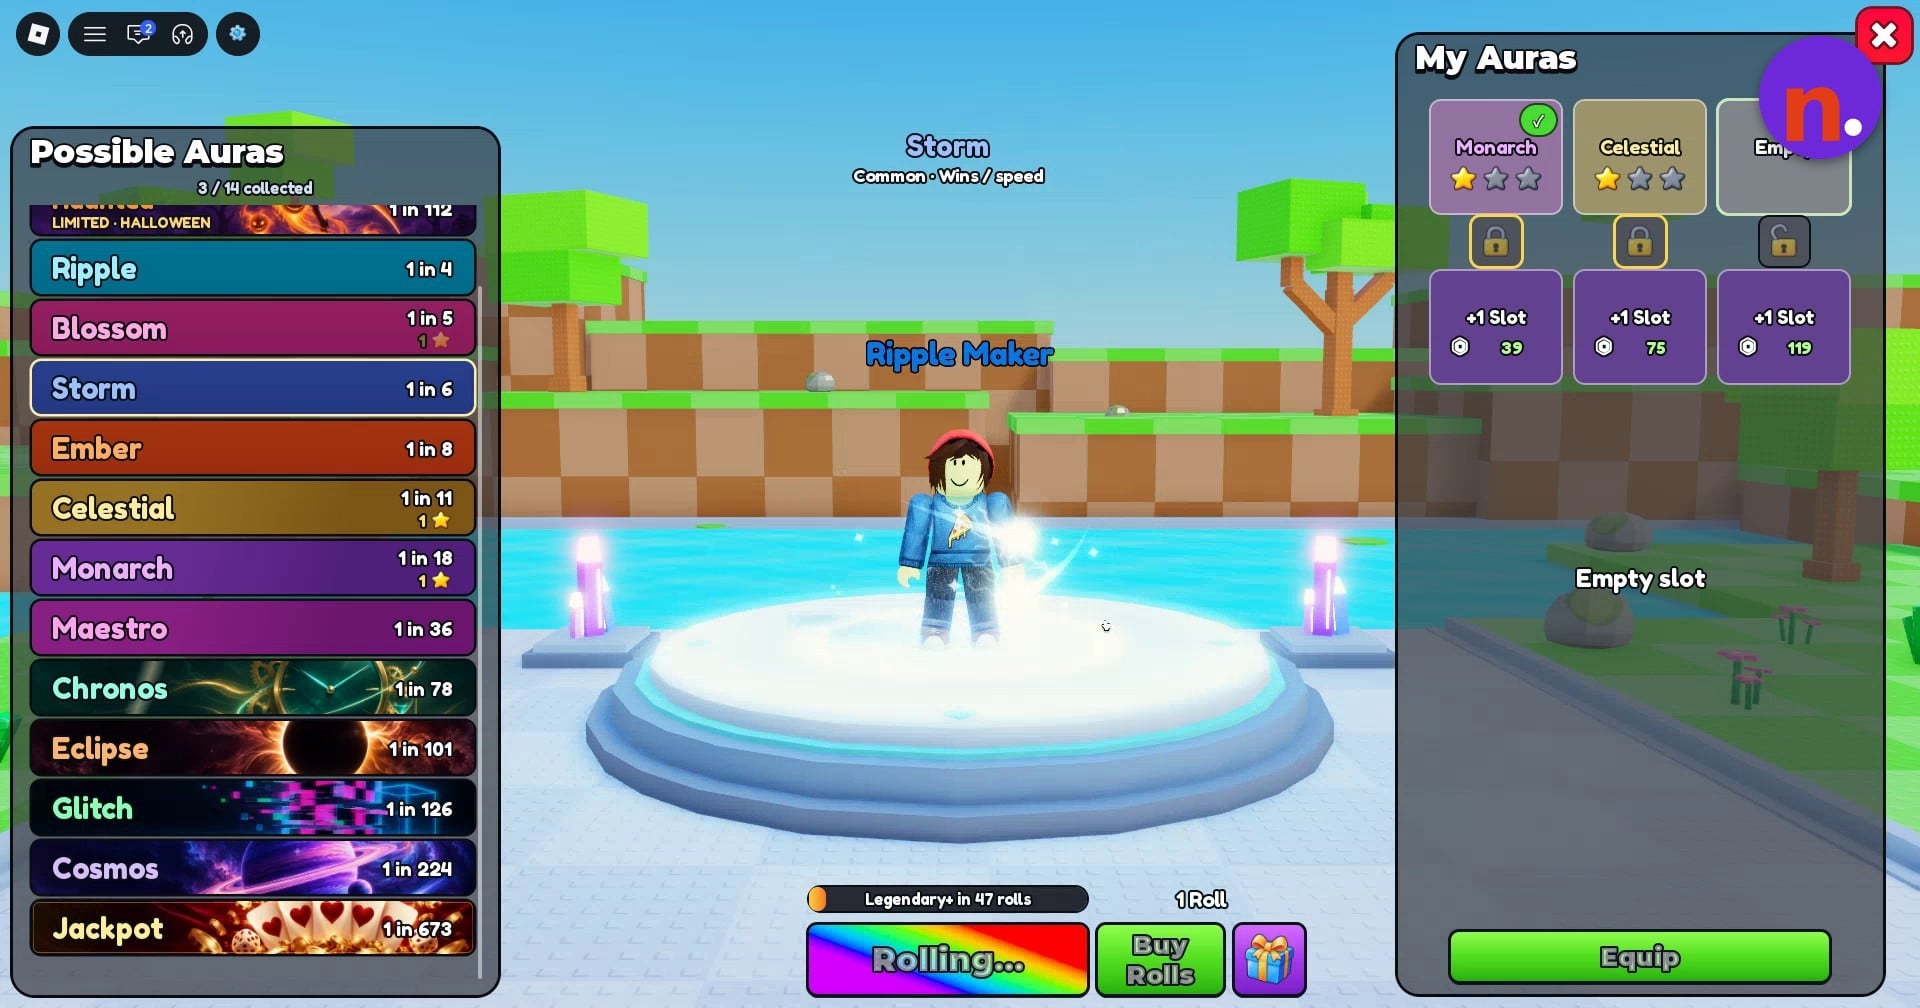
Select the slot you want to use, then press Roll. Slots marked Empty identify unoccupied spaces; Celestial and Ripple are possible results, not a guaranteed sequence.
STEP 18/24
75%
Keep a Celestial result
If you obtain Celestial and want to retain it, lock its slot before selecting an empty slot for another roll. The third slot is an option when it is available and empty.
STEP 19/24
79%
Equip your aura
Select the aura you obtained, equip it, and read its stat effects in My Auras. Additional storage is offered through +1 Slot.
5 – Use your equipped boosts while training and throwing
Finish by putting your pet and aura setup to use.
STEP 20/24
83%
Review the equipped loadout
Reopen My Pets to view your equipped pets and My Auras to review your equipped aura’s effects.
STEP 21/24
88%
Train on an available skill pad
Move onto the 10000x SKILL training pad and train your skill.
STEP 22/24
92%
Resume training after rewards
After collecting a playtime reward, return to skill-pad training before your next throw.
STEP 23/24
96%
Throw from the launch line
Move onto the Throw Zone launch line and throw your stone down the track with your loadout equipped.
STEP 24/24
100%
Return for another throw
Walk back to the Throw Zone launch line when you’re ready to throw again.
Before spending another roll, decide whether you want to keep the aura occupying the selected slot. Keeping an existing aura calls for a different slot choice.
Which eggs and pets can you get, and what bonuses do they give?
Celestial, Transcendent, and Empyrean eggs have prices in wins.
Egg prices in wins
| Egg | Cost in wins |
|---|---|
| Celestial | 2.5T |
| Transcendent | 35T |
| Empyrean | 300T |
The egg inventory also includes Empyrean, Primordial and Titan eggs. The Celestial menu contains separate 20% and 10% outcomes alongside its named outcomes, plus options labeled +3 Eggs, +8 Eggs, and +16 Eggs.
Pet chances, rarities, and bonuses
| Pet | Egg | Hatch chance | Rarity | Bonus or ability |
|---|---|---|---|---|
| Aries Lamb | Celestial | 40% | — | +4K skill |
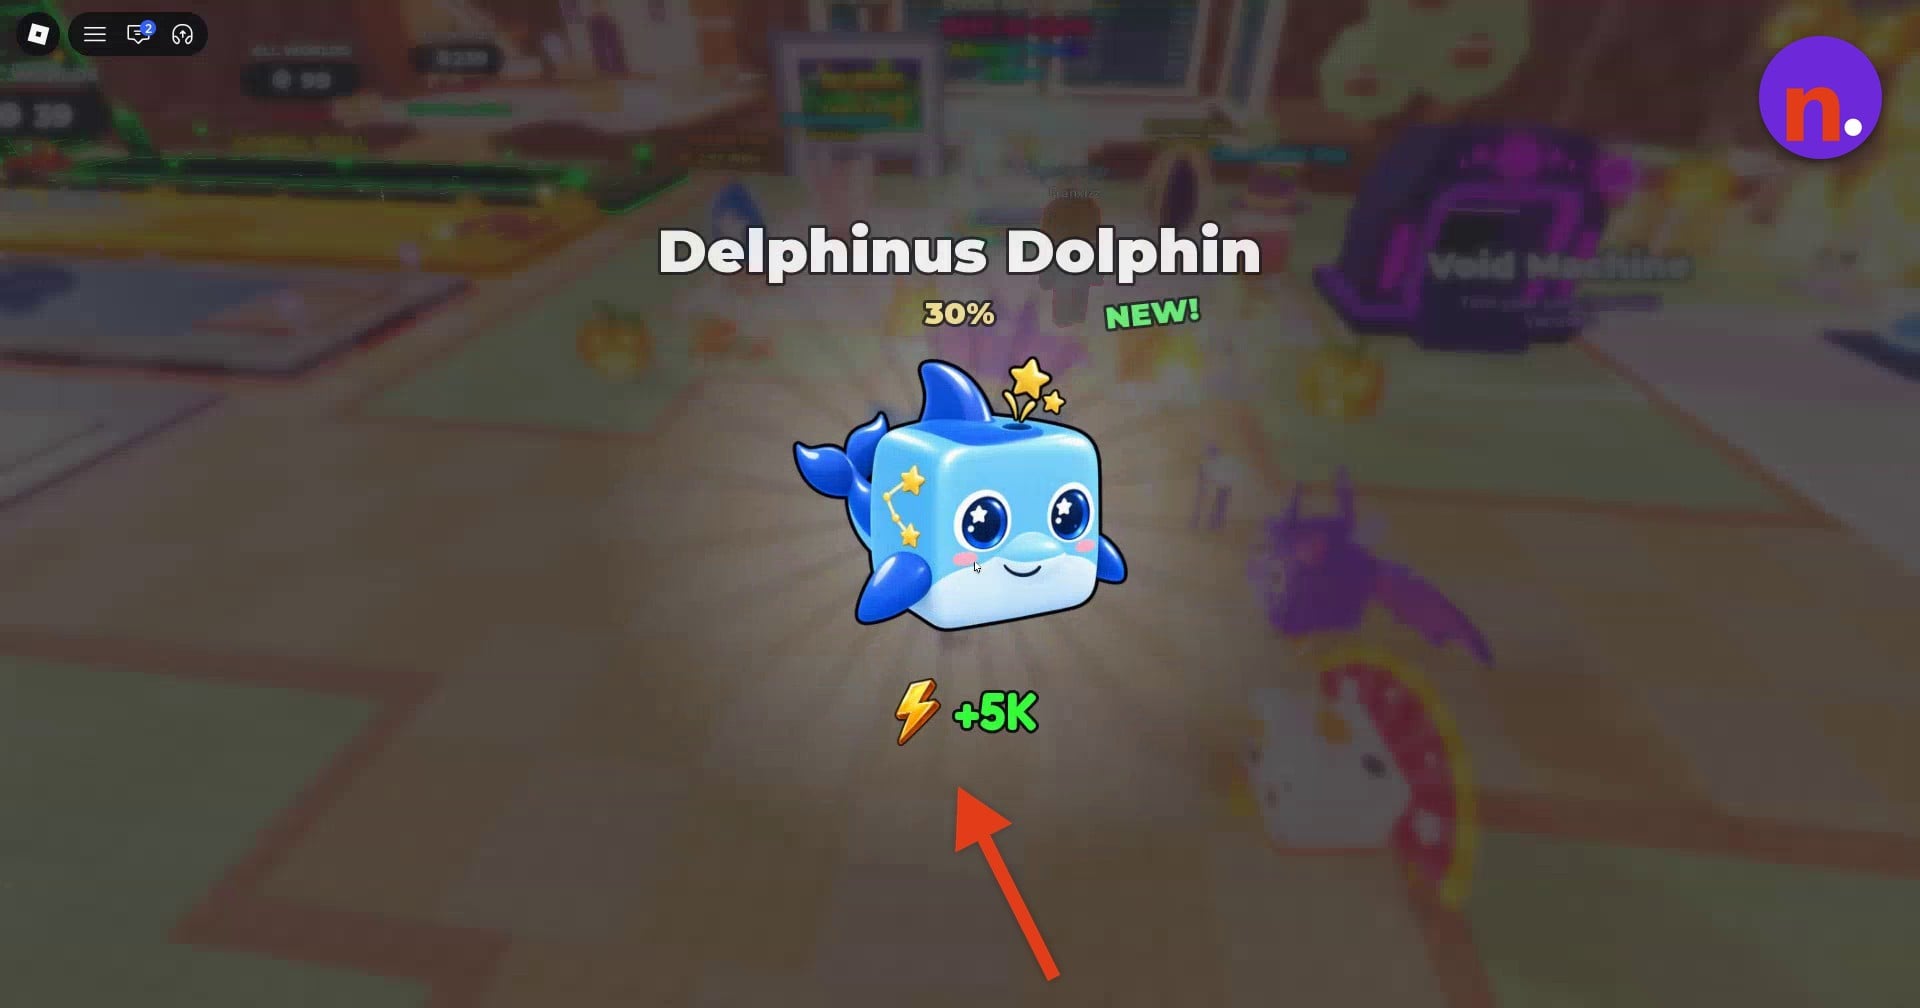
| Delphinus Dolphin | Celestial | 30% | Common | +5K |
| Cherub Piglet | Transcendent | 40% | — | +7.5K skill |
| Immortal Jellyfish | — | — | — | +10.5K skill |
| Queen Bee | — | — | Rare | +13K |
| Trick Bat | — | — | Epic | Always 10% better than your best pet |
| Seraph Tiger | Transcendent | — | Epic | x12K |
| Aurora Qilin | — | — | Rare | x80.00 |
| Jade Scarab | — | — | Rare | x70.00 |
| Fortune Neko | — | — | Rare | Always 10% better than your best pet |
Pet details use both plus-prefixed bonuses and multiplication displays. Keep those labels distinct when comparing your collection; they don’t establish a single formula for calculating every pet’s contribution.
What are the aura roll odds and stat effects?
| Aura | Roll odds or access label |
|---|---|
| Pumpkin Soul | Pass (Limited Halloween) |
| Haunted | 1 in 112 (Limited Halloween) |
| Ripple | 1 in 4 |
| Blossom | 1 in 5 |
| Storm | 1 in 6 |
| Ember | 1 in 8 |
| Celestial | 1 in 11 |
| Monarch | 1 in 18 |
| Maestro | 1 in 36 |
| Chronos | 1 in 78 |
| Eclipse | 1 in 101 |
| Glitch | 1 in 126 |
| Cosmos | 1 in 224 |
| Jackpot | 1 in 673 |
The paired numbers preserve the menu’s multiplier comparisons; the arrows aren’t instructions for upgrading an aura or a promise of an automatic increase. The menu also includes a Legendary+ countdown, whose remaining-roll count changes with its current state.
What do daily aura quests require, and what do paid rolls and slots cost?
The next part shows daily aura quest targets, roll rewards, and paid roll and slot costs.
Daily targets and roll rewards
| Daily quest | Target | Reward |
|---|---|---|
| Throw stones | 30 | +1 Roll |
| Land ricochets | 2,000 | +1 Roll |
| Hatch eggs | 10 | +1 Roll |
These are the full daily targets, so your progress counters show how much remains toward each objective. Paid options sit separately: the aura interface includes Buy Rolls, and Get Rolls also has a Gift Rolls shop.
Roll ticket and extra-slot prices
| Purchase | Robux |
|---|---|
| One Aura Roll ticket | 19 |
| Aura slot 2 | 39 |
| Aura slot 3 | 75 |
| Aura slot 4 | 119 |
Each extra slot is a separate purchase with its own price. Buying tickets or storage is optional alongside the free roll routes.
Can you progress without buying aura rolls?
| Halloween Event | Date and time |
|---|---|
| Starts | 17 October 2026, 16:00 UTC |
| Ends | 3 November 2026, 19:00 UTC |
Yes, you can build your loadout through the free routes. Spending on rolls isn’t required to begin using auras.
Use Daily Quests for three free aura rolls and equip your pets through My Pets. That’s a practical progression choice, not a promise of a particular leveling speed.
Playtime Rewards provides another egg route and also includes a reward of one Luck Boost. During the Halloween Event, tier rewards provide an additional seasonal source of eggs.
The Halloween egg route belongs to that seasonal event window. Playtime rewards give you another reward track alongside it.
Your pet and aura bonuses support the same ongoing activities: skill training and stone throwing. Keep building that loadout through the available rewards, with paid rolls as an optional purchase.
Related 1 Stone Skipping guides






Leave a Reply