Windows 11 was recently leaked to the public and everyone around the world has been rushing to get the new OS installed on a virtual machine with the help of tools liike VirtualBox. Windows 11 comes with a new makeover to the overall UI, a minimalistic design, and less cluttered start menus altogether. That it aligns the taskbar to the center,a feature that comes straight from the macOS book. Although, you can easily move the Windows 11 taskbar to the left if you want.
If you too are trying to get Windows 11 installed on a VM then you might have realized, it’s not a cakewalk. Many users have been facing installation errors on VirtualBox, including errors like “This PC can’t run Windows 11“. Thankfully, most of these are easily mitigated and if you too are in the same boat, then you can try one of the fixes mentioned below depending on your current set of problems.
Here’s how to fix the problems with Windows 11 installation on Windows 11.
Fix #1: Change your chosen Windows version

Virtualbox allows you to choose the Windows version you wish to install and sets up your virtual machine’s resources accordingly. Sadly, as Windows 11 is a leaked copy and not officially released yet, it doesn’t appear on this list. And if you select your Windows version incorrectly, then you could end up experiencing errors and crashes. Thankfully this can be easily changed, simply select either ‘Windows 10’ or ‘Windows 7’ in your VM settings again and you should be good to go.
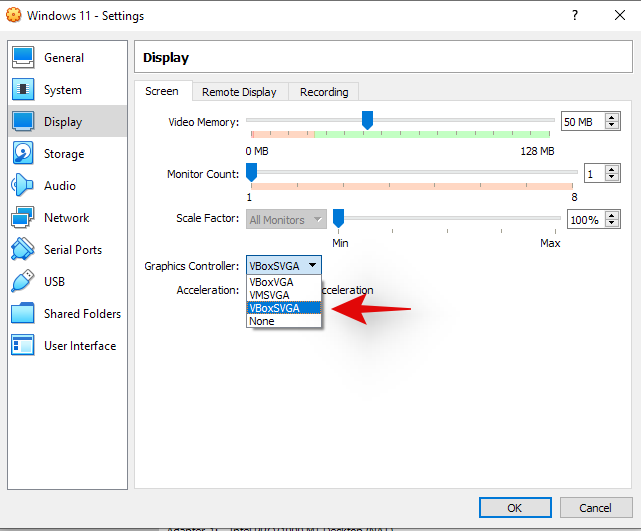
Fix #2: Select VBoxSVGA as your video adapter

If you had selected the wrong Windows version then this setting was also likely messed up for you. You will need to go into your VM settings and select VBoxSVGA as your video adapter in the display settings. This will allocate enough video and graphical resources to your VM so that it can install Windows 11 easily.
Fix #3: Enable TPM
Trusted Platform Module or better known as TPM is a microcontroller on your motherboard that stores encryption keys and other important data which helps verify the identity of your platform. To run VMs on any modern system you will need to enable TPM in your bios settings. Most systems should have this enabled by default but in case you keep facing errors with your Windows 11 installation then we recommend checking TPM in your Bios. In case it is turned off, turn it back on and try again. Once turned on, you should be able to easily install Windows 11 on your VM in VirtualBox.
Fix #4: Enable VT
Virtualization or VT is another bios setting required to run VMs properly on any system. This setting helps and allows your system to virtualize CPUs for the VM. Errors like “This PC can’t run Windows 11” and more are usually caused by such settings. Reboot your system and ensure that VT is enabled in your Bios. If Virtualization is disabled, please enable it and try to install Windows 11 again. Any issues related to Virtualization should now be fixed.
Fix #5: Replace appraiserres.dll
For some users, it seems a file inside the installation .iso causes the problems, mainly “appraiserres.dll”. If the above-mentioned fixes did not fix your error then you can try replacing this file with the one linked below. Extract the iso to a convenient location and then replace the file in the directory with the one linked below.
We hope these fixes helped you install Windows 11 in VirtualBox easily. If you still face issues, feel free to share more details with us in the comments section below.


Fix 2 is the ones that worked for me.
thank you.
Fix 2 did it for me too. Simple as that
another trick is to set hyper-v
Can not fixed!
Unable to start on VirtualBox in Linux