ClockworkMod Recovery (CWM) was the first recovery to land on Android, and rightly, the popular to date.
Sure TWRP is giving it tough competition and is one step ahead of it, but CWM still remains strong: often released or developed well before TWRP, especially on low-end devices where TWRP is absent many a times.
Anyway, here are your good guides and tools to install the CWM recovery on your beloved Galaxy S3, to open up the world of custom ROMs, mods, themes, Nandroid backups and what not for you. Enjoy!
- Method 1: Using ROM Manager android app (non-touch version)
- Method 2: Using Odin PC software for default CWM recovery
- Method 3: Using Odin software for CF Root and Recovery kernel
- Method 4: Galaxy S3 Toolkit
- Method 5: Using Terminal Emulator android app to flash .img file of recovery
- Yet another method… Using another custom recovery
What’s on this page?
Well, we’ve got 5 methods for you to install CWM Recovery:
- Using ROM Manager
- Using Odin PC Software for default CWM
- Using Odin software for CF Root and Recovery kernel
- Using Galaxy S3 Toolkit
- Using a Terminal Emulator app
And.. yet another method, the easiest one: Using another custom recovery.
► You can use this metod only if, and that’s a big (and bold) if, you already have a custom recovery installed — chances of which are less for obvious reasons.
Then, you can simply download a .zip file of CWm and flash it using that recovery. We’ve covered this one as well after the above mentioned 5 methods.
Tip: Click on any of the 6 methods above to jump directly to that method.
[l1]
Method 1: Using ROM Manager android app (non-touch version)
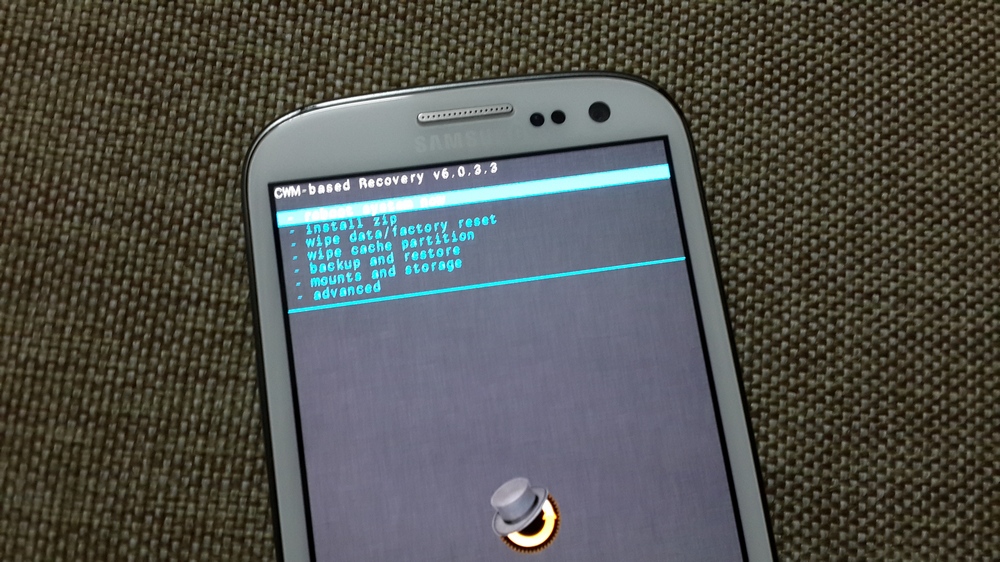
ROM Manager is the official app to help you install a non-touch ClockworkMod recovery (CWM) on your android device. To install touch version of CWM using a ROM Manager, you would need its as much as $5.99 costing paid version, ROM manager (Premium). DOn’t worry, there are free methods — covered below, too — for that!
Btw, you can also use the app to manage Nandroid backups, install zip files of ROMs and other mods, or simply to reboot into recovery mode directly from the app, without having to do hard reboot into recovery using 3 button combo of Power + Home + Volume Up till Samsung logo shows up.
VIDEO:
To make things easier than easy, first watch the video below over viewing the installation to get a fair idea of what you are going to do how.
STEP-BY-STEP GUIDE:
- Important! You would need root access on your Galaxy S3 for the ROM Manager app. Get it now if you don’t have it already → SAMSUNG GALAXY S3 GT-I9300 ROOT.
- Open Play Store app on Galaxy S3 and search and install ROM manager android app.
- Open ROM Manager and tap on the Recovery Setup. Ignore what’s written there. Select OK/Grant to provide root access when the pop up from SuperUser/SuperSU app respectively shows up.
- Now, press menu key and select Recovery Setup.
- Simply tap on ClockworkMod Recovery under ‘Install or Update recovery’ section.
- Now, wait and then confirm your Galaxy S3’s model no. when it appears. Tap on Samsung Galaxy S3 (GT-I9300).
- Tap on Flash ClockworkMod Recovery. The app will begin downloading the recovery from official servers.
(The image below consists of 3 screenshots, covering the text up to Step 10 below.)
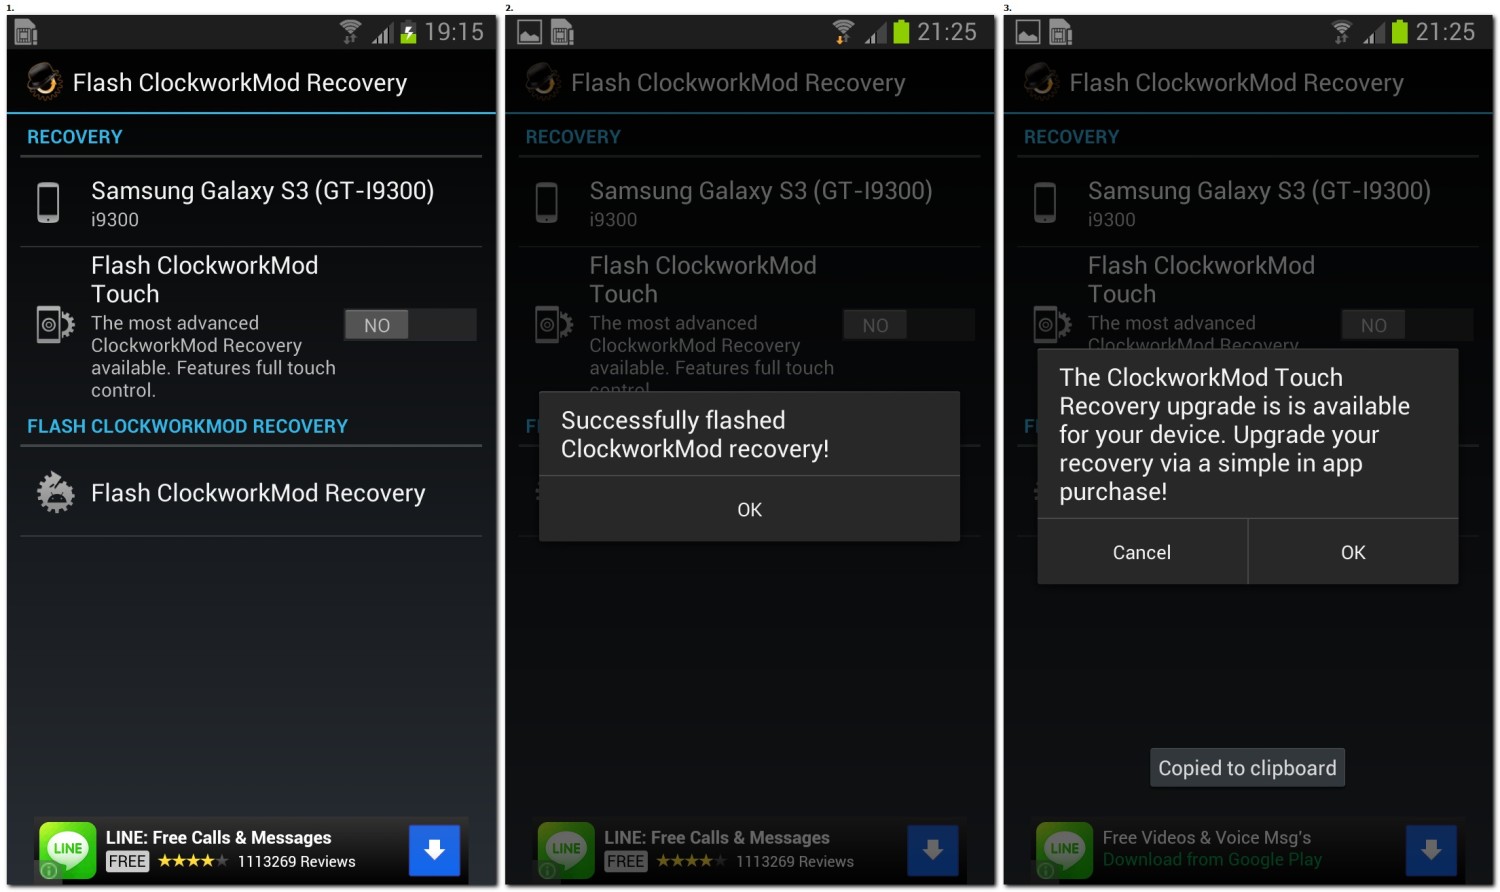
- When download is finished, you’ll get a pop-up window asking for root access, select OK/Grant to provide root access when the pop up from SuperUser/SuperSU app respectively shows up.
- You’ll get a “ClockworkMod recovery successfully flashed” message within seconds! Congrats, recovery has been installed. Let’s check it now.
- Just select ‘Cancel’ when it asks for upgrade (touch version it is, actually), as the same is available for flashing for free using the terminal emulator app on Android. And we’ve covered a guide on this very page, right below this guide.
- Now, don’t use the ‘Reboot into Recovery’ option in the ROM Manager app for this time around, and simply exit the app. It’s better to do a boot into recovery using 3 button combo for the first time.
► Now, to boot into recovery mode: first power Off your Galaxy S3, and wait till capacitive lights go off of buttons. Now, press and hold these 3 keys (Power + Home + Volume Up) together until you see Samsung logo. - You should boot into CWM recovery, the non-touch edition, right away. Happy flashing!
[l1]
Method 2: Using Odin PC software for default CWM recovery
This is perhaps easiest in the long run. Once you have installed recovery using Odin, you always have the recovery’s file on PC and can flash it anytime you want using the Odin. pretty reliable.
The only thing is, you must get ‘Drivers’ working alright. Once you got it, it’s never a problem. And, while it’s mostly easy, it gets trickier sometimes.
VIDEO:
To make things easier than easy, first watch the video below overviewing the installation of the non-touch CWM recovery on Galaxy S3 so that you get a fair idea first of what you are going to do how.
DOWNLOADS:
- CWM Recovery in non-touch version in .tar format (Alternate Link: Mega) Filename: CWM-recovery-6.0.3.3-I9300.tar
(You’ll need it in step 5 below in AP tab of Odin!) - Odin software for PC v3.09 (latest!) [Alternate Download Links: Filecloud | Mega]
STEP-BY-STEP GUIDE:
- Download the files required: CWM-recovery-6.0.3.3-I9300.tar and Odin3_v3.09.zip
- Install Drivers on your PC so that Odin recognizes the Galaxy S3 and shows the must-get “Added!!” message in step 6 below → SAMSUNG GALAXY S3 DRIVERS!
- Extract Odin’s file, Odin3_v3.09.zip, to get this file: Odin3 v3.09.exe
- Double click on Odin3 v3.09.exe to run Odin
- Now, boot your Galaxy S3 into Download Mode. For this:
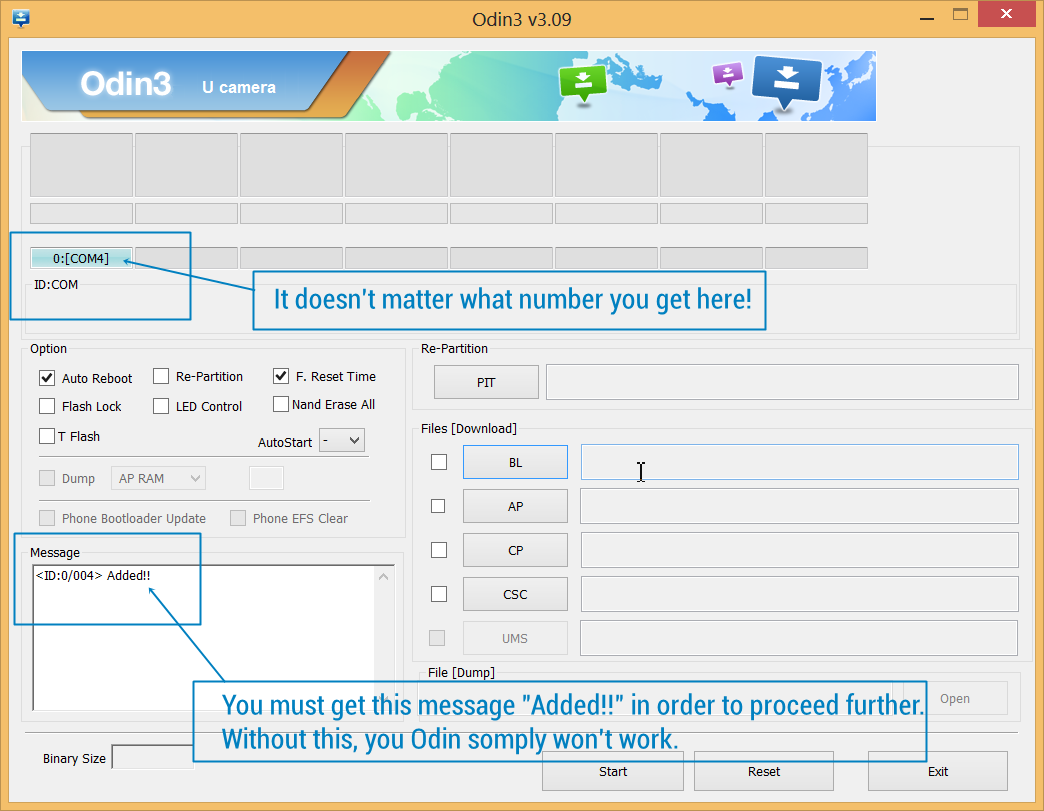
- Connect Galaxy S3 to PC. You should get an ‘Added!!’ message in Odin’s bottom left box. It is a MUST you get the ‘Added!!’ message in order to proceed further. Some points to be noted:
- If you don’t get the Added!! message, then first of all, make sure you installed drivers alright. If you did already, try installing drivers again, using different method as discussed above in drivers section.
- Plus, after installing drivers, try these tricks: reboot your PC, and/or un-install/re-install drivers, and/or change the USB port (preferably use one at the backside on computer) until you get “Added!!” message in Odin.
- Your Odin’s screen would look like this:
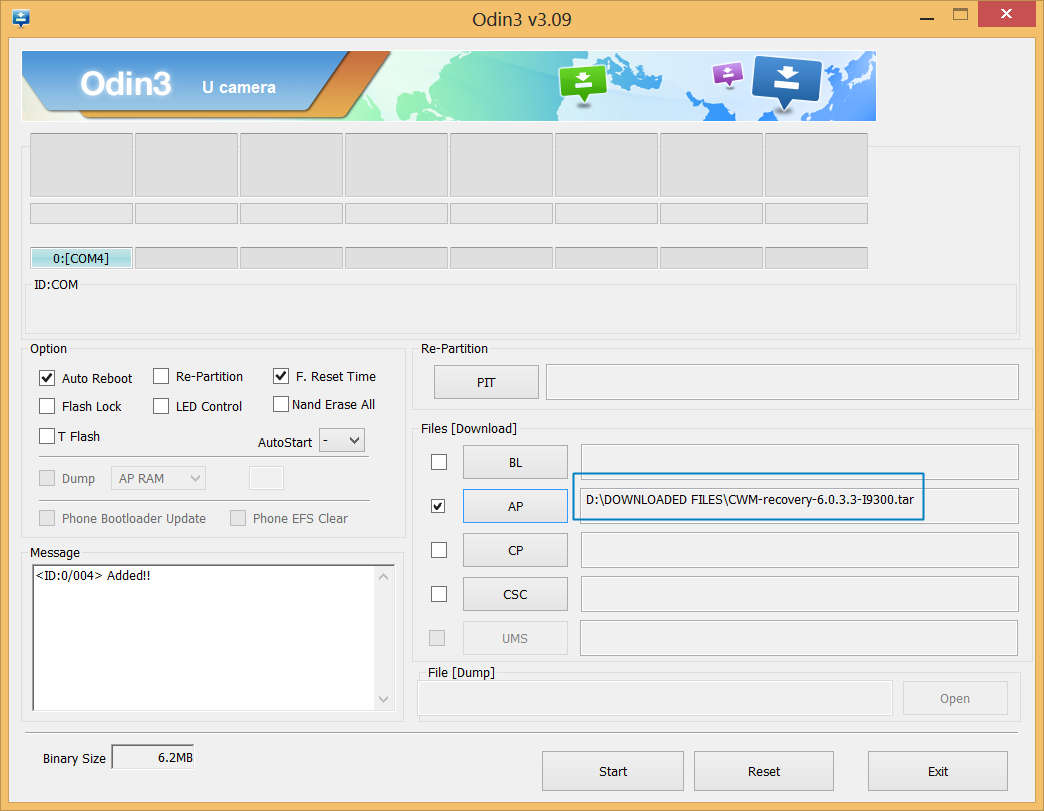
- Once you get ‘Added!!’ message in Odin, click on AP tab in Odin and select the zip file of the non-touch CWM recovery you downloaded above: CWM-recovery-6.0.3.3-I9300.tar
- In Odin, keep ‘Auto Reboot’ and ‘F.Reset Time’ boxes checked while make sure Re-Partition box is unchecked. Leave everything else untouched.
Odin should look like this:
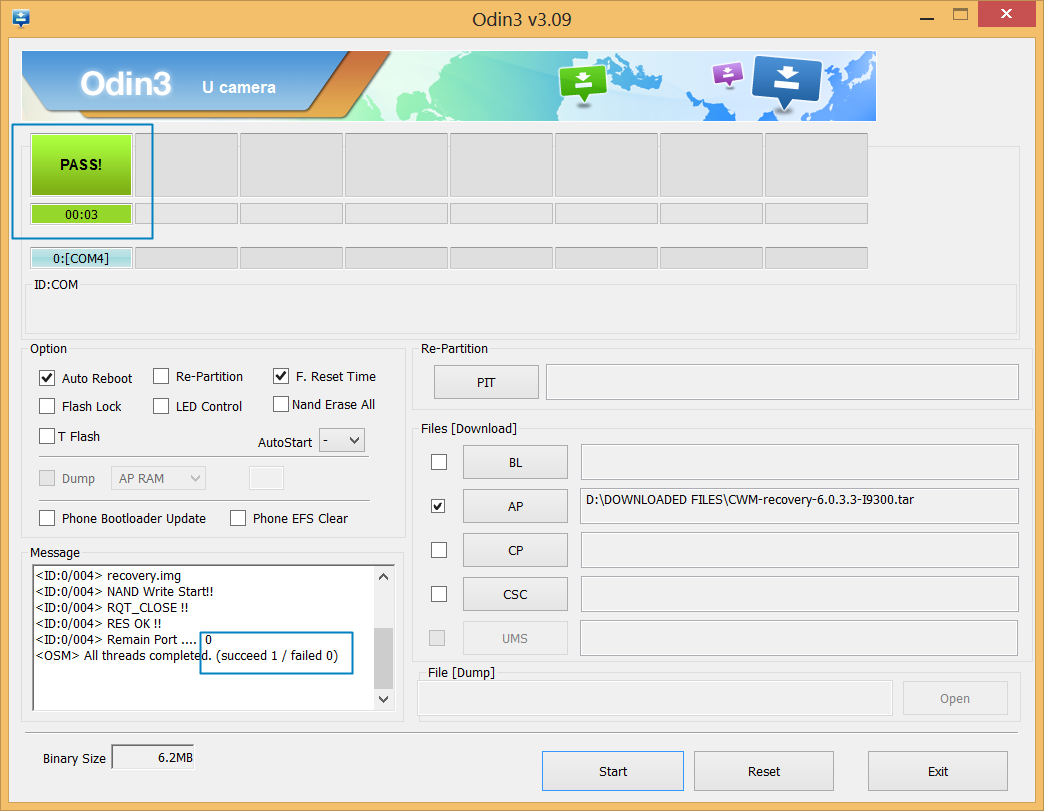
- Hit the Start button on Odin now to start flashing the CWM recovery in non-touch edition on your Galaxy S3 now, and wait until you see PASS on Odin’s top left box. Your device will reboot automatically upon successful flashing, and will be rooted when it has restarted.
- You can ‘Exit’ Odin and ‘Disconnect’ the phone when you see PASS message on Odin.
- If you see FAIL instead of PASS in Odin’s top left box, disconnect Galaxy S3 from PC, close Odin, remove battery and put it back in 3-4 seconds, and then repeat step 4 to step 8.
- Upon successful installation, your Odin will be like this:
- Now, let’s confirm the recovery installation. For this, boot your Galaxy S3 into Recovery Mode:
- Power Off your Galaxy S3. Wait till capacitive lights of Menu and Back keys are off.
- Now, press these 3 keys together until you see Samsung’s logo: Power + Home + Volume UP.
- Your Galaxy S3 will boot into CWM recovery now. Enjoy!
Done. Easy, right?
Btw, actually, let’s just use the CWM recovery right away, to install the touch version of the CWM right away using its non-touch version we just installed.
You would need the CWM recovery in touch version, in .zip format flashable through recovery, which you can find right below.
[l1]
Method 3: Using Odin software for CF Root and Recovery kernel
It would install a older version of CWM, v.5.5, but we still like it because it’s still an easiest way to get root and recovery in one click and does its job quite good.
Caution: Some ROMs these days require CWM v6.x in order to install alright, so make sure ROM hasn’t specified that before installing using this recovery.
VIDEO:
To get a good idea of the procedure to root Galaxy S3 using this method, it’s best to check out it in action in the video below.
DOWNLOADS:
- CF Root and Recovery package v6.4 for Galaxy S3
- Odin software for PC v3.09 (latest!) [Alternate Download Links: Filecloud | Mega]
STEP-BY-STEP GUIDE:
- Download both files from the downloads section just above.
- Install Drivers on your PC so that Odin recognizes the Galaxy S3 and shows the must-get “Added!!” message in step 6 below → SAMSUNG GALAXY S3 DRIVERS!
- Extract CF Root and Recovery package file, CF-Root-SGS3-v6.4.zip, that you download right above to get this file: CF-Root-SGS3-v6.4.tar
- Extract Odin’s file, Odin3_v3.09.zip, to get this file: Odin3 v3.09.exe
- Double click on Odin3-v1.85.exe to run Odin
- Now, boot your Galaxy S3 into Download Mode:
- Connect Galaxy S3 to PC. You should get an ‘Added!!’ message in Odin’s bottom left box. It is a MUST you get the ‘Added!!’ message in order to proceed further. Some points to be noted:
- If you don’t get the Added!! message, then first of all, make sure you installed drivers alright. If you did already, try installing drivers again, using different method as discussed above in drivers section.
- Plus, after installing drivers, try these tricks: reboot your PC, and/or un-install/re-install drivers, and/or change the USB port (preferably use one at the backside on computer) until you get “Added!!” message in Odin.
- Your Odin’s screen would look like this:

- Once you get ‘Added!!’ message in Odin, click on AP tab in Odin and select the CF-Auto-Root file → CF-Root-SGS3-v6.4.tar
- Keep ‘Auto Reboot’ and ‘F.Reset Time’ boxes checked while make sure Re-Partition box is unchecked. Leave everything else untouched.
Odin should look like this:

- Hit the Start button on Odin now to start flashing the CWM recovery in non-touch edition on your Galaxy S3 now, and wait until you see PASS on Odin’s top left box. Your device will reboot automatically upon successful flashing, and will be rooted when it has restarted.
- You can ‘Exit’ Odin and ‘Disconnect’ the phone when you see PASS message on Odin.
- If you see FAIL instead of PASS in Odin’s top left box, disconnect Galaxy S3 from PC, close Odin, remove battery and put it back in 3-4 seconds, and then repeat step 5 to step 8.
- Upon successful installation, You Odin will look like this:

- Now, let’s confirm the recovery installation. For this, boot your Galaxy S3 into Recovery Mode:
- Power Off your Galaxy S3. Wait till capacitive lights of Menu and Back keys are off.
- Now, press these 3 keys together until you see Samsung’s logo: Power + Home + Volume UP.
- Your Galaxy S3 will boot into CWM recovery now.
Done.
[l1]
Method 4: Galaxy S3 Toolkit
You can install Root and either of TWRP or CWM Recovery, in one shot, using the Galaxy S3 toolkit, as detailed below.
VIDEO:
It would helpful for you in rooting your Galaxy S3 using the Toolkit if you have first watched the video below, in which we’ve shown doing just that. Then you can download and do it yourself with better idea of what you are going to do and how.
DOWNLOADS:
STEP-BY-STEP GUIDE:
- Run the Galaxy S3 toolkit’s file, Samsung_Galaxy_S3_ToolKit_v7.0.exe on PC by double clicking on it.
- Hit Next, then Next again and now on ‘Select Components to Install’ screen, make sure Drivers box is also checked. Hit Next.
- Now, you can specify the location of the installation of the toolkit but it’s best to keep default location mentioned therein. Or else, select any drive of your PC and try not to install the toolkit inside any folder on the drive.
- Installation will be over soon. With ‘Execute the program now’ box checked, hit Close button. The program will run itself now. (You can run it manually from the the shortcut at desktop it just created or directly from its installation folder).
- Select NO when it asks for update, and you will get a screen where you get to choose your Galaxy S3 device as per build no.
- Yours is model no. GT-I9300 — International GSM. Right? So, go to Settings – About Phone, and note the build number, especially the last four letters. Now, select the appropriate option based on build no. in the toolkit, that matches your device’s build no.
- if you can’t match/find exact build no., it’s okay, as nearby build no. of your device compared to that listed in the toolkit options would do just fine. In the video above, you can notice by Galaxy S3’s build no. is ALF2 while that I selected in toolkit is ALF6.
- The toolkit might need to download the right files, as regards root, recovery, etc., for your device. Once that is done, you’ll get to Main Menu, with more than 25 options listed here to help you mod your phone.
- Install DRIVERS NOW!! Unplug the Galaxy S3 if it is connected to PC and then Select Option 1, then option 1 again on next screen and then follow the direction to complete the drivers installation. After drivers installation is finished, you will be back on Main Menu.
- Now, select option 2 for Root. Select any one of the six options to root the Galaxy S3 that toolkit provides you. Each one is explained there so that you can decide and choose.
- With Option 3, ALLINONE, you’ll get to select the choice of recovery and root under each of these options.
- Now, the toolkit would ask you to enable the USB Debugging, if it wasn’t enabled already. It’s easy:
- Type ‘Yes’ and hit enter on toolkit. The toolkit will proceed further once it finds USB Debugging is enabled.
- Read what the toolkit’s screen is saying. Actually, and unfortunately, you gotta do stuff manually now. Toolkit will load Odin for you.

- Now, read what and what toolkit asked you to do with Odin and then select the file as it specified in odin:
- Click on PDA tab on Odin and select the file mentioned in point no. 2 on toolkit’s screen.
- You must be able to locate that file in: toolkit’s installation folder → root → GT-I9300.
- Important! Once you’ve selected the file, make sure ‘Auto Reboot’ and “F. Reset Time” boxes are checked, while other boxes are unchecked. You Odin’s screen would look like this:

- Hit Start button on Odin now to start the flashing process. The recovery will be flashed on your device, which will be then used to install Root on your device, which is all automated. Yeah, thankfully!
- Once toolkit has done its job, your phone will be rooted already and will have the recovery you chose installed. Toolkit will return to Main Menu, and you close it now.
Done.
[l1]
Method 5: Using Terminal Emulator android app to flash .img file of recovery
You can install the official touch and non-touch version of the CWM recovery by downloading the same in .img format and then flash it using Terminal Emulator android app. You would need root access, while PC isn’t required.
VIDEO:
And since this is a little bit of manual procedure for the most part, it’s very much recommended you watch this video below first before trying it yourself, to get a fair idea of how it’s done.
DOWNLOADS:
- CWM recovery, touch edition in .img format
Filename: recovery-clockwork-touch-6.0.3.6-i9300.img - CWM recovery, non-touch edition in .img format
Filename: recovery-clockwork-6.0.3.6-i9300.img
STEP-BY-STEP GUIDE:
- Make sure your Galaxy S3 is rooted. Get it now if you don’t have it already → SAMSUNG GALAXY S3 GT-I9300 ROOT.
- Download the CWM recovery from above on your PC. Either touch or non-touch cwm, your choice. Don’t download it on phone as we need to some work on recovery file to be flashed.
- Important! Now, rename the recovery file you looking to install to: s3cwm.img
- Connect your Galaxy S3 to PC. Go to My Computer and then into Galaxy S3’s sdcard.
- Now, create a new folder here, name it as: 9300r. (Don’t use external sdcard for this purpose!)
- Copy the CWM recovery file, s3cwm.img, to folder 9300r you just created.
- Disconnect Galaxy S3 from PC. Now, just to confirm, open My Files app or any file explorer app and browse and confirm that you got s3cwm.img file in 9300r folder on your sdcard.
- Now, you have the s3cwm.img recovery file in 9300r folder of your Galaxy S3. Right? If not, do steps 2 to 6 again.
- Open Play Store app on your Galaxy S3 and search and install the JS Terminal app.
- Open the JS Terminal app.
- Type this and then hit enter key:
su
- The app will ask for Root Access. And you need to provide that. Select OK/Grant to provide root access when the pop up from SuperUser/SuperSU app respectively shows up.
And, you will see that # would appear in place of $ on the command line, meaning you have the superuser access now. Plus, username will change to root@android. - Now, we enter the command to flash the recovery file, s3cwm.img in folder, 9300r. WARNING!! Don’t make any mistake in typing as that could brick your Galaxy S3.
Type this and hit enter key:dd if=/sdcard/9300r/s3cwm.img of=/dev/block/mmcblk0p6
(Yes, you guessed it right. /sdcard/9300r/s3cwm.img is the address of the file with its name)

- Recovery has been flashed. Now, let’s confirm the recovery installation. For this, boot your Galaxy S3 into Recovery Mode:
- Power Off your Galaxy S3. Wait till capacitive lights of Menu and Back keys are off.
- Now, press these 3 keys together until you see Samsung’s logo: Power + Home + Volume UP.
- Your Galaxy S3 will boot into CWM recovery now.
Here’s your CWM recovery. Flash custom ROMs and other Mods and create Nandroid backup easily now. Happy flashing!
[l1]
Yet another method… Using another custom recovery
Well, actually this is actually the easiest.
But you need a custom recovery already for this, which is already quite a task. And that also means, you must be having a TWRP recovery, or an older CWM recovery which is why you must be looking for CWM recovery here.
VIDEO:
We could a TWRP recovery or an old/new touch/non-touch CWM recovery to install a CWM recovery, available in .zip format. We’ve chosen the above non-touch CWM recovery we got just above, to install touch CWM. Here’s a video showing that and then the guide to help you do so yourself.
DOWNLOADS:
- Touch version of CWM recovery in .zip format [Alternate Links: Mega | FileCloud]
Filename: CWM_6.0.3.6_Touch_GT-I9300.zip | Size: 6.3MB
STEP-BY-STEP GUIDE:
- Download the touch edition of CWM recovery from above.
- If you downloaded it on PC, transfer it to Galaxy S3.
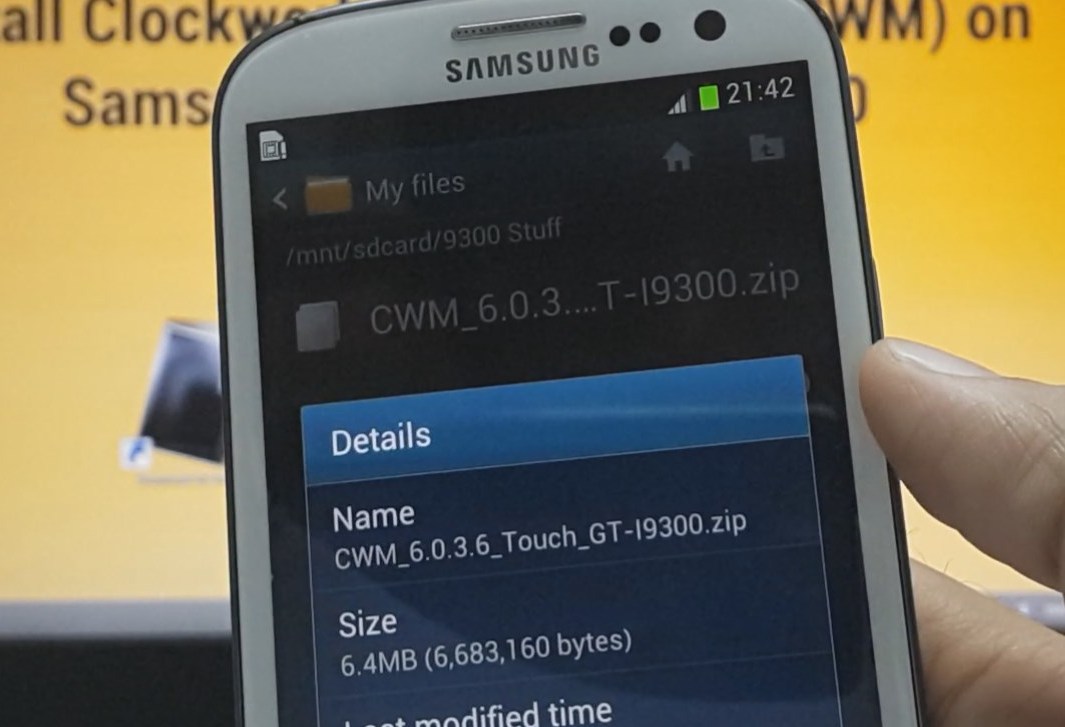
- Confirm you got the recovery file alright by opening My Files app and then locate the app. I have this file in ‘9300 Stuff’ folder in my internal sdcard, as the pic below shows.
- Boot your Galaxy S3 into Recovery Mode:
- Power Off your Galaxy S3. Wait till capacitive lights of Menu and Back keys are off.
- Now, press these 3 keys together until you see Samsung’s logo: Power + Home + Volume UP. You’ll be in recovery mode in few seconds.
- In recovery, you can move up and down between options using volume buttons and can select the option using power button.
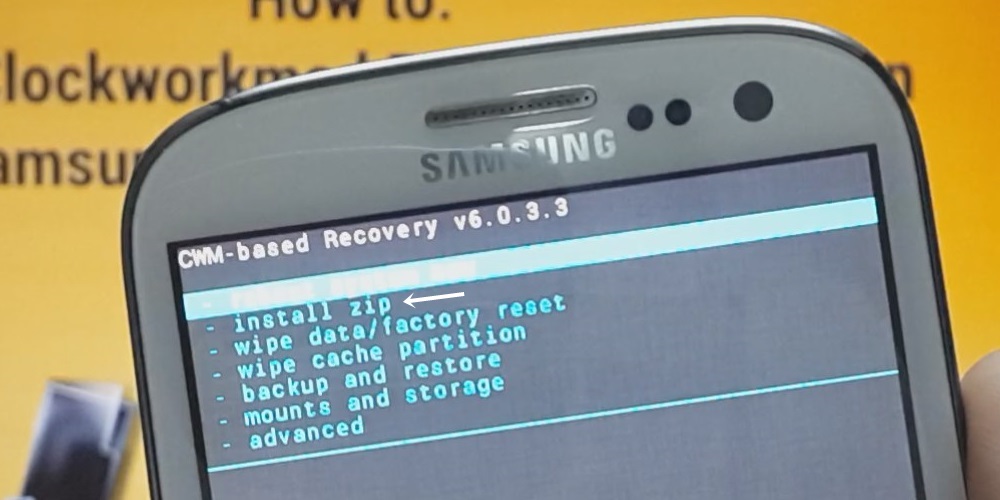
- Select ‘Install zip’ option, and then select ‘choose zip from sdcard’ (or choose zip from external sdcard if your recovery file is in external sdcard)
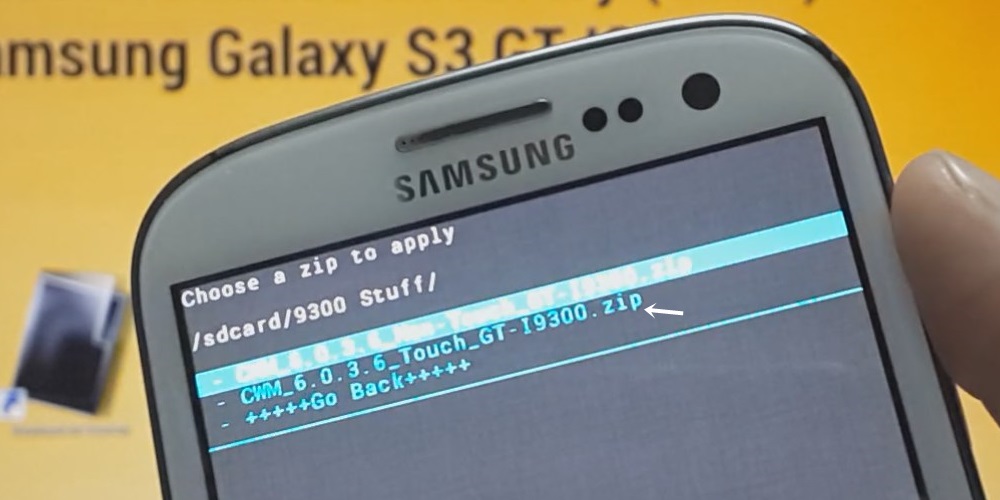
- Select the recovery file: CWM_6.0.3.6_Touch_GT-I9300.zip
- Select Yes – <filename> to ‘confirm install’.
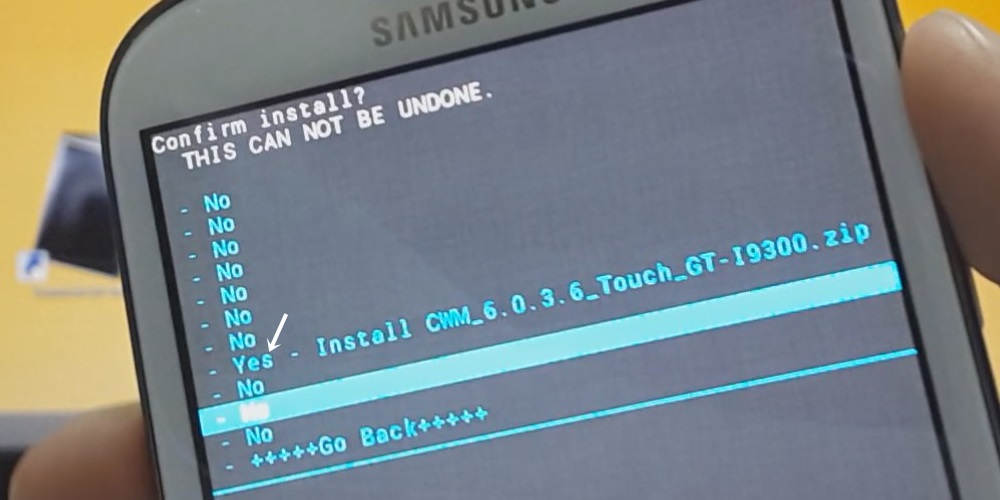
- Install will finish quickly, and you will be back on Install zip’s menu. Select ‘Go Back’ and select ‘reboot system now’.
- Your Galaxy S3 will Power On, and when it does simply boot into recovery mode again as you did in step 3 above to see the new Touch recovery!
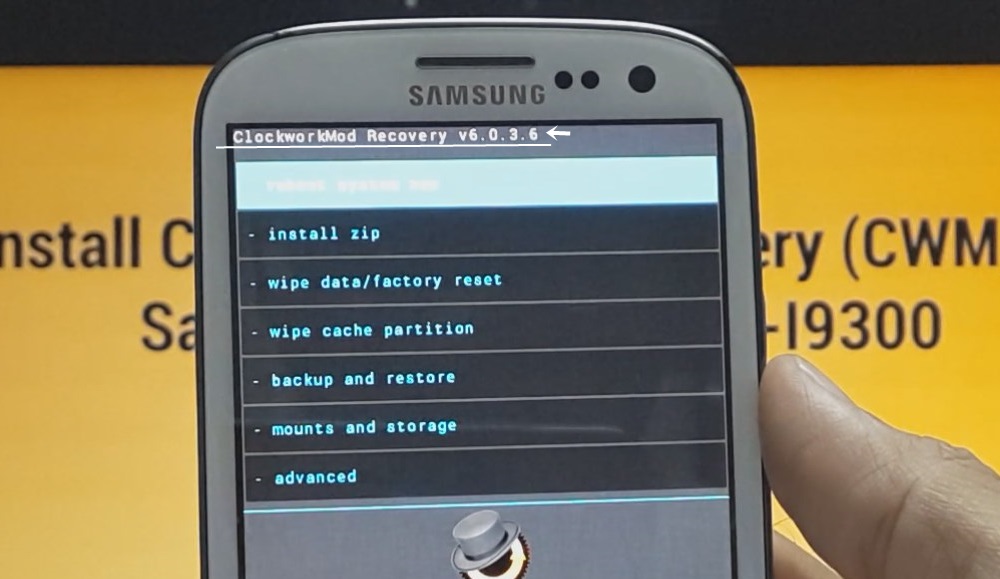
That’s it. That was also how you install zip file from recovery – which means, you can install ROMs too just like that, just don’t forget to wipe data/factory reset first using recovery before installing a ROM.
[l1]
FEEDBACK US!
Well, do let us know what you feel about this tutorial. Your suggestions are most welcomed!
And of course, if you need any help regarding this, feel free to ask right below in the comments section.





Hi
I have followed the steps as you mentioned above. From point no 13(dd if=/sdcard/9300r/s3cwm.img of=/dev/block/mmcblk0p6
(Yes, you guessed it right. /sdcard/9300r/s3cwm.img is the address of the file with its name) i have enter the command and press the enter button. from that on wards my mobile is not starting. when i press power button it’s not starting,
Could you please help me here how to start my mobile.
Thanks in advance.
There must have been some error in typing that resulted in this. Anyway, you can install a firmware and get your phone right away.
Install any of the firmware below:
– https://nerdschalk.com/get-galaxy-s3-android-4-3-update-now-with-firmware-i9300xxugmj9/ – https://nerdschalk.com/download-xxdlg4-the-android-4-1-jelly-bean-firmware-for-galaxy-s3-i9300/
Let me know if you need any help. 🙂
Hi
I have followed the steps as you mentioned above. From point no 13(dd if=/sdcard/9300r/s3cwm.img of=/dev/block/mmcblk0p6
(Yes, you guessed it right. /sdcard/9300r/s3cwm.img is the address of the file with its name) i have enter the command and press the enter button. from that on wards my mobile is not starting. when i press power button it’s not starting,
Could you please help me here how to start my mobile.
Thanks in advance.
There must have been some error in typing that resulted in this. Anyway, you can install a firmware and get your phone right away.
Install any of the firmware below:
– https://nerdschalk.com/get-galaxy-s3-android-4-3-update-now-with-firmware-i9300xxugmj9/ – https://nerdschalk.com/download-xxdlg4-the-android-4-1-jelly-bean-firmware-for-galaxy-s3-i9300/
Let me know if you need any help. 🙂
Thank you so much! I just flashed CWM using Odin on my SGS3 i9300 following your steps. CWM Rom Manager didn’t work for me, but this did.
Glad to hear that ☺
Thank you so much! I just flashed CWM using Odin on my SGS3 i9300 following your steps. CWM Rom Manager didn’t work for me, but this did.
Glad to hear that ☺
Thank you so much! I just flashed CWM using Odin on my SGS3 i9300 following your steps. CWM Rom Manager didn’t work for me, but this did.
Glad to hear that ☺
how to know if its working?
how to know if its working?
how to know if its working?
hi there. i try the same using js terminal but didn’t work and the phone is not powered ON till now. how can i do? i need your help guys
hi there. i try the same using js terminal but didn’t work and the phone is not powered ON till now. how can i do? i need your help guys
hi there. i try the same using js terminal but didn’t work and the phone is not powered ON till now. how can i do? i need your help guys
Everything was going perfectly but when I switched my phone off to see if it’s installed, it just shows the normal mode.
Everything was going perfectly but when I switched my phone off to see if it’s installed, it just shows the normal mode.
Everything was going perfectly but when I switched my phone off to see if it’s installed, it just shows the normal mode.
I try to it all works perfectly until it starts to download, it keeps staying that its not signed? Is this signed???
I try to it all works perfectly until it starts to download, it keeps staying that its not signed? Is this signed???
thanks man GBU
thanks man GBU
Thanks, the article helped a lot. All I had to do is update my CWM (it was giving me the “status 7” error), so I have used the “6th” method, the easiest one: Using another custom recovery.