Well, here is the all new TWRP 3.0 for Galaxy Core Prime. The TWRP recovery provided here is compatible with few models only, so be sure to check your Core Prime’s model no. to make sure the recovery is compatible before giving it a an installation.
With the Galaxy Core Prime TWRP recovery, you can do variety of cool things. First of them includes installing custom ROMs. If and when Marshmallow based ROMs becomes available, you can download the ROM and install it using TWRP to upgrade to Android 6.0 straight away using the custom ROM, even without Samsung releasing the Marshmallow update officially.
Another great feature of TWRP recovery is ability to create nandroid backup. It helps a lot when you are looking to unbrick or restore your Galaxy Core Prime. When restored, the device will be back to same state as at the time of the backup, removing all changes made since then. That way, you have a powerful and very reliable backup right there. It’s good to keep a TWRP backup of your Core Prime saved on PC.
If your devices ever stops booting up, so is damaged software-wise (bad apps or mods), you can simply reboot into recovery mode to access TWRP, connect the device to PC and transfer the backup from PC to device (if not already on device), and then use the restore menu to fix the device in a matter of minutes.
TWRP recovery is a solid too, and is totally worth the risks — you lose your device’s warranty upon installing TWRP recovery. Installation of TWRP recovery breaks the KNOX warranty, thus if service center guys pays attention to it, he knows that you installed something non-Samsung, and would simply deny warranty based on KNOX flag.

Downloads
- Galaxy Core Prime TWRP Recovery — Link | File: recovery.tar.md5 (8.5 MB)
- Odin PC software — Link| File: Odin3_v3.10.7.zip (1.6 MB)
→ Check the official page here for the newer version of TWRP recovery, if any, which may already have fixed the bugs mentioned above.
Supported devices
- Samsung Galaxy Core Prime, model no. SM-G360H/DS
- Don’t try on any other device whatsoever!
Important: Check your device’s model no. on its packaging box, or in Settings > About device. BTW, be sure to use an app like Droid Info to make sure that your device’s model no. is the one given above. If you don’t see the same model no. and codename, then DO NOT try this on your device.
Warning!
This trips KNOX! Hence warranty of your device will be void if you follow the procedures given on this page. You only are responsible for your device. We won’t be liable if any damage occurs to your device and/or its components.
Backup!
Backup important files stored on your device before proceeding with the steps below, so that in case something goes wrong you’ll have backup of all your important files. Sometimes, Odin installation may delete everything on your device!
Step-by-step Guide
Step 1. Download Odin and TWRP recovery file from above.
Step 2. Install Galaxy Core Prime driver (method 1 there!) first of all. Double click the .exe file of drivers to begin installation. (Not required if you have already done this.)
Step 5. Boot Galaxy Core Prime into download mode:
- Power off your Galaxy Core Prime. Wait 6-7 seconds after screen goes off.
- Press and hold the three buttons Power + Home + Volume down together until you see warning screen.
- Press Volume Up to continue to download mode.
Step 6. Double click on extracted file of Odin, Odin3 v3.10.6.exe, to open the Odin window, as shown below. Be careful with Odin, and do just as said to prevent problems.

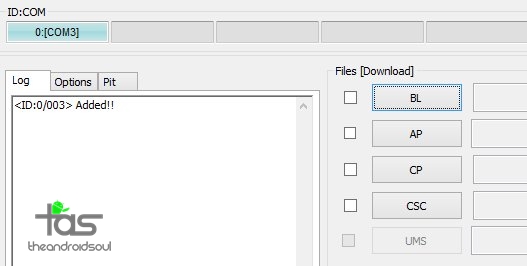
- You cannot proceed until Odin recognizes your device and you get the Added!! message.
- If it doesn’t, you need to install/re-install drivers again, and use the original cable that came with device. Mostly, drivers are the problem.
- You can try different USB ports on your PC too, btw.
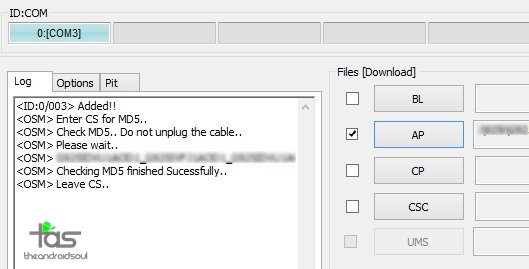
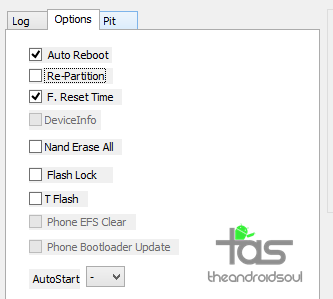
Step 9. Make sure Re-partition checkbox is NOT selected, under the Options tab. Don’t use PIT tab either. Go back to Log tab btw, it will show the progress when you hit start button in next step.
- If Odin gets stuck at setup connection, then you need to do this all again. Disconnect your device, close Odin, boot device into download mode again, open Odin, and then select the TWRP and flash it again as said above.
- If you get FAIL in the top left box, then also you need to flash the firmware again as stated just above.

→ That’s it. Enjoy the TWRP recovery on your Galaxy Core Prime!
To access TWRP recovery, you have to reboot into recovery mode:
- Power off your Galaxy Core Prime. Wait 6-7 seconds after screen goes off.
- Press and hold the three buttons Volume up + Home + Power together until you see Samsung logo on the screen.
If you need any help with this, let us know via comments below and we will try our best to help you out.
Via Dreamstar