[rominfo]
ROOT PACKAGE INFO
| Name | Framaroot and MT6589 Rooting Package. |
| Warranty | Voids Warranty |
| Stability | Stable without any issues. |
| Root Manager App | SuperSU. It manages root permissions for apps on the device. |
| Credits | Framaroot, djrbliss |
[/rominfo]
WARNING!
Android rooting is the process of allowing users of smartphones and tablets to attain privileged control known as “Root Access” within Android’s subsystem.
Rooting may void your warranty temporarily or permanently and we are not responsible for any damage caused by following this tutorial. So proceed at your own risk.
CHECK DEVICE MODEL NO.
To make sure your device is eligible with this, you must first confirm its model no. in ‘About device’ option under Settings. Another way to confirm model no. is by looking for it on the packaging box of your device. It must be A117!
Please know that this page is meant only for Micromax A117. Please DO NOT try the procedures given here on any other device of Micromax or any other company. You have been warned!
BEFORE YOU BEGIN..
You must do this pre-installation stuff before attempting to root your Micromax A117 in order to avoid any complications later, and have a smooth and successful process.
BACK UP YOUR DEVICE
Back up important data and stuff before you start playing around here as there are chances you might lose your apps and app-data (app settings, game progress, etc.), and in rare case, files on sd card, too.
For help on Backup and Restore, check out our exclusive page on that linked right below.
► ANDROID BACK UP AND RESTORE GUIDE: APPS AND TIPS
INSTALL MICROMAX A117 DRIVERS
You must have proper and working driver installed on your windows computer to be able to successfully root your Micromax A117. In case you’re not sure, follow the link below for a definitive guide on installing working driver on Micromax A117
► MICROMAX A117 DRIVERS: GUIDE 1 | GUIDE 2
OTHER THINGS TO TAKE CARE OF:
└ Always keep your phone charged while playing around with your phone in a serious way.
└ Use proper cables to connect it to the PC so that no connection loss occurs during the process.
└ If you have the problem rooting try connecting the phone as media device.
GUIDE: ROOT MICROMAX A117
DOWNLOADS
Download the file given below and save them in a separate folder on your computer (just to keep things tidy, that is).
Framaroot (for Method 1)
DOWNLOAD LINK | Filename : Framaroot.apk (2.0 MB)
You can always download the latest version of Framaroot on the original page here.
Motochopper Root Tool (for Method 2)
DOWNLOAD LINK | Filename : MT6589_Rooting_Package.zip (2.29 MB)
You can always download the latest version of this root package on the original page here.
STEP-BY-STEP GUIDE
METHOD 1: FRAMAROOT
- Connect your phone to the PC and your PC should detect your phone now. If it doesn’t, make sure you have installed the Driver as we said in ‘Before you begin..’ section above, and they are working properly.
- Now, transfer the Framaroot.apk that you downloaded above, and place it in your phone’s storage.
- Now, use a file manager app and browse to the Framaroot.apk file and tap on it to begin installation.
- Open the app from the app drawer. It looks something like this.
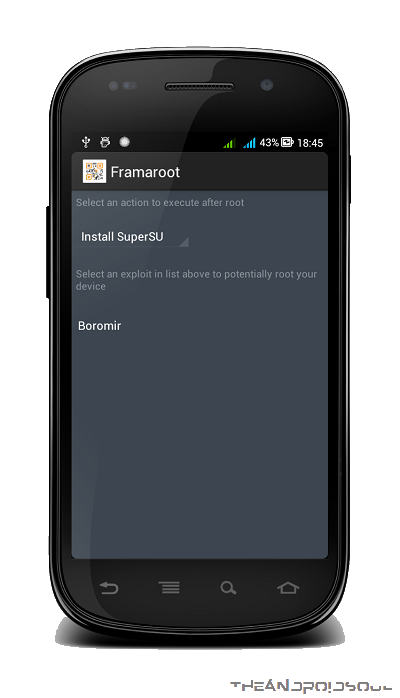
- Now tap on the “Install SuperSU” option in the drop down box as shown in the picture.
- Now click on “Boromir” option that is given in the exploit list.
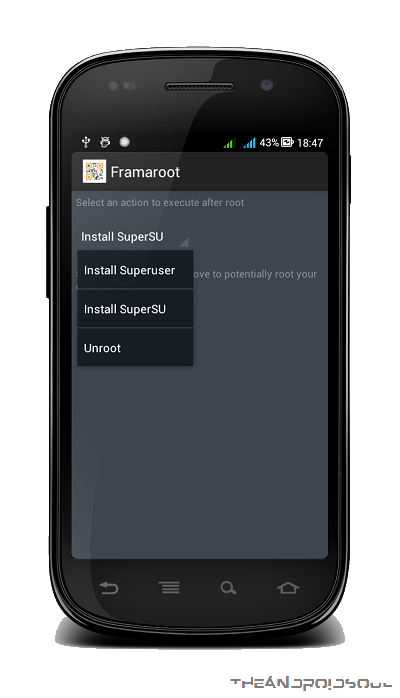
- Let it do its work. You will get a pop-up dialogue box saying the exploit result is SUCCESS. Click OK.
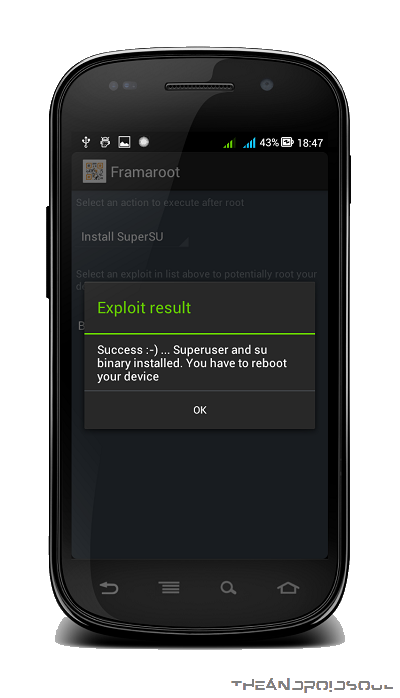
- Now reboot the device. You will find a SuperSU app in the app drawer.
- Congo, You have rooted your device successfully!!!
If you encounter any problem try repeating the above process once again and just make sure that drivers are installed alright.
METHOD 2: MOTOCHOPPER ROOT TOOL
- Download the MT6589_Rooting_Package.zip file from the downloads section and extract it to get a folder named, mt6589_rooter. Now, this will also have files necessary to root your Micromax Canvas Magnus A117, one we got to use (in step 4 below) is this file, run.bat. Here’s a screenshot of files in that folder. Do not add or delete or make any changes to any file.

- Enable USB debugging on your phone now, if it isn’t already. For this: Go to Settings » Developers options » and select the USB Debugging checkbox.
- Now connect your phone to the PC. It should detect the device, if not, then make sure that Drivers are installed and working.
- With phone duly connected, now double click on the “run.bat” file in the extracted folder. It will open up a command prompt.
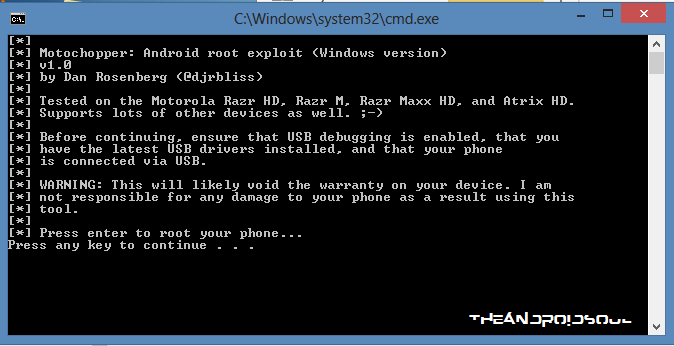
- Now press any key to root your phone. Let the magic happen! The Motochopper will do its job, that is, exploit will run and will install the root package automatically.
- At the end it will show a message “Exploit complete. Press enter to reboot and exit” indicating the process was success. Now hit enter, the phone will reboot automatically.

- After the reboot, you will find the SuperSU app in the app drawer. Congrats your device is rooted!
If you encounter any problem try repeating the above process once again and just make sure that drivers are installed alright.
FEEDBACK US!
If you still feel you have any queries regarding this, feel free to ask them in the comments section below.
Your feedback and queries, if any, are welcomed!
Via XDA




is it possible to upgrade stock firmware without root?
is it possible to upgrade stock firmware without root?
is it possible to upgrade stock firmware without root?
Cool.. Method 1 worked for me. My mobile is Micromax Canvas Magnus A117
Gr8!
Cool.. Method 1 worked for me. My mobile is Micromax Canvas Magnus A117
Gr8!
Cool.. Method 1 worked for me. My mobile is Micromax Canvas Magnus A117
Gr8!