

Midjourney is an AI image generator that has become quite popular lately thanks to its latest iteration, version 5. Midjourney v5 improves visual quality, image size, and the overall stylistic design for your prompts. If you have been using Midjourney lately, then you might have realized that there are a lot of ways to produce different variations and versions of your images.
You can use different Midjourney versions, detailed prompts, different parameters, and more for improved creative control of the images you generate with the text-to-AI-art tool. But keeping track of all the parameters and details can be a bit daunting when you’re just starting out. So here is a definitive cheat sheet that will help you improve your prompts and generate highly detailed and amazing images using Midjourney. Let’s get started.
Midjourney Cheat Sheet
Here are the top tips and tricks to help you make the most of your Midjourney prompts to generate impressive images specific to your requirements. Let’s get started.
1. Use permutations to your advantage
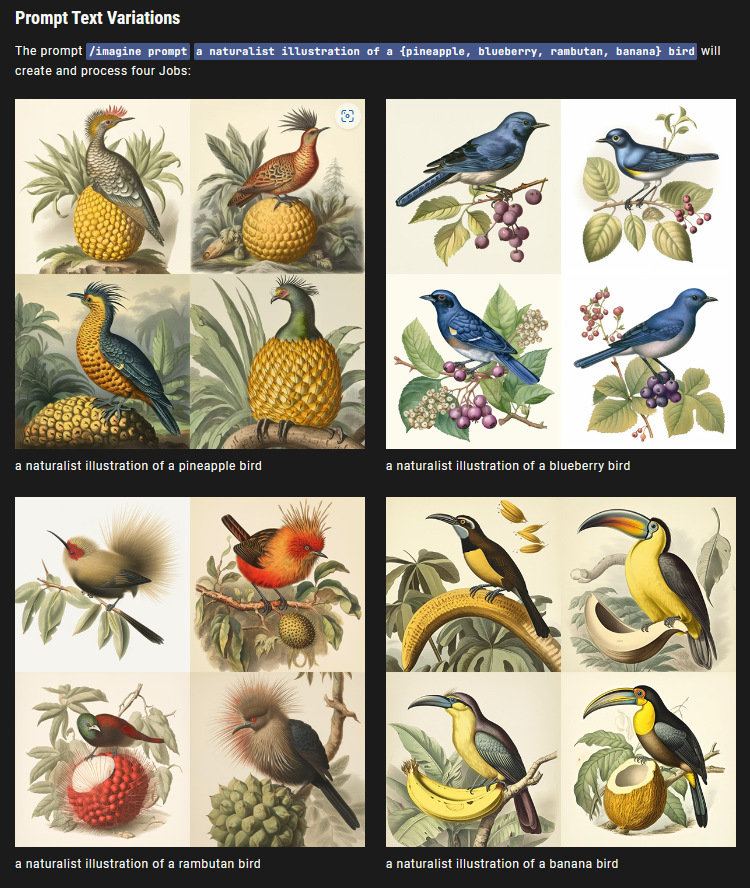
Permutations are another new addition to Midjourney that focus on generating multiple images using a single prompt. There might be times when you aren’t sure or specific about the final image you need but have a good starting point in mind. In such cases, you can use permutations to generate multiple variations from the same text prompt so that you can easily choose a final image you like and then build on it further.
To use permutations in your text prompt, you have to add your variations in curly brackets {}. So, for example, if we need a red panda eating three different fruits, we can use the following prompt.
/imagine a red panda eating a {banana, strawberry, pear} while riding a Yamaha
This will result in three different final sets of images where a red panda will be eating a banana, a strawberry, and a pear. Similarly, permutations aren’t just restricted to text prompts. You can use them in conjunction with other parameters like aspect ratios as well. So if we need to try out different aspect ratios with the same prompt, it will look something like this.
/imagine a red panda eating a {banana, strawberry, pear} while riding a Yamaha –ar {3:2, 1:2, 16:9}
This will result in three different sets of images in three different aspect ratios, resulting in a total of nine sets of images. Similarly, if I wish to try out different versions of Midjourney to find the one that best produces the image that fits my requirements, then I can use permutations as well. The prompt will look like the one shown below.
/imagine a red panda eating a {banana, strawberry, pear} while riding a Yamaha –{v5, v4b, niji}
This will result in three different sets of images developed using Midjourney v5, v4b, and niji each. So if you’re looking to generate multiple images instantly to find the one that best fits your current requirements, then permutations are the best option for you.
2. You can add weights to your words
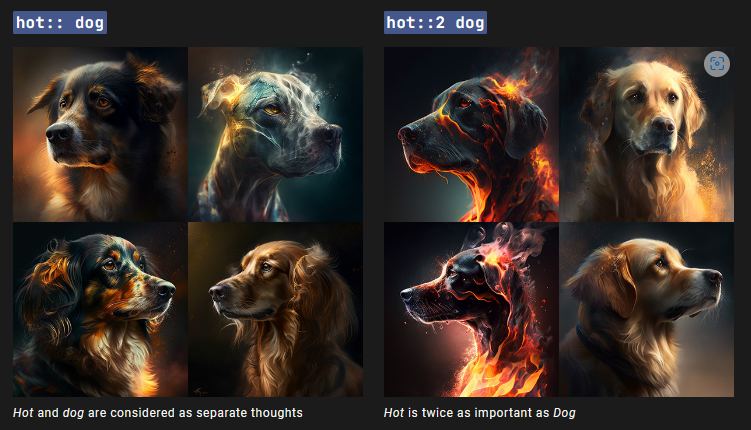
We discussed above how you can add image weight when uploading images to Midjourney. Image weight will help determine how inspired your final images are from the one you uploaded. But did you know you can add and dictate the weight for other elements in your text prompt as well?
You can dictate the weight for different elements like lighting, subjects, style, and more in your text prompt. This will allow for greater creative control over your final images, where you will be able to dictate the exact look you want for your images.
You can add weight to your elements by using the “::” separator. For example, when generating images using the following prompt, “a red panda eating a banana in space while riding a beach buggy” , we can modify the prompt to enhance certain elements like space and beach buggy using the weight parameter. The final prompt will look like the one below.
“a red panda eating a banana in space::1.5 while riding a beach buggy::2.0”
The weight parameters can be included anywhere and in conjunction with other commands as well to create exceptionally creative images that meet your requirements.
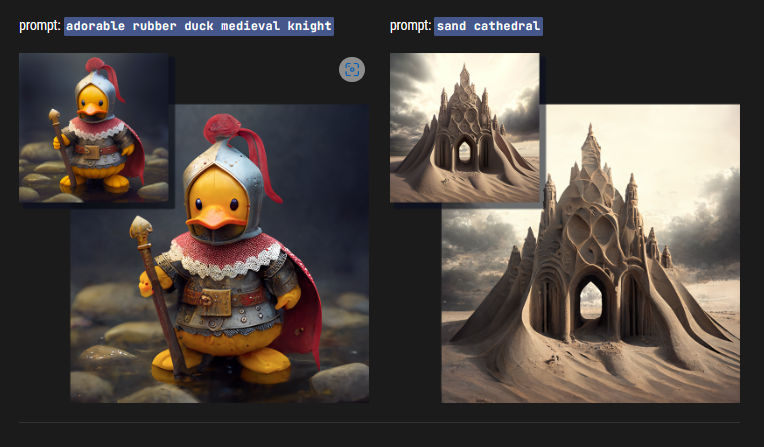
3. Specifics are your friend!
Consider setting the tone and boundaries for your images with specifics like: Medium, Drawing style, Time period, Emotions, Colors, and Environments. More on this below withe examples.
Specificity is your friend when using text prompts with Midjourney. You might feel that describing the scene using abstract words and nouns will help generate stylistic images, but such words and phrases are subjective. The algorithm can sometimes interpret the prompts the way you wish while sometimes going in a completely different direction. Being as specific as you can help restrict the algorithm to your requirements which will help generate the images you require. Here are some elements that you should include in your prompts to be more specific so you can get a final image that best fits your requirements.
3.1 – Set Medium

Choose your medium beforehand to dictate the art and brush style you like. Your medium can be Block print, Folk art, Graffiti, Watercolor, Crosstich, and more. This way, you can dictate your canvas and art style to get the perfect image you want.
Some of the options available are:
- Block Print
- Folk Art
- Cyanotype
- Graffiti
- Paint-by-Numbers
- Risograph
- Ukiyo-e
- Pencil Sketch
- Watercolor
- Pixel Art
- Blacklight Painting
- Cross Stitch
3.2 – Set the drawing style
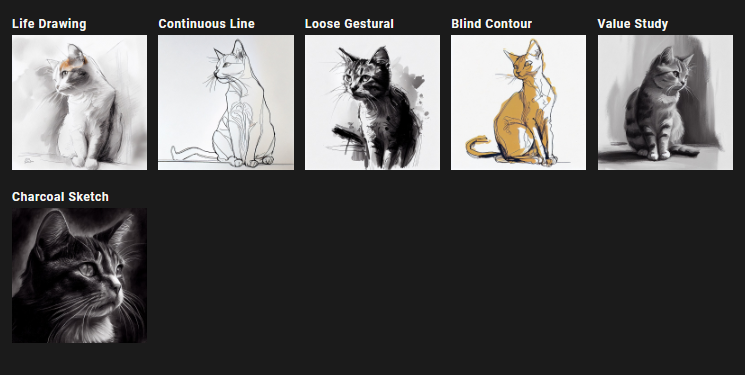
You should also include the drawing or creation style you wish to use in your final image. This can include things like still life, continuous line, charcoal sketch, and more to help dictate how the subject is drawn in your final image.
Some of the options available are:
- Life Drawing
- Continuous Line
- Loose Gestural
- Blind Contour
- Value Study
- Charcoal sketch
3.3 – Set the time period
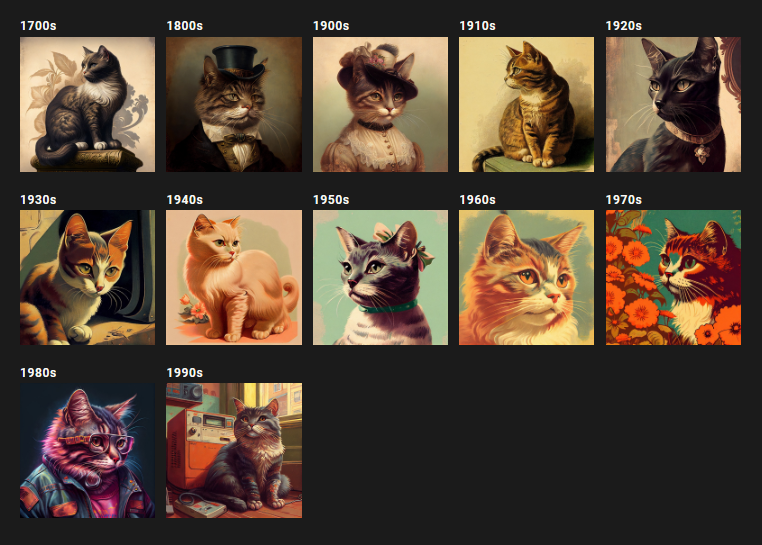
You should also dictate the time to be more specific. You can include years like 1880, 2030, 2099, and more or refer to different eras like the Victorian era, Renaissance era, and more.
2.4 – Set Emotions
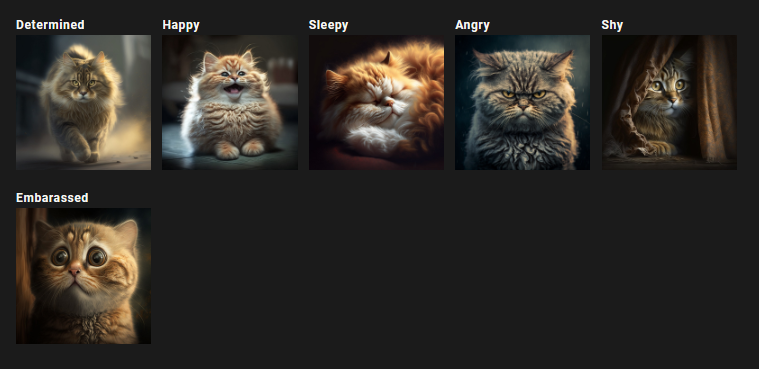
If you find your image to be perfect but your subjects lifeless, then you likely haven’t included the emotion to be expressed by your subject. Including emotions for your subjects can help bring your final images to life. You can include emotions like surprise, sad, determined, shy, and more to nail the look of your final image.
Some of the options available are:
- Determined
- Happy
- Sleepy
- Angry
- Shy
- Embarrased
3.5 – Set color and tint
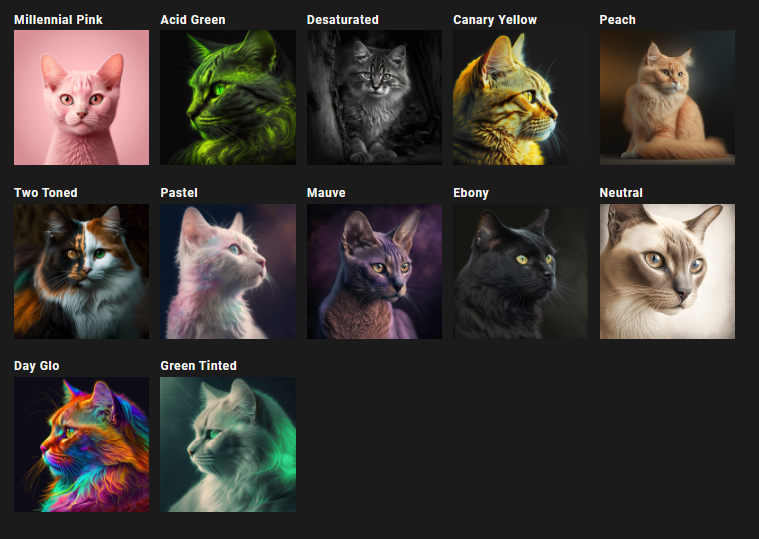
You should also include colors or color palettes to help Midjourney generate the look you like. You can include terms like pastel, two-toned, desaturated, and more to dictate the colors in your image. You can also include specific colors like millennial pink, canary yellow, and more to use specific colors in your final images.
3.6 – Set an environment
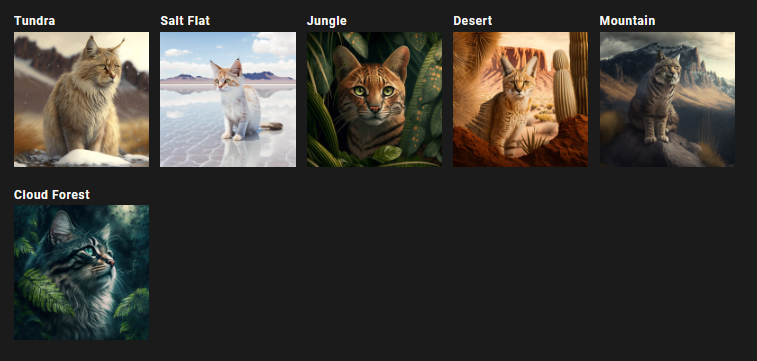
While you might think terms like jungle, space, and desert are enough, getting more specific can help generate better images. So if we wish to generate an image of a jaguar in a jungle, a prompt like “a black jaguar in a clouded rain forest looking determined in the style of DaVinci in unsaturated colors” will work much better when compared to the results from “a black jaguar in the forest”. You can include various environments like tundra, mountains, plateaus, salt flats, and more to generate images specific to your requirements.
Some of the options available are:
- Tundra
- Salt Flat
- Jungle
- Desert
- Mountain
- Cloud Forest
4. Use “/describe” to understand the algorithm
Midjourney was recently updated to include some new and interesting commands, including the “/describe” command. This command works exactly opposite to the “/imagine” command. While the /imagine command allows you to convert your text prompts to images, the /describe command instead converts your images to text prompts. When you use the /describe command, you need to provide Midjourney with an image. The algorithm will then analyze the image and generate four text-based prompts on it. You can then generate new images using each of these prompts. If you find yourself struggling with prompts, then the /describe command can surely come in handy.
You can use it to learn and judge how the algorithm processes your prompts and how you can structure your future prompts for better results. For example, if you provide an image and then generate four prompts, you can get a sense of what you should have used to generate the same image using Midjojurney. Similarly, when you generate images using these four prompts, you can identify an image that best fits your requirements and then analyze the relevant prompt to identify details and specifics that led to the final results. You can then keep on improving your future prompts by using similar specifics and details to generate images that meet your requirements.
5. Use “/blend” to combine art styles or subjects
/blend is another great command to help you combine and create images inspired by each other. Instead of the /imagine command, where you can upload an image and have your final image inspired by it, /blend instead will combine two to five images together and create the final results inspired by all of them. You can use this to your advantage to have Midjourney style your final image inspired by a specific image.
You can also use /blend to combine two different subjects or landscapes for a unique final image. /blend allows you to blend up to five images together, and you can even define the image weight for each specific image. Use this post from us to help you use /blend to your advantage to generate interesting images using Midjourney.
6. Attach images whenever possible

Midjourney also allows you to attach images so you can use them in your prompts. You can then define the image weight based on your requirements which will determine how inspired the final images are from the one you provided. You can also include a text prompt to go in conjunction with your image, which can allow you to be more specific in terms of your requirements. Uploading images to Midjourney to use in your prompts can help you stylize your images, pick specific subjects and even create art with your own images.
You can also provide Midjourney with real-life scenes, which it can then modify and stylize based on your requirements. So the next time you wish you could stylize or create images from something you captured in real life, then remember to upload and include images in your prompts. Here’s a detailed guide from us to help you upload and use images in Midjourney.
7. Use aspect ratios to your advantage
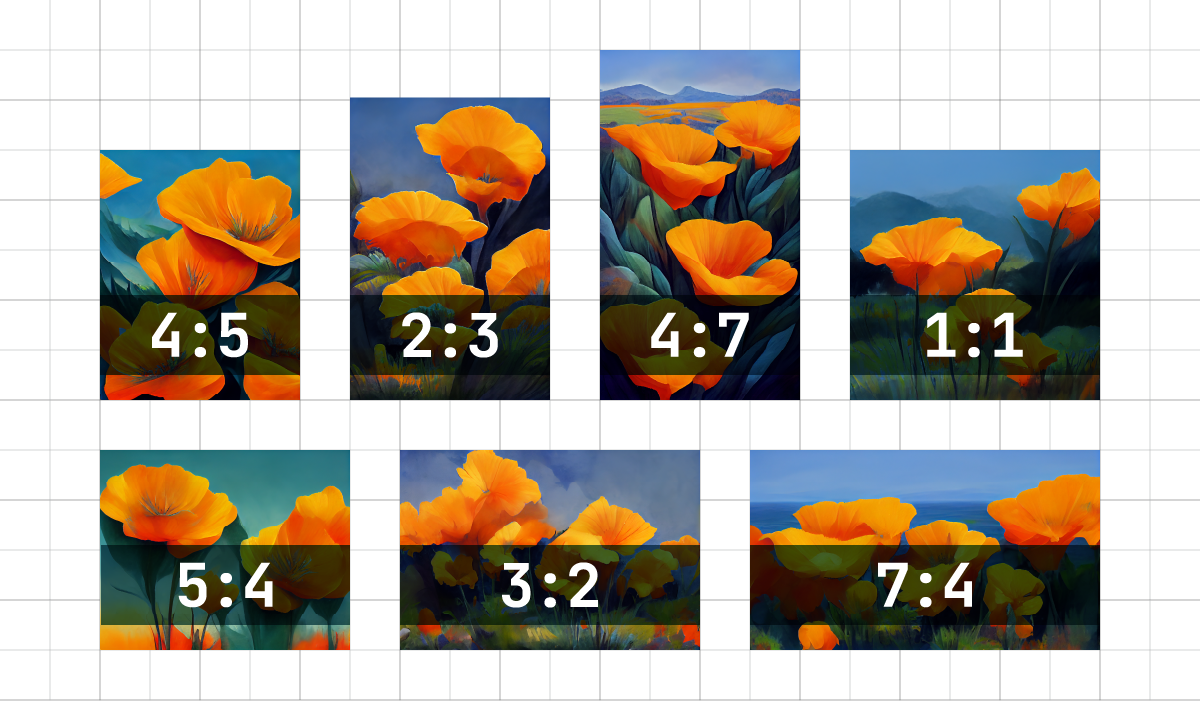
Midjourney can also respect your aspect ratio settings which can take away the hassle of cropping or resizing your final images. This can be especially advantageous if you’re using Midjourney version 5. You can generate banners, billboards, posters, and more by dialing in specific aspect ratios. Midjourney can respect your aspect ratios depending on the version you use. While Midjourney v5 can produce images with any aspect ratios, older versions have a few restrictions that have been listed below.
| Midjourney Version | Supported Aspect Ratios |
| v5 | Any aspect ratio |
| v4c | 1:2 to 2:1 |
| v4a or v4b | 1:1, 2:3 and 3:2 |
| v3 | 5:2 to 2:5 |
| Test or Testp | 3:2 to 2:3 |
| niji | 1:2 to 2:1 |
To add aspect ratios to your prompts, you can use the following syntax. Replace (Your aspect ratio) with the preferred aspect ratio supported by the Midjourney version you’re currently using.
/imagine [Your text prompt] –ar (Your aspect ratio)
8. Get the most out of upscaling
Once you have generated and settled on an image, you should definitely upscale it. While your final set of images will have predetermined upscalers for you, there are a couple of ways to enhance your images when upscaling them. Firstly, you can use the light upscaler. This upscaler won’t add many details to your final image and is ideal for faces and human subjects. When you upscale an image by default in Midjourney, it uses the detailed upscaler. This upscaler will upscale your image while adding tons of finer details to your final image.
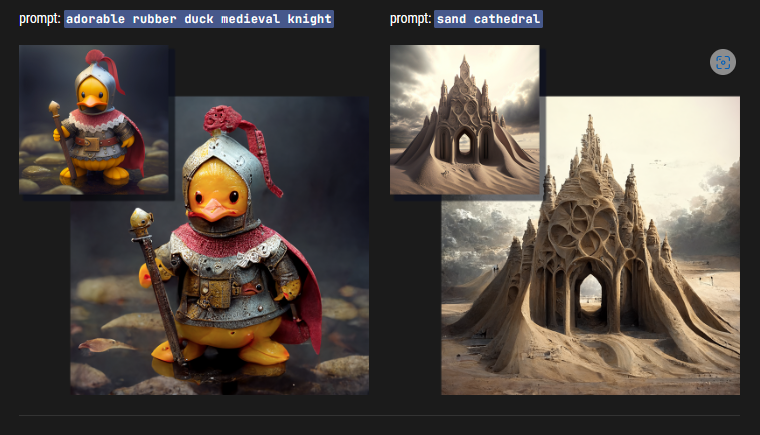
This can include elements like dents, scuffs, HQ textures, and more. However, there might be times when you don’t wish to add finer details to your final image or wish to soften the textures, which can help with human subjects. In such cases, you can use the light upscaler. You can use the light upscaler in the following format.
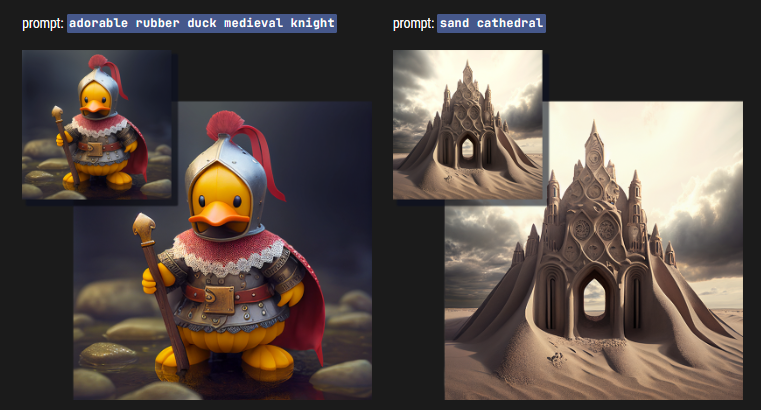
/imagine [Your text prompt] –uplight
Here’s an example and comparison of how light upscale differs from the default detailed upscaler.
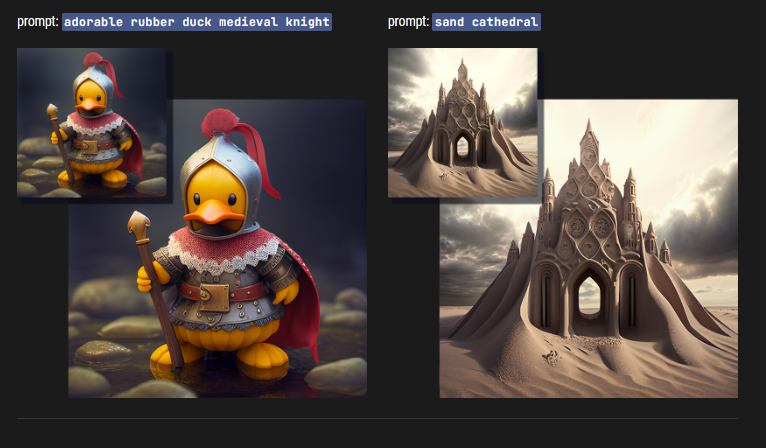
We discussed the detailed upscaler above, but one thing to keep in mind is that it is only available for Midjourney v1, v2, v3 and HD. So if you’re looking to add finer details to your upscaled image, then we recommend switching versions for the best final result.
Another upscaler at your disposal is the beta upscaler. The upscalers mentioned above produce final images with 1024 x 1024 size. But the beta upscaler allows you to double this and generate final images with a size of 2048 x 2048. To use the beta upscaler, you can add –upbeta to your prompt.
Lastly, there is the Anime upscaler. This is the default upscaler for Midjourney niji and works best for illustrations and anime-inspired artwork. You can add –upanime to your text prompt to use the Anime upscaler.
You can also change your default upscaler depending on your Midjourny version using the /settings command.
9. Describe your lighting well
Describing your scene the best you can is essential to get a great image from Midjourney. While most users tend to go into great detail regarding their subjects, something everyone tends to overlook is describing the lighting. Like any photograph or piece of art, lighting is essential to create the perfect image. How your subjects are lit, the number of light sources in your scene, and how your shadows interact are all essential parts of generating a great image.
So when prompting Midjourney for your images, we recommend you be highly specific about your lighting. You should define the color temperature, the number of light sources in the scene, your subject’s position, anything that might create shadows, and more to get the best possible image for your requirement. If you’re trying to create sparsely lit images, then you can be specific about shadows in your scene too.


Discussion