
The recovery that comes installed by default on your phone with the firmware is called Stock recovery. You need stock recovery installed in order to take OTA updates.
If you installed a custom recovery like TWRP, CWM, etc. anytime on your device, then you need to install the stock recovery back for taking OTA updates as OTAs check for its presence and can install only then.
Here we have provided installation guides for various methods for Samsung Galaxy devices.
Usually, you will find stock recovery in these 3 formats: TAR, IMG and ZIP. Among Samsung devices, TAR and ZIP remains most popular formats you’d find stock recovery available for download.
We’ve provided below methods to install each of those 3 formats of stock recovery. Recovery comes in .IMG format actually, both TAR and ZIP format contain IMG recovery files only.
Recovery TAR is required for flashing via unofficial Samsung software called Odin, which makes installing recovery, recovery, boot, modem, etc. anything very easy — only thing is that it must be available in TAR format for Odin.
While, Recovery ZIPs are flashable only via custom recovery like TWRP, CWM, etc.
While, for Recovery IMG, on Samsung devices, you will need an app like Flashify from Google Play Store, which requires root access and installs recovery quite easily.
Upon flashing stock recovery via any method, the custom recovery is replaced with stock recovery, and you are able to take OTA updates.
Samsung Galaxy Recovery Installation Guides
Note: The guide for installing a recovery remains same for all Samsung devices. Yes, ALL Samsung devices. So, whether you own a new or old Galaxy phone or tablet, feel free to use the guide below.
Disclaimer!
You only are responsible for your device. We won’t be liable if any damage occurs to your device and/or its components.
Backup, backup, backup!
Backup important files stored on your device before proceeding with the steps below, so that in case something goes wrong you’ll have a backup of all your important files. Sometimes, recovery installation may delete everything on your device!
Method 1: Installing Recovery TAR
And also download the Odin PC software from here → Odin 3.10.6.
- Power off your device. Wait for 6-7 seconds after screen goes off.
- Press and hold the three buttons Volume down + Power + Home together until you see Warning screen.
- Press Volume Up to continue to download mode.


- You cannot proceed until you get the Added!! message, which confirms that Odin has recognized your device.
- If you don’t get Added!! message, you need to install/re-install drivers again, and use the original cable that came with device. Mostly, drivers are the problem (look at step 2 above).
- You can try different USB ports on your PC too.
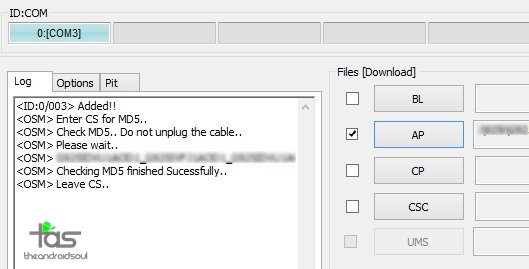
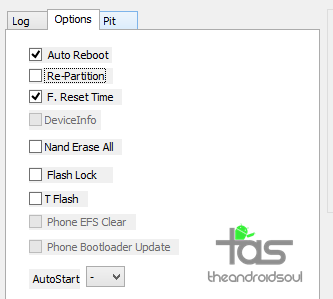

- If Odin gets stuck at setup connection, then you need to do this all again. Disconnect your device, close Odin, boot device into download mode again, open Odin, and then select the file and flash it again as said above.
- If you get FAIL in the top left box, then also you need to flash the file again as stated just above.
That’s it. You have successfully installed stock recovery back. Try to take the OTA update now, it should do all fine now.
Need help? Sure let us know via comments below.
Method 2: Installing Recovery IMG
Under this method, you need to use an Android app like Flashify (a good alternative is Rashr, BTW, in case Flashify doesn’t work for you).
Here’s how you do this.
Try to take an OTA update now, it should work.
Need help? Well, just give us a shout in comments section below, we’ll be happy to help.
Method 3: Installing Recovery ZIP
- Power off your device. Wait for 6-7 seconds after screen goes off.
- Press and hold the three buttons Volume up + Power + Home together until you see Samsung logo.
Step 5. In TWRP/CWM/any custom recovery, use the Install option and select the stock recovery file.
Go into Settings, About device, and check for the system update now. It should install all fine now.
Need help? Just let us know via comments if you need any help with this.