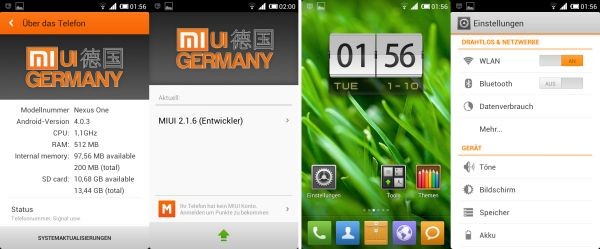
It’s here!!! MIUI v4 based on the Android 4.0.3 or Ice Cream Sandwich framework, for the original Google Experience Device which started the Nexus legacy, the Google Nexus One. I used to own one, and man, do I wish I had still kept it. The fact that the developer community continues to churn out ROM after ROM for this awesome device speaks volumes about the versatility of this phone. It has successfully endured three iterations of the Android OS ( Eclair 2.1, Froyo 2.2 and Gingerbread 2.3) and seems to be still going strong with the current and latest offering, Android 4.0 -Ice Cream Sandwich.
MIUI, as many of you already know, is one of the favorite UIs/ROMs in the world of Android ROMs. It features a unique, and heavily themed interface, that does away with the traditional Android app drawer and functions more like iOS, wherein you slide through homescreens to access apps. It also includes additional functionality not found in stock Android, including toggles on the notification pull-down, unique music app, gallery, and camera apps, and a modified phone dialer that displays matching contacts as a user enters a number. While some users find MIUI too similar looking to iOS, and hence prefer not to use it, there is no denying the slick, elegant, classy UI which you can further customize through hundreds of themes accessible from within the ROM, and the fact that it makes your device stand out from the crowd.
Before we move to read about how we can install this on the Nexus One, you should know that while it is a working MIUI v4 port, it is still a beta, and not an official MIUI release yet. There may be some issues at the moment, however, these are being worked upon by the XDA member dRaCID01, who has brought this ROM to us. The known issues are mainly due to the ICS kernels which don’t seem to be getting along well with the Nexus One 100%. But like I said, its a work-in-progress ROM, and it can only get better from here on 🙂
Known Issues (quoted from the developer’s page)
- no Videocamera support
- no Panorama pictures
- no FM Radio
- no USB mounting / tethering (only charging)
- no WiFi DHCP (only static IP is working)
Pre-Flashing Preparation
- The Nexus one is basically an HTC device underneath all the Google branding, and like all other HTC devices out there, this too needs S-Off ( removal of restrictions to allow all partitions (including /system) to be mounted in write mode while the operating system is booted) before you get around to flashing custom ROMs on it. To install this version of MIUI, you need to first install a Custom bootloader called Blackrose. You can refer to this excellent guide to download and install Blackrose on your N1.
- After installing Blackrose, you would also need this new hboot, to be able to flash ROMs on your N1.
You can download the new Hboot file here hboot_220-16-200.nb0
- You will need adb to be able to flash this hboot file. You can refer to this excellent step-by-step guide on how to set up adb on a Windows machine.
- Once adb is all set up on your machine, power up a command prompt and type in the following commands to flash the new hboot file
fastboot flash hboot hboot_220-16-200.nb0
fastboot reboot-bootloader
Other pre-flashing requirements
- Installing/Flashing this ROM will erase your apps and data. So, it’s very important you back them up, before proceeding further. To backup your apps and important data — bookmarks, contacts, SMS, APNs (internet settings), etc. Restore APN settings if Internet isn’t working for you. You can refer to this excellent Android Backup Guide to back up all your data and settings.
- Make sure you have at least a 50% battery charge on your N1
Once this is done, we are all set to move on to the next step; the actual flashing of the MIUI v4 ROM
Flashing the ROM
- Download the MIUI v4 Beta Rom file from HEREFilename: MIUI-GER_v4_2.1.6_N1_4.0.3_Signed.zip ( Don’t worry, it supports English Language too 🙂 )Size: 120.18 MB
- Transfer the downloaded zip fie to the root of your external microSD card on the Nexus One
- Switch off your phone, and reboot into ClockworkMod Recovery (Press down on the Trackball & hold the Power button until the device boots to the bootloader. Once in the bootloader, press the Power button once, use Volume Down to select “recovery” and press the Power button to select.)
- Perform a Backup of your existing ROM, so that you can always restore it from recovery if something does not work out with this ROM. To perform a backup, select Backup and Restore –> On the next screen, Select Backup again.
- Perform a full Wipe.
- · Wipe data / factory reset –> Confirm Wipe data/Factory reset on the next screen
- · Wipe Cache Partition –> Confirm Wipe cache partition on the next screen
- · From the main menu, select Advanced, and then Wipe Dalvik Cache–>Confirm Wipe Dalvik on the next screen
- Now scroll to “Install zip from sdcard” and select it.
- Select “Choose zip from sdcard”. Scroll to the file you transferred in Step 2 and select it.
- Now confirm installation by selecting “Yes — Install MIUI-GER_v4_2.1.6_N1_4.0.3_Signed.zip.zip”. The ROM will start installing.
- After the installation is complete, select “go back” and then select “reboot system now” to reboot your phone.
That’s it. Enjoy the Ice Cream Sandwich based MIUI v4 Beta on your Nexus One. If you want to track updates and user experiences, you can visit the original development thread here. If you run into any issues with installation or usage, do add your comments below in the comments box, and we’ll be glad to try and help out.
· Wipe data / factory reset –> Confirm Wipe data/Factory reset on the next screen
· Wipe Cache Partition –> Confirm Wipe cache partition on the next screen
· From the main menu, select Advanced, and then Wipe Dalvik Cache–>Confirm Wipe Dalvik on the next screen


Still waiting for miui v4 on Samsung galaxy s !! Btw, good article madhav.
Thanks,….You may want to try the Galnet MIUI on the Galaxy S…It is a MIUI v4 build and works pretty well.. Have a look at it over here
http://galnetmiui.co.uk/landing/miui-v4-builds/
Still waiting for miui v4 on Samsung galaxy s !! Btw, good article madhav.
Thanks,….You may want to try the Galnet MIUI on the Galaxy S…It is a MIUI v4 build and works pretty well.. Have a look at it over here
http://galnetmiui.co.uk/landing/miui-v4-builds/
where to place the file hboot_220-16-200.nb0 i have instaled black rose but how to update the bootloader
where to place the file hboot_220-16-200.nb0 i have instaled black rose but how to update the bootloader