If you own a Kindle Fire HD 7″ or even an older Amazon tablet, you are aware that Amazon only allows you to install apps from its own Amazon App Store and doesn’t provide the option to use the Google Play Store for downloading installing apps. But thanks to the development community, there is always a way around it, and now you can install the Google Play Store app on your Kindle Fire HD 7″ and install apps from the Google Play app store, thanks to a hack by XDA Forum Member stopxwatch. This also enables you to install and use Google apps like Gmail, Maps, Google+, etc.
Warning!! The hack requires adding some files to the system folder on the tablet. Since there is currently no way to restore the original system folder, if something goes wrong, it may cause problems including the tablet refusing to run properly. So make sure to follow the instructions very carefully.
Let’s take a look at how the Google Play Store can be installed on the Amazon Kindle Fire HD 7″.
Compatibility
This hack and the guide below are compatible only and only with the Amazon Kindle Fire HD 7″. It’s not compatible with other devices.
Warning!
The methods and procedures discussed here are considered risky and you should not attempt anything if you don’t know completely what it is. If any damage occurs to your device, we won’t be held liable.
How to Install Play Store on Kindle Fire HD
- Make sure your Kindle Fire HD 7 is rooted. You can use this guide to root it.
- Download the necessary files.
- Copy the 3 files downloaded in step 2 to your Kindle Fire HD.
- Install ES File Explorer from the Amazon App Store on your tablet.
- Open ES File Explorer. Then, do the following in ES File Explorer:
- Go into its Settings, then scroll down and click on the Root settings option.
- Enable “Root Explorer” option, then click Yes when prompted. Then, click the Allow button on the next popup to grant root access to ES File Explorer.
- Also enable the options “Up to Root” and “Mount File System”. Then, close the settings and go back to the main app.
- Now, browse to where you copied the 3 files in step 3. Tap on the GoogleServicesFramework.apk file and install it.
- After installation of Google Services Framework is complete, long press on the Vending.apk file and select Copy.
- Then, press the “Up” button on the top till you can see folders such as “acct”, “cache” etc.
- Go into the settings/app folder. Here, press the Paste button on top of the app to copy the Vending.apk file here.
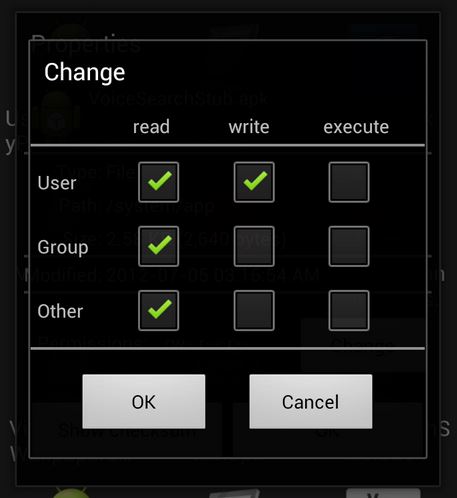
- Long press on the Vending.apk file in system/app after copying it, then click on the Properties button. Then, click on the “Change” button.
- Here, make sure that for “User”, the “read” and “write” options are enabled. For “Group” and “Other”, only the “read” option should be enable. Take a look at the screenshot below for reference.

- After making the necessary changes in step 11, press the back button to close the Properties box. Then, tap on the Vending.apk file once to start installing it.
- You will now have the Android Market app installed on your Kindle Fire HD 7.
- Open Android Market from the apps menu, then follow instructions to set up your Market account by entering your Google details.
- After you have set up Android Market, close it.
- Now, using ES File Explorer, browse to where you copied the Play.apk file. Tap on it and install it, which will upgrade Android Market to the latest Play Store.
- You can then access the Play Store (aka Android Market) by clicking on the Play Store icon on your Kindle Fire HD 7.
- Be sure to download Google apps like Gmail, YouTube, Maps, etc from the Play Store which you can now use without problems!


Step 9 should say “system/app”. You need to reboot after installing market before it will allow you to sign in.
Step 9 should say “system/app”. You need to reboot after installing market before it will allow you to sign in.
Step 9 should say “system/app”. You need to reboot after installing market before it will allow you to sign in.
on step 9, do you mean system/app?
on step 9, do you mean system/app?
on step 9, do you mean system/app?
Worked pretty easy once I got past step 9 :). Main thing I really dislike about the KFHD is I cant just use USB to transfer files.. Had to do a crazy work about using sugar sync. Really annoying if you using XP (as I am for my movie computer).
After many reboots and cussing lol. Finally got everything working. There gonna be one lil happy girl come Christmas Morning. Thanks All and Happy Holidays ..
Ok all done and running but when I try to install things like chrome and maps I get “Your device is not compatible with this version” and I cannot install. Anyone any ideas?
Thanks
Ok all done and running but when I try to install things like chrome and maps I get “Your device is not compatible with this version” and I cannot install. Anyone any ideas?
Thanks
Ok all done and running but when I try to install things like chrome and maps I get “Your device is not compatible with this version” and I cannot install. Anyone any ideas?
Thanks
In step ES 9, I couldn’t get the step to work without checking the “mount file system” option in the Root Settings of ES Explorer. Worth trying if you are having problems copying the vending.apk to system/app.
In step ES 9, I couldn’t get the step to work without checking the “mount file system” option in the Root Settings of ES Explorer. Worth trying if you are having problems copying the vending.apk to system/app.
In step ES 9, I couldn’t get the step to work without checking the “mount file system” option in the Root Settings of ES Explorer. Worth trying if you are having problems copying the vending.apk to system/app.
in Step 9 is System/app ?? when im trying to copy… the system says… Copy failed… what happened ?
Solved !!! In the Es Explorer Sttings you have to check the “Mount file system” option… so … you can paste the vending.apk in System/app !!! Works Awesome !!
Anybody has a problem with adding a google account? I’ve got this message: “Can’t establish a reliable data connection to the server.” Any ideas? Thanks
problem solved. Wi-fi problems 😛
in Step 9 is System/app ?? when im trying to copy… the system says… Copy failed… what happened ?
in Step 9 is System/app ?? when im trying to copy… the system says… Copy failed… what happened ?
Solved !!! In the Es Explorer Sttings you have to check the “Mount file system” option… so … you can paste the vending.apk in System/app !!! Works Awesome !!
Solved !!! In the Es Explorer Sttings you have to check the “Mount file system” option… so … you can paste the vending.apk in System/app !!! Works Awesome !!
Anybody has a problem with adding a google account? I’ve got this message: “Can’t establish a reliable data connection to the server.” Any ideas? Thanks
problem solved. Wi-fi problems 😛
Anybody has a problem with adding a google account? I’ve got this message: “Can’t establish a reliable data connection to the server.” Any ideas? Thanks
problem solved. Wi-fi problems 😛
Perfect. Step 9 threw me off, but once I read the comments I was all set. Thank you!
Perfect. Step 9 threw me off, but once I read the comments I was all set. Thank you!
Perfect. Step 9 threw me off, but once I read the comments I was all set. Thank you!
Problem: i make the 18 steps, and i open google play. when i login my user google play stop to work. Any idea?
Problem: i make the 18 steps, and i open google play. when i login my user google play stop to work. Any idea?
Problem: i make the 18 steps, and i open google play. when i login my user google play stop to work. Any idea?
hello John..could you possibly help me get mine done? like step by step…I am so confused
hello John..could you possibly help me get mine done? like step by step…I am so confused
hello John..could you possibly help me get mine done? like step by step…I am so confused
My device when i am trying to add a google account it says “Can’t establish a reliable data connection tho the server”. Please Help!
My device when i am trying to add a google account it says “Can’t establish a reliable data connection tho the server”. Please Help!
My device when i am trying to add a google account it says “Can’t establish a reliable data connection tho the server”. Please Help!
The google services framework will not install and the play apk download link is invalid.
The google services framework will not install and the play apk download link is invalid.
The google services framework will not install and the play apk download link is invalid.