Earlier, Social Media was all about text and words, but in the past few years, things have changed and now photos/videos form a major part of the Social Media.
What started as a network for sharing photos, Instagram eventually embraced videos, stories, and live video. Much importance is given to the Likes on Social Media including Instagram, and everybody wants to outstrip other users in the case of user engagement – likes and comments.
Instagram has been around for many years now, yet people are unaccustomed with the tips and tricks of Instagram.
Also read: Instagram guide and tips for beginners
We have listed some Instagram tricks and tips that that will help you score a brownie points over others.
Use Emoji Hashtags.
Social media is synonymous with Hashtag. If you are part of any social media, you must be familiar with the text Hashtags like #PhotoOfTheDay, which we BTW mentioned in our beginners guide to Instagram.
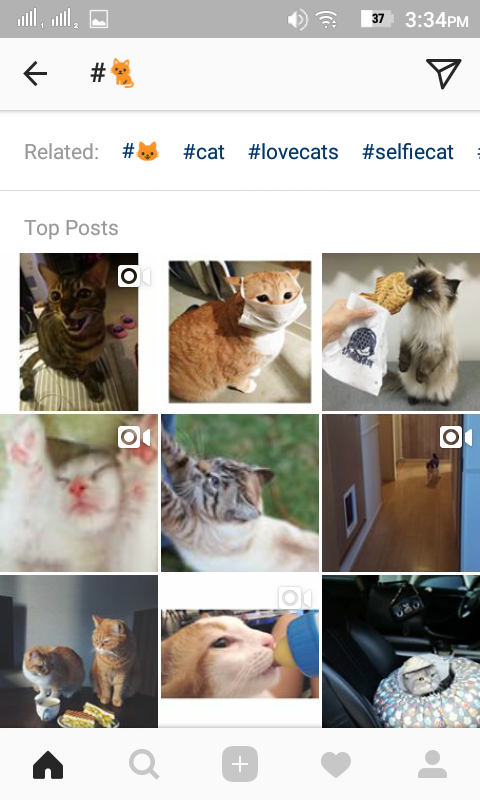
However, in addition to the text Hashtags, Instagram allows you to use Emoji Hashtags as well. Emoji Hashtags are simple and cool, and unlike text Hashtags where there are multiple Hashtags for the same thing, there is only one Emoji Hashtag, that categorizes all the posts with that Hashtag.
To use an Emoji Hashtag, type # followed by Emoji – similar to text Hashtags.
Also read: Google Assistant Tips and Tricks
Browse images taken near you.
Next time when you are bored, open the Instagram and browse images from a beach of your liking. Although, it won’t compensate for the canceled plans but something is better than nothing.
Wondering how to do so?
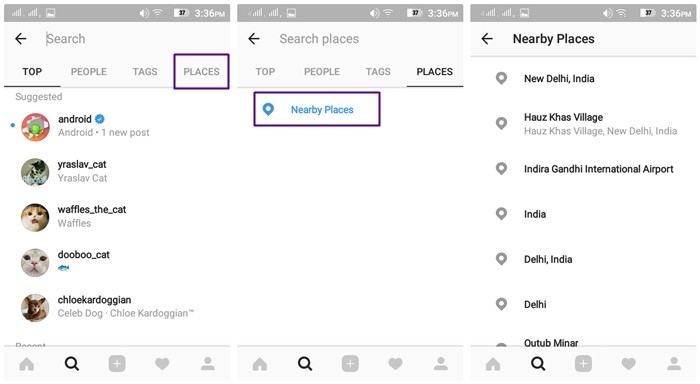
Well, Instagram has this really cool yet buried down feature that allows you to view photos/videos tagged with a specific location. There are two ways to enjoy this feature; first, you can browse images taken near you (Nearby Places), second, you can search for the places manually.
To use this feature, follow the steps:
- Open Instagram.
- Tap the search icon in the bottom Navigational Bar to open the search screen.
- Tap the search bar – where you enter the search query. A top Nav bar will appear below the search bar which lists: Top, People, Tags, and Places.
- Select Places.
- Turn on the Nearby Places to browse the images taken near your current location.
Alternatively, type the location/place in the search bar to browse images from that particular location.
Find out posts that you have liked
When browsing Instagram, one stumbles upon a plethora of images – some we “like”, others we tune out. There are multiple occasions where we reminisce about our liked Instagram images but fall flat in recalling the exact post. What if I tell you, you could dig into the past and retrace the “liked” images.
To view your Liked photos:
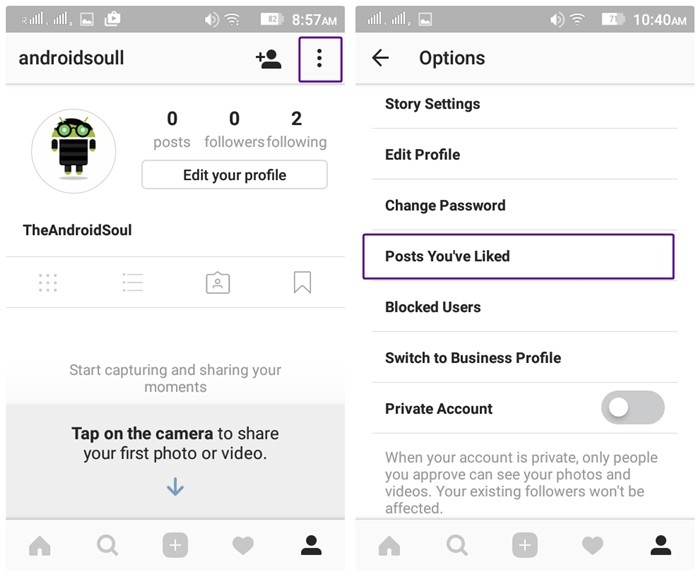
- Open your profile.
- Tap the three dots present at the top right corner.
- Select “Posts you’ve liked” option. Voila!
However, you cannot view your liked photos via the Instagram website; this feature is only available within the Instagram app.
Find posts that your friends have liked.
In addition to revealing the posts that you have liked, Instagram enables you to leaf through the recent activity of the people you follow. I am sure that the inner stalker within you had an adrenaline rush after reading the above line.
All right! Calm down.
Instagram only allows you to track the recent activity of the people you follow and not their entire history of Instagram.
To stalk people, follow the steps:
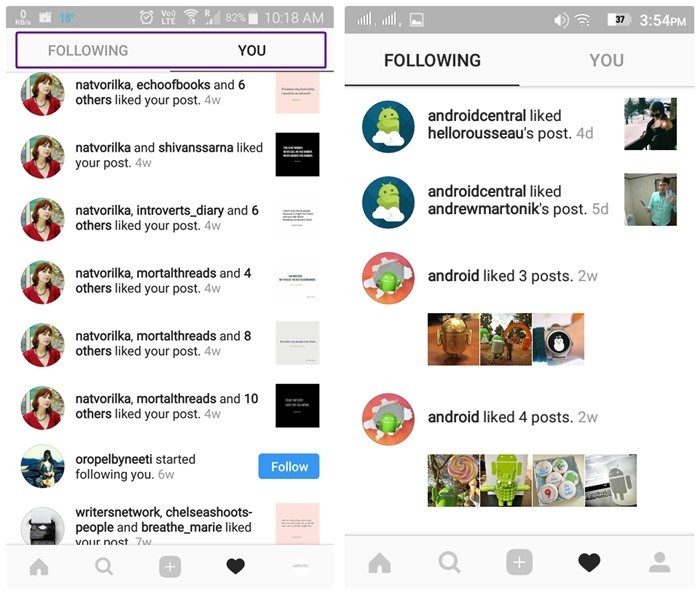
- Open the Activity Tab/ Notification center.
- Swipe right to toggle between You and Following.
The Following Tab brings together the recent likes and comments of the people that you follow.
Also read: 8 cool new WhatsApp Status Tips and Tricks
Drive traffic to an external website.
One of the bad things about Facebook-owned Instagram is; it lacks link support. I don’t know what the team Instagram had in mind while committing this cruel act but it’s frustrating. HOW CAN A SOCIAL NETWORK NOT SUPPORT LINKS?? Grrr!!!
Anyway, there is a solution for everything. If you want to link to an external website – youtube link, blog – on Instagram, there is a trick with the help of which you can add a website but it only supports one link at a time.
To unearth this hack, follow the steps:
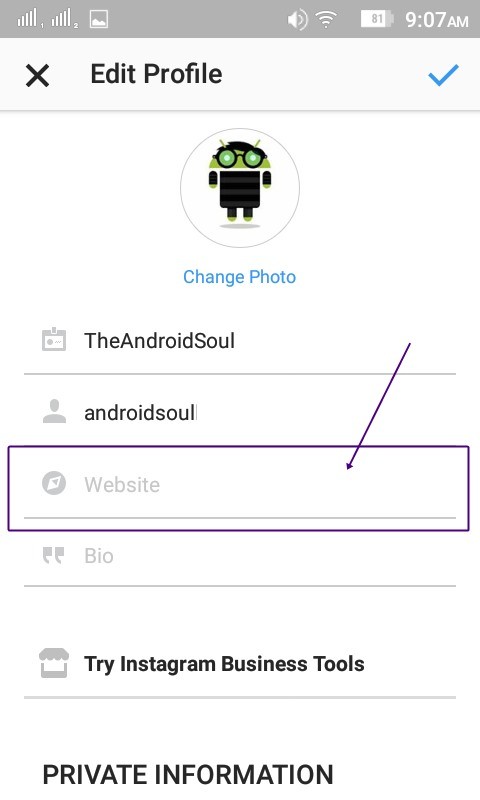
- Go to your profile.
- Tap Edit your Profile.
- Add the link in the Website option.
Surprisingly, being a silly hack, this helps a lot. However, it is important to inform people about the link in the bio. Under the circumstances, it becomes necessary to mention it in your photo caption.
Direct Upload
On Instagram, when you press the camera key on the bottom Navigational Bar, it gives you three options to upload media – gallery, photo and video. This is a two-step method to publish a photo, however, you can skip one step and save time by directly uploading the photo from the camera roll.
To do so, just hold down (Long touch) the camera tab on the Menu bar.
Remove Tags
Prior to this post, whenever a friend uploaded a bad photo of you, or when someone randomly tagged you in his or her photo, you hated it but you laughed it off. That is because; you might be obscure about the fact that the tagged photos of you are visible on your profile.
Don’t worry! You can liberate yourself from the unnecessary tags by removing the tag.
To untag yourself from the photos, follow the given steps:
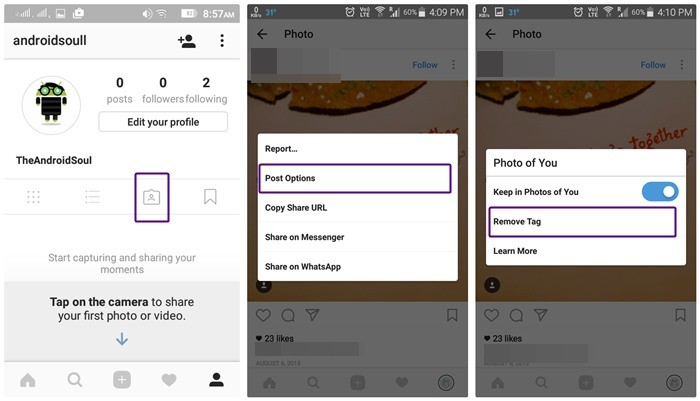
- Open your Instagram profile.
- Tap the icon next to the Save icon. This is where all your tagged photos are accessible.
- Select the photo from which you want to remove the tag.
- Tap the three dots located at the top right corner.
- Select Post Options from the menu.
- Select Remove Tag.
Additionally, you can keep the tag but remove the particular photo from your tagged photos. To do so, in the above menu, turn off the “Keep in Photos of You” option.
Use multiple Instagram accounts
Do you have multiple Instagram accounts – of pets, business, that you find yourself consistently logging in and out of? You don’t need to take so much trouble, as Instagram allows you to add multiple accounts and effortless switch between them.
To do so:
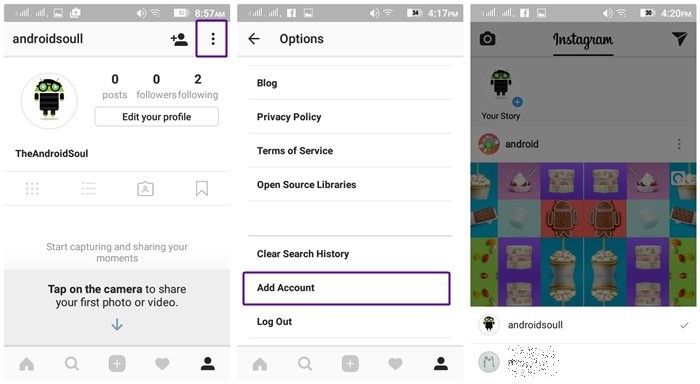
- Go to your profile.
- Tap three dots located at the top right corner.
- Scroll down and tap “Add Account” option.
- Sign in with your second account. You will be logged into your second account.
- To switch accounts, long press the Profile Tab in the bottom Nav Bar and select your account.
Also read: Facebook Stories: 7 tips and tricks you should use
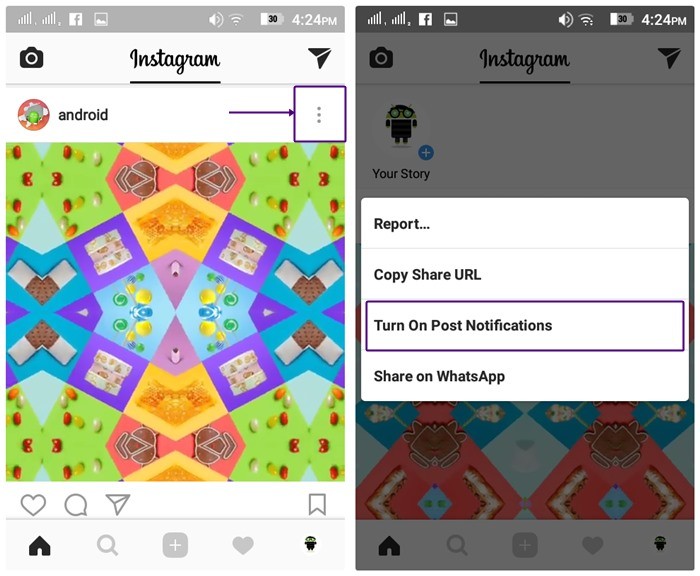
Turn on post notifications
We all have our favorites – be it on social media or real life and one feels elated to latch on to their favorites and not to miss anything from them. What if you could get a notification, every time your favorite profile posted something?
Sounds good no?
To do so, follow the given steps:
- Tap the three dots located at the top right corner of any photo that your favorite person has uploaded.
- Select “Turn on Post Notifications” from the menu.
Reorder filters
One of the specialties of Instagram is the Instagram filter – which enhances and amplifies the photos. However, there are umpteen filters and only some of them are used repeatedly. Fortunately, Instagram facilitates you to reorder and hide the filters.
To do so:
- Tap the camera icon in the bottom Nav bar.
- Select the photo that you want to upload. Click Next.
- In the bottom panel, swipe the filters until you reach the end. You will see Manage option. Select it.
- To hide a filter, tap the tick option. Doing this will hide the filter from the main menu.
- To reorder the filters, hold down the icon (two horizontal lines) next to the each filter and move it upwards or downwards.
Use Instagram as a photo editor
You can use Instagram as a photo editor and thus edit photos using Instagram inbuilt tools. You can use inbuilt filters and photo editing tools on the photos without having to post them.
To use Instagram filters without posting the photos, follow the given steps:
- Turn off your internet connection, both Wifi and Mobile Data.
- Open Instagram app, capture or upload a photo. Press Next.
- Edit your photo and apply the filter. Press Next.
- Ignore the caption option. Press Share.
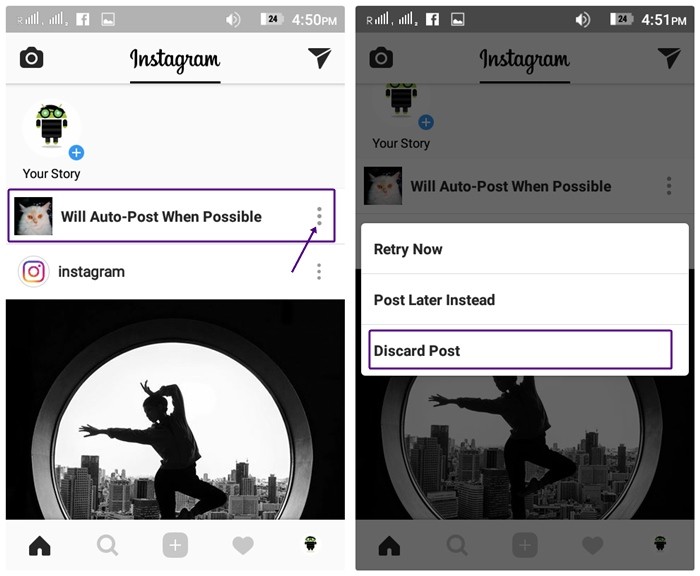
- You will be redirected to the Instagram Homepage, where you will see a notification “Will auto-post when possible”.
- Go to your device gallery, you will find your edited photo in the Instagram folder.
- Open Instagram app again, and make sure you delete the unpublished post. To do so tap the three dots next to the notification “Will auto-post when possible” and select Discard Post.
Use Multiple Instagram Filters
The innate feature of Instagram doesn’t support multiple filters on one photo, however, if you are a filter freak, breathe easy, as there is a simple trick to use multiple filters on one photo.
To do so,
- Follow all the steps mentioned in the previous tip (Instagram as a Photo Editor).
- Now open the photo that you edited in the above step in the Instagram and follow the previous steps again.
Also read: How to create video slideshow of photos on Android
Share photos after uploading them.
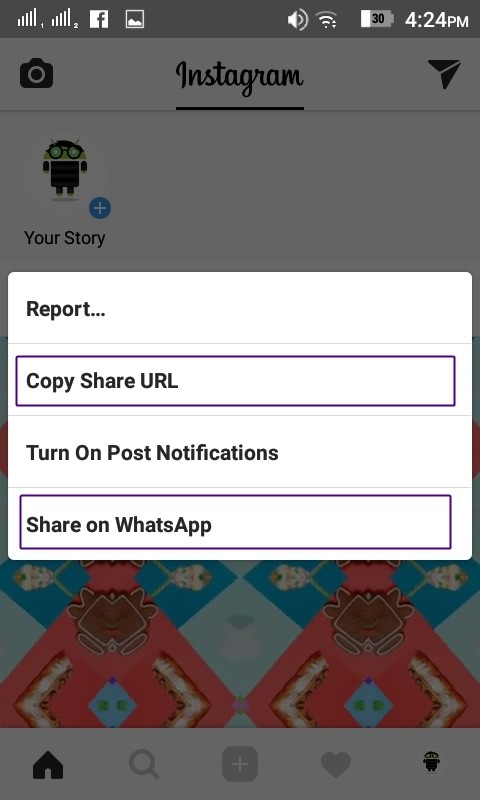
Although Instagram gives you an option to share the photo on other social media while uploading it, it also provides multiple options to share your photo after you have uploaded it– including WhatsApp share.
To share the photos, follow the steps:
- Tap the three dots located at the top right corner of any photo – yours or somebody else’s.
- Choose Share/ Share on WhatsApp/Share on Messenger to share your photo.
If your preferred website/app is not included in the share option, you should select “Copy Share URL” option, and then paste it wherever you like.
Send disappearing messages.
In addition to the Story, Instagram recently launched Disappearing messages. As the name suggests, these messages disappear after the receiver has seen it – tad similar to Snapchat Messages.
To do so, follow the steps:
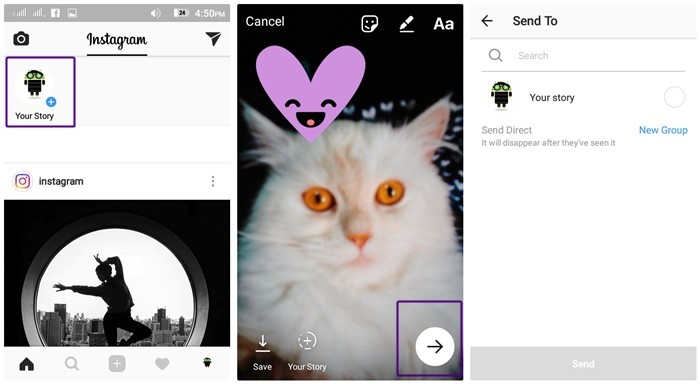
- On Instagram home screen, tap “Your Story” located at the top, or, swipe right from the home screen.
- Capture your photo – you can add stickers, doodle on it –then press the arrow at the bottom right corner.
- You will see two options – Your Story and Send Direct. Under Send Direct option, choose a friend to whom you want to send the disappearing message.
- Tap Send.
Your friend will get a notification and once they have seen the message it will disappear forever.
Also read: Top 10 Snapchat tips and tricks
How to Unsend messages on Instagram
In case, you are embarrassed by any of your messages or accidentally sent someone a wrong message, Instagram allows you to “Unsend the message”. If you are lucky and the other person has not seen the message, Unsend message helps a lot.
However, if the other person has seen the message, and you don’t want to be reminded of your embarrassing text, Unsend message removes the message from both the accounts.
To Unsend a message,
- Go to the DM section of Instagram. Tap the chat containing the message that you want to unsend.
- Long touch the message and hit “Unsend Message”.
Within no time, the message will disappear from both the accounts. Amazing, right?
Organize saved Instagram posts in Collections
In our beginners guide to Instagram, we mentioned how you could save Instagram posts to your account. However, Instagram recently introduced a new feature that goes by the name “Collections”, which lets you organize your saved posts in different folders. You can organize the existing saved photos in collections or create a new collection while saving a photo. To add a post to the collection, simply long press the save icon and select the “collection”. If you want to know more about collections, check our detailed guide on Instagram collections.
Upload multiple photos to Instagram
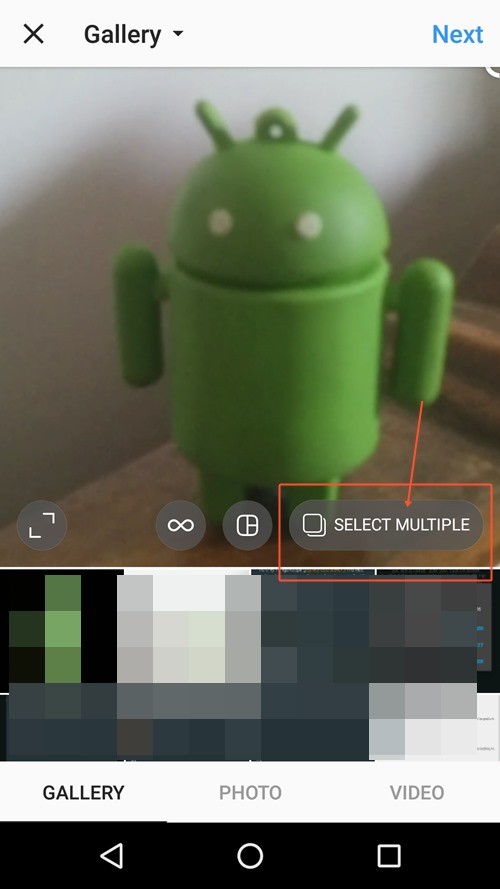
If uploading one photo to Instagram doesn’t satisfy you, you can now upload up to 10 photos and videos in one single post. Multiple photos look like a digital album that you swipe left and right to move to the next photo or video.
To upload multiple photos/videos in one post, follow the steps:
- Tap the “plus” icon to upload media.
- Tap “Select multiple” and select up to 10 photos.
- Tap next.
- You can either apply the same filter to every photo or apply filters individually. To apply the same filter, select the filter from the bottom carousel and to apply a separate filter, tap each photo to edit them.
- Tap Next
- Write a caption and hit share.
→ Download Instagram Android app
If we have missed any tip, let us know in the comments below.





Excellent. This was thorough. One pro tip/warning I’d like to add is this:
When you try to share a specific forward with multiple users, the app creates a group with all the selected users and sends the post instead of sending it as individual messages like WhatsApp. Please do note and cheers.
Excellent. This was thorough. One pro tip/warning I’d like to add is this:
When you try to share a specific forward with multiple users, the app creates a group with all the selected users and sends the post instead of sending it as individual messages like WhatsApp. Please do note and cheers.