Microsoft Teams has become a prominent tool for when you’re working with your colleagues remotely from home. The collaboration tool packs a slew of features including audio/video calling, screen-sharing, integration options, Office compatibility, background blur, and direct messaging. There are a few very interesting features in the work too, like setting a custom background and raising your hand in a meeting to notify the admin to unmute you.
While it’s quick reliable in terms of productivity, the service comes with a caveat. Unlike other applications in your PC, Microsoft Teams is hard to uninstall when you’re done using it once and for all. That’s because Microsoft Teams keeps reinstalling itself on your Windows PC even after the uninstallation process and also loads itself during boot.
The following guide will, thus, help you uninstall Microsoft Teams completely, and stop it from installing again automatically, not to mention open a pop-up window again.
What’s required
In order to uninstall Microsoft Teams completely, you need to understand why it’s harder to remove it from your PC. When you install Teams, you’re installing two software – Microsoft Teams and Teams Machine-Wide Installer. The latter is what reinstalls Microsoft Teams onto your PC every time you sign in.
Thus, to completely uninstall Teams, you have to remove both applications. You will first need to uninstall ‘Microsoft Teams’ and then remove the ‘Teams Machine Wide Installer’ from your PC.
How to uninstall Microsoft Teams on Windows
The following guide will help you completely remove Microsoft Teams from your Windows PC.
Step 0: Ensure that Microsoft Teams is not currently running on your PC. You can quit Teams by right-clicking the Teams icon in the taskbar and choosing the Close window option.
Part 1: Uninstall Microsoft Teams
Step 1: Click the Start button and head over to Settings > Apps.
Step 2: Type “teams” in the search box under ‘Apps & features’.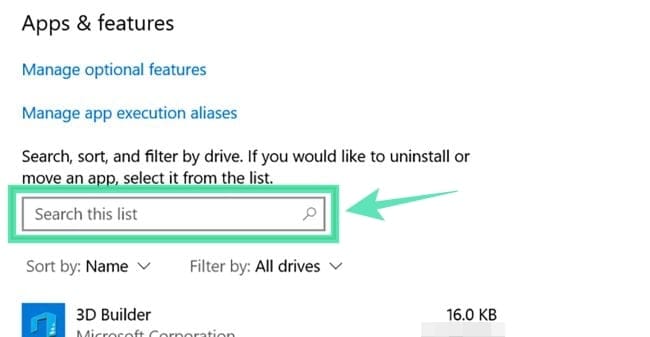
Step 3: Highlight Microsoft Teams and then click on Uninstall. 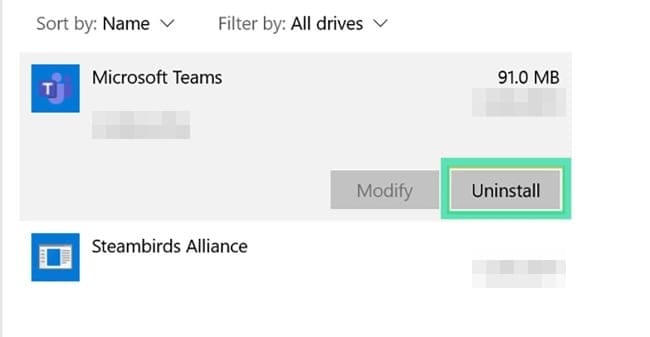
Step 4: Confirm the uninstallation by clicking Uninstall and then selecting Yes. 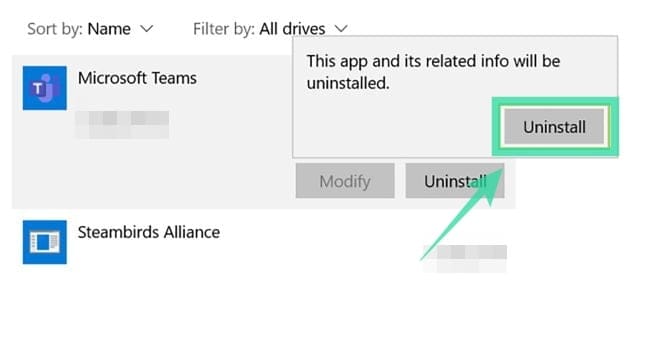
Part 2: Uninstall Teams Machine-Wide Installer
Step 1: Follow Steps 1 & 2 from the above.
Step 2: Select Teams Machine-Wide Installer inside ‘Apps & features’ and then click on Uninstall. 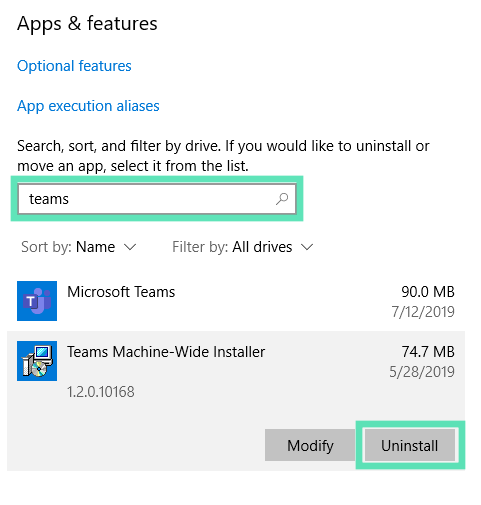
Step 3: Confirm the uninstallation by clicking Uninstall and then selecting Yes.
Why do you need to uninstall Teams Machine-Wide Installer
As explained above, you will need to uninstall Teams Machine-Wide Installer to completely remove Microsoft Teams from your PC. If you uninstall only the main Microsoft Teams app, the service will install again and will pop up on your screen when you sign into the computer the next time.
What happens if you do not uninstall Teams Machine-Wide Installer
If you removed the Microsoft Teams app but didn’t uninstall Teams Machine-Wide Installer at the same time, Microsoft Teams keeps reinstalling itself on your Windows PC and will launch itself on the next boot.
How to uninstall Microsoft Teams on Mac
To uninstall the Microsoft Teams app from your macOS device, follow the steps below.
Step 0: Ensure that the Teams app isn’t currently running. Quit the app by right-clicking the Teams app in the dock, long-pressing the Options button and clicking Force Quit.
Step 1: Open the Application Folder by clicking on Finder in the dock and selecting the Applications folder under Favorites.
Step 2: Select Microsoft Teams from this folder and drag it to the Trash icon in the dock. 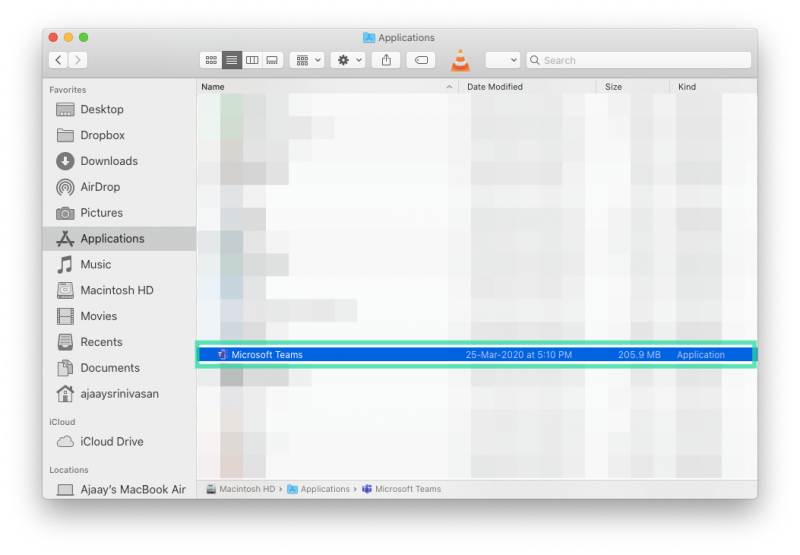
How to reinstall Microsoft Teams
You can reinstall Microsoft Teams by downloading Teams desktop application which is available for devices running on Windows (32/64-bit), Mac, Linux (32/64-bit), Android or iOS.
► Click here to download Microsoft Teams
► How to install Microsoft Teams on your system
Did you successfully uninstall Microsoft Teams from your device? Did the above guide help you solve the repeated reinstalling of Teams? Let us know in the comments below.





Discussion