The Apple Music app on Android recently received a pretty sizable update, packing a lot of features that can enhance the audio quality as well as the overall listening experience. Unfortunately, however, the latest Apple Music update has introduced a couple of new default settings, which can catch you off-guard amidst your favorite playlist.
Crossfading, which was introduced in the latest update, has been one of the worst-hit sectors, leading to a poor listening experience. So, today, we’re taking a look at fixing it for good. Now, without further ado, let’s check out what crossfading is and how you can control it in Apple Music.
Related: What Does the Infinity Symbol Mean in Apple Music?
What does crossfading mean?
In simplest terms, crossfading refers to the smooth transition effect while going from one song to another. Generally, when a song ends, you are in a bit of a silent limbo before the next one begins. With crossfading turned on, you won’t experience the limbo anymore as the end of your current song would fade into the beginning of the next one. When done correctly, crossfading can considerably enhance your listening experience.
Unfortunately, Apple Music’s default auto-crossfading option is far from satisfactory.
Related: iOS 15 Spotify not working via Bluetooth? How to fix this
Why should you control your crossfading in Apple Music?
As discussed in the previous section, crossfading allows the fading of one song into the next. This means that the volume of the tail of one song would continue to decrease as the volume of the head of the next song gradually increases. When the transition is done tastefully, you’ll neither miss the ending of one song nor the beginning of the next one.
Apple Music’s default auto-crossfading setting doesn’t implement the necessary poise to get the job done. This setting not only results in the premature end of the previous song but also muffles the intro of the next song to a great degree. And since this is a newly introduced feature, the transition can feel a bit jarring and confusing. So, the best course of action is to try out the different presets before landing on the one that works.
How to turn off auto crossfading in Apple Music
With the little introduction out of the way, let’s take a look at turning off auto-crossfading in Apple Music. First, launch the Apple Music app on Android. Now, tap on the vertical ellipsis button at the top-right corner of the screen.

Then, go to ‘Settings.’

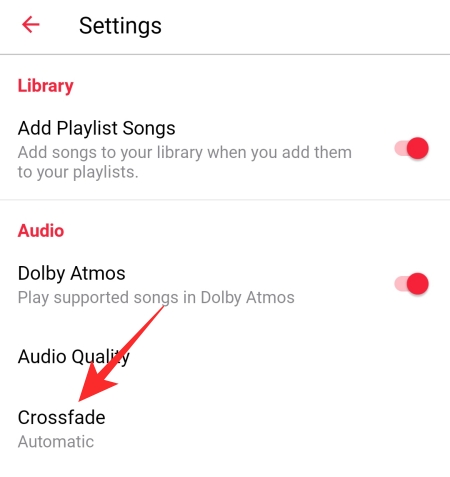
Under the ‘Audio’ tab, you’ll find the Crossfade option. Tap on it.

The default would be set to ‘Automatic,’ which adjusts the crossfade timing based on the song you’re playing. So, in theory, some songs would demand a shorter crossfade, while others would require longer. This setting tends to cut the tail end of songs, fading in the next song prematurely.
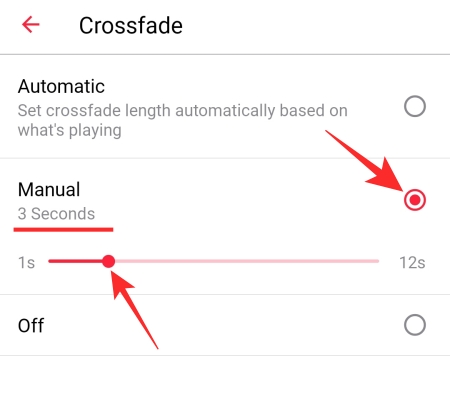
To attain complete control over what’s playing, you’ll need to select the ‘Manual’ crossfade option. Apple Music lets you pick any value between 1 and 12. In our experience, anything between 2 and 5 seconds seems to work on most of the songs. Also, a shorter crossfade time would make the shuffling a lot easier on the ear. Adjust the slider until you get the correct crossfade timer.

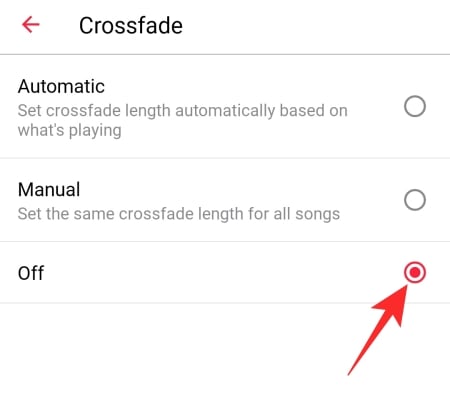
If you don’t like the concept of crossfade and wish to go back to the olden days, you can always choose to turn of crossfade entirely. Tap on ‘Off’ and exit the area.

Does Apple Music offer Gapless Playback?
Gapless Playback and crossfade have been on Spotify — Apple’s biggest rival — for a while now. Gapless Playback makes sure that there is no pause or silence between songs when you’re consuming a playlist. Crossfade, of course, allows you to fade out one song and fade the next one in. Apple Music has only rolled out the crossfade feature on Android, but there is no Gapless Playback option present on the app. So, if you want complete control over the transition of songs, you better switch over to Spotify.
RELATED


Hi.
I actually think the automatic crossfade actually works pretty well. Especially with songs that end cold. I have been playing with it on my Samsung Note 20 Ultra 5G and am really enjoying the results. I am even happier that they added the crossfade that starts the next song at full volume instead of fading it up as the first one fades down like it does on Spotify. I am just trying to figure out what the Auto crossfade is looking for to start the next track. It truly is a favorite feature of mine. I wish there was a way to set a threshold so that when the volume drops below a certain point the next song would start.
Now if Apple music could get the same feature on my iPad… and have an app for Windows that syncs with my phone without it being web based.