With the majority of people in isolation, Zoom has taken over as the next best utility to interact with your co-workers and clients. If you’ve come to use it for some time, you’ll know that the collaborative tool gives you the ability to record video and audio of a meeting session.
Recording privileges are exclusive to hosts but can also be given to select participants and if you do have them, you will be able to store recordings of your Zoom meetings on your computer and on the cloud.
▶ How to record a Zoom meeting without host permission
In this guide, we will help you figure you different ways to share a session that has been recorded on Zoom.
Yes. You can share meetings recorded on Zoom, no matter where they’re stored. Zoom recordings can be shared from within your local storage or from the cloud and can be easily uploaded to content sharing platforms like YouTube, Vimeo, and others.
If you saved your Zoom recording to the cloud, you can share it from within your Zoom web portal.
Note: When a meeting is recorded to the cloud, a copy of the meeting recording is sent over to your email containing the recording link, password, meeting title, and the time at which the meeting started.
You can do so by following these steps:
Step 1: Head over to the Zoom web portal and click on My Account at the top right.
Step 2: Under the Personal section in the left sidebar, click on the Recordings tab and then hit the Cloud Recording tab at the top.
Alternatively, you can head over directly to the Zoom recording page and sign in to your account.
Here, you will be able to see all of your Zoom recordings that have been saved to the cloud.
Step 3: If you want to share a recording listed on this page, click on the Share button on the right side of the selected recording.
Step 4: In the next window, you can configure different controls for the shared recording.
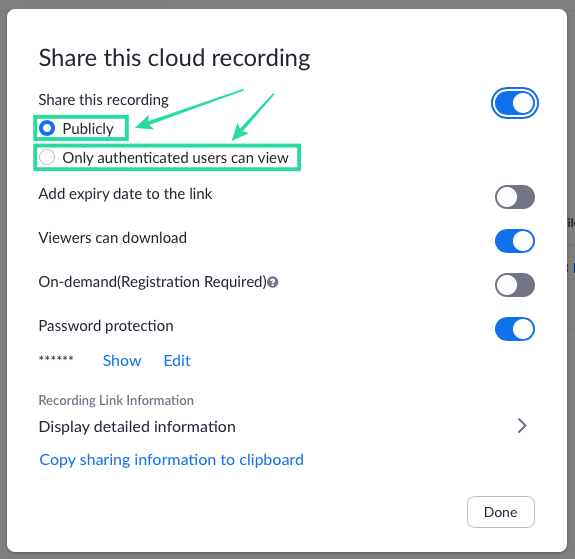
Step 5: Once you have decided on the sharing controls, you can click on the ‘Copy sharing information to clipboard’ at the bottom.
This will copy the recording information to your clipboard and you can paste the details as a message, email, or on a messaging app to share it with others.
To share a Zoom recording that’s saved internally on your local storage, you will first need to locate it and then move on to the sharing part. Follow the steps mentioned below to share a local Zoom recording:
Step 1: Open the Zoom app on your Windows PC or Mac.
Step 2: Click on the Meetings tab at the top and then head over to the Recorded tab on the left sidebar.
Here, you will see a list of past recordings that were recorded on the computer as well as on the web. You can distinguish between the two of them easily as the recordings stored on the cloud will only have the ‘Open’ button while the rest of them while locally recorded meetings will display other options when selected.
Step 3: Locate the recording that you want to share and click on the Open button on the right side.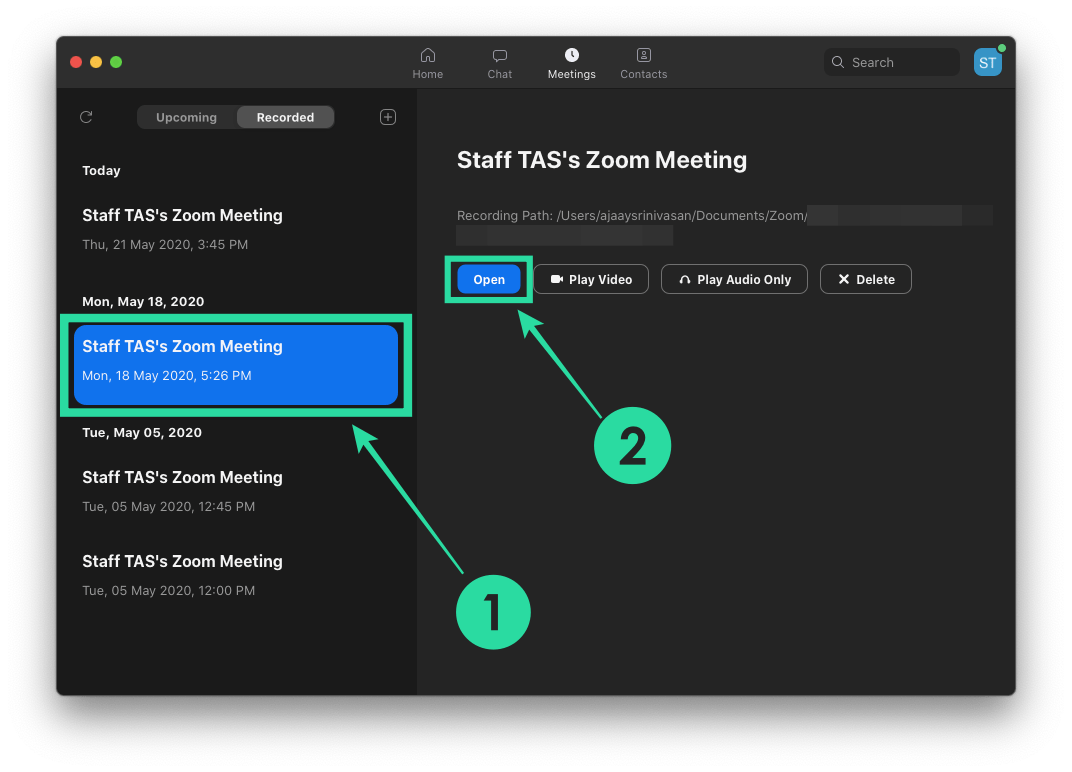
A folder will open up on your screen showing the recording files that were locally saved after the meeting. The ‘.mp4’ format file is the video recording of the meeting session while the ‘.m4a’ file is the one with just the audio transcript of the recorded meeting.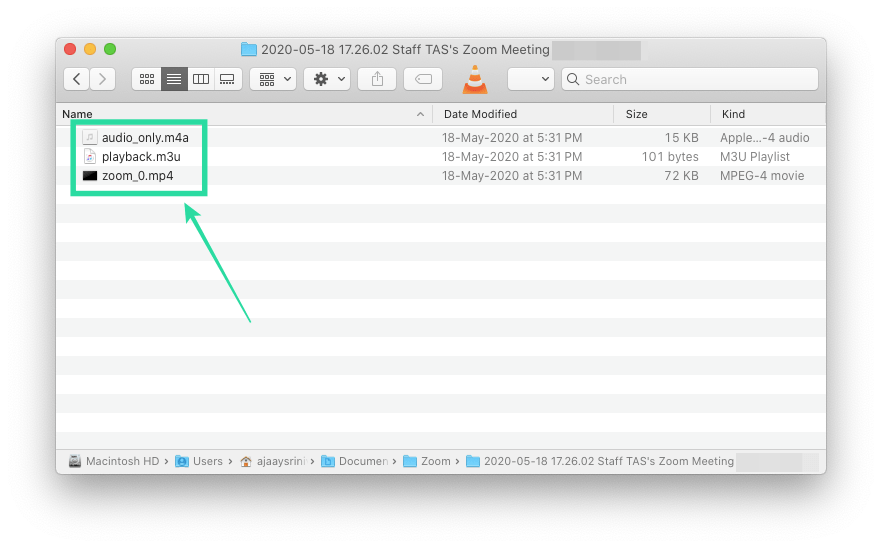
Step 4: To share the Zoom recording, you can upload the relevant files to a video sharing platform or on a chat messaging service and share it with other members.
Since Zoom recordings contain video and audio content of large parts of a meeting or the entire session, the total size of the recording will be quite large. It would thus be easier to access if the Zoom recording was uploaded to a file hosting or cloud storage service like Dropbox, Google Drive, OneDrive, etc.
Hosts or accounts who were assigned to save these recordings can upload them to one of these services. They can then share a link to these files with other participants of the meeting for east access. If someone shares a recording, you can download it by clicking on the link that they shared that will take you to the file hosting website from where you can download individual files of the recording or all of them.
How to download your Zoom recording from the cloud
If someone shares a Zoom recording saved on the cloud, you will get all the details regarding how to access them over email, text, or through a messaging app. To download the recording, click on the recording link sent to you.
This will open a webpage where you can play the recording. You can now proceed to download the recording files by clicking on the ‘Download’ button at the top right. The downloaded files will be saved to your default folder where are you downloaded files are stored.
Convert Zoom recording to MP4
In an ideal scenario, Zoom will start converting your recording sessions from “.zoom” files to “.mp4” or “.m4a” files, the moment you end a meeting. Sometimes, the conversion process might get interrupted and if it does, you can manually convert your local recording to MP4 by following the methods in the post mentioned below:
▶ Convert local recordings manually on Zoom
Let’s discuss the various option Zoom gives you when sharing a cloud Zoom recording.
In step 4 of the guide called ‘How to share cloud Zoom recording’ above, you can set the recording availability to be private or public, when you click the ‘Share’ button.
You can decide who can access your recorded Zoom meeting over the cloud. Choosing the ‘Publicly’ option will allow you to record to be available for everyone with the link to the recording.
When you select the ‘Only authenticated users can view’, your recording can only be viewed by users who are signed in to your account.
Access Duration
You can toggle the ‘Add expiry date to the link’ option to ON to enable an expiry date to the share link. When you do, you will have four options to choose from in terms of how long you want to link to remain active – 3 days, 7 days, 30 days, and Custom date.
Selecting the last option will allow you to set an exact date until when the share link will be accessible.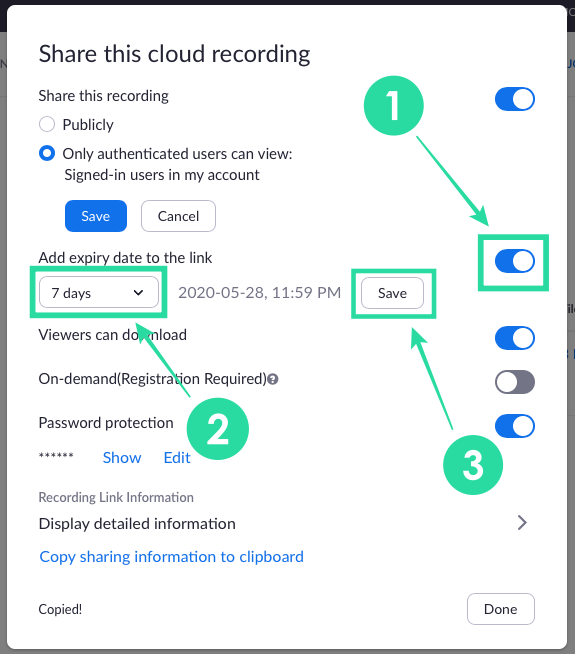
Allow or block download
You can toggle the ‘Viewers can download’ switch if you wish to allow users to download the Zoom recording besides letting them watch it.
Require registration
Regardless of what you chose as ‘Recording availability’ above, you can enable the ‘On-demand(Registration Required)’ option to make sure the viewers register their name or email ID before getting to watch it online.
Password protection
Toggle the switch next to ‘Password protection’ to ON to enable a password to your recording. You can view the password by clicking Show or change it something you want by clicking the Edit button below it.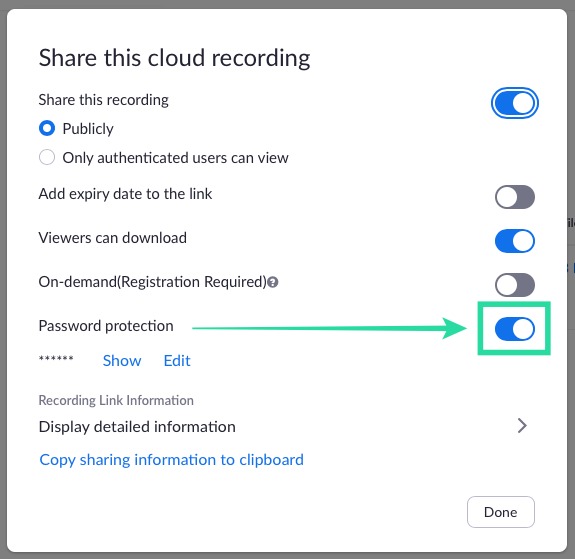
Did this page help you? In case it didn’t, let us know what issue are you facing in the comment section below.






I have a Mac. I can see the files but it does not convert. It says that another file is being converted. I had tried to fool the app but replacing the files in todays stop recording folder but when I ended the Zoom session it said another file was being converted. So I still cannot convert the files.
I am a participant in a zoom meeting. I want to watch the meeting again but when I click on the link the host sends me via email I get the message ‘Recording does not exist’. The host tells me the recording is available for 4 weeks. I am within that time limit. Do I need to have a zoom account and do I need any other software to access the recording?