Microsoft Teams has become one of the fastest-growing remote collaboration platforms in today’s world due to the rising number of organizations opting to work from home.
The company has gradually and steadily introduced new features that make collaborating from home a lot easier including the likes of screen sharing, conversation channels, dedicated wiki pages for particular projects, end to end encryption, and a lot more.
The company recently released its 3rd-anniversary edition update for Teams that included a host of new features including the much anticipated ‘raise hand’ feature. This feature has been included after numerous requests from educational institutions and teachers. Let’s take a more in-depth look at the ‘raise hand’ feature.
What is the ‘raise hand’ feature and why we need it?
The raise hand feature is a new addition to Microsoft Teams that allows you to notify the host and other participants that you have something to add to the on-going conversation. The feature is quite useful for companies that hold webinars with multiple participants and schools that remotely conduct classes.
Due to the nature of these events, teachers and hosts find it useful when most participants are muted during a lesson or topic which makes it easier for everyone to concentrate without getting distracted by background noises.
Initially, when everyone was muted during a class or a webinar there was no actual way to identify your teacher or trainer that you wanted to chime in or had a question without interrupting the whole lesson. The ‘Raise hand’ feature allows you to seamlessly notify your teacher or trainer about doubts or questions without disturbing the whole lesson for everyone else.
What happens when you ‘raise hand’?
When you use the feature, a small ‘hand icon’ appears near your name beside the ‘mute icon’. The teacher or trainer can then incorporate your question at their convenience which will make it easier for everyone to keep up with the lesson without getting disturbed.
How to ‘raise hand’ on Microsoft Teams
Note: This feature is currently being rolled out in batches and might not be available to you even if you update to the latest version of Microsoft Teams. Raise hand is also unavailable in web clients for now and can only be accessed through Microsoft Teams app on Android and its desktop client for Windows or macOS.
On your PC
Step 1: Open the desktop client and join a meeting to get started.
Step 2: Once the meeting starts, you will see a ‘hand icon’ in the calling bar at the bottom of your screen. This is the icon that will help you ‘raise hand’ during the meeting. Click on it to ‘raise hand’.
Your trainer or teacher will now be notified in their calling bar with a notification. You will also be able to view the ‘raise hand’ icon beside your name on the screen. The hand icon will also be displayed adjacent to your name on the Participants list. 
Similarly, you can lower your hand by clicking on the hand icon again which will now be highlighted to let you know that it was previously enabled. 
On Android
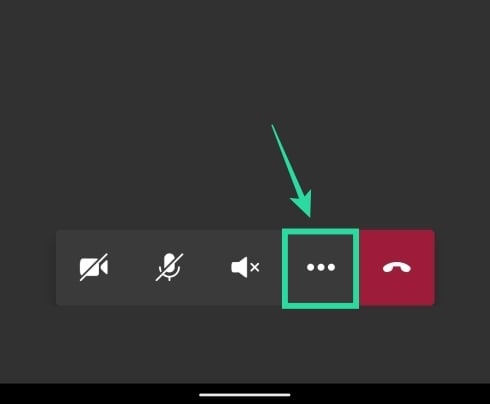
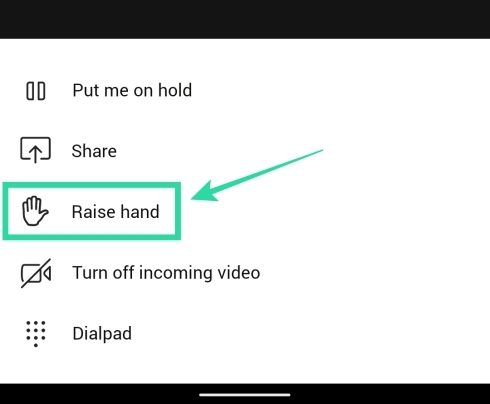
You can also use the new ‘raise hand’ feature on the Microsoft Teams app on your phone. You can do so by joining a meeting, tapping on the 3-dot button from the bottom, and then selecting the ‘Raise hand’ option from the menu. Your meeting organizer will now be notified that you raised your hand and can let you speak next.
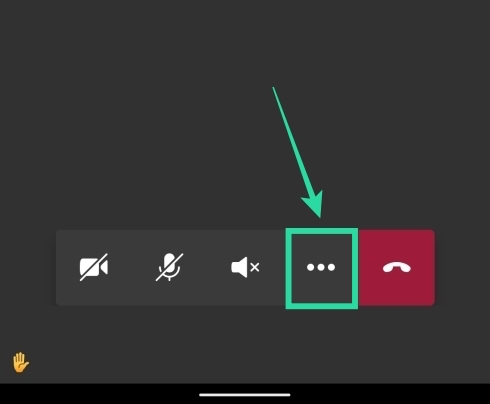
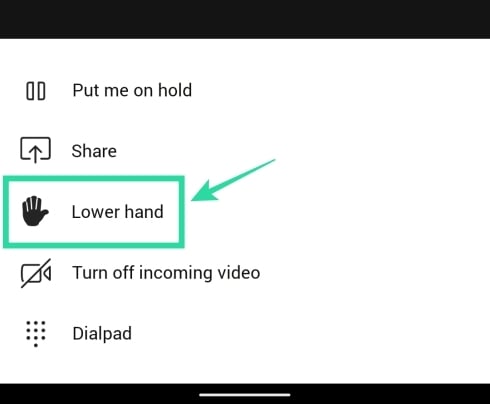
If you want to lower your hand, tap the 3-dot button from the bottom and select ‘Lower hand’.
What do you think about the ‘raise hand’ feature? Is it useful for you? Feel free to share your opinion with us in the comments section below.
Why I am not seeing the ‘raise hand’ option?

The new ‘Raise hand’ feature is available for Microsoft Teams app on Android and iOS as well as on the desktop clients of Microsoft Teams on Windows or macOS. If you’re not seeing the ‘Raise hand’ feature, chances are that you’re either using Teams on the web or through an outdated app on your computer or mobile. Download the latest version of Microsoft Teams on your PC by clicking your profile picture at the top of the app and then selecting ‘Check for updates’.






it is not avalable for me please give me a reason
I have 1.3.00.12058 and still do not have this feature, I wish they’ hurry up with this roll out, its now almost mid-May
cool
I cannot see the raise hand option ( I am using an IPad )
I see the raise hand 🙂
will this be available via mobile at any point?
Will this be available via mobile ?
Yesterday I saw the raise hand button but today again it’s not there
Please check what is happening please
This is not available on iPad app
I am on version 1.2.00.10168 and I do not see Raise hand. And I am using Windows 10 Desktop. Which version onwards do I start seeing Raise Hands feature?