Like physical hard drives, even the space on your Google Drive account has a limited capacity. If you have a standard Google account like most of us, the 15GB of free space may not be enough. If you don’t want to pay for additional storage, then clearing up some space from your Drive is the only way to keep using it for cloud storage.
In this post, we’ll explain all the ways you can permanently delete files from Google Drive.
Related: How to make sure your Google Photos sync to Google Drive
How to delete files from Google Drive [3 methods]
To keep your data safe, Google Drive doesn’t provide a permanent delete button when interacting with your files on a device. However, you can get rid of the files you upload on the service once and for all in fairly simple steps on any device.
Method 1: Using Google Drive on the web
- To delete files from Google Drive forever when using it on your computer, go to the Google Drive homepage on a web browser you regularly use and sign in to your Google account if you haven’t already.
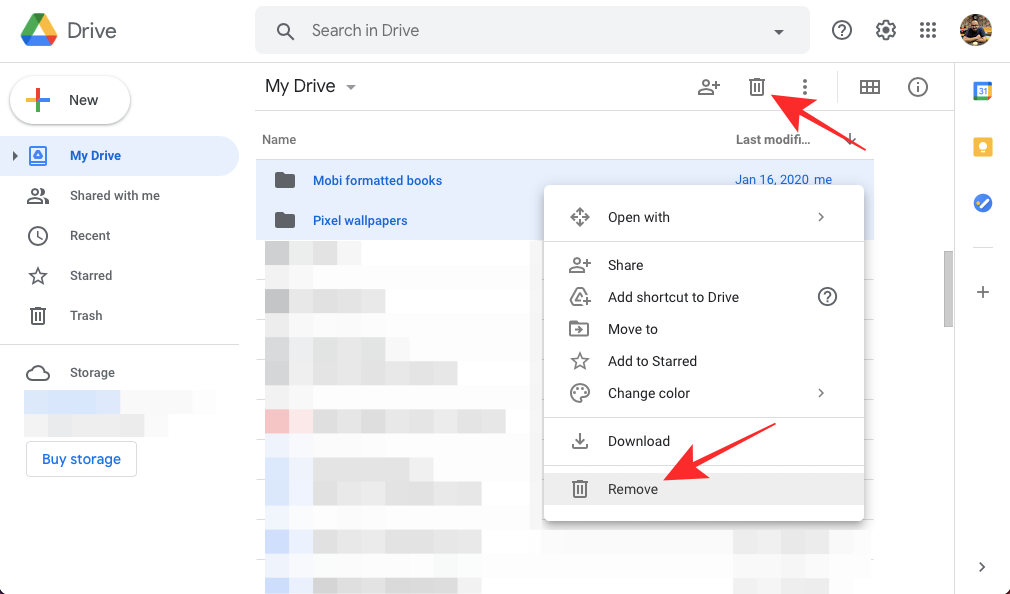
- Select a file or folder you want to delete permanently by clicking on them. You can select multiple files or folders to delete by pressing the Command key (on macOS) or the Ctrl key (on Windows or ChromeOS) while highlighting the files and folders you wish to delete.
- Once you have highlighted the files you want to delete, click the trash icon at the top right corner of the page. When you do this, the selected file will be only moved to your Google Drive trash. Alternatively, you can also right-click on the files and select Remove.
- To delete the files and folder forever, click on the Trash tab from the left sidebar.

- If Google Drive’s Trash only consists of the files you previously deleted, click on Empty trash from the top right corner.
- If there are other files you wish to keep in the trash but want to permanently delete the ones you just moved to Google Drive’s Trash, then you can delete them by selecting them and then clicking on the trash icon at the top right.
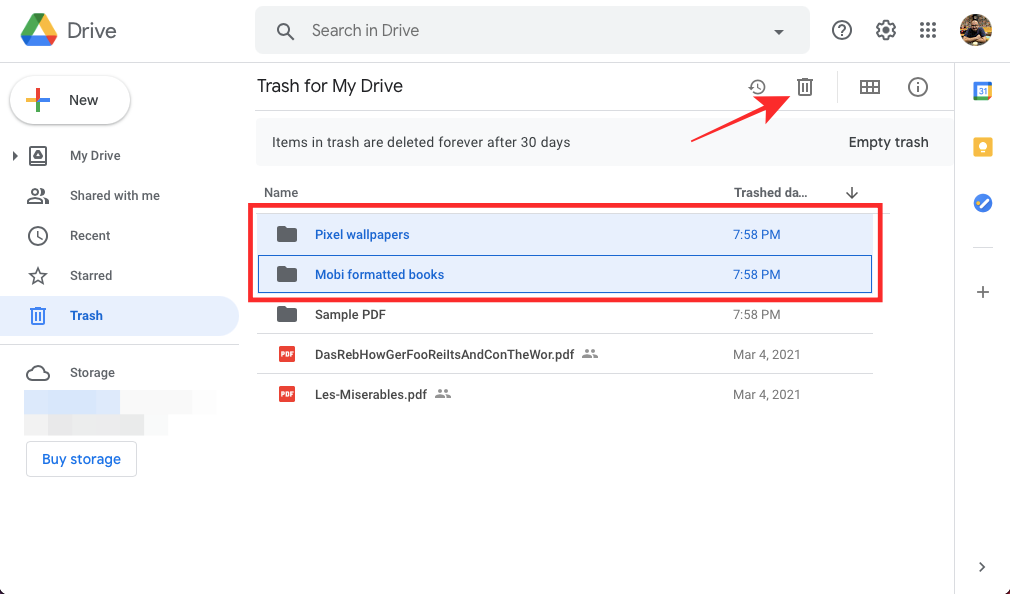
- To confirm this deletion, click on Delete forever from within the dialog box.

- The selected files and folders will now be permanently removed from your Google Drive and will no longer be available for access.
Related: How to sync a local folder with Google Drive on your Android device
Method 2: Using the Google Drive app on Android
If you use Google Drive on your Android smartphone, you can permanently delete files from it directly with the Google Drive app.
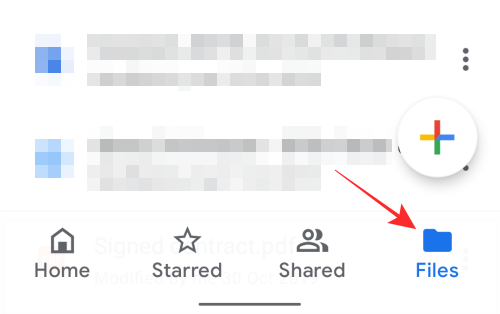
- Open the Google Drive app on Android and tap on the Files tab from the bottom.
- If you want to delete a file or a folder one by one, tap on the 3-dots icon adjacent to the file or folder name.

- To move the selected file to trash, tap on Remove from the popup menu.

- For deleting multiple files and folders at once, long-press on any file you wish to delete and select other files you want to delete together. After you have made your selection, tap on the trash icon at the top.

- You will be asked to confirm the deletion process. To do this, tap on Move to bin on the dialog that appears. Your files will now be moved to the trash section inside Google Drive.

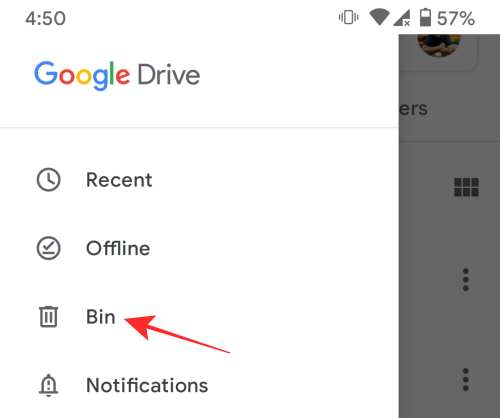
- Your next step is to delete the selected files indefinitely. To do this, tap the 3-lines icon from the top left corner of the screen and select the Bin tab from the left sidebar.
- Inside the Bin, tap and hold on to the files and folders you wish to remove permanently. After making your selection, tap on the 3-dots icon at the top right corner.

- In the popup that appears, select Delete forever.

- You will be asked to confirm the deletion and to do this, tap on Delete forever in the dialog that pops up.
The selected files will now be deleted from Google Drive.
Related: 6 Reasons why Google Files should be your default file manager
Method 3: Using the Google Drive app on iPhone
Deleting files from Google Drive on iOS is pretty similar to how you do it on Android.
- Open the Google Drive app on your iPhone and tap on the Files tab from the bottom toolbar.

- Now, you can delete a file or a folder one by one by tapping on the 3-dots icon adjacent to the file or folder name.

- Then select Remove from the menu that pops up.

- For deleting multiple files and folders together, long-press on any file you wish to delete and then tap on other files you want to delete together. After you have made your selection, tap on the 3-dots icon at the top.

- When the popup appears at the bottom portion of the screen, select Remove.

- Confirm the file deletion process by tapping on Move to Bin in the dialog. The selected files will be moved to the trash.

- The next step is to delete the files permanently from the trash folder. To get to this folder, tap on the 3-lines icon from the top left corner, and select the Bin tab from the sidebar that appears on the left.

- If your trash section consists only of the files you just moved to it, you can simply empty it and delete the files from it forever. To do this, tap on the 3-dots icon at the top right corner of the trash screen and then select Empty Bin.

- You can also delete the files in the trash individually by tapping the 3-dots icon adjacent to the respective file name.

- Then select Delete forever from the popup menu.

- Confirm this by tapping Delete forever in the dialog that appears.

The selected files will now be removed from your Google Drive account permanently.
Related: How to scan documents and store them online on Android
If you had previously shared a bunch of files with someone else on Google Drive, you might need to follow additional steps before deleting them as the files will get inaccessible for the people you shared them with. So, when deleting shared files, it’s important to decide whether or not to allow the people you shared the ability to own the file so you can remove it without hindering others’ work.
Step 1: Spot which files are shared with others
Unlike the files that are shared with you, things you share with others aren’t located at a different tab inside Google Drive and are instead available inside the ‘My Drive’ section as all of the other files you uploaded to the platform. This means, that the files you share with someone will be located in the same main folder where other unshared files exist.
You can however identify the files you shared with someone by looking for a user icon adjacent to the file names.

Folders you have shared with others will be marked with a user icon inside the folder icon.

You can view whom you’ve shared the files and folders with by right-clicking on them and clicking on View details from the menu.

This should load up the details of the file or folder in a sidebar that appears on the right.

Here, you will be able to look at the people you have shared the file with along with other file details.
Step 2: Make sure others download a copy (Optional)
To make sure others’ work isn’t hindered by your deleting the files you shared, you can request them to download a copy so that you can get rid of them with ease.
- To allow others to download a copy of your shared file, right-click on it, and select ‘Share’.
- Next, click on the cogwheel icon at the top right corner of the dialog that appears.

- In the next screen, check the box adjacent to the ‘Viewers and commenters can see the option to download, print, and copy’ option and then click on ‘Save’.

- This way, all viewers with access to your files can download and print the contents of your file first before you proceed to delete them.
- Additionally, if you trust someone else with access to your files, you can transfer its ownership to them so that they may control everything related to it in the future. You can do so by right-clicking on a file, selecting Share, and then clicking on the role type adjacent to the person you want to transfer ownership to. From the list of options, click on Make owner to get the job done.
Related: How to save photos online for free using Google Photos
Step 3: Delete the shared files
After you have made sure others have either copied your files or have ownership rights to them, you can go ahead and delete them like you would with all other files on Google Drive.
- Select the files and folders you want to delete by highlighting them (using Cntrl or Command keys for multiple files) and then clicking the trash icon at the top right corner.

- When the files have been moved to trash, you can delete them permanently by using the Trash option inside Google Drive’s Trash section.
You can remove the files that were shared with you on Google Drive pretty easily.
- To delete files that were shared by others, go to the Shared with me tab from the left sidebar inside Google Drive.
- Here, you will be able to see a list of all the files that someone else shared with you on the service along with their name and the share date.

- Select the files and folders you want to delete by highlighting them (using Cntrl or Command keys for multiple files) and then clicking the trash icon at the top right corner.
- When the files have been moved to trash, you can delete them permanently by using the Empty trash option inside Google Drive’s Trash section.
How to delete your recent files from Google Drive
If you no longer wish to use the files you may have accessed recently, then Google Drive lets you quickly spot them among your other files using the ‘Recent’ section.
- Go to Google Drive’s main screen and click on the Recent tab from the left sidebar.
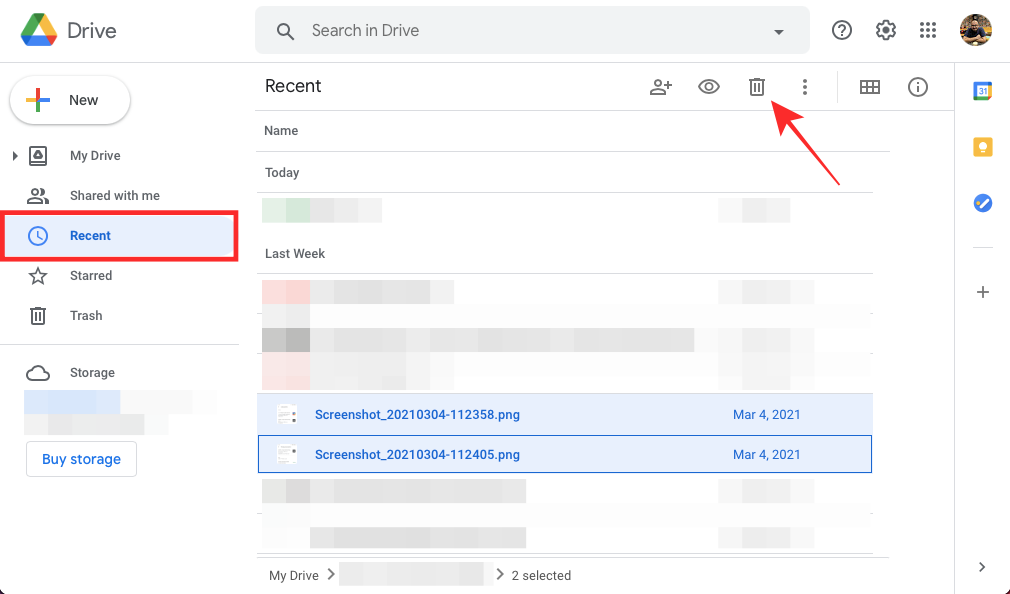
- You will be able to see the files you accessed on different dates like ‘Today’, ‘Last Week’, ‘Last month’, and more.
- To delete multiple files and folders from this section, highlight them (using Cntrl or Command keys for multiple files) and then click on the trash icon at the top right corner.
- When the files have been moved to trash, you can delete them permanently by using the Empty trash option inside Google Drive’s Trash section.
How to recover permanently deleted files on Google Drive
If you permanently deleted files from your Google Drive, you should know that you won’t be able to recover them yourself. However, there’s one way to recover them and that is to contact Google to request to initiate the recovery process. For this process to complete, you should be using Google Drive with a consumer account.
- To recover permanently deleted files from your Drive, go to this page and select Missing or deleted files under “Select your issue”.

- Inside the text box under “How can we help you?”, type your concerns and mention what kind of files you’re looking to recover. Click on Submit after that to report your issue. A Google Drive Specialist will get in touch with you and you can share your problems with them to get them resolved.
For GSuite account users, you will have to contact your GSuite administrator to restore the files that were deleted within the past 25 days of deletion.
RELATED
- How to find and remove permissions you gave to Google Drive, Contacts, and more
- How To Schedule Dark Mode for Google Search
- What Is Google Live Transcribe?
- How To Change Your Google Profile Picture [4 Ways]
- How To Find Weak Passwords and Change Them Easily on Chrome
- How to record a Google Meet video meeting