We unlock our smartphone countless times a day. This monotonous task has become such a big part of our daily lives that many times due to the hassle of repeated unlocking, we want to remove the lock (PIN, pattern, password etc.) from our phone. Nevertheless, a second later, we realize that it’s not safe and it’s better to have lock on the device.
What if we told you that there is a way where you don’t need to enter the PIN/pattern/password manually each time you have to unlock your device, instead your phone will unlock automatically. Yes, it’s possible and Android Smart Lock feature does that. Smart Lock feature on Android spares you the trouble of unlocking the phone repeatedly.
Introduced with Android 5.0 Lollipop, many people are unaware of the awesome Smart Lock feature on Android that automatically locks/unlocks your device depending on certain pre-set conditions. In other words, Smart Lock lets you specify conditions where your Android device (phone or tablet) will remain unlocked. If those conditions are met, you won’t need to unlock your device with your PIN, pattern, or password.
Check out: Cool hidden features of your Android device
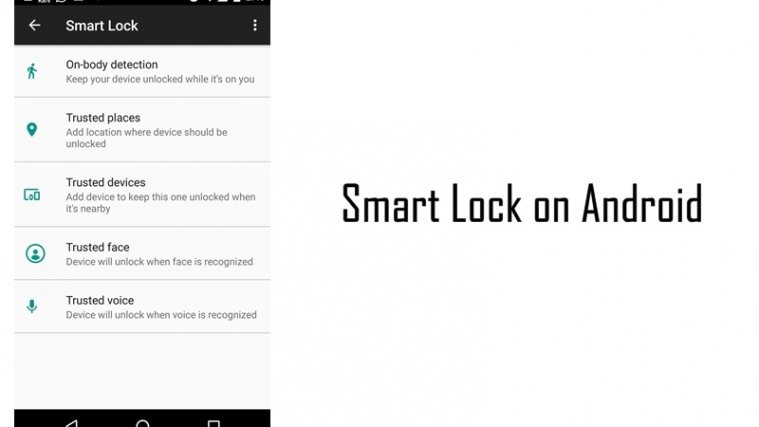
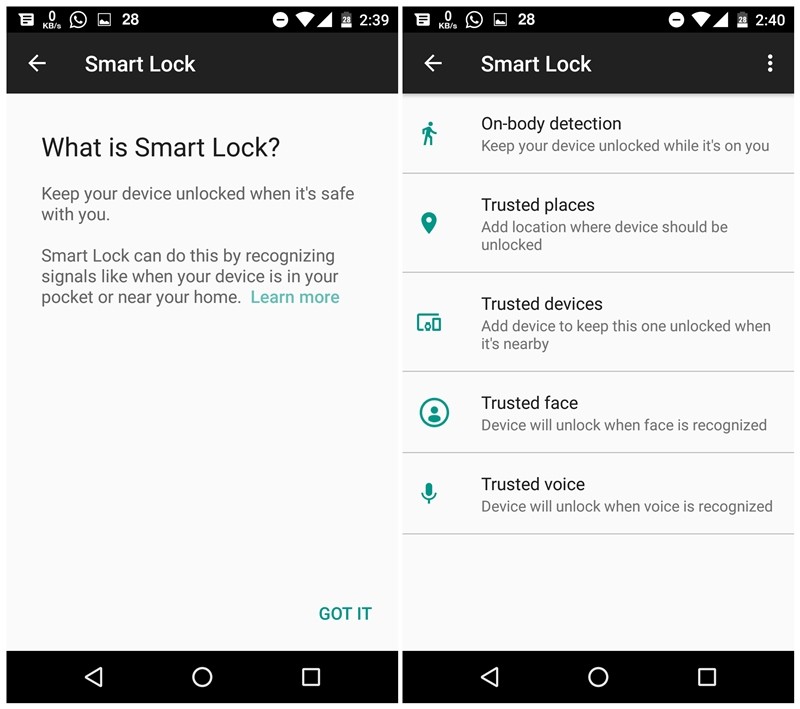
So what are the conditions? Currently, there are five ways or conditions that you can set up to automatically unlock your Android device or say keep your device unlocked. These are:
- On-body detection
- Trusted places
- Trusted devices
- Trusted face
- Trusted voice
Kindly note, that not all the features/conditions are available on every device. You can have one, or the others, or all at the same time. Some features may work on some devices only.
All these options are present in the Smart Lock feature on your Android device. Before we go into the details of each condition individually, we will first understand where the Smart Lock feature is located and how to turn it on.
How to turn on Smart Lock on Android
To turn on Smart Lock on your Android device (smartphone or tablet), it is necessary to have some kind of lock on your device in the first place. It could be a PIN, a pattern or a password. If you don’t have a lock on your device, Smart Lock will be greyed out in the Settings. Once you set up a lock (PIN/pattern/password), follow the steps below to turn on Smart Lock:
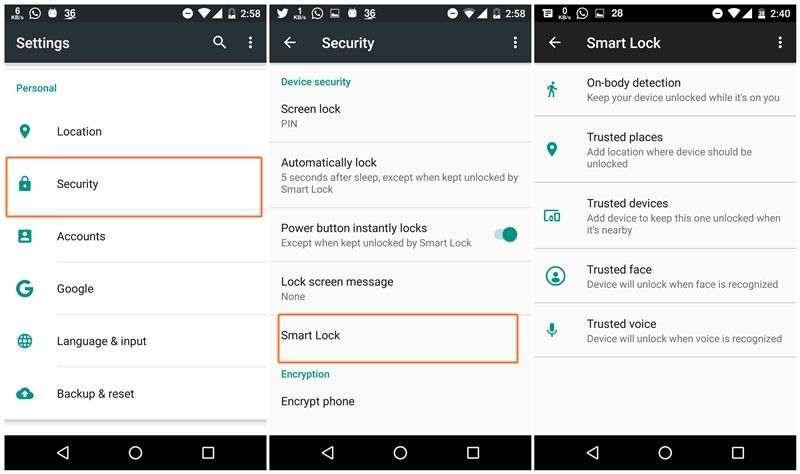
- Go to Settings » Security.
- Scroll down and tap on Smart Lock.
└ If it’s greyed out, set up lock (PIN/pattern/password) for your device first. - Enter your device PIN/pattern/password.
- Select any Smart Lock feature (On-body detection/Trusted places/Trusted devices/Trusted face/Trusted voice) that you want to set up. You can use multiple Smart lock features simultaneously.
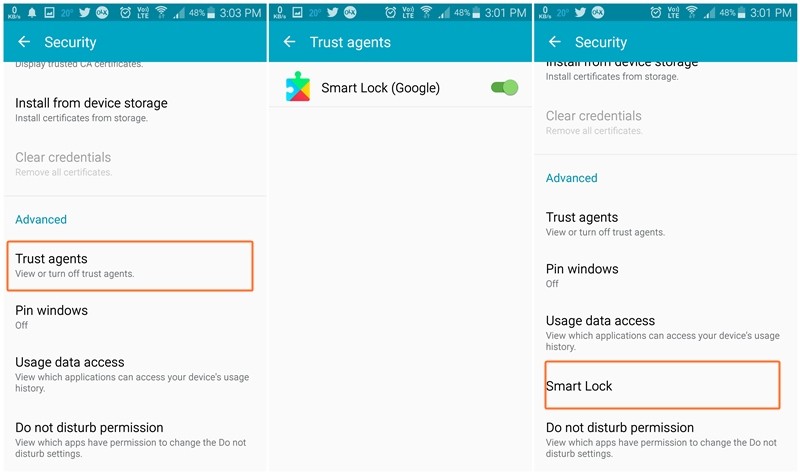
However, if you don’t find Smart lock feature under Security settings on your device, select Trust Agents also located under Security settings and enable Smart Lock (Google). Go back to Security settings, you will have Smart Lock feature there.
After you set up Smart Lock using any of the conditions, you’ll see a pulsing circle at the bottom around the Lock icon, which indicates Smart Lock feature is currently on.
Also read: How to recover notifications cleared from notification bar
There are certain things that you need to remember while using Smart Lock feature:
- If you restart your phone, you’ll need to manually unlock it with your PIN, pattern, or password.
- If you don’t use your phone for 4 hours, you’ll need to manually unlock it with your PIN, pattern, or password.
How to set up and use On-body detection Smart Lock
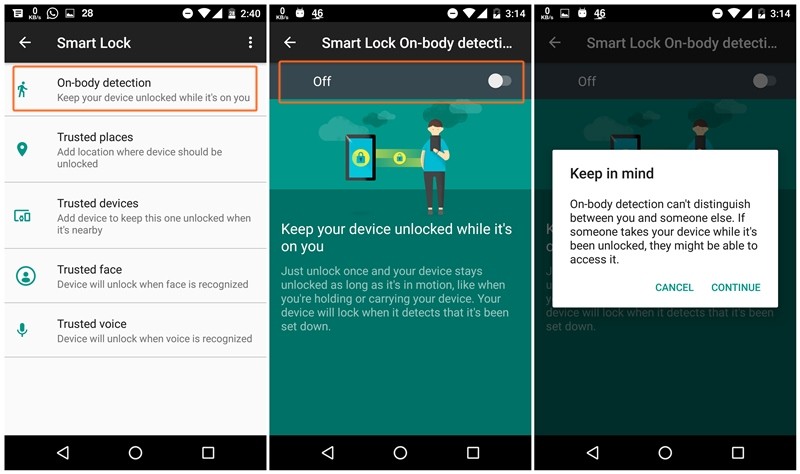
On-body detection, as the name suggests, keeps your device in the unlocked state as long as your phone detects that you are carrying it with you, whether it is in your hand, pocket or bag. On-body detection uses sensors such as an accelerometer to keep your phone unlocked. Once you unlock your device, it stays unlocked as long as your device senses that it’s on your body. And as soon as your phone detects that it’s no longer on your body such as it’s kept on a table, it locks automatically after 1 minute. On some devices, On-body detection learns the pattern of your walk and locks your phone if it detects one that seems different from yours.
There are some obvious caveats with the On-body detection. First of all, if you give your device to someone else while it’s unlocked, the device will stay unlocked considering it is still on someone’s body though different from yours. Secondly, it can take up to one minute to lock after you’ve stopped moving and thirdly, it can take up to anything between 5 and 10 minutes to lock after you get into a vehicle.
- Go to Settings » Security » Smart Lock.
- Enter your device PIN/pattern/password.
- Select On-body detection.
└ If you don’t see “On-body detection,” then it’s not available for your device. - Turn the toggle “On” or “Off” at top right corner.
- On the pop-up, tap Continue.
That’s all you have to do to enable On-body detection Smart Lock. Now, as long as your device is in motion, it stays unlocked. To turn it off, just turn the toggle off for On-Body Detection.
Check out: How to backup your Android Phone
How to set up and use Trusted places Smart Lock
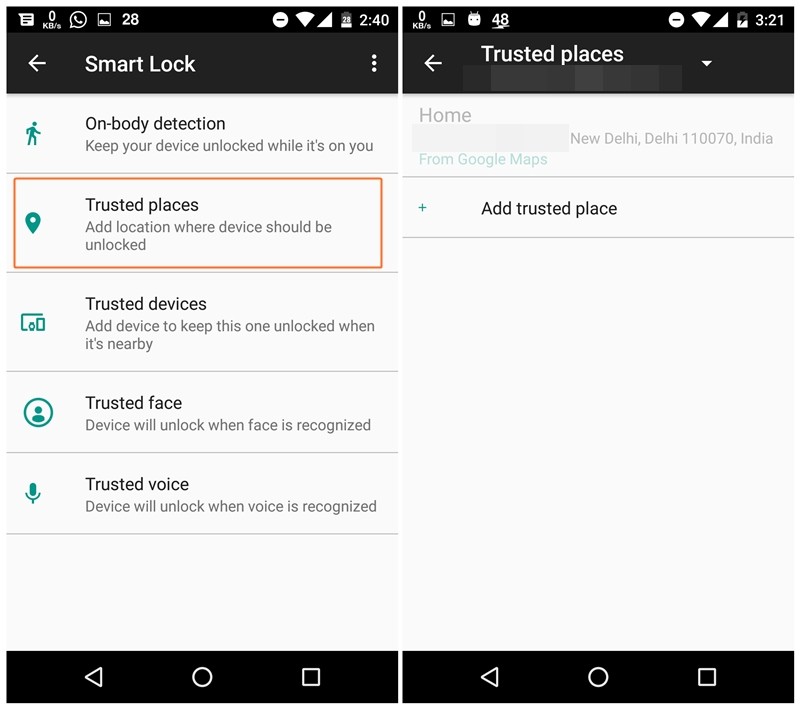
Trusted places Smart Lock kicks in when your device is in a certain place. For instance, if you are comfortable with leaving your phone unlocked at your home or at some other location, but it should be locked at all other locations, Trusted places Smart Lock is a good option. Trusted Places uses geographic boundaries to detect the location. As long as your phone is in that particular location, your phone stays unlocked, the moment you leave that location, the phone locks itself automatically. Cool, eh?
Note: You must have location service turned ON on your device for Trusted places to work.
- Go to Settings » Security » Smart Lock.
- Tap on Trusted places.
- If Home and Work locations are already associated with your Google account, they will show up here. Tap a place to activate it.
- If you want to add a custom Trusted Place, tap on “Add Trusted place” and select a location on the map.
- To remove or edit any location from Trusted places, tap the location and hit Edit or Remove as per your need.
How to set up and use Trusted devices Smart Lock
With Trusted devices Smart Lock, you can have your phone stay unlocked whenever it’s connected to a trusted device. In other words, your phone automatically unlocks the moment it pairs to a trusted device.
You can add trusted devices such as fitness trackers, smartwatch or your car’s Bluetooth-enabled audio system. Plus, if you pair a new Bluetooth device, a notification will inform you that you can add it as a trusted device for Smart Lock. Previously, Smart Lock also supported NFC-based unlocking, but as of September 2017, it has been depreciated.
Read: How to sync clipboard between your computer and Android device
Like other Smart Lock options, Trusted devices also has its limitations. For instance, if someone takes your phone and Trusted device with them, they could gain access to your device. That’s why it’s not recommended to enable Smart Lock for accessories that are always on your phone or tablet such as Bluetooth keyboards or cases. Similarly, if your paired Bluetooth device’s range is long, someone might be able to unlock and access your phone from up to 100 meters.
- Turn on Bluetooth on your device and pair the Bluetooth device like you normally do.
- Then go to Settings » Security » Smart Lock.
- Select Trusted devices » Add Trusted device.
- Select the Bluetooth device you wish to add as a trusted device from the list of paired devices.
To remove any trusted device, just tap the device name in the above setting and tap OK to remove it.
How to set up and use Trusted face Smart Lock
Some of the new smartphones such as Samsung Galaxy Note 8 feature an improved and a secured version of Trusted face Smart Lock. If, however, you don’t own a device that supports Face unlock natively, you could use the Trusted face Smart Lock feature available on most Android phones.
Read: How to allow call ringtone while keeping notifications on silent
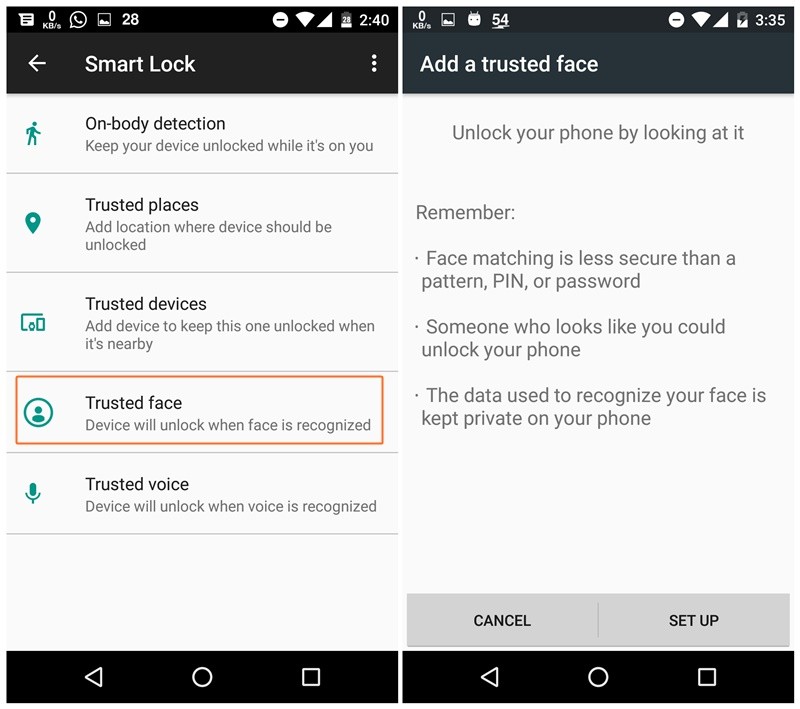
In the Trusted face Smart Lock feature, your device will unlock when it recognizes your face. You will not be prompted to enter PIN, pattern or a password. However, you will have to swipe the screen to open the device.
When Trusted Face is enabled on your phone, you will see an icon (similar to the one present in the left image) at the bottom of your lock screen, provided your device isn’t in a trusted place or connected to a trusted device. If your device recognizes your face, the icon will change to an unlocked icon, which indicates unlock is successful. Then you just need to swipe to open the device.
Please note, you can add only one trusted face to Smart Lock.
How to add a trusted face
- Turn on Bluetooth on your device and pair the Bluetooth device like you normally do.
- Then go to Settings » Security » Smart Lock.
- Select Trusted face.
└ If you don’t see “Trusted face” option, then it’s not available for your device. - Select Set up and follow the on-screen instructions.
- Once set up is done, you can unlock your device with your face by simply looking at it. To do so, just place the device parallel to your face.
If for some reason, your device doesn’t recognize your face, you can also unlock your device with your PIN, pattern, or password.
How to set up and use Trusted voice Smart Lock
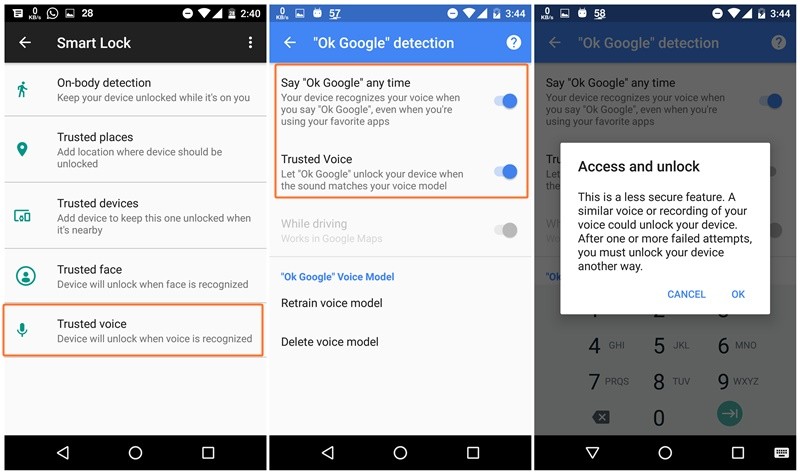
Trusted voice Smart Lock feature unlocks your device using voice. However, you cannot set up a custom command to unlock your device as the featured is based on Google Assistant. You have to use the command, “Okay Google” to unlock your device without using any PIN, pattern or a password. In fact, when you use Trusted voice to unlock your device, your phone will immediately launch Google Assistant. You can then use Google Assistant and ask Google to do things for you like you would normally do with Google Assistant.
Also read: How to create Google Assistant shortcuts
How to add Trusted voice
- Turn on Bluetooth on your device and pair the Bluetooth device like you normally do.
- Then go to Settings » Security » Smart Lock.
- Select Trusted voice.
- On the next screen, enable Say ‘Ok Google’ anytime.
- Enable Trusted Voice toggle.
To use Trusted Voice, just say ‘Ok Google’ from the lock screen or while the screen is off (on supported devices) to unlock your device without manually entering a password.
That’s all. Happy Androiding!


