

The fastest route to maximum damage is to commit to one high-damage class, match its primary stat and armor affixes to its Physical, Ranged, or Magic archetype, craft Exotic gear, raise mastery, equip the strongest matching title, and optimize its Forge, Gear Score, and Aspect setup.
Dungeon Lootr spreads its damage scaling across several menus, so a high-rarity class alone will not finish the build. The fastest route keeps every upgrade pointed at the same damage type, then tests whether the resulting power holds up during a full dungeon run.
- Maximum-damage build checklist
- How to build maximum DPS quickly in Dungeon Lootr
- Class archetypes, primary stats, and damage affixes
- Exotic armor recipes and material farms
- Armor rolls, mastery bonuses, and titles
- Forge upgrades, Gear Score, weapons, and Aspects
- Training Area tests for real dungeon DPS
Maximum-damage build checklist
| System | Target |
|---|---|
| Class choice | A high-offense class you can keep leveling and using |
| Exotic armor | Supernova Ring, Living Armor, and King’s Crown |
| Damage stat | Strength, Dexterity, or Intelligence matched to the class archetype |
| Armor affixes | Matching Physical, Ranged, or Magic damage rolls |
| Mastery | Passive cooldown and skill-damage bonuses for the equipped class |
| Title | The strongest available bonus for the build’s primary stat |
| Gear Score | Continually improved through the Forge and stronger dungeon loot |
| Aspect | A passive that complements the weapon, class, and attack rotation |
Current rankings do not agree on one undisputed top class: Cursed King leads one current overall-damage ranking, while Celestial Unrestricted and the Toji spec are also top-end damage routes. The expensive mistake is committing stats, materials, and rerolls before deciding which class you will actually keep leveling.
How to build maximum DPS quickly in Dungeon Lootr
Build one class from the archetype outward so every stat, armor roll, mastery bonus, and title contributes to the same damage plan.
STEP 1/8
Commit to a high-offense class

Choose the class you intend to main; obtaining Toji from the Unrestricted Fighter requires Gojo at level 25 and 500,000 gold.
STEP 2/8
Craft the Exotic armor set

Use the Forge to work toward the Supernova Ring, Living Armor, and King’s Crown as their materials become available.
STEP 3/8
Reroll the armor affixes

Replace mismatched rolls with direct damage, critical, or useful sustain affixes suited to the equipped class.
STEP 4/8
Check the class archetype
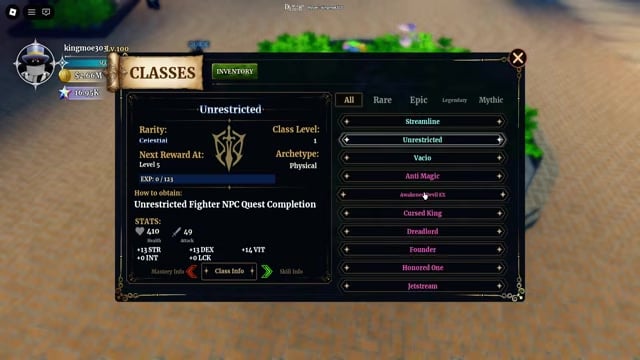
Open Class Info and identify whether the equipped class deals Physical, Ranged, or Magic damage before spending more resources.
STEP 5/8
Allocate the matching stat points
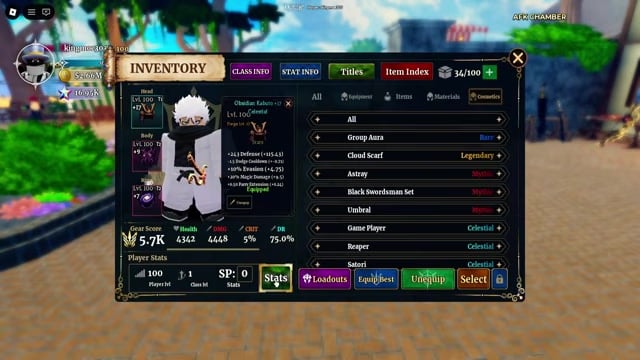
Put offensive points into Strength for Physical, Dexterity for Ranged, or Intelligence for Magic damage.
STEP 6/8
Configure useful move variants

Inspect Skill Info and switch options such as parry-only or i-frame-only behavior when another variant better supports the build.
STEP 7/8
Raise class mastery
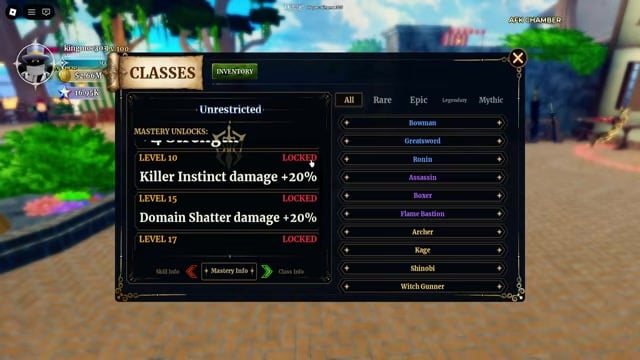
Keep leveling the active class to unlock its passive cooldown reductions and move-specific damage bonuses.
STEP 8/8
Equip the strongest matching title

Open Inventory, select Titles, and equip the available title that contributes the most useful stats to your class.
Video help
Class archetypes, primary stats, and damage affixes
| Archetype | Stat and affix |
|---|---|
| Physical — Unrestricted | Strength and Physical Damage |
| Ranged — Sinister | Dexterity and Ranged Damage |
| Magic — Demonbane | Intelligence and Magic Damage |
Key The archetype label in Class Info is the deciding factor, including for classes outside these examples. Check it whenever you change classes; a strong Magic Damage roll contributes little to a Physical kit, and an impressive Strength title does not serve a Ranged build as well as a Dexterity-focused alternative.
Exotic armor recipes and material farms
| Item or material | Requirement or route |
|---|---|
| Supernova Ring | 12 Celestial Ore, 15 Exotic Essence, and 1 Exotic Ingot |
| Living Armor | Exotic chest armor crafted at the Forge |
| King’s Crown | Exotic head armor crafted at the Forge |
| Exotic Essence | Earned from Challenges |
| Celestial Ore | Farmed in Nightmare dungeons |
| Exotic Shattered Armor | Dropped by the Scarlet Knight in the Underworld on Nightmare+ |
The three demonstrated Exotic armor targets cover the ring, chest, and head slots. Craft them through the Forge, beginning with whichever piece gives the clearest upgrade over your current equipment.
Select a missing ingredient in the crafting or Item Index interface to check its destination before leaving the lobby. This keeps the farm focused on the material currently blocking your next craft instead of filling the inventory with unrelated loot.
Exotic Shattered Armor is chance-based, so plan for repeated Scarlet Knight clears. Prioritize a difficulty you can clear consistently; a slower theoretical farm that regularly ends in failure will delay the finished set.
Armor rolls, mastery bonuses, and titles

For the Supernova Ring, Base Damage is the direct offensive target. Other armor pieces can carry the matching Physical, Ranged, or Magic damage affix, while critical rolls provide another offensive route. Lifesteal is utility rather than raw hit damage, but it can preserve attack uptime when incoming damage would otherwise force you to disengage. The right balance depends on the class and the content you can survive.
Mastery strengthens the class itself. One displayed Toji mastery unlock at level 17 applies a −5 adjustment to all skill cooldowns, while another adds 20 damage to the fourth move. Read each class’s mastery track and favor unlocks that improve frequently used attacks or let the full rotation cycle sooner.
Titles finish the stat package. Unchained provides +18 Strength, making it attractive for a Physical build, while Lord of Death provides +12 STR, +10 DEX, and +5 INT. Compare the usable contribution rather than the total number of displayed stats; points outside the class’s damage axis should not decide the choice.
Forge upgrades, Gear Score, weapons, and Aspects
Bring dungeon loot back to the Forge instead of treating the Exotic armor set as the endpoint. Converting useful loot into higher Gear Score raises overall power, while Reforge Stones help improve offensive properties that do not fit the finished build.
The weapon must support the same class plan. Compare replacements by their Gear Score, useful offensive properties, and attached Aspect, because two otherwise similar weapons can perform differently once their passives activate.
Aspects are passive combat traits bound to the equipped class and can modify normal attacks or skills with effects such as burn, leech, critical triggers, or area damage. Aspect Gems are available through Challenge Dungeons. Choose one that activates reliably during your normal rotation; no single Aspect is universally strongest across every class, weapon, and encounter.
Training Area tests for real dungeon DPS

The Training Area displays ability damage, making it the cleanest place to compare a new weapon, affix, title, mastery unlock, or Aspect. Measure both the largest hit and the output of a full ability rotation.
Change only one variable per Training Area test, then repeat the same ability sequence so the damage difference belongs to that upgrade.
Peak damage is not the same as sustainable dungeon DPS. Successful parries with F negate incoming damage, while sufficient survivability and shorter cooldown gaps let you keep attacking; a slightly lower Training Area peak can therefore produce more damage over a complete boss fight than a fragile paper-DPS setup.



Leave a Reply