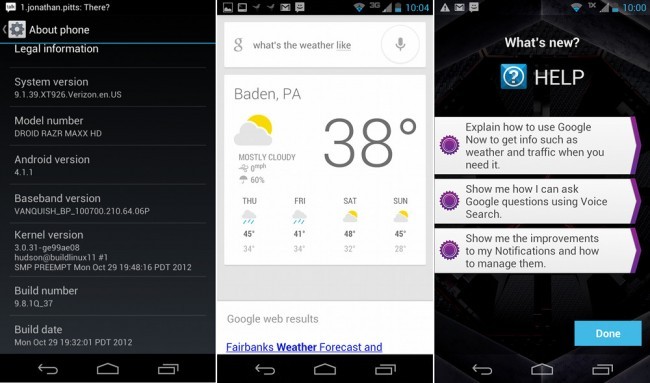
Motorola has already announced that the Droid Razr HD and its cousin wit the juiced up battery- the Droid Razr Maxx HD would be getting the official update to Android 4.1 before the end of this year. But it’s no fun cooling your heels and waiting for it to happen, especially when there is an active developer community who manages to get their hands on the latest firmware builds, and release it for you to enjoy on your device much before anyone else. As we already know, a leaked Jelly Bean build was recently outed for the Droid Razr M, and today, we have another leaked build, labeled as 9.1.39Xt926.verizon.en.us, out for the Razr HD, thanks to the ever-alert DirtyDroidX from DroidRzr. The leaked build should also work perfectly on the Razr Maxx HD, as both are identical devices with just a difference in the battery and storage capacities.
The guide below will walk you through the steps for installing the leaked Jelly Bean firmware on your Razr HD /Razr Maxx HD
Compatibility
This guide is applicable only for the Motorola Droid RAZR HD and the RAZR MAXX HD. DO NOT try this on any other device.
Warning!
The methods and procedures discussed here are considered risky and should not be attempted if you don’t know exactly what you’re doing. We won’t be held liable for any damage caused to your device.
How to Update Droid Razr HD / Razr Maxx HD with Leaked Jelly Bean Firmware
————- Warning! ————-
If you install the leaked Jelly Bean firmware on your Razr HD or Razr Maxx HD, you might not be able to revert back to stock Ice Cream Sandwich firmware as there are currently no stock images available to revert back to official firmware. You might also not be able to upgrade to the official Jelly Bean update whenever it comes out. Also keep in mind that this is a leaked build, and not the final, official firmware, and the existence of bugs is quite possible.
So be very sure, that you want to go ahead with this procedure.
You need to be running 100% stock OS. You need not be rooted to be able to update your device with this firmware. In case you want to root before updating, you can use this handy guide to root your Razr HD or Razr Maxx HD.
- Download the update.zip file and place on external1 storage. | Update.zip
- Download this crc file and place it on external1 as well | CRC file . This is optional, and just a precaution to ensure that the contents of the update.zip file indeed what they are supposed to be. Doesn’t hurt to be sure, right?
- If you are already rooted, and want to retain root, install OTA RootKeeper from the Play Store. P.S: You do not need root to apply this leaked firmware, and can skip Steps 3 & 4 if you are not rooted.
- Launch OTA RootKeeper, and first click backup su. Once that is done, click the Temporary unroot button.
- Now it’s time to get Jelly-Beaned. Turn off your phone and reboot to recovery mode. To enter recovery, Hold the Volume Up and Power buttons simultaneously until you get to the boot screen. Then Press Volume Down to select Recovery, and hit Volume Up to enter Recovery.
- When the Android logo shows up, immediately press both Volume buttons at the same time
- Now select Apply update from external storage, and navigate to the Update.zip file you transferred to external1 in Step 1.
- Select the Update.zip file and let recovery flash it.
- Once the Update.zip has been applied, your device should automatically reboot.
- You are now Jelly Beaned. Enjoy Android 4.1 on your Razr HD or Razr Maxx HD.
For more information, and to see what other users are saying about this build, you can visit the original thread over at DroidRzr. DirtyDroidX mentions that the overall experience with this build is fast and fluid. Google Now works just fine, and so does Temple Run. And if you’ve been priming your lightsaber for the showdown on November 8th, that should work too. Till then enjoy the buttery smooth Jelly Bean experience on your phone, and let us know how you like it in comments.


