Have fun Sony Xperia L users! Your device just got an AOSP based Android 5.0 Lollipop ROM. The ROM comes from developer varun.chitre15 and is in alpha stage at this time, the Wifi, Bluetooth, RIL (phone and data) and GPS aren’t working at this time but it should soon get fixed.
The Xperia L isn’t expected to receive Lollipop update officially from Sony, although the device runs on 1GB RAM and a dual-core processor which are pretty doable for running the Lollipop on any phone. Yet, anyway, we don’t expect Sony to upgrade this phone as even the last year’s KitKat update wasn’t pushed to the Xperia L.
To install AOSP based Lollipop ROM on your Xperia L, you’ll need to first unlock the bootloader on your device as the ROM doesn’t come in a recovery flashable zip. You’ll need to flash/install it in the fastboot mode which requires an unlocked bootloader.
Without further ado, let’s see how to install Android 5.0 on your Xperia L.
DOWNLOADS
Download Xperia L Android 5.0 ROM [AOSP] (190.5 MB)
File name: c2105_alpha1_android-5.0.0_r2_fastboot.zip
└ All credits for the ROM file goes to varun.chitre15 over at XDA. For updates to the ROM, check his original post here.
Fastboot and ADB files (919 KB)
File name: adb_and_fastboot_files.zip
[ad1]
INSTALLATION INSTRUCTIONS
WARNING: Warranty may be void of your device if you follow the procedures given on this page. You only are responsible for your device. We won’t be liable if any damage occurs to your device and/or its components.
Important Note: Backup important files (music, photos, documents, videos, etc.) stored on your Xperia L before proceeding with the steps below. Your device internal storage will be completely wiped so make sure you backup any/all of your important files on a PC.
- Make sure your device is a Sony Xperia L. Do NOT install the ROM on any other device.
- Unlock the Bootloader on your Xperia L (process is similar to Xperia Z).
- Extract the c2105_alpha1_android-5.0.0_r2_fastboot.zip file on your PC (using 7-zip, preferably). You’ll get the following three files:
- boot.img
- system.img
- userdata.img
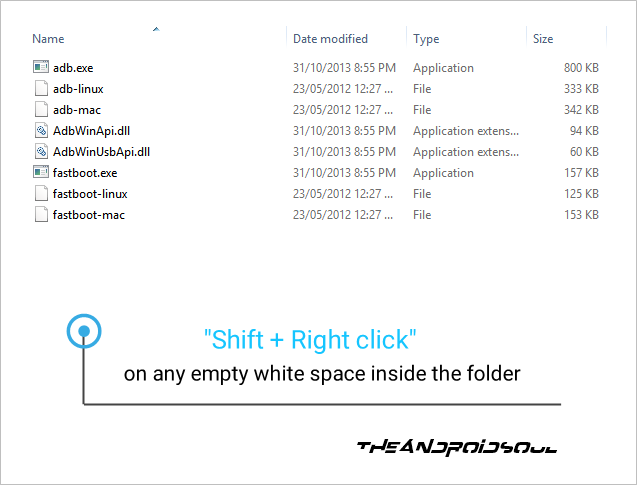
- Extract/Unzip the adb_and_fastboot_files.zip in a separate folder on your PC. You’ll get the following files:

- Now Copy/Paste the three files you extracted in Step 3 to the folder where extracted files in Step 4. All your extracted files should be in one folder.
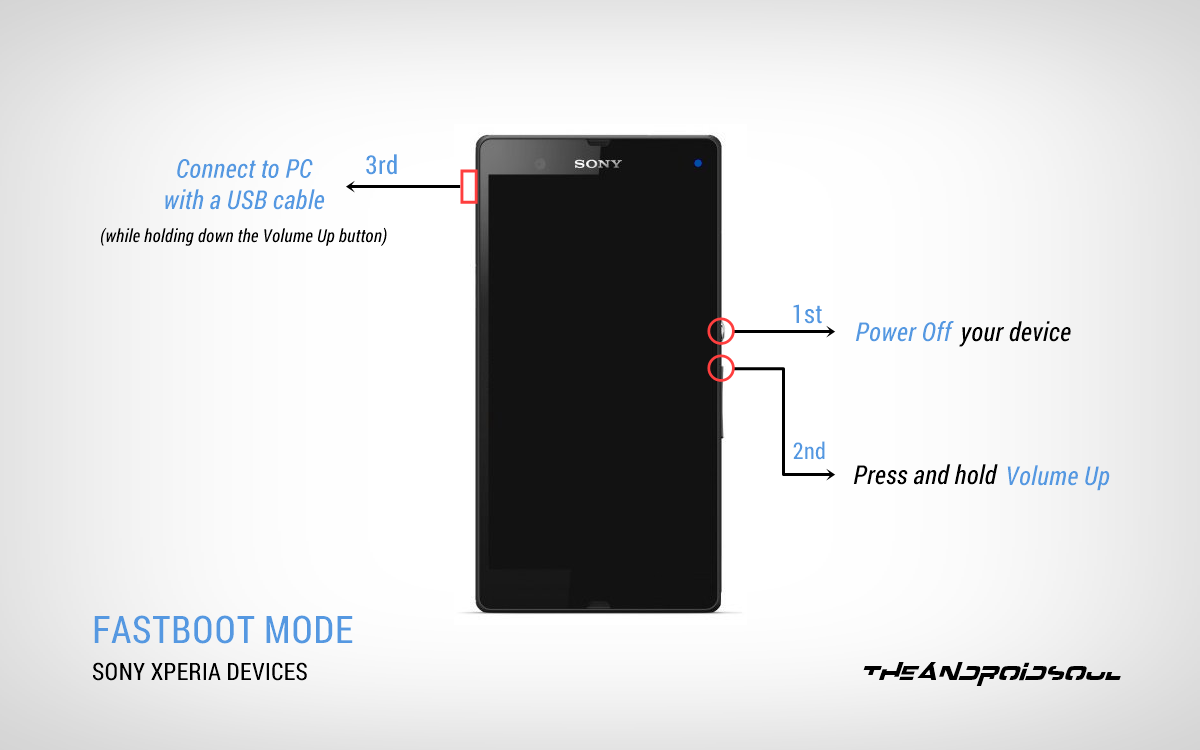
- Boot your Xperia L into Fastboot mode:
- Switch off your Xperia L first
- Press and hold the Volume Up button
- Connect the device to your PC using a USB Cable while holding down the Volume Up button on your Xperia L
└ Before plugging in the USB cable on your Xperia L make sure that the other end of USB cable is already connected to the PC. - Your Xperia L should be in Fastboot Mode now and the device’s LED light should turn into Blue

- Open the folder where all your extracted files are saved (refer Step 5) and then open a command window inside that folder. Press “Shift + Right click” inside the folder on any empty white space and select “Open command window here” from the context menu

- Now issue the following commands one by one to Install Android 5.0 Lollipop on your Xperia L. This might take time, so have patience.
fastboot flash boot boot.img
fastboot flash system system.img
fastboot flash userdata userdata.img
- Once you’ve successfully flashed boot.img and system.img and also wiped the userdata. Then reboot your Xperia L using the following command:
fastboot reboot
- Your Xperia L will now reboot with Android 5.0 Lollipop installed. Be extremely excited for this!
That’s it. You should now have Android 5.0 Lollipop rocking your Xperia L. However, since this is a AOSP based ROM, you will not have Google services like Play store and Play services framework. For this you’ve to install Android 5.0 Gapps on your Xperia L. Get it from the link below:


I did all steps, then I pressed to power button to turn on it, but My Xperia L is not turning on, there is battery symbol on it. what should I do?
Hmm, maybe erasing cache would help. Boot into fastboot mode and issue the following command: fastboot erase cache
..and then reboot.
Maverick:Android Tools temp$ ./fastboot erase cache
erasing ‘cache’…
FAILED (remote: Command not allowed)
finished. total time: 0.002s
Maverick:Android Tools temp$
That’s weird. You were able to flash the images, but unable to erase cache via fastboot. Anyway, post your issues to the development thread over here . You’ll find better help there.
it is ok, working now, thank you for your helping..
I did all steps, then I pressed to power button to turn on it, but My Xperia L is not turning on, there is battery symbol on it. what should I do?
I did all steps, then I pressed to power button to turn on it, but My Xperia L is not turning on, there is battery symbol on it. what should I do?
Hmm, maybe erasing cache would help. Boot into fastboot mode and issue the following command: fastboot erase cache
..and then reboot.
Maverick:Android Tools temp$ ./fastboot erase cache
erasing ‘cache’…
FAILED (remote: Command not allowed)
finished. total time: 0.002s
Maverick:Android Tools temp$
That’s weird. You were able to flash the images, but unable to erase cache via fastboot. Anyway, post your issues to the development thread over here . You’ll find better help there.
That’s weird. You were able to flash the images, but unable to erase cache via fastboot. Anyway, post your issues to the development thread over here . You’ll find better help there.
it is ok, working now, thank you for your helping..
it is ok, working now, thank you for your helping..
I did all steps, then I pressed to power button to turn on it, but My Xperia L is not turning on, there is battery symbol on it. what should I do?
Hmm, maybe erasing cache would help. Boot into fastboot mode and issue the following command: fastboot erase cache
..and then reboot.
Maverick:Android Tools temp$ ./fastboot erase cache
erasing ‘cache’…
FAILED (remote: Command not allowed)
finished. total time: 0.002s
Maverick:Android Tools temp$
That’s weird. You were able to flash the images, but unable to erase cache via fastboot. Anyway, post your issues to the development thread over here . You’ll find better help there.
it is ok, working now, thank you for your helping..
Hi Shivam,
Thanks for the great work.
I was able to update my Sony Experia L but after that my phone is not detecting SIM, any clue ??
Regards,
Praveen
Hi Shivam,
Thanks for the great work.
I was able to update my Sony Experia L but after that my phone is not detecting SIM, any clue ??
Regards,
Praveen
Hi Shivam,
Thanks for the great work.
I was able to update my Sony Experia L but after that my phone is not detecting SIM, any clue ??
Regards,
Praveen
Hi Shivam,
Thanks for the great work.
I was able to update my Sony Experia L but after that my phone is not detecting SIM, any clue ??
Regards,
Praveen
Hey how long did it take for those commanding process to get over? its testing my patience ya… irritating.. it says waiting for device..
system.img should take the most. Anyway, it should be finished by now
Hey how long did it take for those commanding process to get over? its testing my patience ya… irritating.. it says waiting for device..
system.img should take the most. Anyway, it should be finished by now
Hey how long did it take for those commanding process to get over? its testing my patience ya… irritating.. it says waiting for device..
system.img should take the most. Anyway, it should be finished by now
hey!! bro
when i paste( fastboot flash boot boot.img) then hit enter it show me so you tell me what should i do
and
when i start my mobile sony xperia L
SONY > XPERIA > Colors,,, and phone is not starting..
what should i do
please reply me as soon as
What you got on cmd screen after you entered the command: fastboot flash boot boot.img
Did it install alright? Show me the screen — take a pic of it, upload it on mediafire.com, and then sare it URL here. So that I know what error or processing was done.
hey!! bro
Thanks for the great work.
I was able to update my Sony xperia L but after that my phone is not detecting SIM, any clue ??
Regards,
JATIN
hey!! bro
Thanks for the great work.
I was able to update my Sony xperia L but after that my phone is not detecting SIM, any clue ??
Regards,
JATIN