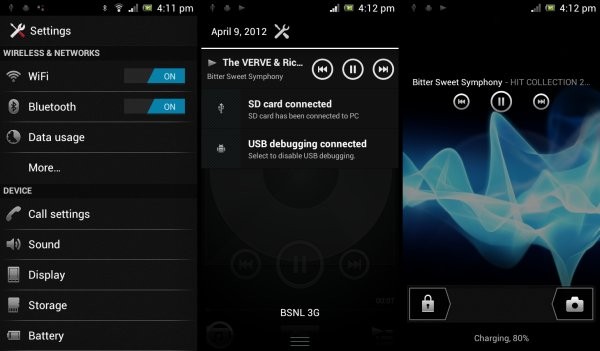
Sony recently announced that the Ice Cream Sandwich update for their devices has been pushed to mid-April and beyond. However, for the Xperia Arc, an ICS firmware from Sony’s servers has been leaked by an unknown source. Now Sony has already officially released beta ICS ROMs for the Arc (and other Xperia devices), however, this leaked version is a much later build. And you can give it a try on your Arc thanks to recognized XDA developer DooMLoRD, who has released a pre-rooted package of the firmware.
Now, keep in mind that this is a leaked firmware, and though almost everything seems to be working, something or the other might not work properly and there may be bugs present in the ROM.
Read on to find out how you can install the leaked Ice Cream Sandwich firmware on your Xperia Arc.
Compatibility
This ROM and the guide below are compatible only and only with the Sony Xperia Arc, model number LT15i. It’s not compatible with any other device and may render an incompatible device unusable. Check your device model in Settings » About phone.
Warning!
The methods and procedures discussed here are considered risky and you should not attempt anything if you don’t know completely what it is. If any damage occurs to your device, we won’t be held liable.
Pre-Installation Requirements
- This procedure will wipe all your apps, data and settings (but it will NOT touch your SD cards, so don’t worry about those). Backup your Apps and important data — bookmarks, contacts, SMS, APNs (internet settings), etc. This Android backup guide would help you.
- Sufficiently charged battery, at least 50% is recommended.
How to Install the Ice Cream Sandwich Firmware on Xperia Arc
- Your phone must be running the stock 4.0.2.A.0.62 firmware. Install it by following the guide → here.
- Important! Your Xperia Arc must have an unlocked bootloader. You can unlock your bootloader officially → here.
- Install ADB on your computer using the guide → here. This is required to flash the requisite kernel on your phone. (Skip if you already have ADB installed on your PC).
- Download the ROM.
Download Link | Filename: ARC-ICS-DooMLoRD-Stock-562-ROM-v01.zip - Download the following files:
- Application cleaner package.
Download Link | Filename: ics_fw_562/ARC-ICS-562-clean_apps.zip - Google Apps package, which will install the required Google apps like Market, Gmail, etc, which aren’t included in the ROM itself.
Download Link | Filename: gapps-ics-20120317-signed.zip
- Application cleaner package.
- Transfer the 3 zip files downloaded in step 4 and 5 to the SD card on your phone.
- Download the kernel required to flash the ROM.
Download Link | Filename: ARC-ICS-562-DooMLoRD-Advanced-Stock-v01-boot.img - Download fastboot, which will be used to flash the kernel downloaded in step 7.
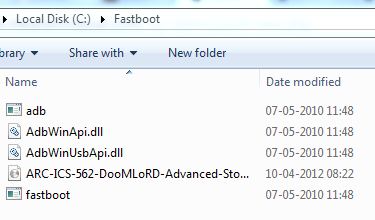
Download Link | Filename: Fastboot.zip - Extract the Fastboot.zip file to the C: drive on your computer to get a folder named Fastboot with four files inside it.
- Copy the ARC-ICS-562-DooMLoRD-Advanced-Stock-v01-boot.img file downloaded in step 7 to the Fastboot folder. You should have 5 files in the Fastboot folder now, as shown in screenshot below:

- Now, connect your phone to the computer in fastboot mode. To do this, first plug the USB cable to PC, then pick up your phone and hold the “Back” key (key at the bottom left on your Arc), and then, while holding the Back key, connect the USB cable to your phone.
- Open Command Prompt on your computer from Start » All Programs » Accessories.
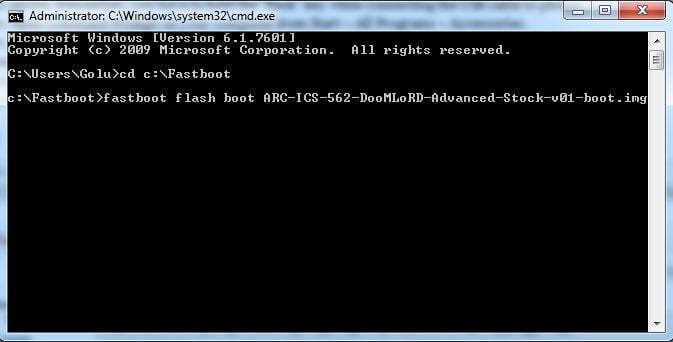
- Now, in Command Prompt, type the following commands to flash the kernel, pressing Enter after each command (Check the screenshot after step 13.2 for reference).
- Once the kernel is flashed, you will get a “finished” message in the command prompt window. Disconnect the phone from your computer.
- Turn on the phone. The screen will turn on and show you the kernel logo. As soon as the blue LED lights up, start pressing the Back button on your phone continuously until you boot into recovery. In recovery, use Volume buttons to navigate and Home button to select options.
- Select install zip from sdcard, then select choose zip from sdcard. Scroll to the ARC-ICS-DooMLoRD-Stock-562-ROM-v01.zip file on the sdcard and select it.
- Confirm installation by selecting Yes – Install ARC-ICS-DooMLoRD-Stock-562-ROM-v01.zip on the next screen. The ROM will start installing.
- After ROM finishes installing, select go back to go back to the main recovery menu.
- Now, repeat step 16, but this time, select the ics_fw_562/ARC-ICS-562-clean_apps.zip file downloaded in step 5.1. Select Yes on next screen to confirm installation.
- After installation completes, select go back to go back to the main recovery menu.
- Repeat step 16 again, but this time select the Google apps package file gapps-ics-20120317-signed.zip to install the Google apps.
- After the installation is complete, select go back then select reboot system now to reboot the phone.
The first boot will take some time, after which your Xperia Arc will boot into Ice Cream Sandwich Android 4.0.3. Do let us know how the ROM works out for you, in the comments below.


oyes el lt15i y el lt15a son los mismos vrdd?
oye y asi c vera en la ics oficial (sin rom) con esa interas o va a ser diferente?
oyes el lt15i y el lt15a son los mismos vrdd?
oyes el lt15i y el lt15a son los mismos vrdd?
oye y asi c vera en la ics oficial (sin rom) con esa interas o va a ser diferente?
oye y asi c vera en la ics oficial (sin rom) con esa interas o va a ser diferente?
Thanks! Perfectly & smoothly!
Thanks! Perfectly & smoothly!
Thanks! Perfectly & smoothly!
Its shows
ARC-ICS-562-DooMLoRD-Advanced-Stock-v01-boot.img, cannot be load
Its shows
ARC-ICS-562-DooMLoRD-Advanced-Stock-v01-boot.img, cannot be load
Its shows
ARC-ICS-562-DooMLoRD-Advanced-Stock-v01-boot.img, cannot be load