As Xiaomi’s new launched trio of Mi 8 handsets make their way to more and more consumers, we are seeing the essential (?) tolls start popping up for the device too. And by that, we mean the TWRP recovery, which for the tweakers among us, is a must-have even before we hit that Buy Now button.
You favorite custom recovery, TWRP, is now available for the Xiaomi Mi 8 and Mi 8 SE now, installing which would allow you to not only install custom ROMs (Project Treble?) but also root the device.
If you have either of the Xiaomi Mi 8 and Xiaomi Mi 8 SE with you and wish to start customizing it to your liking, you can start by installing the TWRP recovery. Check out the download links and a step-by-step guide below to get going.
Warning!
Do not try anything given on this page if you do not know completely what you are doing. In case any damage occurs, we won’t be held responsible.
Xiaomi Mi 8 and Mi 8 SE TWRP Recovery
Download the TWRP recovery file for your variant of the Xiaomi Mi 8 from below.
- Mi 8: mi8-twrp-3.2.2.img
- Mi 8 SE: mi8se-twrp-0629.img
Xiaomi Mi 8 and Mi 8 SE Root
Here’s an easy step-by-step guide to help you install TWRP recovery on your Xiaomi Mi 8. You can use the TWRP recovery to easily gain root access on the device.
- Make sure that you’ve unlocked the bootloader for the Mi 8 before proceeding.
- Download the required files:
- TWRP file form above.
- Root file (Magisk 16.4): Magisk 16.4.zip
- DM verity disabler: no-verity-opt-encrypt-6.0.zip
- Connect your Mi 8 (or Mi 8 SE, for the rest of this guide) to the PC using the USB cable it came with.
- Transfer all the downloaded file (TWRP, Magisk, and DM verity disabler) to your device. Do keep a copy of TWRP IMG file on your PC too. Keep the Mi 8 connected to PC.
- Make sure you have enabled USB Debugging on your Mi 8, as explained in the bootloader unlock post above (step 1). You may need to re-do it after unlocking the bootloader.
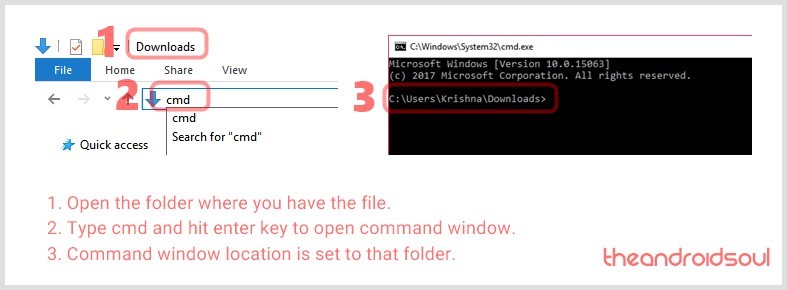
- Now open a command window inside the folder where you have the TWRP file from above. For this, go that folder, and then type cmd in the address bar of that folder’s window, and then hit the enter key. A command window will open up, and its location will be that folder.

- Boot your Mi 8 into bootloader/fastboot mode. For this run this command:
adb reboot bootloader
└ If you get a permission dialogue on your device to “Allow USB debugging”, tap OK.

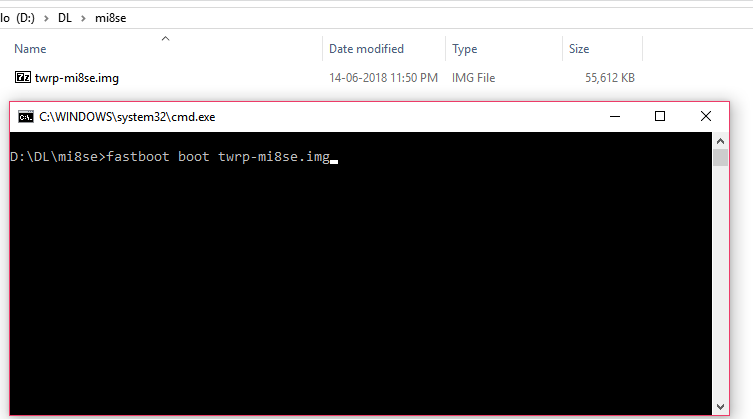
- Install TWRP recovery temporarily and boot it for once by running the command below. To run a command, simply type this in the command window and then hit the enter key.
fastboot boot <twrp-recovery-filename>.img
The filename would be mi8-twrp-3.2.2.img for the Mi 8, while it would be mi8se-twrp-0629.img for the Mi 8 SE.

- Reboot into recovery mode. For this, use volume buttons to bring up ‘Recovery mode’ option, and then press the power button to select it and boot into recovery mode and access TWRP.
- Enter the password or PIN you are using to let system decrypt in recovery mode and get to TWRP recovery. (It won’t ask if you are not using any PIN or password on the device.)
- You will see TWRP recovery now. When asked to ‘Keep System Read only?’, tap on the ‘Keep Read Only’ button to not allow for system modifications.
- To change the language from Chinese to English, follow the guide given here.
- This recovery is in Chinese. If you wish to, you may change the language to English.
- Check out the TWRP recovery. Confirm everything is working alright as you need/want. If you like it, install it permanently. For this, on the home screen of TWRP, tap on Install button, then Images… button, and then select the twrp file. Confirm the action on the next screen by swiping at the bottom of the screen to install it.
- Time to root the Mi 8! You have to install the root file (Magisk ZIP file) now. Go back to the home screen of TWRP and tap on Install, > then select the ZIP file, Magisk-v16.4.zip, and confirm on the next screen.
- In case you don’t want to root the device, be sure to install the DM verity disabler file now (in place of Magisk file) to get the Mi 8 to boot normally (prevent from bootlooping).
- Once it’s done, tap on Reboot System button to restart the device. If and when it asks for ‘Install TWRP App?’, tap on ‘Do Not Install‘ button as you don’t need the TWRP app.
That’s all.
Do let us know if you have any queries regarding root access and TWRP recovery for the Xiaomi Mi 8 handsets.


Hello and thx for this ! When I’m in command, i see an error message ” image disc file is damaged”. Have you any idea ?
Thanks for your help
hi i need help please i tried this on my 8 se at the end it just keeps booting to the fastboot mode i tried the DM verity but it wont work. and in every operation i do this keeps showing in red failed to mount /system (invalid argument)
Not working on my Mi 8 Global. fastboot boot mi8-twrp-3.2.2.img
FAILED (command write failed (Unknown error))
This file hoster is limited.
For mi 8 and latest global version step 13 did not work. I flashed twrp.img to recovery (i guess it has to be recovery as you did not mentioned which part it should be) but phone turned to stock recovery after reboot.