Samsung released a new update for AT&T Galaxy S5 Active recently, with G870AUCU2BOF2 bring the build no., but because it patches current exploits you could not root OF2 right now. That is to say, if you employ regular OTA method to upgrade to OF2. While, using the update method given below, you may very well update to OF2 build and still have root access retained.
Yes, you need to be rooted on your current firmware to be able to update to OF2 with root. If you are unrooted, you couldn’t use the update method below, because installing the OF2 via a custom ROM requires root access in itself. Credit for this OF2 root goes to muniz_ri, who has developed a penchant for cracking the update to retain the root access — we’e only grateful to him!
In case you were wondering, this method keeps your warranty intact. This doesn’t trips KNOX flag. If your KNOX is set to 0x0 in Odin/download mode, then it will stay at 0x0, meaning warranty is not void. If you already have KNOX tripped to 0x1, then your warranty is already void, and it doesn’t matter.
In case you have already updated to OF2 build, whether via OTA or using Odin (latter isn’t available for now!) — then you cannot root using this method anymore. You will have to wait for new exploits to be discovered, and only when new root tool is available, you could root your AT&T Galaxy S5 Active again.
Btw, if you have not updated to OF2 yet, but don’t have root either which is a must have, then you need to root your S5 active first of all. See the step 2 of the guide below — it got you covered very well. And do ask us using the comments section below if you need help regarding this.
So, all in all, this is useful to you only if you have not updated to OF2 yet, and have root access. In this scenario, you can safely update using this method and still keep root. But if you have already installed the OF2 update, you cannot root until new root solution becomes available.
How to update AT&T Galaxy S5 Active to OF2 with Root
Downloads
- OF2 custom ROM. Download either of the two ROMs given below. If you want to theme your device, choose deodexed version. Otherwise, choose full stock ROM.
- Stock ROM | File: G870A_OF2_Stock_Rooted_ROM.zip (1.6 GB)
- Stock Deodexed ROM | File: G870A_OF2_Stock_Rooted_Deodexed_ROM.zip (1.4 GB)
- Bootloader OC5 | File: G870A_OC5_Bootloader.tar.md5 (1.9 MB)
- Odin PC software | File: Odin3_v3.10.6.zip (1.6 MB)
(Need this to install OC5 bootloader file.)
Supported devices
- AT&T SAMSUNG GALAXY S5 ACTIVE, model no. SM-G870A
- Don’t try on any other device of Samsung or else, whatsoever!
Instructions
Warning: Warranty should not be void of your device if you follow the procedures given on this page. If anything happens, you only are responsible for your device. We won’t be liable if any damage occurs to your device and/or its components.
- Make sure S5 Active is not running OF2 update already. Check in Settings > About device. If it’s on OF2 already, this method won’t help you. It should be pre-OF2 builds like OC5 and NE4.
- Also make sure your S5 Active has root access. If not, and provided you have not installed OF2 already, do this:
- Download the Full NE4 firmware for your S5 Active
- Install the NE4 firmware using Odin (see how to flash using Odin here).
- Once you have NE4 firmware installed, download the TowelRoot app’s APK and install the APK. Open the TowelRoot app, and tap on the ‘Make it rain’ button. Your device will be rooted.
- Confirm root with a root checker app. Proceed to next step once you got root access.
- It’s good to set the ‘Screen timeout’ to 10 minutes under Settings > Display.
- Download the ROM, Odin and OC5 bootloader file from above.
- Transfer the ROM file (whether you chose deodexed or normal one) to your S5 Active. Remember the location where you put them. You can disconnect your S5 Active once ROM is transferred to it.
- Install Galaxy S5 Active driver (method 1 there!) first of all. Double click the .exe file of drivers to begin installation. (Not required if you have already done this.)
- Disable Reactivation lock. If you don’t find this option in settings as given below, then ignore this step, and proceed to next step. This is very important! For this:
- Go to Settings > Lock screen and security > Find my mobile.
- Disable the Reactivation lock if it’s enabled, using the toggle button.
Tip: If you haven’t added a Samsung account on your device ever, you would find it disabled by default. But if you did add a Samsung account anytime, it would be enabled most probably, so take care to disable it. If you are unable to this on phone, you can use Samsung’s website for this, just sign-in, go to Find my mobile section, and then disable from there. If you still can’t do this, do ask me via comments section below.
- Download the Flashfire android app that we will use to flash the ROM:
- Login into Google using the same Gmail ID that you are using on phone. Go to Google+ page and join the community.
- Next, sign up here to be able to install the app from play store and receive updates.
- Use the play store link provided thereafter to get to pay store page of the app and install it. It may take hours before it shows up for you in play store. You can only wait.
- Open the Flashfire app. Provide it root permissions by tapping on Grant button on the pop-up that shows up. (Tap on Agree on the Disclaimer pop-up that comes only one time. And read the Instructions section, it’s helpful.)
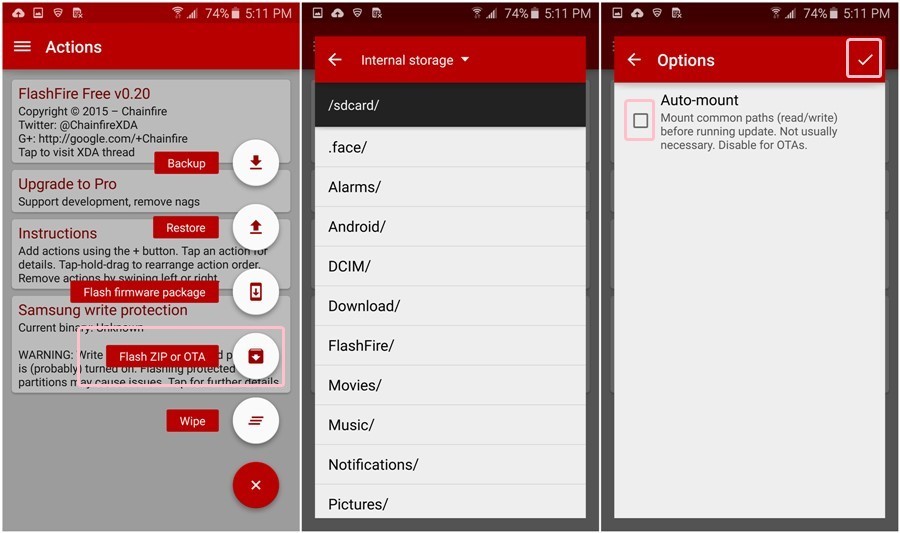
- Tap on + button, select ‘Flash ZIP or OTA’ and then select the ROM file on your device from step 5 here. On next screen, leave Auto-mount option unchecked, and just tap on checkmark sign at top right corner to continue.

- You will be back on main screen, tap on EverRoot. Make sure every option is unchecked. Then tap on the checkmark sign at right top corner to continue.
- Tap on Reboot option, and select Download. So that device boots into download mode after of OF2 firmware is done. We need this because we have to install the OC5 bootloader after flashing the ROM.
- If the firmware currently installed on your device is OC5 (build no. in Settings > About device, must ending with OC5), then you have the OC5 bootloader already, and don’t need to install it again. In this case, set the Reboot option to Normal. And, skip remaining steps of the guide. You’re good to go, your device is success
- Now, tap on FLASH button, and then on OK button to start installing the OF2 update via the custom ROM we selected above. That’s it.
(Uh, don’t worry when Screen turns black and Flashfire does its things and pauses for around 1 minute in between. When rebooting, device will seem stuck at AT&T’s logo, for like 2 minutes, but will reboot all fine soon enough, don’t worry!)
→ When FlashFire app has done its job, it will reboot device normally, or to download mode, depending on what you chose in step 12 above. If you chose normal reboot, then you’re done. But if you chose Download mode, then proceed with next steps of the guide to flash the OC5 bootloader. - Keep the device in download mode, and don’t connect to PC until said so.
- Extract the Odin file. You should get this file, Odin3 v3.10.6.exe (other files could be hidden, hence not visible).
- Open the Odin software now. Double click on Odin3 v3.10.6.exe for this. Be careful with Odin, and do just as said to prevent problems.

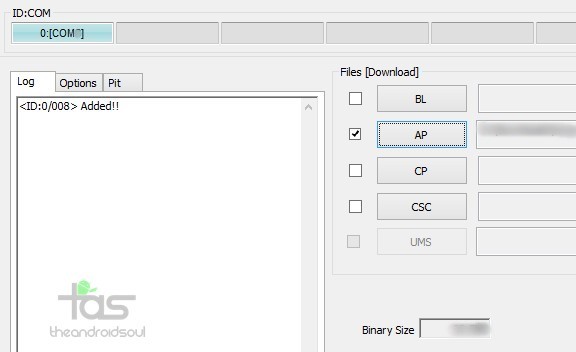
- Connect your S5 Active to PC now using USB cable. Odin should recognize your S5 Active. It’s a must. When it recognizes, you will see Added!! message appearing in the Log box in bottom left, and the first box under ID:COM will also show a no. and turn its background blue. Look at the pic below.
- You cannot proceed until you get the Added!! message, which confirms that Odin has recognized your device.
- If you don’t get Added!! message, you need to install/re-install drivers again, and use the original cable that came with device. Mostly, drivers are the problem (look at step 2 above).
- You can try different USB ports on your PC too, btw.

- Load the OC5 Bootloader file into Odin. Click the AP button on Odin and the select the file: G870A_OC5_Bootloader.tar.md5

- Make sure Re-Partition checkbox is NOT selected under the Options tab. Don’t use PIT tab either. Go back to Log tab now, it will show the progress when you hit start button in next step.

- Click the Start button on Odin now to start flashing the OC5 bootloader on your S5 Active. Once done, you’ll get PASS message as show below upon successful installation from Odin. Now, device will reboot automatically.
- If Odin gets stuck at setup connection, then you need to do steps 16 to 20 again. For this, close Odin, disconnect your S5 Active, remove battery, insert it back after 5-6 seconds, reboot to download mode and then start from step 5 again.
- Or, if you get FAIL in the top left box, you need to try flashing again, as stated just above.

- That’s it. You’re done. Check out root access once device has fully rebooted. Use a root checker app for this.
Want Tethering to share your Data?
Well, just flash this file using FlashFire’s ‘Flash zip or OTA’ option, as said in step 10 above. Once device reboots normally, you can share Data via tethering on your S5 Active on OF2 update.
If you need any help with this, let us know via comments below and we will try our best to help you out.


i have oc5 didnt update yet and i just want to tether my phone what should i do ? ive never rooted a phone before either plse advise thanks
i have oc5 didnt update yet and i just want to tether my phone what should i do ? ive never rooted a phone before either plse advise thanks
i have oc5 didnt update yet and i just want to tether my phone what should i do ? ive never rooted a phone before either plse advise thanks
I am stuck on an at&t logo, what should I do?
I am stuck on an at&t logo, what should I do?
I am stuck on an at&t logo, what should I do?