[rominfo]
CUSTOM ROM INFO
| Name | CyanogenMod 11 Milestone 1 aka CM11 M1 |
| Android Update | Android 4.4, KitKat (Launched in Nov 13 by Google) |
| Is this official? | No. |
| Stability | Good enough for daily use |
| Credits | cyanogenmod |
[/rominfo]
Let’s see how to install the Nexus specific CyanogenMod 11 M1 on your Nexus 5.
WARNING!
Warranty may be void of your device if you follow the procedures given on this page.
You only are responsible for your device. We won’t be liable if any damage occurs to your device and/or its components.
CHECK DEVICE MODEL NO.
To make sure your device is eligible with this, you must first confirm its model no. in ‘About device’ option under Settings. Another way to confirm model no. is by looking for it on the packaging box of your device. It must be D821!
Do not use the procedures discussed here on any other Nexus device or any other company. You have been warned!
BEFORE YOU BEGIN..
You must do this pre-installation stuff before attempting to install the ROM on your Nexus 5 in order to avoid any complications later, and have a smooth and successful process.
BACK UP YOUR DEVICE
Back up important data and stuff before you start playing around here as there are chances you might lose your apps and app-data (app settings, game progress, etc.), and in rare case, files on the internal memory, too.
For help on Backup and Restore, check out our exclusive page on that linked right below.
► ANDROID BACK UP AND RESTORE GUIDE: APPS AND TIPS
CHARGE YOUR DEVICE
If your android device powers off due to lack of battery while the process is underway, it could damage the device.
So, make sure your device is adequately charged — at least 50% battery of the device.
EXAMPLE VIDEO
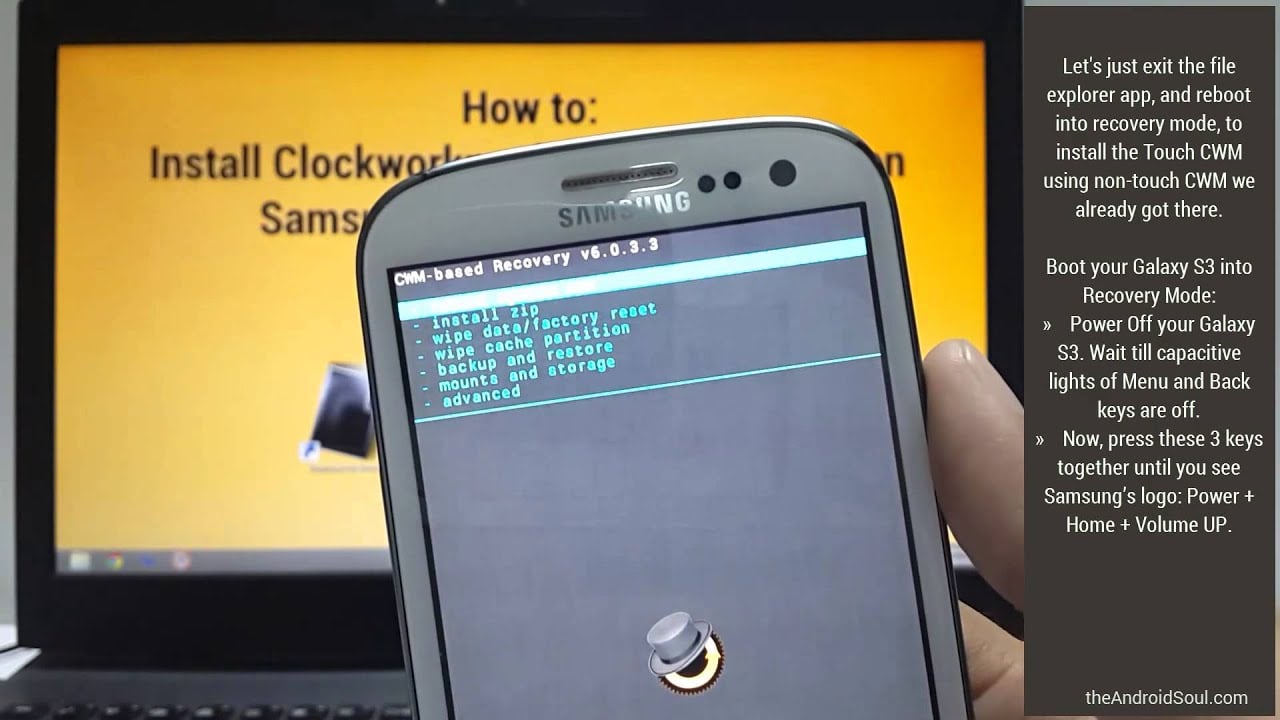
If you haven’t used a custom recovery, either CWM or TWRP, before, to install a .zip file of a ROM on anything else, then we suggest you first watch a video of that, given right below, to get familiar with the process.
Just fyi, the video below shows installing a .zip file (of recovery) on Galaxy S3, but it doesn’t matter as the process remains exactly same. So, once you are finished with video, jump to downloads and step-by-step guide below.
NEXUS 5 CYANOGENMOD 11 M1 ANDROID 4.4 KITKAT ROM
DOWNLOADS
Download the files given below and transfer them to a separate folder on your phone and remember the location.
GAPPS FILE
Download Link | File name: gapps-kk-20131119.zip (123.71 MB)
ROM FILE
For LG Nexus 5: Download Link | File name: cm-11-20131205-SNAPSHOT-M1-hammerhead.zip (204.32 MB)
You can get the latest version of the ROM available from the original page here. (We prefer snapshot and release candidate build more than nightlies.)
Reminder: Before you proceed, make sure you’ve transferred the files you downloaded above to a separate folder on your Google Nexus 5.
STEP-BY-STEP GUIDE
Make sure you have backed up your phone adequately (including important data stored on internal memory).
NOTE:
Older versions of both CWM and TWRP recoveries are not working with Android 4.4 based ROMs, throwing installation errors and even WiFi bugs on some phones, therefore you need to use the latest version of either recovery. We believe TWRP v2.6.3.0 and above, and CWM v6.0.4.3 and above are working fine with Android 4.4 ROMs.
You need unlocked bootloader and a custom recovery to be able to install CyanogenMod 11 M1 on your Nexus 5.
If you haven’t yet unlocked bootloader of your Nexus 5, follow our simple guide to do so:
If you don’t already have a custom recovery, install latest CWM Recovery or TWRP Recovery using our one-click installer:
- Nexus 5 TWRP Recovery with One Click Installer
- Nexus 5 ClockworkMod Recovery (CWM) with One Click Installer
GUIDE FOR CWM RECOVERY USERS
- Boot into recovery mode. For this:
- Power off your device and wait 4-5 seconds after lights go off.
- Press and hold Volume Down + Power key together and release the Power key once the Google logo appears, but keep holding the Volume Down key. You will be in Bootloader mode now.
- Press Volume Down two times so that Recovery option appears, and then press Power key to reboot into recovery mode.
└ In recovery, use Volume buttons to navigate Up and Down between options and use Power button to select an option.
- Create a Nandroid Backup from recovery. It’s optional but very important to do, so that in case something goes wrong you can restore to current status easily. For making a Nandroid Backup, go to Backup And Restore » Backup.
- Perform a Factory Reset (This will delete all apps and their settings and game progress). For this:
- Select Wipe data/Factory reset, then select Yes on the next screen to confirm factory reset (screenshot)
- Also perform a System Format, Go to ‘Mounts and storage‘, select ‘format /system‘, then select Yes on the next screen to confirm system format
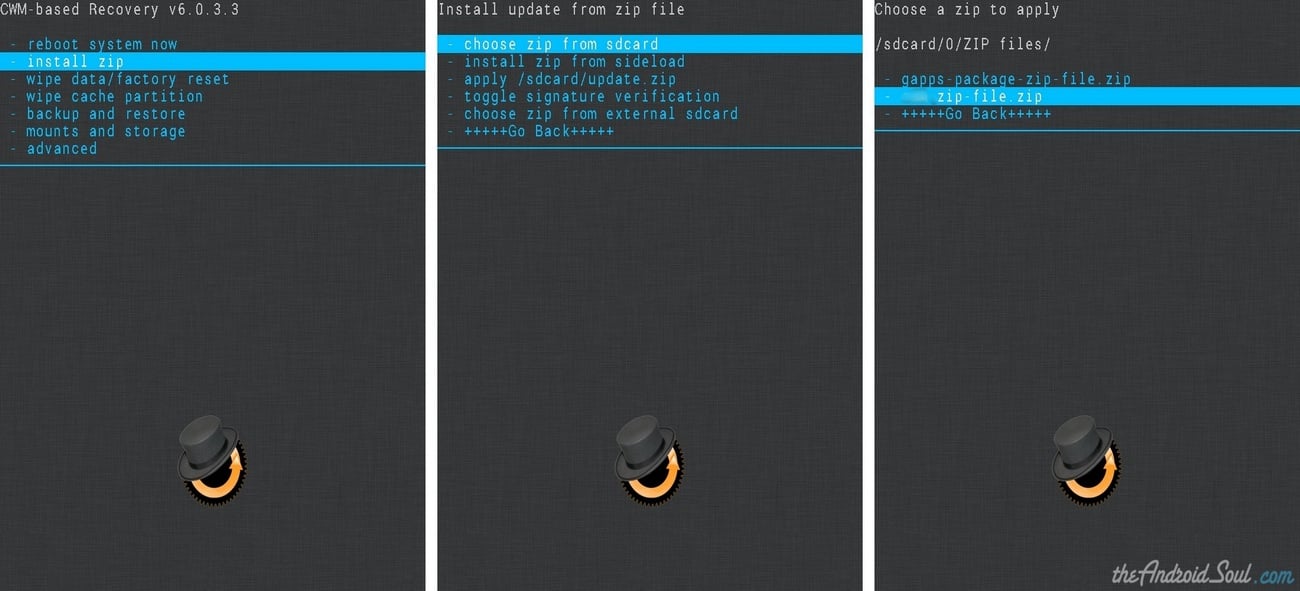
- First Install the ROM file:
- Now similarly flash the Gapps file.
└ Make sure to first flash the ROM file and then the Gapps file. - Reboot your device. For this, go back to the main menu of recovery and select reboot system now.
That’s all. Your phone will now reboot and it will take some time as it’ll be phone’s first boot after installing CyanogenMod 11 M1, be extremely excited for this!
Note: In case your device gets bootloop (stuck at logo while rebooting), just do a factory reset (step 3) and you will be fine.
GUIDE FOR TWRP RECOVERY USERS
- Boot into recovery mode. For this:
- Power off your device and wait 4-5 seconds after lights go off.
- Press and hold Volume Down + Power key together and release the Power key once the Google logo appears, but keep holding the Volume Down key. You will be in Bootloader mode no
- Press Volume Down two times so that Recovery option appears, and then press Power key to reboot into recovery mode.
└ In recovery, use Volume buttons to navigate Up and Down between options and use Power button to select an option.
- Create a Nandroid Backup from recovery. It’s optional but very important to do, so that in case something goes wrong you can restore to current status easily. For making a Nandroid Backup, go to Backup » and select all check boxes and swipe on the Swipe to confirm option at the bottom of the screen to confirm backup.
- Perform a Factory Reset (this will delete all apps and their settings and game progress). For this:
- Tap on Wipe » then at the bottom of the screen do a Swipe on the ‘Swipe to factory reset‘ option (screenshot)
- Also perform a ‘System format‘. For this:
- Tap on Wipe » tap Advanced Wipe » tap System to select it » then at the bottom of the screen do a Swipe on the ‘Swipe to wipe‘ option
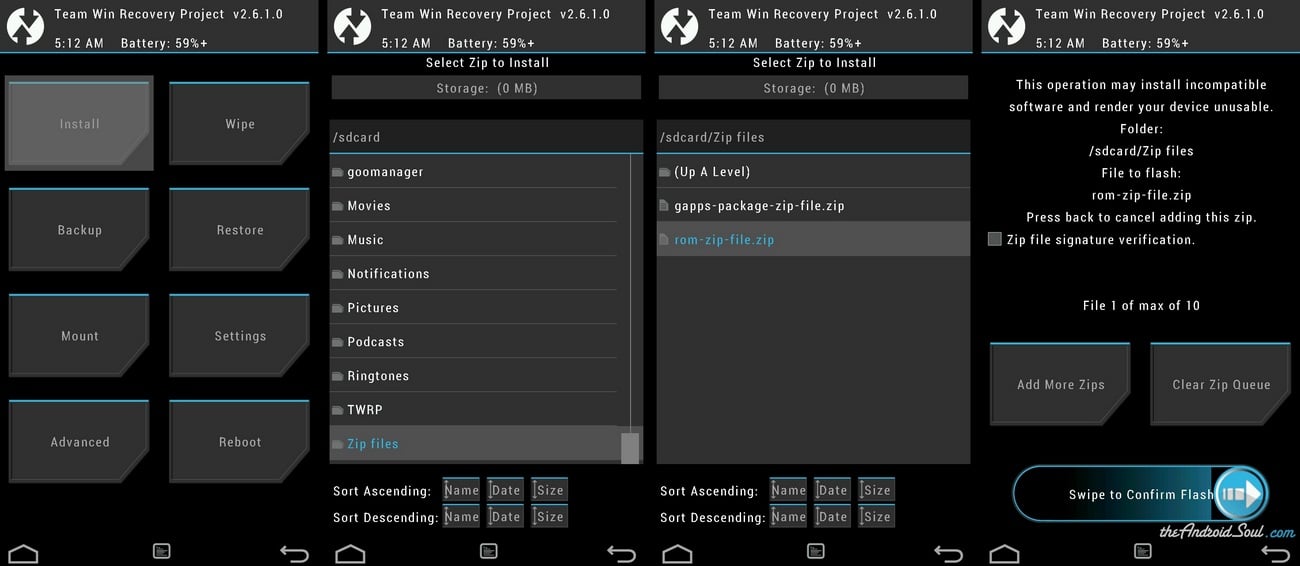
- First Install the ROM file:
- Now similarly flash the Gapps file.
└ Make sure to first flash the ROM file and then the Gapps file. - Reboot your device. Go back to the main menu of recovery and tap on Reboot » then, tap on System to reboot your phone.
That’s all. Your phone will now reboot and it will take some time as it’ll be phone’s first boot after installing CyanogenMod 11 M1, be extremely excited for this!
Note: In case your device gets bootloop (stuck at logo while rebooting), just do a factory reset (step 3) and you will be fine.
FEEDBACK US!
It was easy to install the latest Nexus specific snapshot build of CyanogenMod 11, right? Let us know how it tastes to you.
Your suggestions and queries, if any, are most welcomed!


