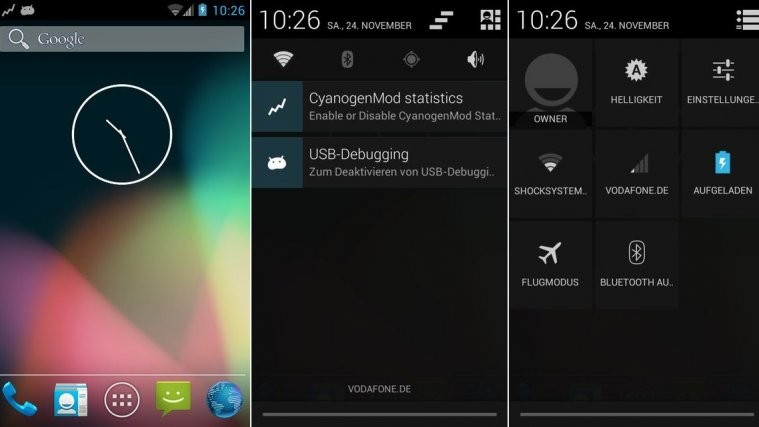
The wait is officially over. After the release of the Android 4.2 sources, everyone was waiting for CyanogenMod ROM based on the latest version of Android to make its way to the community, and now the CyanogenMod team is all ready to start porting Android 4.2 to various devices.
XDA Elite Recognized Developer codeworkx has released CyanogenMod 10.1 (CM10.1) to the Galaxy S2 I9100G, bringing all the new features found in Android 4.2 – a new keyboard with inbuilt gesture aka Swype-like typing, lockscreen widgets, 360 degrees panorama photos via the Photo Sphere feature in the camera, quick toggles in the notifications menu, and lots more – and CyanogenMod’s customization options, which made the ROM popular in the first place.
Keep in mind that this is a custom ROM based on stock Android and not on a Samsung ROM, so some features from stock ROMs will not be available, and there may also be a few bugs and issues here and there, though none should be major enough to put you off from using the ROM as a daily driver.
Follow the guide below to install CM10.1 on your Galaxy S2 I9100G and enjoy the latest version of Android on your phone.
Compatibility
The procedure described below is only for the Samsung Galaxy S2, model number i9000G. Do not try it on any other device, not even on the I9100.
Warning!
The methods and procedures discussed here are considered risky, so try them out at your own risk, and make sure to read each step carefully before attempting anything. We will not be held responsible if anything goes wrong.
How to Install CM10.1 on Galaxy S2 i9000G
- [Important] The procedure to install the ROM includes wiping the data on the phone, so make sure you backup important apps and data such as SMS, contacts, bookmarks, etc. See our Android Backup Guide for help. The personal files on your SD card, however, will not be wiped, so there is no need to back them up. You just need to take a backup of the installed apps and data such as messages if you want.
- Remove sim card lock, if you have set it earlier. Go here: Settings » Location and Security » Sim card lock » checkbox should be clear (not selected).
- Install the stock Android 4.0.3 XXLPQ firmware on your phone by following the guide → here.
- Install Clockworkmod (CWM) recovery on XXLPQ by following the guide → here. We need ClockworkMod recovery to be able to install the ROM.
- Download the latest build of the ROM from the source page.
- Also download the Google apps package using the link below. AOSP ROMs like CyanogenMod do not contain Google apps like Gmail, Talk, YouTube, Search, etc by default, so you will need to install the Google apps package as well.
Download Google Apps | Filename: gapps-jb42-20121120.zip - Copy both the ROM and Google apps files (copy the files, don’t extract them) to the internal storage (not to the microSD card) on the phone.
- Turn off the phone and boot into Clockworkmod recovery. For this, press and hold these 3 buttons together until the screen turns on: Volume UP + Home + Power. Phone will boot into CWM recovery.
Use volume keys to scroll up and down between options and power key to select an option in recovery. - Select wipe data/factory reset, then select Yes on next screen to confirm. Wait a while till the data wipe is complete (this will only wipe installed apps and settings, but will not wipe files on the SD card).
- Select install zip from sdcard, then select choose zip from sdcard. Scroll to the ROM file and select it. Confirm installation on the next screen.
- The phone might reboot once during installation, then continue installing the ROM automatically. If it doesn’t resume and just boots into ClockworkMod recovery, repeat step 10 to install the ROM again.
- After ROM installation completes, select choose zip from sdcard again, then select the Gapps file to install the Google apps package.
- Installing Updates: The ROM will get regular updates, so be sure to check back on the source page for updated versions. To update to a newer version of the ROM, just download it, put it on the phone, and flash it from recovery, without wiping data. You don’t need to install the Google apps package again either, as those are automatically backed up and restored when updating to a new version of the ROM.
- To go back to a stock Samsung ROM again, you can flash the XXLPQ firmware by following the guide linked in step 2 above. This will reset the phone back to a
CyanogenMod 10.1, based on Android 4.2, is now up and running on your Galaxy S2 I9100G. Enjoy using the latest version of Android, visit the source page to get more details on the ROM, and do let us know how it works for you.


