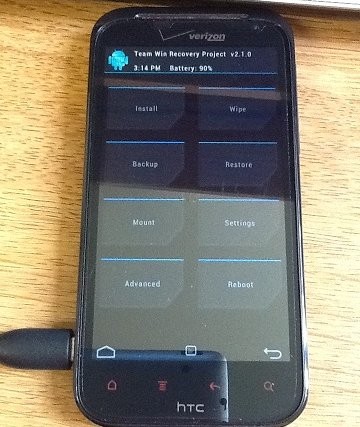
Forget the volume buttons on your HTC Rezound, as you won’t have to use them anymore for navigating the recovery on your phone. XDA Recognized Developer con247 has come up with an unofficial port of the TWRP (Team Win Recovery Project) recovery for the Rezound, which features a full touch interface along with a nice UI, unlike the volume buttons-driven CWM recovery. For the uninitiated, TWRP recovery was first developed for the Amazon Kindle, which doesn’t have physical volume buttons, so a touch interface was necessary for navigating recovery.
Let’s take a look at how you can install TWRP recovery on your HTC Rezound.
Compatibility
This ROM and the guide below is compatible only and only with the HTC Rezound. It’s not compatible with any other device and may render an incompatible device unusable. Check your device model in Settings » About phone.
Warning!
The methods and procedures discussed here are considered risky and you should not attempt anything if you don’t know exactly what you are doing. If any damage occurs to your device, we won’t be held liable.
How to Install TWRP Recovery on HTC Rezound
- Download the recovery image from the official development page. You need to download the .zip file with the name PH98IMG.zip.
- Copy the PH98IMG.zip file to the internal SD card on the phone. Make sure you do not rename the file. It should be named PH98IMG.zip to work.
- Turn off the phone. Then, boot into HBOOT mode by holding down the Power + Volume Down keys on the phone.
- Once in HBOOT mode, your phone will automatically detect the PH98IMG.zip file that we transferred in step 2 and will start installing it automatically. If it doesn’t start, simply press the Volume Up key once to start installation.
- After the installation is complete, use the Volume keys to navigate and select the Recovery option using the Power button to reboot into TWRP recovery.
[Optional] Mounting the SD Card as USB Storage on Computer from TWRP Recovery
The option to mount the SD card as USB storage on the computer from TWRP recovery doesn’t work correctly (but you can browse the SD card in recovery on the phone without any problems), so in case you do need to mount the SD card on your computer from recovery, do the following:
- Download the SD card fix file.
Download Link | Filename: TEMPINTSDFIXNEWFIRMWARE.zip - Copy the TEMPINTSDFIXNEWFIRMWARE.zip file to the internal SD card on the phone.
- Turn off the phone, then boot into HBOOT mode as explained in step 3 in the main procedure above. Then, from the HBOOT menu, enter recovery by navigating to Recovery and selecting it.
- Select the Install option, then navigate to the TEMPINTSDFIXNEWFIRMWARE.zip file and install it.
- After the installation is complete, you will be able to manually mount the SD card from TWRP recovery.
- NOTE: If the file downloaded in step 1 doesn’t work, download this alternative file instead, copy to it to internal SD, then follow steps 3 and 4 to install it and fix the SD card mount problem.


those files are dead links in the optional steps.
those files are dead links in the optional steps.