Unlocking the bootloader allows you to put custom ROMs, kernels and boot images on your Xperia devices which cannot be done otherwise. Say you want to install an AOSP based ROM on your Xperia Z which need to change the boot image on the device to be compatible with the AOSP code then it can only be done by unlocking the bootloader on your device.
Generally, rooting and custom recovery installation also requires an unlocked bootloader, but thanks to the developer community of Xperia Z for achieving root without the need to unlock bootloader.
Also thanks to Sony for having their entire range of Xperia devices released since 2011 to be bootloader unlockable. Not every Android manufacturer does that, at-least not so easy.
The bootloader unlocking process on Xperia devices is fairly simple. And with our step by step instructions with screenshots below, even noob users will be able to do it easily.
Two methods of unlocking the Bootoader
There are two methods you could choose from to unlock the bootloader on your Xperia Z
- Unofficially using Flashtool: You can unlock the bootloader on your device using a program called Flashtool. Getting the bootloader unlocked through flashtool is painless and very quick compared to Sony’s offical way of doing it. And on a plus note you also save yourself from letting Sony know that you tried to unlock your device’s bootloader (which voids warranty)
- Officially from Sony’s website (link): You can follow Sony’s official way of unlocking the bootloader which is also simple and easy to follow but a little bit lengthy. However, in the official way you’ve to get the bootloader unlock key from Sony’s website, which lets the manufacturer know that you intended to unlock your bootloader (which voids warranty) by provding them your phone’s IMEI number to get the key.
Below are full step by step installatiion instruction for both the methods discussed above. So proceed with whatever method you think is best. In our opinion, go with the Flashtool method. It’s much easier to unlock bootloader using Flashtool.
Warning!
You’ll void the warranty of your Sony Xperia Z by unlocking its bootloader.
Backup your important data!
Every single file on your device will be deleted once you unlock the bootloader. So make sure you backup all your important data before proceeding with the guide given below and also make sure to move your backup files to your PC or Cloud storage because even any backup file kept on the phone will be deleted.
Check out the link below if you need any help with backing up your Xperia Z
→ How to completely backup your Android device
Method 1 – Unlock Bootloader using Flashtool
Flashtool is a multi utility program for Xperia devices that does a lot of tasks in much easier ways compared to Sony’s official ways. Here in this guide we’ll be using flashtool only for the purpose of unlocking the bootloader.
Download and install Flashtool
→ Download Flashtool (113MB)
- Install Flashtool to the directory of your choice
- Once installed, start flashtool either by searching on the Start screen (or start menu) on Windows or open the directory where you installed flashtool and double-click the Flashtool.exe file. For e.g., if you installed flashtool on C drive on your computer, then open the directory “C:Flashtool”
Note: If you’re running a 64-bit windows installation then make sure you start the Flashtool64.exe file
Instructions for unlocking bootloader using Flashtool
- Start/Open Flashtool
- Click on the bootloader unlock icon as shown in the screenshot below

- You’ll see a window asking you to connect your device in Flashmode. Ignore the animated instruction on the screen as it’s not meant for the Xperia Z, instead follow the instructions given below to connect your Xperia Z to your PC in Flashmode
- Switch off your phone
- Now while holding down the Volume Down key on your phone connect it to PC using a USB cable
- Your device should now be connected in Flashmode and Flashtool should show a “Device selector” pop-up window
- Select your device (Xperia Z) from the list of devices
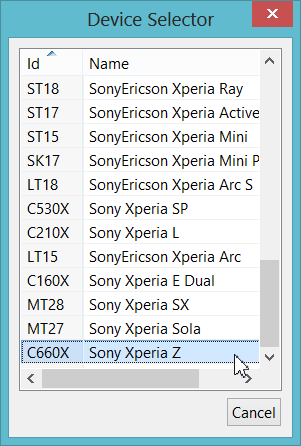
- In a few seconds after selecting your device from the list, Flashtool will show you a “BootLoader Unlock Wizard” pop-up window
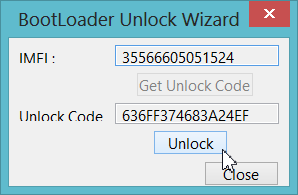
- Click the Unlock button to begin bootloader unlocking process
- Check Flashtool log to confirm status of bootloader. If successful, it should look like the screenshot below

- Have fun!
[l1]
Method 2 – Unlock bootloader using Sony’s website
Unlocking bootloader using Sony’s website would require you to first get the unlock from Sony’s website and then run a couple of fastboot commands using command propmt on your PC.
Getting the bootloader unlock key from Sony’s website
- Open this link in a new tab or window → http://unlockbootloader.sonymobile.com/unlock/step1
- Click on “Yes, I’m sure” button on the page opened with the link provided above
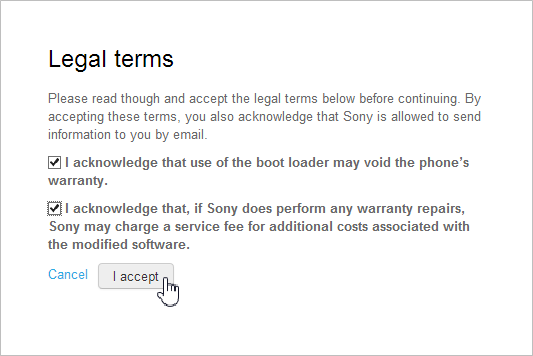
- Read the warning in Legal terms carefully, tick the two checkboxes and then click on “I accept” button to confirm that you accept the legal terms mentioned on the page
- On the next page there will be three fields asking you your Name, your phone’s IMEI number and your E-mail address. To get IMEI number of your phone, open the phone dialer app on your phone and dial *#06#. This will you the 15 digit IMEI number of your phone, but remember to insert only first 14 digits of your IMEI number in the IMEI field of the form
Fill the form as described in the image below

- Check for new mail on the E-mail address you provided in the form above with the subject line “Your requested unlock boot loader key”. Open the mail and you’ll see your bootloader unlock key
- Save your bootloader unlock key in your Notepad, a text file or just anywhere you could remember and refer back quickly.
Unlocking bootloader using the Unlock Key
Now we’ll run some fastboot commands on your PC and for that you’ll need to download some files on your computer. Below is the download link:
→ Download fastboot files (807 KB)
- Extract the fastboot file you downloaded from the link above and open the folder where you extract it
- Now open command window inside the folder. Press “Shift + Right click” on any empty white space inside the folder and then select “Open command window here” option from the context menu

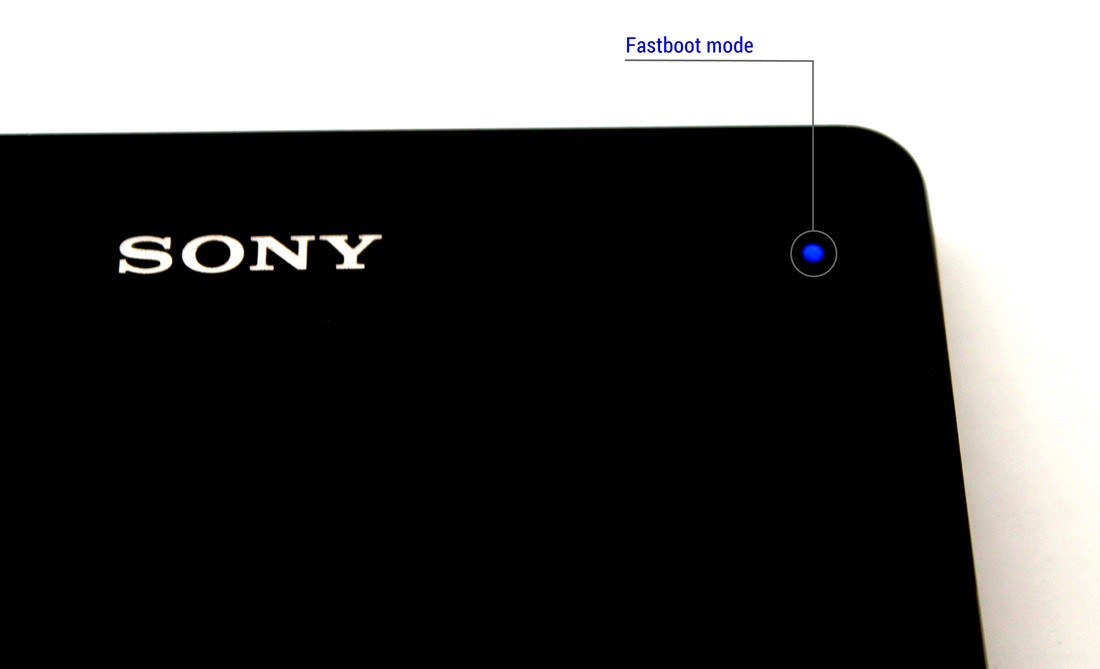
- Now connect your phone in fastboot mode
- On the command prompt window we opened in Step 2 type the command given below and hit enter. This is to verify that your device has connected properly (check the screenshot below for reference)
fastboot.exe -i 0x0fce getvar version
- Now you’re going to run the main bootloader unlock code. So make sure you’ve backed up your important data on the phone because once you unlock the bootloader every single file on your phone will be deleted
- Paste/write the following command in the command prompt window. Do NOT hit enter yet
fastboot.exe -i 0x0fce oem unlock 0xKEY - Replace the last word in the command (KEY) with your bootloader unlock key that you received from Sony via E-mail. Your command should look like this
fastboot.exe -i 0x0fce oem unlock 0x636FF374683A24EF

Important note! The key used in the command above is for illustration purpose only. You must NOT use this key. Every single device has its own unique bootloader unlocking key. - Hit enter once you’ve put your unique bootloader unlock key in place
- Paste/write the following command in the command prompt window. Do NOT hit enter yet
- If the bootloader unlock process goes well. You’ll see a message like this on your command prompt screen

- Have fun!
[l1]
Need help?
In case you need any help with the guide above be sure to let us know in the comments section below. We’d be happy help.




i have “Your phone bootloader cannot be officially unlocked”
Which phone are you trying this on?
xperia go st27i
i have “Your phone bootloader cannot be officially unlocked”
Which phone are you trying this on?
xperia go st27i
i have “Your phone bootloader cannot be officially unlocked”
Which phone are you trying this on?
xperia go st27i
same error “Your phone bootloader cannot be officially unlocked” for xperia z
same error “Your phone bootloader cannot be officially unlocked” for xperia z
same error “Your phone bootloader cannot be officially unlocked” for xperia z
Using Flashtool on a Mac and it redirects me to Sony’s site to get the unlock code? The device selection does not pop up at any point… I’d love to be able to unlock the bootloader without notifying Sony 🙂 Any ideas?
Did you solve this Problem? I’ve got the same.
So in essence this step does not happen. The device is connected, then Flashtool does something and after that asks me to reconnect the device in fastbootmode and once I’ve done that the tool asks me for the unlock code and directs me to Sony’s site…
Your device should now be connected in Flashmode and Flashtool should show a “Device selector” pop-up window
Make sure you’re using the latest version of Flashtool, version 0.9.13.0. Download the latest flashtool from the link below: http://www.flashtool.net/download.php
Yep that’s where I donwloaded Flashtool and it therefore should be the latest version…?
same here
Using Flashtool on a Mac and it redirects me to Sony’s site to get the unlock code? The device selection does not pop up at any point… I’d love to be able to unlock the bootloader without notifying Sony 🙂 Any ideas?
Did you solve this Problem? I’ve got the same.
Using Flashtool on a Mac and it redirects me to Sony’s site to get the unlock code? The device selection does not pop up at any point… I’d love to be able to unlock the bootloader without notifying Sony 🙂 Any ideas?
Did you solve this Problem? I’ve got the same.
So in essence this step does not happen. The device is connected, then Flashtool does something and after that asks me to reconnect the device in fastbootmode and once I’ve done that the tool asks me for the unlock code and directs me to Sony’s site…
Your device should now be connected in Flashmode and Flashtool should show a “Device selector” pop-up window
Make sure you’re using the latest version of Flashtool, version 0.9.13.0. Download the latest flashtool from the link below: http://www.flashtool.net/download.php
Yep that’s where I donwloaded Flashtool and it therefore should be the latest version…?
same here
unlocking the Bootoader, methods are superb. Is it not much difficult for new user to get unlock codes? I I heard about unlocking of Sony Xperia Z from http://www.safeunlockcode.com, how they work? any one utilized their service?
unlocking the Bootoader, methods are superb. Is it not much difficult for new user to get unlock codes? I I heard about unlocking of Sony Xperia Z from http://www.safeunlockcode.com, how they work? any one utilized their service?
unlocking the Bootoader, methods are superb. Is it not much difficult for new user to get unlock codes? I I heard about unlocking of Sony Xperia Z from http://www.safeunlockcode.com, how they work? any one utilized their service?
I got a message (Your phone bootloader cannot be officially unlocked)
what should I do?
I got a message (Your phone bootloader cannot be officially unlocked)
what should I do?
I got a message (Your phone bootloader cannot be officially unlocked)
what should I do?
omg…it’s so troublesome from sony for the unlock bootloader..
everywhere i went…everyone’s experiencing the same prob…
they can’t unlock the bootloader..
omg…it’s so troublesome from sony for the unlock bootloader..
everywhere i went…everyone’s experiencing the same prob…
they can’t unlock the bootloader..
omg…it’s so troublesome from sony for the unlock bootloader..
everywhere i went…everyone’s experiencing the same prob…
they can’t unlock the bootloader..
Bootloader unlock allowed: No 🙁
Bootloader unlock allowed: No 🙁
Bootloader unlock allowed: No 🙁
hi after the bootloader unlock my sony experia z keeps rebooting
hi after the bootloader unlock my sony experia z keeps rebooting
No mails from Sony website. This is nit woring guys. Epic Fail!
No mails from Sony website. This is nit woring guys. Epic Fail!
No mails from Sony website. This is nit woring guys. Epic Fail!