[rominfo]
FIRMWARE PACKAGE INFO
| Name | Stock firmwares |
| Version | Android 4.4 KitKat |
| Warranty | No Issues. |
| Stability | Stable, without any issues. |
| Credits | Tomsgt |
[/rominfo]
Android Operating system is well-known for its flexibility to customize the user interface, theme the apps, building custom Roms and kernels and such things. However with great flexibility comes great responsibility as well as an equal threat. While designing and developing various apps and kernels, sometimes things may go wrong leaving your device in a bricked or semi-bricked condition where you can’t access it anymore.
A bricked device is just a dead device and can’t be for any general use purpose but there are some methods to unbrick your device which is quite a relief. If you’ve made a backup earlier with a recovery you can restore it. Check the below guide to install TWRP recovery to restore your nandroid backup.
TWRP Recovery for Moto E → Visit Page.
But if you’re unlucky and have no backup of your device, you can unbrick your device with a firmware and start from fresh. Thanks to Tomsgt of XDA community, who kindly packed the firmware along with the batch files which will help to unbrick your device with a single click. These are some Batch files that are made to make it easy to unbrick, unroot, restore, relock, and remove the unlocked bootloader logo.
Follow the simple guide below to unbrick and restore your Moto E to the latest firmware.
WARNING!
Warranty may be void of your device if you follow the procedures given on this page.
You only are responsible for your device. We won’t be liable if any damage occurs to your device and/or its components.
GUIDE: UNBRICK AND RESTORE MOTO E
Before you begin with the instructions below, make sure your android device is adequately charged — at least 50% battery of the device.
STEP 0: CHECK DEVICE MODEL NO.
To make sure your device is eligible with this, you must first confirm its model no. in ‘About device’ option under Settings. Another way to confirm model no. is by looking for it on the packaging box of your device. It must be XT1021/XT1023!
Please know that this page is meant only for Moto E. Please DO NOT try the procedures given here on any other device of Moto E or any other company. You have been Warned!
STEP 1: BACKUP YOUR DEVICE
Back up important data and stuff before you start playing around here as there are chances you might lose your apps and app-data (app settings, game progress, etc.), and files on the internal memory, too.
SO, BE SURE TO COPY ALL FILES ON PHONE TO COMPUTER.
For help on Backup and Restore, check out our exclusive page on that linked right below.
► ANDROID BACK UP AND RESTORE GUIDE: APPS AND TIPS
STEP 2: INSTALL THE MOTOROLA DEVICE MANAGER
You must have proper and working driver installed on your windows computer to be able to successfully unbrick your Moto E.
In case you’re not sure, follow the link below for a definitive guide for installing driver for your Motorola device on your computer.
► ADB AND FASTBOOT DRIVERS FOR MOTOROLA PHONES AND TABLETS
STEP 3: INSTALLATION INSTRUCTIONS
DOWNLOADS
Download the fastboot files and the firmware file from below.
FASTBOOT AND ADB FILES
DOWNLOAD LINK | ADB and Fastboot Necessary Files.zip (920 KB)
FIRMWARE FILE
Choose according to your firmware → Download here.
STEP-BY-STEP GUIDE
Important Note: As flashing this firmware will surely delete everything on phone (apps, settings, files and folder on SD card, etc.), be sure to back up/copy all your pictures, videos and other important files to computer.
We’ve divided the guide into 2 parts. 1st setting up the fastboot on PC and Moto E, and 2nd, installing the firmware file using one-click installer.
PART 1: PREPARING FOR FIRMWARE INSTALLATION
- Turn OffFastboot mode on your device first.
- Go to Settings » Power » make sure the Fastboot checkbox is NOT selected.
- Turn on USB Debugging on your device:
- Enable developer options: Go to your Settings » select About device » Scroll to the bottom and tap on “Build number” seven times to enable developer options.
- Enable USB Debugging: Open device’ Settings » select Developer options » Select the “USB debugging” checkbox.
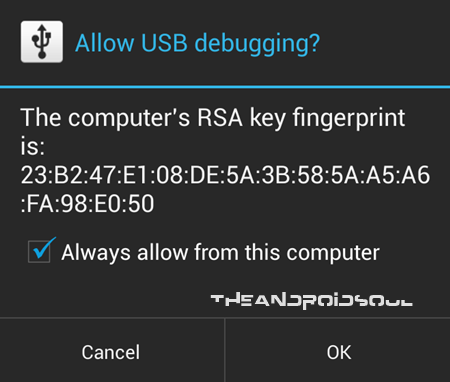
- Connect your device to computer with a USB cable and if a pop-up screen shows up on Phone asking you to Allow USB debugging for the computer, make sure to tick the checkbox and tap OK.
- Now, disconnect your device from PC.
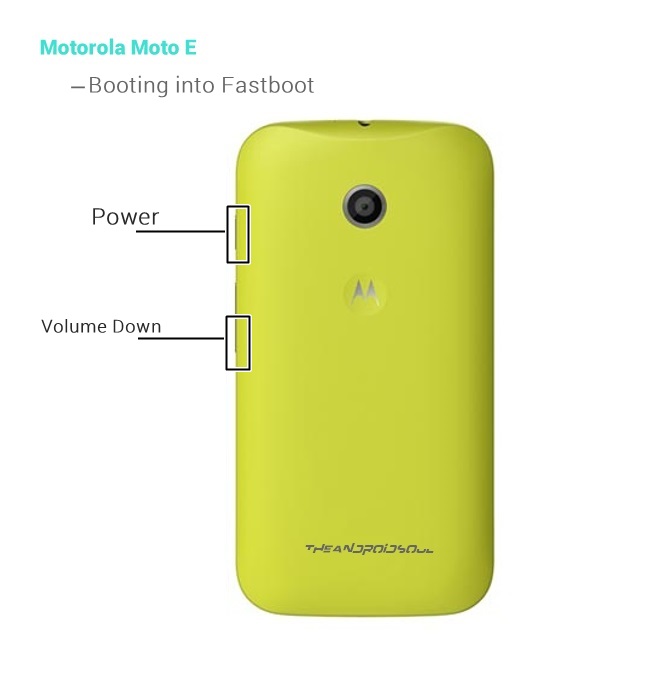
- Power off your device and enter the Fastboot/Bootloader Mode: (Refer to the image below)
- Once in fastboot mode, connect the device to PC using the USB cable.
- Extract the Fastboot files in the ADB and Fastboot Necessary Files.zip (can use 7-zip free software for this), to get these files. Let’s call this folder on your PC as FASTBOOT FOLDER, where all your necessary fastboot and adb files are.
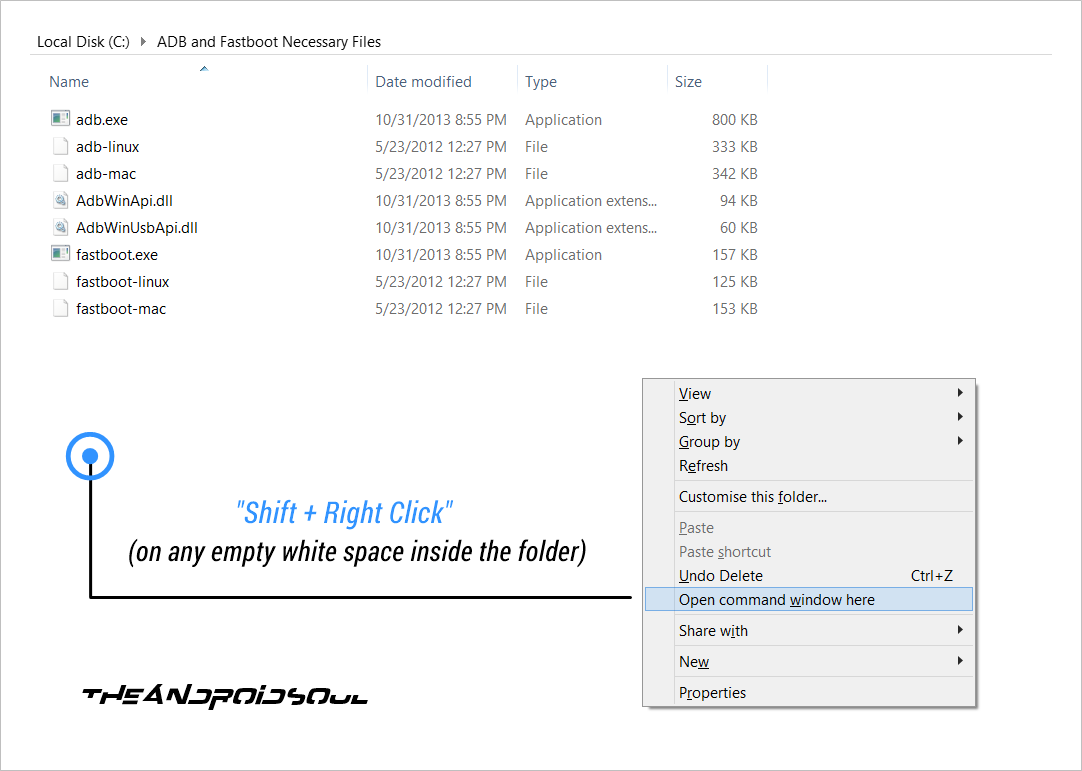
- Opencmd window infastboot folder.
- In the fastboot folder, hold shift button and then right-click on empty white space to get a list of options, and then click on this option ‘Open command window here’. This will open a cmd window with your fastboot folder as its address.
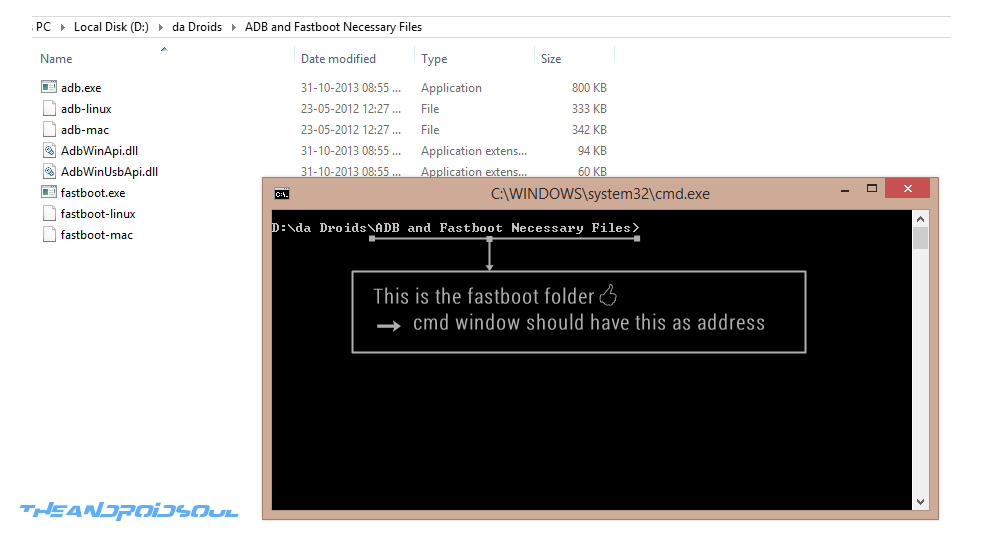
- In the fastboot folder, hold shift button and then right-click on empty white space to get a list of options, and then click on this option ‘Open command window here’. This will open a cmd window with your fastboot folder as its address.
- Now type this in thefastboot devicescmd window:
fastboot devices
You should get a device ID upon hitting the Enter key. Otherwise there is a problem with drivers.
PART 2: INSTALLING THE FIRMWARE WITH ONE-CLICK INSTALLER
- Extract the contents of the firmware package to a folder on your PC.
- There should a firmware file and a bunch of batch files each having its own significance.
- Select the required batch from the below list and double-click on it:
- Remove unlock bootloader logo
- Restore & Relock Bootloader full wipe
- Restore Firmware No Data Wipe
- Normal Stock Firmware Restore
- The batch file will automatically perform the specified task and will complete the process within a few minutes.
- Reboot the device once the firmware flashing is completed
That’s it.
FEEDBACK US!
It was easy to unbrick and restore your Moto E to a firmware build based on KitKat, right?
Your suggestions and queries, if any, are most welcomed!
Via XDA





Hey bro after relocking only one sim is active. Dual sim option is not visible.
Hey bro after relocking only one sim is active. Dual sim option is not visible.
Hey bro after relocking only one sim is active. Dual sim option is not visible.
what the hell man you dnt know the meaning of hardbrick
device wnt turn on ok
what the hell man you dnt know the meaning of hardbrick
device wnt turn on ok
what the hell man you dnt know the meaning of hardbrick
device wnt turn on ok
Thank You SOOO Much man……..!
Thank You SOOO Much man……..!
Thank You SOOO Much man……..!
Do you even know what a bricked phone is?, you wouldn’t even be able to open phone settings.
Right, right — ignore step 2. You don’t need USB debugging in fastboot mode. It works by default.
or see this http://forum.xda-developers.com/moto-e/general/root-moto-e-rooting-flashing-recovery-t2802971
Do you even know what a bricked phone is?, you wouldn’t even be able to open phone settings.
Right, right — ignore step 2. You don’t need USB debugging in fastboot mode. It works by default.
or see this http://forum.xda-developers.com/moto-e/general/root-moto-e-rooting-flashing-recovery-t2802971
Do you even know what a bricked phone is?, you wouldn’t even be able to open phone settings.
Right, right — ignore step 2. You don’t need USB debugging in fastboot mode. It works by default.
or see this http://forum.xda-developers.com/moto-e/general/root-moto-e-rooting-flashing-recovery-t2802971
After unlocking the boot loader….my device is not charging and stuck on t boot loader unlocked image 🙁 plz help me….when I connect t charger it shows 0% and again t same image …its not all charging….when I remove t charger ….t screen goes blank…..coz of this I cant even flash factory images :(I can enter t boot loader menu…. When none of t options r working,when I click on fastory reset,it’ll just show battery sign and switches off…plz tell me t way to charge t battery
After unlocking the boot loader….my device is not charging and stuck on t boot loader unlocked image 🙁 plz help me….when I connect t charger it shows 0% and again t same image …its not all charging….when I remove t charger ….t screen goes blank…..coz of this I cant even flash factory images :(I can enter t boot loader menu…. When none of t options r working,when I click on fastory reset,it’ll just show battery sign and switches off…plz tell me t way to charge t battery
How do you unbrick a phone if you need to turn it on, do you realized that if its bricked we cant enable usb debugging? Its like watching videos on youtube until the internet gets back.
How do you unbrick a phone if you need to turn it on, do you realized that if its bricked we cant enable usb debugging? Its like watching videos on youtube until the internet gets back.