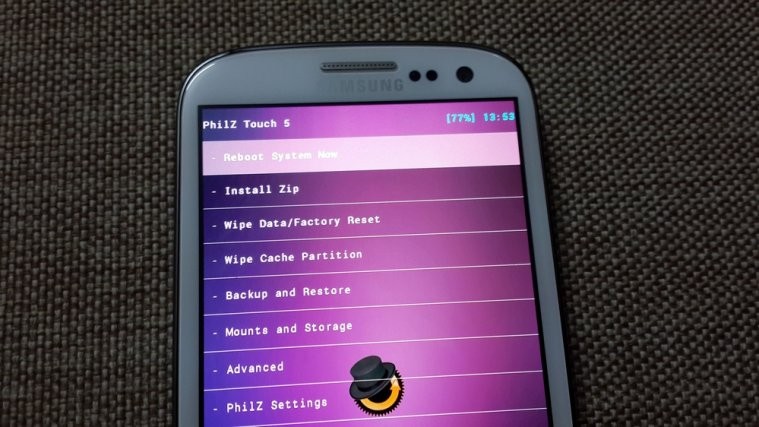
Sometimes, you just have to thank the name of the thing of which you want to thank name of. In this case, that thing is: Philz Touch Advanced Recovery.
As apparent as it is by its name, it’s developed by a developer who is known by the name of Phil3759, and is very much based on very popular CWM recovery. CWM equals ClockworkMod Recovery, if you’re wondering. CWM is a very very popular recovery, if you’re still wondering.
But while CWM is very basic but equally solid recovery, Philz Touch raises the bar altogether.
It not adds useful options and features so much and so well that even TWRP recovery — CWM’s better and only competitor — looks short on features for once, while it isn’t. And it’s solid, too.
As regards features, check out the lengthy list here, but our favorite ones are:
- Ability to change recovery’s colors
- Select between 4 touch types (FULL TOUCH, DOUBLE TAP, SEMI TOUCH (scroll but no touch validation) and NO TOUCH) in the recovery
- Select backup types
- Select multiple zip files for flashing like TWRP
- Set default folder to look directly into for zip files
- Adjust row height
- Shows clock and battery stats
- Change brightness
- Auto dim and turn off screen while in recovery
- Show/hide on-screen keys and many more features
It’s simply one very cool recovery to have, and luckily, Galaxy S3 users have it for their device.
There are 2 methods to install Philz Touch Advanced CWM Recovery:
- Odin PC Software
- A custom recovery: CWM/TWRP
Let’s see them both.
[l1]
Method 1: Philz Touch Recovery: Using Odin PC software
VIDEO:
The video shows installing the Philz Touch Advanced CWM recovery using Odin. Watch it first to get good idea of what you need to do, before trying to install it yourself.
DOWNLOADS:
- Philz Touch advanced CWM recovery (download the latest version from there)
Filename: philz_touch_5.15.0-i9300.tar.md5 (You’ll need it in step 5 below in AP tab of Odin!) - Odin software for PC v3.09 (latest!) [Alternate Download Links: Filecloud | Mega]
Filename: Odin3_v3.09.zip
STEP-BY-STEP GUIDE:
- Download the two file above: philz_touch_5.15.0-i9300.tar.md5 and odin3.09.zip
- Install Drivers on your PC so that Odin recognizes the Galaxy S3 and shows the must-get “Added!!” message in step 6 below → SAMSUNG GALAXY S3 DRIVERS!
- Extract Odin’s file, Odin3_v3.09.zip, to get this file: Odin3 v3.09.exe
- Double click on Odin3 v3.09.exe to run Odin
- Now, boot your Galaxy S3 into Download Mode:
- Connect Galaxy S3 to PC. You should get an ‘Added!!’ message in Odin’s bottom left box if drivers are properly installed and working. It is a MUST you get the ‘Added!!’ message in order to proceed further. Some points to be noted:
- If you don’t get the Added!! message, then first of all, make sure you installed drivers alright. If you did already, try installing drivers again, using different method as discussed above in drivers section.
- Plus, after installing drivers, try these tricks: reboot your PC, and/or un-install/re-install drivers, and/or change the USB port (preferably use one at the backside on computer) until you get “Added!!” message in Odin.
- Your Odin’s screen would look like this:

- Once you get ‘Added!!’ message in Odin, click on AP tab in Odin and select the .tar.md5 file of the philz touch recovery you downloaded above: philz_touch_5.15.0-i9300.tar.md5
- In Odin, keep ‘Auto Reboot’ and ‘F.Reset Time’ boxes checked while make sure Re-Partition box is unchecked. Leave everything else untouched.
► Odin should look like this:

- Hit the Start button on Odin now to start flashing the TWRP recovery on your Galaxy S3 now, and wait until you see PASS on Odin’s top left box. Your device will reboot automatically after successful flashing, and will be rooted when it has restarted.
- You can ‘Exit’ Odin and ‘Disconnect’ the phone when you see PASS message on Odin.
- If you see FAIL instead of PASS in Odin’s top left box, disconnect Galaxy S3 from PC, close Odin, remove battery and put it back in 3-4 seconds, and then repeat step 4 to step 8.
- Upon successful installation, your Odin will be like this

- Now, let’s confirm the recovery installation. For this, boot your Galaxy S3 into Recovery Mode:
- Power Off your Galaxy S3. Wait till capacitive lights of Menu and Back keys are off.
- Now, press these 3 keys together until you see Samsung’s logo: Power + Home + Volume UP.
- Your Galaxy S3 will boot into CWM recovery now.
If you run into any roadblocks, feel free to ask us in comments below.
[l1]
Method 2: Philz Touch Recovery: Using another custom recovery
VIDEO:
Philz Touch recovery is also available in .zip file format, flashable through cwm/twrp recovery. So, if you already got any version of cwm or twrp installed on your Galaxy S3, you probably won’t want to use Odin and would just like to flash the Philz Touch recovery using your existing recovery. Well, for this, see below.
Before you try this, we recommend you watch this video above showing installation of Touch CWM recovery, using another custom recovery (non-touch CWM recovery).
This will get you an idea of how to flash a .zip file of recovery, in recovery, which is actually very easy.
► Only the file to be flashed in recovery changes for you from the video, the procedure remains exactly same. Moreover, the guide below will also help you.
DOWNLOADS:
- Philz Touch advanced CWM recovery in .zip format
Filename: philz_touch_5.15.0-i9300.zip | Size: 7.78MB
STEP-BY-STEP GUIDE:
- Download the Philz Touch advanced CWM recovery from above
- If you downloaded it on PC, transfer it to Galaxy S3.
- Boot your Galaxy S3 into Recovery Mode:
- Power Off your Galaxy S3. Wait till capacitive lights of Menu and Back keys are off.
- Now, press these 3 keys together until you see Samsung’s logo: Power + Home + Volume UP. You’ll be in recovery mode in few seconds.
- In recovery, you can move up and down between options using volume buttons and can select the option using power button.
- Now you need to select the Install option in your recovery:
- Under CWM, select ‘Install zip’ option, and then select ‘choose zip from sdcard’ (or choose zip from external sdcard if your recovery file is in external sdcard)
- Under TWRP, select ‘Install’
- Select the recovery file: philz_touch_5.15.0-i9300.zip
- Select Yes – <filename> to ‘confirm install’.
- Install will finish quickly. Now, just go back and restart your Galaxy S3:
- Under CWM: select ‘Go Back’ and select ‘reboot system now’
- Under TWRP: press Back button in bottom right to go back and then select ‘Reboot’, and then ‘System’
- Your Galaxy S3 will Power On, and when it does simply boot into recovery mode again as you did in step 3 above to confirm the installation of new recovery.
If you run into any roadblocks, feel free to ask us in comments below. And it was easy to install a recovery, right?
[l1]
FEEDBACK US!
Well, do let us know what you feel about this tutorial. Your suggestions are most welcomed!
And of course, if you need any help regarding this, feel free to ask right below in the comments section.


I tried the first method to the T except for using philz version (philz_touch_6.07.9-d2spr.tar.md5)..odin says pass..and when I go into recovery mode, the screen that appears is still the factory menu. any ideas on why it isn’t opening up to philz??
What’s your device’s model no.? The recovery you used is for Sprint Galaxy S3.
Mine is the sprint-model sph-l710. I did not save philz to my external sd, or use kies with a factory reset because I assumed you can do it without a factory reset right?
I used method 2 on my S3-ATT to install PhilZ, and that worked nicely.
I used method 2 on my S3-ATT to install PhilZ, and that worked nicely.
I used method 2 on my S3-ATT to install PhilZ, and that worked nicely.
Ive been getting it all right untill RES OK !! but it wont continue from there. Help?
Ive been getting it all right untill RES OK !! but it wont continue from there. Help?
Ive been getting it all right untill RES OK !! but it wont continue from there. Help?
I pressed start on odin and have been waiting for a while now, still do not see PASS nor FAIL. What do I do?
the message box stopped at ” recovery.img”
I pressed start on odin and have been waiting for a while now, still do not see PASS nor FAIL. What do I do?
the message box stopped at ” recovery.img”
I pressed start on odin and have been waiting for a while now, still do not see PASS nor FAIL. What do I do?
the message box stopped at ” recovery.img”
I might be late for this conversation but, im getting a “NO COMMAND” screen when rebooting the cellphone after Odin’s Installation. Everything went as the video explained, but im unable to see the philz screen. What could be wrong?
I might be late for this conversation but, im getting a “NO COMMAND” screen when rebooting the cellphone after Odin’s Installation. Everything went as the video explained, but im unable to see the philz screen. What could be wrong?
I might be late for this conversation but, im getting a “NO COMMAND” screen when rebooting the cellphone after Odin’s Installation. Everything went as the video explained, but im unable to see the philz screen. What could be wrong?
First method says passed but but Philz is not installed and the second method tells me that it fails to verify the package? Ive checked and I have the correct model but sill no luck. Can you offer any advice? Thanks
First method says passed but but Philz is not installed and the second method tells me that it fails to verify the package? Ive checked and I have the correct model but sill no luck. Can you offer any advice? Thanks
First method says passed but but Philz is not installed and the second method tells me that it fails to verify the package? Ive checked and I have the correct model but sill no luck. Can you offer any advice? Thanks
First method says passed but but Philz is not installed and the second method tells me that it fails to verify the package? Ive checked and I have the correct model but sill no luck. Can you offer any advice? Thanks
First method says passed but but Philz is not installed and the second method tells me that it fails to verify the package? Ive checked and I have the correct model but sill no luck. Can you offer any advice? Thanks
wgrałem zły Philz do mojego i9300 i dotyk mi nie działa a przyciski na dole działają odwrotnie pomocy 🙁
wgrałem zły Philz do mojego i9300 i dotyk mi nie działa a przyciski na dole działają odwrotnie pomocy 🙁
wgrałem zły Philz do mojego i9300 i dotyk mi nie działa a przyciski na dole działają odwrotnie pomocy 🙁