One click tools provide a convenient and easy solution to perform various activities and modifications on an Android device, such as rooting, installing custom recoveries, unlocking the bootloader et al without the need to use hacks from a lot of different places and sources. They also make the process easier for those who dread opening up a command prompt.
With the release of the new Nexus devices last week, it was not surprising that all the essential tools to prepare the Nexus 10 for custom ROM flashing would follow suit. And it sure did, with an all-in-one toolkit for the Nexus 10,a bootloader unlocking method, and a one-click root tool.
While manual methods of flashing TWRP and CWM custom recoveries were also made available, now we have an easy one click custom recovery installer, which automates the entire process without you having to tinker about with adb et al. This new One-click recovery installer comes to us courtesy of XDA member mazwoz. If you’ve not flashed a custom recovery yet on your new Nexus 10, read on to know how you can.
The tool is only compatible on Windows systems for now, but a Linux version is in the works too.
Compatibility
The procedure described below is only for the Samsung Nexus 10. Do not try it on any other device.
Warning!
The methods and procedures discussed here are considered risky, so try them out at your own risk, and make sure to read each step carefully before attempting anything. We will not be held responsible if anything goes wrong.
How to use the MazWoz Recovery Flasher to install TWRP Recovery on Nexus 10
- To flash a custom recovery, you need to first unlock the bootloader on your Nexus 10. If you have already unlocked it, proceed to the next step, else you can follow this handy toolkit to unlock it. You can also use the same toolkit to install the necessary USB drivers for the Nexus 10 on your PC.
- Now download the flasher zip file from the source page to your PC, and unzip it to a new folder on your desktop. You should see four files, like in the screencap below.

- Now reboot your Nexus 10 into Fastboot mode. To do so, turn it off completely, and then power it back on by holding the Volume Up + Volume Down + Power buttons together till the screen turns on and shows “Start” written in big green letters.
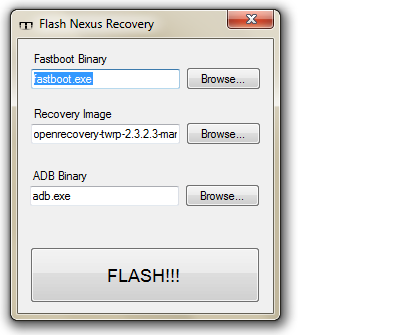
- Now launch the recovery flasher by double-clicking the Recovery Flasher.exe file in the folder you extracted in Step 2. You should see something like what’s in the screenshot below, with the requisite files already pre selected.

- Click the FLASH!!! button. Keep clicking Yes, when to tools asks you for confirmation, and it will start flashing TWRP on your device.
- Once the installation is done, your Nexus 10 will reboot into the normal Android 4.2 OS. To access TWRP, simply turn it off, and then back on using the three button combo in Step 3, and then use the Volume up button to scroll to the Recovery option. Select the recovery option using the power key, and you should boot into TWRP.
TWRP is now installed on your Nexus 10, and you are all set to explore the wonderful world of Custom ROMs, which we are sure there will be a lot of for the Nexus 10.


