The tiny country of South Korea strictly dominates the world of technology, especially when you consider that some of the largest brands in the industry such as Samsung and LG come from there. While Samsung may be the crowned champion of the Android OS platform, LG is lagging nowadays when it comes to sales numbers. In 2018, the South Korean company is looking to grab some more bite of the premium segment of the smartphone market with the LG G7 ThinQ, packing the hardware and design elements that you’d expect from a 2018 flagship.
For the Android community, the ability to make the most out of their LG G7 ThinQ is severely dependent on whether they own a US variant or one from any other region. For now, rooting the LG G7 ThinQ has been made possible, but it is limited to the model G710EM (Global) version. This is strictly due to the fact that the US variants of the LG G7 ThinQ do not have the ability to unlock the bootloader just yet. But for all of you lucky folks who do, here’s how you can root your LG G7 ThinQ right now.
How to root the LG G7
Warning!
Do not try anything given on this page if you do not know completely what you are doing. In case any damage occurs, we won’t be held responsible.
Compatibility
The download files and the process for gaining root access given on this page are compatible only with the LG G7. Do not try this on any other device as you might end up damaging your device and permanently brick it.
Pre-requisite
- Make that you have installed ADB and Fastboot driver on your PC.
- Make sure you have enabled developer options, USB debugging and OEM Unlock on your LG G7.
- Unlock the bootloader of your LG G7. Until you do this, you cannot modify the system for root access.
Method#1 Using patched boot image and Magisk
- Make sure you have unlocked the bootloader of your LG G7 as asked above in the pre-requisite section.
- Download the root package file, lg-g7-boot-patched.img, on your PC.
- Rename it to something easy like g7-root.img so that it is easy to type it later on.
- Make that you have installed ADB and Fastboot driver on your PC and have enabled developer options, USB debugging and OEM Unlock on your LG G7. It’s covered in the unlock bootloader guide above, but just in case.
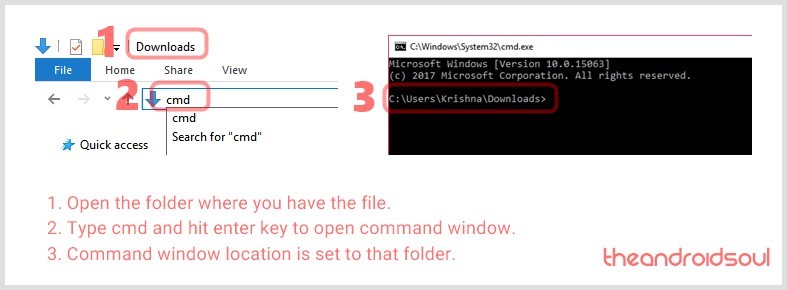
- Now open a command window inside the folder where you have the magisk file from above. For this, go that folder, and then type cmd in the address bar of that folder’s window, and then hit the enter key. A command window will open up, and its location will be that folder.

- Connect your LG G7 phone to the computer using the USB cable it came with.
- Reboot to fastboot mode (also called bootloader mode). For this, in the command window, type the command below and hit the enter key to run it:
adb reboot bootloader
- We root the LG G7 now. For this, install the magisk by running the command below:
fastboot flash boot_a g7-root.img
fastboot flash boot_b g7-root.img
- LG G7 is rooted now. Now we just restart the device now by running this command:
fastboot reboot
- Once the LG G7 has restarted, you can verify the root access using a root checker app from the Play Store.
- Download the APK file of the Magisk app. Transfer it to your LG G7 is your downloaded it on the PC.
- Install the app. Tap on the file to start the installation. (You can open a file manager app on your phone, browse to the location of the downloaded file, and then tap on it to install it.)
- When done, open the Magisk app, and it must show now that have root access now.
That’s it.
Method#2 Using TWRP
Well, the TWRP recovery for the LG G7 is available, but it’s a very alpha build and requires a lot of effort not suitable for regular users. If you are experienced in this kind of stuff and can play with fastboot, etc. stuff well, then go ahead and give it a try by visiting the thread maintained by J0SH1X.
You will need the vendor file, which can be downloaded from here, while you can download the TWRP from the abovelinked page, and magisk from here.
We are intentionally not covering a full guide here, because it’s too risky for average and new users into this kind of stuff.
Let us know in case you need any help with the rooting the LG G7.


