Update (Feb 2, 2016): LG G3 just got the TWRP 3.0 available, the version that was released by the TWRP guys yesterday that packs in whole new UI and many features addition. TWRP 3.0 is based Marshmallow, and thus supports latest G3 Marshmallow updates a lot better.
If you use Marshmallow option to treat your device’s SDcard as system partition, then you no longer need to decrypt it back to normal suing system, you can now do it directly from TWRP recovery in v3.0. This helps when you decide to use SDcard for any other use, as you need to decrypt it back.
TWRP 3.0 allows you to flash factory images directly from recovery. For full changelog of TWRP 3.0, see here.
Original post: LG G3 finally sees the light as the device gets a bootloader unlock (sort of) trick to flash custom recovery and hence custom ROMs. Folks over at XDA have developed a way to unlock LG G3 and they are calling it Bump!. It’s a follow up on the Stump root method by JCase and other popular devs. Bump! doesn’t actually unlocks LG G3’s bootloader but the thing allows you to flash Bump’d up boot images.
This isn’t a bootloader unlock, but it gets the job done in a similar way. You can flash Bump’d images on your LG G3 easily via ADB with root access, and bump’ing boot images is easier too, the devs of Bump! will soon post instructions for that soon. Meanwhile, the devs have provided a bump’d up TWRP recovery image for all variants of LG G3.
The only requirement for Bump! is that you have to have root access on your LG G3 to be able to flash TWRP recovery. There are several methods for rooting LG G3, the most popular being the Stump Root method. If you need help with rooting your LG G3 follow the link below:
Once your LG G3 is rooted, download TWRP recovery for your variant of LG G3 from the download section below along with ADB and Fastboot files to quickly setup ADB environment on your PC.
DOWNLOADS
→ In case LG G3 TWRP 3.0 doesn’t work out best for you, just install the v2.8.7.x provided above to keep a working recovery so that you’re not without this awesome tool. That said, TWRP 3.0 should be working alright on your device.
STEP-BY-STEP GUIDE
- Install ADB driver.
- Rename the TWRP recovery to something easy, like: g3-twrp.img
- Then transfer the twrp-recovery.img file to the root directory of G3’s INTERNAL SD CARD. Do NOT put the file inside any folder on your internal sd card.
- Prepare your phone:
- Enable developer options: Go to your phone’s Settings » select About phone » Scroll to the bottom and tap on “Build number” seven times to enable developer options.
- Enable USB Debugging: Open phone’s Settings » select Developer options » Tick the “USB debugging” check-box (under Debugging section).
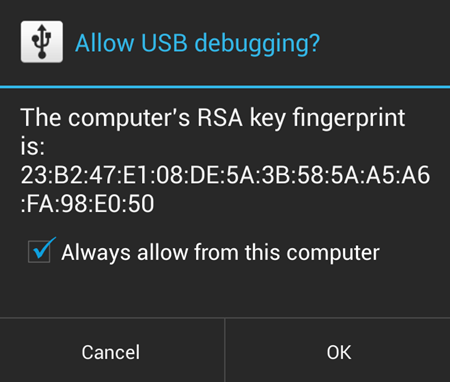
- Connect your phone to PC with a USB cable and if a pop-up screen shows up on phone asking you to Allow USB debugging for the computer, make sure you tick the checkbox and tap OK.

- Open the folder where you extracted the adb-and-fastboot-files.zip file on your computer in Step 2 above.
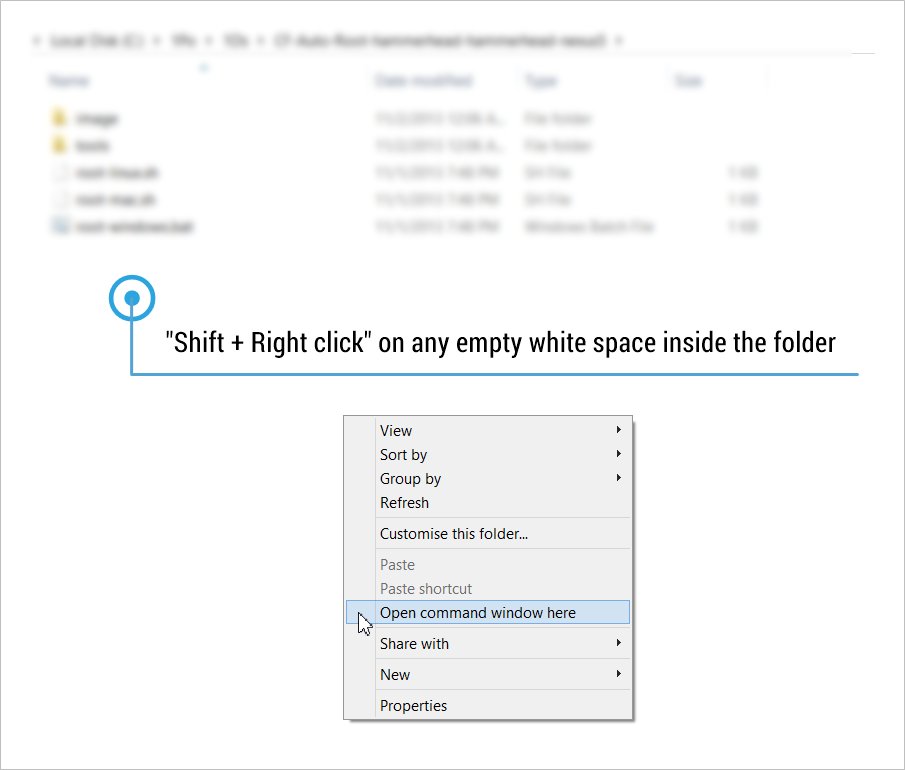
- Press Shift key + Right click on any empty space inside the folder, and select Open command window here from the context menu.

- Now issue the adb devices command in from the command line to verify that your LG G3 is connected in ADB mode.
└ If you get a blank response from the command, then that mean you don’t have proper drivers installed for LG G3 on your PC. So download and install LG G3 Drivers from here. - Once your G3 is connected to your PC, issue the following commands (one at a time) in the command line to install TWRP Recovery on your G3.
NOTE: If you get ‘out of space’ error anytime while running the commands below, then just ignore it.adb shell
su
dd if=/dev/zero of=/dev/block/platform/msm_sdcc.1/by-name/recovery
dd if=/sdcard/twrp-recovery.img of=/dev/block/platform/msm_sdcc.1/by-name/recovery

exit

exit

adb reboot recovery
- That’s it. Enjoy!
How to boot into LG G3 Recovery Mode
- Power off your LG G3 and unplug USB
- Press and hold “Volume Down + Power” button together and soon as you see the LG Logo, release the Power button and quickly press it again
- Continue holding both “Volume Down + Power” until you see “Factory Reset” screen. At this point, if have Bump installed (TWRP Recovery), it won’t erase your data, so don’t worry!
- On the Factory reset screen press “Volume Down” once, and then press “Power” button to confirm
- Repeat the above step, press “Volume Down” once again, followed by “Power” to confirm
- You’ll boot into recovery mode
Let us know in the comments below if you need any help with the instructions above.
Send your thanks and joyful tears to thecubed and Team Codefire for bringing Bump to us!
Credit: dadi11 (for TWRP 3.0)


