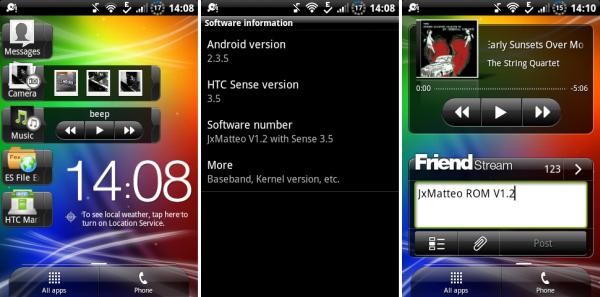
The immensely popular Mid-End android phone — HTC Wildfire S — added another custom Rom to its arsenal — this time, featuring Sense 3.5. Envied by many rival OEM’s, Sense is arguably a very functional UI. And coupled with an OverClock Kernel and ClockworkMod Recovery v.5.0.2.8, this Rom brings you the best of both worlds. Developed by XDA member matt5eo, this rom is called JxMatteo_ROM. Read on as we guide you through the procedure to install this ROM on your phone.
Warning!
The methods and procedures discussed here are considered risky and you should not attempt anything if you don’t know exactly what you are doing. If any damage occurs to you or your device, including a bricked, non-functional device, we won’t be held liable. You have been forewarned!
Compatibility
This ROM and the guide below are compatible only and only with the HTC Wildfire S. It’s not compatible with any other device. So, be sure to try this only on HTC Wildfire S and not any other device.
ROM Info
About:
- Device: Wildfire S
- Android: 2.3.5
- UI: HTC Sense 3.5
- Kernel: Stock (OC available)
New:
- HTC Sense 3.5
- Browser
- SystemUI
- Settings
- Gallery
- Calculator
- Calendar
- Clock
- FM Radio
- HTC Hub
- Messages
Pre-Installation Requirements:
- Rooted HTC Wildfire S with Clockworkmod Recovery installed.
- Battery charged to minimum of 50%.
- This procedure will wipe all your apps, data and settings (but it will NOT touch your SD cards, so don’t worry about those). Backup your Apps and important data — bookmarks, contacts, SMS, APNs (internet settings), etc. This Android backup guide would help you.
How to Install JxMatteo_ROM with Sense on HTC Wildfire S:
- Download the rom file and overcloak kernel from the original development page.
- Transfer both the downloaded zip files (of rom and Kernel) to your external microSD card on the HTC Wildfire S.
- Turn off the phone. Start Clockworkmod recovery by simultaneously pressing and holding the Volume down button and the Power button. From the resulting HBOOT menu, press Volume down to select the Recovery option and press the Power button to activate it.
- [Optional] Perform a Nandroid Backup of your existing ROM, so that you can always restore it from recovery if something does not work out with this rom. To perform a backup, select Backup and Restore » On the next screen, select Backup again.
- Perform a full wipe. First select Wipe data / factory reset » select Yes on the next screen.
- Next, select Wipe Cache Partition » select Yes then
- From the main menu of recovery, select Advanced, and then Wipe Dalvik Cache » select Yes on the next screen. You’re done wiping off the data now. Lets flash the rom now.
- From the main menu of recovery, select “Install zip from sdcard” » “Choose zip from sdcard” » scroll to and select the rom’s zip file you downloaded in step 1. Select Yes on next screen. The ROM will start installing.
- [Optional] If you want to Overclock your phone and extract more juice out of it, then once again select “Install zip from sdcard” » “Choose zip from sdcard” » scroll to and select the Overclock Kernel file you downloaded with the rom file in step 1.
- After the flashing process is done, select “go back” and then select “reboot system now” to reboot your phone.
- The first boot will take time, so wait a while for the phone to boot up, and when it does, enjoy the Sense 3.5 on HTC Wildfire S.
That’s it. You now have the Rom installed on your HTC Wildfire S. Visit the original development page to check development progress and updates. Share your thoughts and problems in the comments below and we’ll do our best to help you out.


works great 🙂
works great 🙂
works great 🙂
Does this rom work with the Virgin Mobile wildfire s?
also feeling, can you post pics, and maybe a review.
Does this rom work with the Virgin Mobile wildfire s?
also feeling, can you post pics, and maybe a review.
Does this rom work with the Virgin Mobile wildfire s?
also feeling, can you post pics, and maybe a review.
E: signature verification failed
Installation aborted
:/
After installing, perform a Factory Reset from the bootloader. Hope this works for you m/
E: signature verification failed
Installation aborted
:/
After installing, perform a Factory Reset from the bootloader. Hope this works for you m/
E: signature verification failed
Installation aborted
:/
After installing, perform a Factory Reset from the bootloader. Hope this works for you m/
Installed easily. Official page for this is http://jxmatteo.tk/ and the files are on RapidShare (which is slow ATM) so be prepared for a 1 hour wait before installing…
If you JUST want the OC and not the HTC SENSE 3.5 interface you can simply download & install the Kernel (3MB) and install is through CWM skipping the other steps and then with your normal stock ROM or whatever you have installed download SETCPU to overclock and underclock (also change voltage).
ENJOY!
Thanks writer and Matt3o (creator & distributor of the software)
search key not working
search key not working
search key not working
Rom installed without a hitch but as soon as the lockscreen first came on I got com.android.phone has stop unexpectedly force closed. I also noticed while every five seconds force closing the error that I previously mentioned i got to the about phone and saw that this rom is for Wildfire s A510e I have the A510c which is Virgin Mobile also had no signal radio wasn’t working so I’m assuming that this rom don’t work for Virgin Mobile phones. I’m disappointed cause I really liked this rom just thought It should of been in the guide that this wouldn’t work on A510c before I waited an hour for it to download but the rom looks great. Just wish I could use it on mine
You need to install a Radio also called modem) for your version A510c, which will get it working on Virgin Mobile.. find it on internet, search for virgin mobile wildfire s radio and install it. About the force close, factory reset will solve it.. or if only one app is giving you a prob, go to that app’s app info (under application management), and clear data from there.
Can’t find a download link for the virgin radio? any idea from where to get?
VERY cool custom ROM for the Wildfire S can be found here:
http://forum.xda-developers.com/showthread.php?t=1652973
It’s called WildChild v1.0 and it’s fantastic. Fast and stable, and very cool looking theme. Even the APKs themselves are themed!!! Worth a download!
hate that rom
VERY cool custom ROM for the Wildfire S can be found here:
http://forum.xda-developers.com/showthread.php?t=1652973
It’s called WildChild v1.0 and it’s fantastic. Fast and stable, and very cool looking theme. Even the APKs themselves are themed!!! Worth a download!
hate that rom
VERY cool custom ROM for the Wildfire S can be found here:
http://forum.xda-developers.com/showthread.php?t=1652973
It’s called WildChild v1.0 and it’s fantastic. Fast and stable, and very cool looking theme. Even the APKs themselves are themed!!! Worth a download!
hate that rom
Does it also work on the htc wildfire (buzz) ?
Does it also work on the htc wildfire (buzz) ?
Does it also work on the htc wildfire (buzz) ?
http://manager1295mts.wix.com/matt5eo/download
http://manager1295mts.wix.com/matt5eo/download
http://manager1295mts.wix.com/matt5eo/download