The iPhone 14 Pro’s camera has the biggest sensor on an iPhone yet, featuring a large 48 MP unit. If you’ve recently gotten your new iPhone 14 Pro and would like to make the most out of your phone’s camera, then here is what you need to know to get started and learn some basic tips.
iPhones have long been at the forefront of smartphone photography, partly thanks to their wonderful camera sensors and partly due to the way in which images are processed in the background. Apple has always strived to improve the image-capturing abilities of iPhones, and the new iPhone 14 lineup features the new Photonic engine. Additionally, exclusive to the iPhone 14 Pro, images are binned down to 12MP to reduce size while ensuring excellent details and reduced noise. Here’s how you can make the most out of your iPhone 14 Pro and Pro Max’s camera.
Related: 23 advanced tips to use iPhone 14 Pro camera like a pro!
Part 1: How to get started with iPhone 14 Pro camera
Let’s get you familiar with your iPhone’s camera settings so that you can customize them to your preference. You can then use the next section to get familiar with the camera app controls and subsequently learn about using each camera mode on your iPhone. We have also included helpful tips at the end to help you capture all your moments and memories as perfectly as possible. Let’s get started.
3 ways to get familiar with your iPhone’s camera settings
iPhone 14 Pro and Pro Max models exclusively feature the new ProRAW and ProRes image and video formats to help you capture RAW data. If you’re looking to capture photos professionally or need all the data you can get from your images in post-production, we recommend enabling these while customizing your settings using the section below.
1. Choose your Image and video formats
Let’s first help you choose your image formats. All images captured from here on will be captured in the format you choose. Follow the steps below to help you along the way.
Open the Settings app and tap Camera.

Now tap Formats at the top.

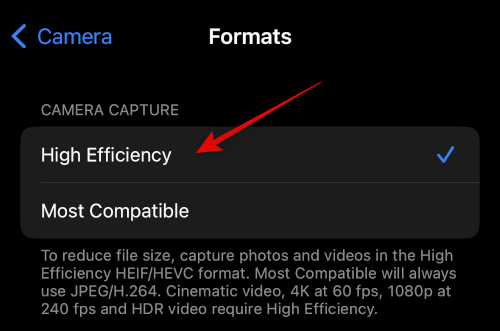
Tap and choose the image format for your images at the top. You have the following options at your disposal.
- High Efficiency: This will store images in the HEIF/HEVC format. These formats help reduce file size while ensuring that all details are retained in your images and video. You need to use this format when shooting 4K at 60 fps, 1080p at 240 fps, HDR, or Cinematic Video on your iPhone.
- Most Compatible: Most Compatible will save all images and videos in the JPEG/H.264 format. These files will be compatible with most devices and video editors currently available on the market.
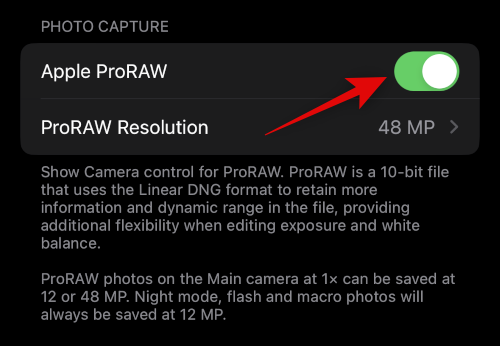
Scroll down and turn on Apple ProRAW if you wish to capture RAW images. You will get to choose which images are captured in ProRAW when using the camera app.
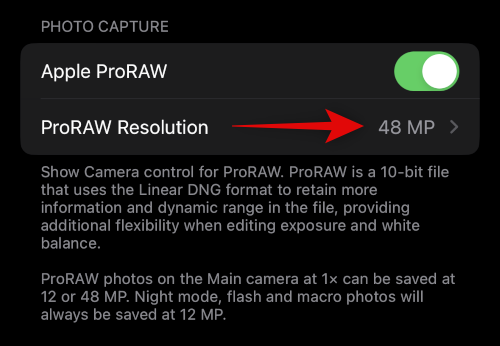
Tap ProRAW Resolution to choose the resolution for your ProRAW images.
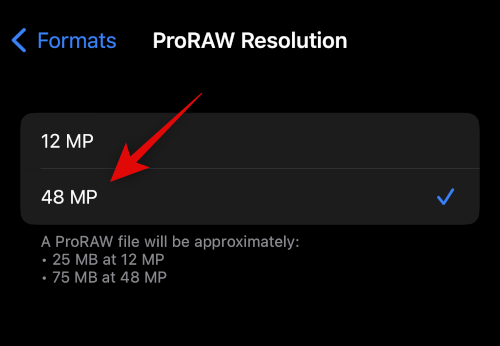
Tap and choose your preferred resolutions. 12 MP images will be 25 MB in size, while 48 MP images will be up to 75 MB in size. These are approximate values and can vary slightly depending on what you capture.
Go back to the previous page and turn on Apple ProRes if you wish to record ProRes videos. This is a professional video recording format that offers 10-bit color depth with HDR videos. ProRes videos shot in HD are usually 1.7 GB in size for the duration of a minute.

And that’s it! You will now have customized and chosen your preferred image formats.
2. Choose your Recording Resolutions
You can predetermine recording resolutions for recording video, Slo-mo, and Cinematic Video on your iPhone 14 Pro and Pro Max. These will be your default recording resolutions and can always be changed if needed in the Camera app. Let’s get started.
Open the Settings app and tap Camera.

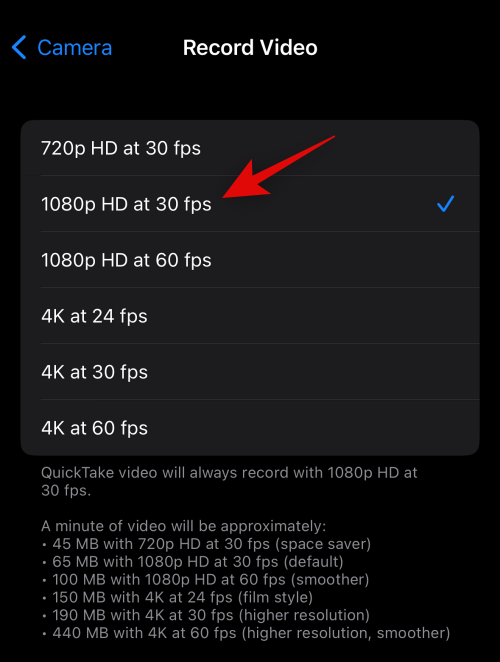
Now tap and select Record Video.

Tap and choose your preferred default resolution. You should have the following options at your disposal.
- 720p HD at 30 fps
- 1080p HD at 30 fps
- 1080p HD at 60 fps
- 4K at 24 fps
- 4K at 30 fps
- 4K at 60 fps
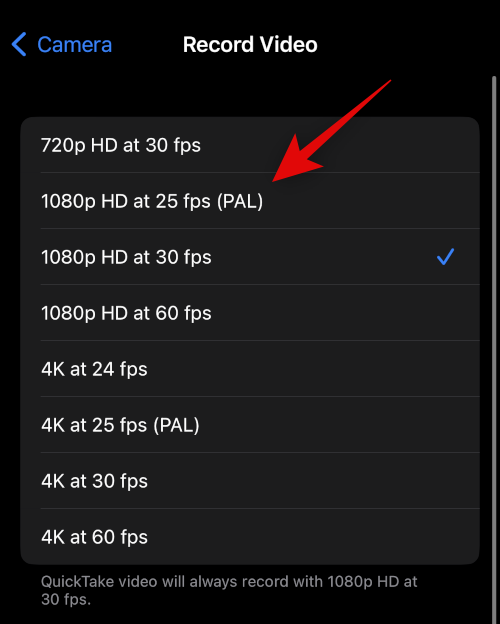
If you wish to use PAL formats depending on your region, tap Show PAL Formats.

PAL formats will now be available in the list above. Tap and choose the one you prefer.
Turn on Enhanced Stabilization based on your preferences. Turn on this toggle to zoom in slightly when recording Cinematic and normal videos to apply software stabilization to your captures.

Similarly, turn on Action Mode Lower Light if you wish to use Action Mode in low light conditions. Your iPhone will reduce stabilization to account for low-light conditions when this feature is enabled.

Now turn on HDR Video if you wish to record in HDR. You can record up to 60 fps when recording in HDR.

Tap Auto FPS.
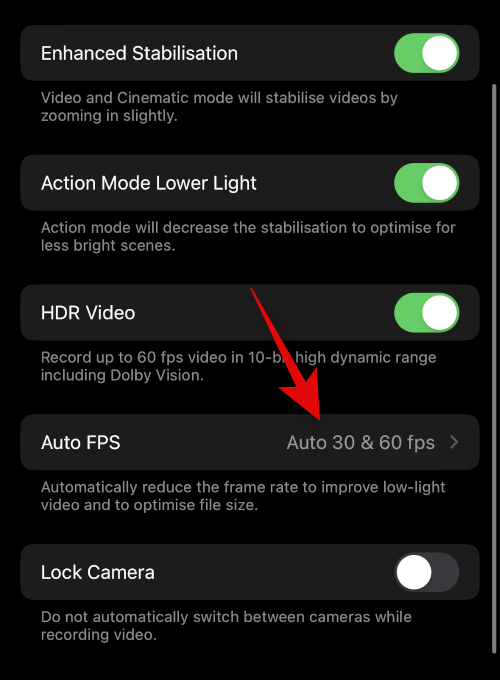
Choose whether you want iOS to automatically choose fps for your video based on current lighting conditions. You can choose Auto 30 fps to switch to optimize 30 fps videos or choose Auto 30 & 60 fps to optimize both. Choose Never if you want the Camera app to record at your chosen fps regardless of the current lighting conditions.

Go back, and lastly, turn on the toggle for Lock Camera if you wish to disable switching between cameras when recording a video.

Now go back to the previous screen and tap Record Slo-mo.

Choose your preferred frame rate and resolution for Slo-mo videos shot on your iPhone.

Go back and tap Record Cinematic.

Choose your preferred resolution and fps as we did for other recording modes.

And that’s it! You will now have customized your recording settings to your preferences and requirements.
3. Adjust other settings
The Camera app offers a few more options to better optimize your image-capturing experience. Here’s how you can customize these settings on your iPhone 14 Pro and Pro Max.
Open the Settings app on your iPhone and tap Camera.

The first option you get is to toggle Stereo Sound. Tap and turn on or turn off the toggle based on your preferences.

Next tap Preserve Settings. This option will allow you to keep the settings you chose when capturing images after you close the Camera app.

Tap and turn on the toggle for the following options depending on the changes you wish to preserve. Changes made to these options in the Camera app won’t be reverted to your default choices once you close the app.
- Camera Mode
- Creative Controls
- Macro Control
- Exposure Adjustment
- Night Mode
- Portrait Zoom
- Action Mode
- Apple ProRAW
- Apple ProRes
- Live Photo

Now go back to the previous page. Tap and turn on the toggle for Use Volume Up for Burst if you wish to capture images in burst mode using the Volume Up button on your iPhone.

Similarly, toggle Scan QR codes if you wish to scan QR codes using the Camera app or not.

Lastly, turn on Show Detected Text if you wish to use OCR to recognize text from the real world using the Camera app.

Scroll down to the COMPOSITION section and turn on the toggle for Grid if you wish to use a composition grid when capturing images.

Turn on Mirror Front Camera to mirror images captured from your front Camera.

Similarly, toggle View Outside Frame if you wish to view a preview in the Camera app outside your composition frame.

Tap Photographic Styles to choose a preferred style.

Swipe and find the style you like. We will use Cool for this guide. Tap Use “Cool” at the bottom of your chosen photographic style.

Now turn on the toggle for Prioritise Faster Shooting if you wish for your iPhone to automatically adjust your camera settings to capture images instantly when pressing the shutter button faster.

Toggle Lens Correction whether you wish to correct lens distortion for the ultra-wide and front Camera or not.

Toggle Macro Control to automatically use Macro when you’re closer to objects and subjects.

And that’s it! You will now have customized all your camera settings based on your preferences.
7 camera modes to know (controls also explained)
Let’s now take a look at the Camera app and all the controls offered to you for each mode. This will help you make the most out of your iPhone’s Camera when capturing images in the real world, even if you have to instantly capture images.
1. Panorama mode
Here’s how you can capture and use Panorama controls on your iPhone 14 Pro and Pro Max.
Open the Camera app and tap PANO at the bottom.

Tap and choose your lens from the choices at the bottom of your screen.

You need to keep the arrow on your screen aligned with the yellow line when taking a camera. Position yourself accordingly and tap the shutter button to start capturing a panorama.

Your iPhone will ask you to slow down if you’re going too fast. You will also get a preview of the panorama being captured on your left.

And that’s how you can capture a panorama on your iPhone.
2. Portrait mode
Portrait images add an aesthetic blur to the subject’s background for a more professional look. Here’s how you can use this mode on your iPhone 14 Pro and Pro Max.
Open the Camera app on your iPhone and tap PORTRAIT at the bottom.

Let’s first take a look at the controls offered when using the rear Camera. Tap the 1x or 2x icon on your left to switch between lenses. Tap and choose the lens you prefer to use. Now swipe between the choices to choose a Portrait lighting you like.

Swipe up to view additional capture controls available to you.

Tap the Flash icon to toggle flash based on your preferences.

Similarly, tap the icon beside it to adjust the Exposure.

Use the slider to increase or decrease the exposure.

Tap the Exposure icon again to close the option. Next, you have the Timer icon. Tap on it to turn on or turn off the timer for your image capture.

Tap and choose your preferred duration and tap the Timer icon to close the option.

Tap the Filters icon next if you wish to apply filters to your capture.

Swipe and choose a filter you like by tapping on it.

The last option will allow you to choose a focal length manually. This can help you control the depth of field in your images. Use the slider to adjust the focal length and set the desired value.

And that’s it! Once you’ve customized these options, you can capture images as needed.
3. Photos mode
When capturing Photos normally, you have access to a lot of options, including Apple ProRAW. Here’s how you can customize and access them all when capturing photos normally on your iPhone.
Open the Camera app. The Photo mode should have been selected by default. If not, tap and select Photo at the bottom of your screen.

Start by choosing your lens from the options available above the camera modes at the bottom.

Now swipe up to view available menu options.

Toggle Flash based on your preferences using the first icon.

Tap the next icon to adjust your Shutter Speed.

Now use the slider to dial in your Shutter Speed manually.

Tap the next icon to toggle Live Photo. Tap On or Off based on your preferences.

Now tap the next icon to choose your Photographic style. Your chosen photographic style will be applied by default. You can use this option to change photographic styles or fine-tune the values applied by your photographic style.

Swipe on the viewfinder to change photographic styles.

Use the Tone and Warm values to fine tune the values of your photograhic style.

You can tap the Reset icon to reset tone and warmth values if needed.

Now tap the next icon to choose your image’s aspect ratio.

Tap and choose your preferred aspect ratio.

The next icon can help you adjust the Exposure. Tap the icon and adjust the exposure as we did earlier.

Similarly use the next icon to use a Timer if needed.

The next icon will help you apply Filters. Tap the icon and choose a filter you like.

The last icon will allow you to enable RAW capture if you have enabled Apple ProRAW on your iPhone 14 Pro and Pro Max.

And that’s it! You will now have customized your Photo mode settings, and you can now use the shutter button to capture images as needed.
4. Video mode
Options available when capturing videos are slightly different. Here’s how you can customize them and capture videos on your iPhone.
Open the Camera app and tap Video at the bottom.

Start by choosing your lens using the options available above your shutter button.

Now swipe up to view available options to customize your video.

Use the first option to toggle Flash.

Tap the next icon to adjust your Exposure.

Use the slider to adjust the exposure.

If you have Apple ProRes enabled, you can use the next toggle to enable the same.

The last option is for Action Mode. Tap and enable Action Mode if you wish to capture videos in motion.

You can now change the resolution in which your videos are captured by tapping HD or 4K in the top right corner depending on your current resolution.

Similarly, tap the current Frame Rate beside the resolution to change your frame rate.

And that’s it! You can now press the shutter button to start capturing a video on your iPhone 14 Pro and Pro Max.
5. Cinematic mode
Cinematic Videos allow you to create a more professional look directly on your iPhone. Here’s how you can customize and capture Cinematic Videos on your iPhone.
Open the Camera app and tap CINEMATIC at the bottom.

Cinematic videos basically apply a shallow depth of field to your videos for a more professional look. This requires good lighting conditions as it relies on a lower f-stop. Thus you don’t get many options to customize the Cinematic mode. Start by choosing the lens you wish to use. You only get the option to either use the 1x or 3x option in Cinematic mode.

Now swipe up to view available options.

Toggle Flash using the first icon.

Use the second icon to adjust your Exposure.

Use the last icon to adjust the f-stop used by your lens.

Use the slider to adjust your current focal length.

You can now adjust the resolution and fps using the icons in the top right corner of your screen as we did before.

You can now tap the shutter icon to record a Cinematic video on your iPhone.

And that’s how you can customize and use the Cinematic mode on your iPhone.
6. Slow-Mo mode
Open the Camera app and tap Slo-Mo at the bottom of your screen.

Slo-Mo only allows you to use the ultrawide lens or the telephoto focal lengths. Tap and choose your preferred lens from the options available above your shutter button.

Now tap and choose your resolution and fps from the options in the top right corner of your screen.

Swipe up to view other options.

Tap the Flash icon to turn on or turn off the Flash as needed.

Tap the next icon on your right to adjust your exposure.

Use the slider to adjust your exposure.

You can now use the shutter button to record your Slo-Mo video as intended.

7. Time-Lapse mode
Like Slo-Mo, Time Lapse does not offer too many options to customize your capture. Here’s how you can configure the available options on your iPhone.
Open the Camera app and tap Time-Lapse at the bottom of your screen. You will find it on the extreme left of the available camera modes.

Firstly tap and choose your preferred lens from the options above the shutter button.

Now swipe up to adjust your exposure.

Use the slider to adjust your exposure as needed.

And that’s it! You can now tap the shutter button to capture your Time-Lapse.
5 basic camera functions to know [Step-by-step guide]
Although using each Camera mode is quite easy and intuitive, there are a few camera functions, gestures, and more that can help improve your overall photography experience on the iPhone 14 Pro and Pro Max. Here are a few basic and essential camera functions that will help you better your camera experience on your iPhone.
1. How to manually zoom
You might have noticed that there’s no option to Zoom when using the camera app. So how do you manually zoom in on the Camera app? Let’s find out!
Open the Camera app and tap, and choose your preferred camera mode. Manual zoom in the camera app depends on the lenses available to you in each mode. Thus we will use the Photo mode for this example.

Tap and hold on to the lenses available to you and simply slide up without lifting your finger.

A circular dial will now appear, allowing you to zoom in on the camera app.

Slide left to Zoom In and slide right to Zoom out.

And that’s how you can manually zoom in on the Camera app on your iPhone 14 Pro or Pro Max.
2. How to access exposure and other settings quickly
The iPhone Camera app is quite comprehensive but has a lot of automatic functions that might make it difficult for users that love to manually dial in settings and capture images. Here are a few gestures to automatically focus, adjust exposure and lock focus in the iPhone app with a few taps and slides.
Open the Camera app and tap on your desired capture mode at the bottom. We will use the Photo mode for this example.

Now tap on your subject to automatically focus on your subject.

Once you tap, quickly slide up or slide down while the focus indicator is activated to adjust the Exposure. Slide up to increase the exposure or slide down to decrease it.

Now tap and hold on to your subject for a few seconds to lock the Focus. Once focus is locked AE/AF LOCK will show up at the top of your screen.

And that’s how you can quickly adjust exposure and other Settings in the iPhone camera app.
3. How to use the Shutter button in different ways
The Shutter button is quite intuitive in the Camera app and supports a few gestures you might not be aware of. Here are a few Shutter button gestures to help enhance your photography experience on the iPhone 14 Pro and Pro Max.
Open the Camera app and choose your desired camera mode by tapping at the bottom of your screen. Most gestures are supported in the Photo mode to help you quickly capture images and videos from the default mode.

Now tap and slide the shutter button to the left to capture images in the Burst mode.

Similarly, swipe the shutter button to the right to capture a Video from the Photo mode itself.

And that’s how you can use shutter button gestures to your advantage in the iPhone camera app.
4. How to preserve your usual camera settings

As discussed above, you can choose to preserve your camera settings. This is a great way to prepare for upcoming shoots and times when you know you will need to take photographs. You can use preserve settings to your advantage to get the camera app ready for fast-moving shots, low light conditions, or ProRes video capture, depending on your Settings. For example, if you’re going to a race track, you can dial in your exposure and shutter speed settings and preserve them to be prepared for the event. You can then simply snap photographs when needed without having to fiddle with your iPhone’s camera settings.
5. How to take long exposure shots
Long Exposures can help you get pictures in extremely low light. They also allow you to try your hand at Astrophotography in areas with minimal light pollution. You can take long exposure shots by simply adjusting the Shutter Speed of your Camera to the highest value and then clicking your picture. The issue here is that shutter speed controls how long will the shutter of your camera sensor will be open so that light can pass and get through it. If the shutter is open for too long, as in the case with long exposure shots, any slight improvement can introduce blur.

Thus it is recommended you keep your Camera very still when taking long exposure shots. But the peril doesn’t stop here; pressing the shutter button can be the slightest movement enough to ruin your long exposure shot. In such cases, we recommend using a tripod and then using your headphones to trigger the shutter (we will talk more about this in the tips and tricks section below). However, if you don’t have a tripod handy, you can use the timer function on your iPhone’s camera app to delay the capture so that when your phone moves when pressing the shutter button, the timer delay will help negate this movement.
The following camera modes allow you to manually adjust your shutter speed so that you can take long exposure shots on your iPhone 14 Pro and Pro Max.
- Photo Mode
- Portrait Mode
You might have noticed that these modes might not cater to all needs, especially if you wish to manually control your ISO as well. Third-party solutions can thus help you better in this case. You can find out more about them in our tips and tricks section below.
Part 2: 11 Tips for iPhone 14 Pro camera
Here are a few tips and tricks that will help you make the most out of your iPhone 14 Pro and Pro Max’s 48 MP camera.
1. Use the grid

The composition grid is a great tool if you’ve never used it before. It can help you frame your shots parallel to the ground, ensure that your subject is in the frame, and even get a sense of the relationship between negative space in your current frame. I highly recommend you try using the Grid when taking your images to ensure that you don’t have to spend extra time editing your images.
Also known as the rule of thirds, the idea is to place your subject/point of interest at one of the cross sections in your Grid. This is because the human eye is naturally drawn to these points in your frame, and following this rule can help you frame your shots better. Needless to say that the Grid is there to help you, and rules are meant to be broken. Depending on your current subject, you can choose to frame your shot differently. Grids can also help you align your frame with straighter elements in your frame for a more stabilized image. You can align your Grid to a street lamp, a horizon line, a building in the background, or other elements to straighten your shots while using the rule of thirds.
2. Let the in-built level help you
When pointing your Camera straight down or up, you will get a small leveling tool in the center of your camera preview to help level your shot. This is a huge help when trying to capture macro shots or when trying to photograph the sky. The in-built level helps ensure your shots are parallel to the ground, which helps avoid distortion of perspective in your images.
The in-built level is automatically activated when your iPhone detects it is being pointed down or up. So simply pay attention to the level once it appears and align both the cross together to take a perfectly level shot when using your iPhone 14 Pro or Pro Max.
3. Use the light meter when manually adjusting exposure

Do you like to adjust your exposure manually? Then the light meter can help you immensely. The light meter looks at the white point in your current composition and thus adjusts the meter accordingly. You can then refer to this meter to find the perfect exposure for your current composition and adjust it accordingly to your manual preferences. To view the light meter, simply start adjusting the exposure manually, and you should be able to view the light meter in the top left corner of your screen. If the light meter moves to the left as you adjust your exposure, then it means your shot is underexposed, and if it moves to the right, then it means your shot is overexposed.
4. Use the true tone flash in low light conditions
If you’ve been into photography for a while, then you might know that most photographers refrain from using Flash unless absolutely necessary. But the iPhone 14 Pro and Pro Max flash is slightly different as it comes with a new generation of true tone flash with nine different LEDs to help you capture your moments in low light conditions. Just like your iPhone’s display, the true tone flash adjusts its warmth based on the current lighting conditions. This helps ensure you do not have to adjust your color in post-production to correct skin tones and other white points in your frame. Thus don’t refrain from using the Flash whenever necessary.
5. Remember you can access the Camera from your lock screen
There might be times you need to capture moments quickly on your iPhone. It could be a spontaneous event, a funny moment, or a sudden scenario that you need to capture. You can always access your Camera directly from your lock screen. The fun part about this is that you don’t need to tap and hold on the lock screen camera icon either. Simply swipe left on your lock screen to access the iPhone camera on your iPhone. You can then use the gestures we discussed above to quickly take burst photos or a video depending on your preferences.
6. When in doubt, use the Portrait mode
The Portrait mode has come a long way, and it exceptionally takes advantage of the new 48MP sensor on the iPhone 14 Pro and Pro Max. You can use the Portrait mode whenever you’re confused about framing, your background, or other elements preventing you from taking the perfect shot. The following Portrait options will exceptionally help you get rid of the background and take aesthetic shots on your iPhone 14 Pro and Pro Max.
- High-Key Light Mono
- Stage Light Mono
- Stage Light
These modes will completely get rid of the background so whenever you’re in doubt, feel free to rely on the Portrait mode on your iPhone 14 Pro and Pro Max.
7. Customize Photographic Styles as needed
Photographic styles are a great way to capture aesthetic looks without having to adjust settings in the camera app. Additionally, Photographic styles apply Warmth and Tone settings to your images while capturing your images which takes the need away to adjust the same in post-production. But this doesn’t mean you’re limited to the values set by the five photographic styles available to you.
You can still manually adjust the Warmth and Tone applied by your Photographic style to fine-tune the color of your image based on your current lighting conditions. You can do so when selecting Photographic Styles in the Camera app. Here’s how you can do that on your iPhone 14 Pro and Pro Max.
Open the Camera app and choose your preferred camera mode. We will use PHOTO for this example.

Now swipe up and tap the Photographic Styles icon.

Swipe and choose a photographic style you like and then tap TONE or WARMTH depending on what you wish to adjust.

Use the slider to adjust your chosen value.

And that’s how you can customize photographic styles on your iPhone.
8. Tripods are your friend for nighttime photography
As discussed with long exposures, tripods go a long way when trying out nighttime photography or Astrophotography. They help keep your iPhone stable to ensure that longer shutter speeds can capture steady shots on your iPhone. Tripods can also help you make self-videos for social media platforms and even help you capture hands-free moments with your loved ones. So if you love capturing the sky or landscapes at night, getting a tripod will help you tremendously improve your Camera captures.
9. Use ProRAW and ProRes for maximum quality

ProRAW and ProRes allow you to take advantage of the 10-bit color depth and the maximum 48MP resolution when capturing images and videos. Though it has its limitations, if you’re looking to produce something professional like a Short Film or a YouTube video, then ProRAW and ProRes can tremendously help you during post-production.
You can apply LUTs and color grade your footage or images to a professional level. You can adjust the white balance and exposure with much more headroom while taking full advantage of the 48MP sensor on your iPhone 14 Pro and Pro Max.
Keep in mind that ProRAW and ProRes files are super huge in size, and if you have a 128GB model, you will be limited to 1080p 30 FPS when recording ProRes footage. However, if you have an iPhone 14 Pro or Pro Max with higher capacity, then you can record ProRes in 4K 30 FPS.
10. Get Familiar with HDR and its disadvantages
HDR images and videos offer exceptional color depth in high-contrast situations allowing you to take perfect shots and videos in harsh lighting conditions. While a great feature, HDR has its limitations on your iPhone.
Firstly, your iPhone takes several images at different exposure settings and then blends them together to create an HDR image. While this technique offers great detail and color depth, it can cause issues when capturing subjects in motion by introducing blur. However, in some cases, you can use this to your advantage to capture subjects with some form of motion blur.
Additionally, when capturing videos, you’re limited to the High-Efficiency format despite your Format settings in the Settings app. Images, however, will be captured in the Most Compatible format as usual. Thus we recommend you keep this in mind when capturing images and videos in HDR as, in some cases, results might not be what you expect them to be.
11. Wired Headphones: Your second shutter button
Wired Headphones might seem like a thing of the past since Apple phased out the headphone jack, but if you have a pair of lightning headphones, you essentially have a remote shutter for your Camera. Wired headphones allow you to trigger the shutter button on your Camera using either the Volume Up button or the Volume Down button.
This way, you can use this remote shutter to capture selfies from far away, capture long exposures without a tripod without having to touch your iPhone, and much more. So if you need a remote shutter button for your iPhone’s Camera, getting a pair of wired headphones is the next best option for you.
We hope this post helped you easily get familiar with your iPhone’s Camera and make the most out of it. If you have any more questions or face any issues, feel free to reach out using the comments section below.






Discussion