Downloads
- OnePlus 2 TWRP recovery:
You can download the latest OnePlus 2 TWRP recovery available at the moment from this page here.
Supported devices
- OnePlus 2
- Don’t try this on OnePlus One!
- Don’t try on any other device whatsoever!
Warning: Be notified that warranty of your device may get void if you follow the procedures given on this page. You only are responsible for your device. We won’t be liable if any damage occurs to your device and/or its components.
→ Backup important files stored on your OnePlus 2 before proceeding with the steps below, as unlocking the OnePlus 2 bootloader will completely wipe/delete all files on the device.
Step-by-step Guide
Step 1. Install OnePlus 2 driver.
Step 2. Install ADB and Fastboot driver.
Step 3. Unlock Bootloader of your OnePlus 2.
Step 4. Enable USB debugging.
Step 5. Download the TWRP recovery file (Recovery TWRP.img) and SuperSU root package file from above.
Step 6. Transfer the root package file (SuperSU) to OnePlus 2.
Step 7. On PC, rename the TWRP file to this name: op2-twrp.img
Step 8. Boot your OnePlus 2 into bootloader mode. Just follow the first paragraph there. (Make sure you have backed up all important data as you’ll lose everything on phone in the steps below.)
Step 10. Connect your OnePlus 2 — in bootloader mode — to PC. Let the driver install.
Step 11. Open a command window on your PC in the folder where you have the op2-twrp.img file. For this:
- Open any folder on PC. Now, left click on empty white space inside the folder.
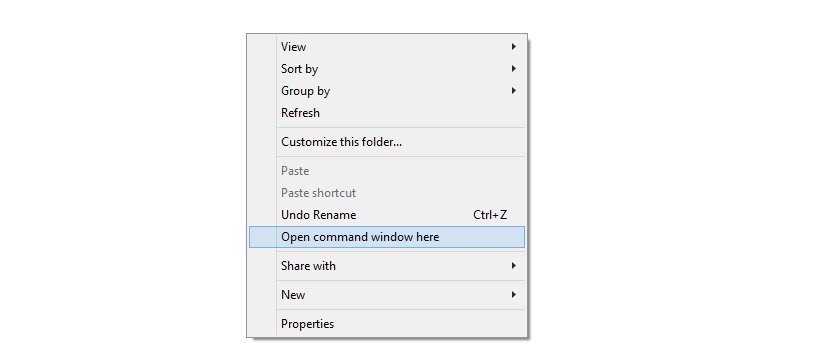
- Now, while holding shift key, right click on empty white space to get a pop-up as shown below.
- Choose Open command window here option from that.

You will see a command window open up, with location directed to folder where you have the op2-twrp.img file.
Step 12. Let’s confirm whether fastboot is working. With OnePlus 2 connected to PC, run the following command in command window. (You can type it manually, or copy paste and then hit enter key to run it.)
You should get a serial no. with fastboot written after it. If not, you need to reinstall the fastboot drivers from above.
fastboot devices
Step 13. Flash TWRP recovery on your OnePlus 2 now. For this, run the following command.
fastboot flash recovery op2-twrp.img
Step 14. When done, boot your OnePlus 2 into TWRP recovery directly using this trick. Enter the following command.
fastboot boot op2-twrp.img
Step 15. You’ll be in recovery mode now, with TWRP in front of you. Keep the system partition as read-only for now. This will the first thing TWRP will notify you about. Now, take backup. Make sure you include System partition. You might need to restore System partition from this backup using the restore function in TWRP, when OTA update is available for your device. It’s helpful a lot in that case. Once backup is done, proceed to next step.
Step 16. Mount system partition now. For this, go back to main menu of TWRP using the Home button in bottom left. Now, tap on Mount menu, and untick the option ‘only mount system read-only’. Go back to main menu of recovery.
Step 17. Root OnePlus 2. Now, tap on Install menu, and then browse and select your SuperSU file that you transferred to OnePlus 2 in step 6 above. then do the Swipe action at bottom to begin flashing the SuperSU file.
Step 18. Tap on Reboot System button to restart the OnePlus 2.
That is it. Confirm the root status using a root checker app from play store. Also, to use TWRP recovery, just use this guide to boot into recovery mode.
Need help? Do let us know via comments section below.


